Posts Tagged ‘Mobile’
 LHS Episode #116: O Savannah
 This week in the heart-pounding, blood-stopping episode of Linux in the Ham Shack, our intrepid hosts discuss a variety of topics from call sign look-up databases to Ubuntu, freeware collaboration suites to mobile computing, and QRP kits to hosted developer platforms. As if that were not enough, there’s music, banter, a cameo by Wil Wheaton and a rocking good time. What more could you possible want?
73 de The LHS Guys
Mobile Install
I have taken my HF mobile install through a number of different iterations (the constant being the rig: an Icom IC-706MKIIG). Today I hope that I have finally reached a lasting, workable setup. Here is a quick re-cap of my trials and tribulations:
First attempt (2007):
What this install lacked in experience, it made up in effort. The successes were routing the powerline and the feedline. The antenna system was a different story. My combination of Hustler and Hamstick antennas (along with the unfortunate choice of putting an Icom AT-180 autotuner in the mix) met with mixed success. I did make contacts and enjoyed the mobiling. The rig itself was placed under the passenger seat. Placed side by side with my TM-D710A left very little room and little clearance between the seat and the floor. I came to realize that my 2005 Toyota Tundra lacked any real great locations to stash a rig. The drivers seat (no way), behind the back seat (nope), under the back seat (not going to happen).
Tarheel Model 75A and the stake pocket mount (2008):
I have not regreted going with the Tarheel Model 75A. I finally figure out that using an autotuner was a non-starter and a screwdriver offered a great solution. The stake pocket mount was a mixed success. The way the pocket was always had the antenna sticking up at a funny angle. It also did not seem very secure. I still made lots of contacts and had lots of fun.
Switched to MT-1(S) mount (2009):
Switching to the MT-1(S) mount did a lot to improve my operations. By having the antenna mounted right to the side of the bed, my ground (… and other half of the antenna) was greatly improved.

February 2010
Using the iPortable (2009-2012):
I don’t usaully have a passenger in the front seat – just two kids in the back. But having a heavy weight passenger in the front seat was a no-go for IC-706 in the all too cramped location under the seat. The iPortable setup allowed me to consolidate the IC-706MKII and the TurboTuner in one spot. No more messy nest of wires. But the iPortable offered somewhat of an obstacle to the kids in the back seat.
Current (…and final?) install (2013):
I have had the TM-D710A installed for a while. The AVMAP makes a good pairing and you can find my location via APRS here.

Now the iPortable is in the large tool box mounted to the bed of the pickup.

The big task was to reroute all the cables: an extension to the powerline, pulling out the feedline, and moving the control cable for the Tarheel antenna. The IC-706 includes the AD5X fan modification.

I had to drill a hole on either side of tool box to route the cables in and out. So far, so good – everything works and I am getting a full 100 watts out on every band.

I did forget to run a line for a CW paddle… that is on the To Do List.
There are also a few additional improvements I would like to make.
– 12v booster to 13.8v
– Extra 12v battery
– amplifier? ![]()
Mobile Install
I have taken my HF mobile install through a number of different iterations (the constant being the rig: an Icom IC-706MKIIG). Today I hope that I have finally reached a lasting, workable setup. Here is a quick re-cap of my trials and tribulations:
First attempt (2007):
What this install lacked in experience, it made up in effort. The successes were routing the powerline and the feedline. The antenna system was a different story. My combination of Hustler and Hamstick antennas (along with the unfortunate choice of putting an Icom AT-180 autotuner in the mix) met with mixed success. I did make contacts and enjoyed the mobiling. The rig itself was placed under the passenger seat. Placed side by side with my TM-D710A left very little room and little clearance between the seat and the floor. I came to realize that my 2005 Toyota Tundra lacked any real great locations to stash a rig. The drivers seat (no way), behind the back seat (nope), under the back seat (not going to happen).
Tarheel Model 75A and the stake pocket mount (2008):
I have not regreted going with the Tarheel Model 75A. I finally figure out that using an autotuner was a non-starter and a screwdriver offered a great solution. The stake pocket mount was a mixed success. The way the pocket was always had the antenna sticking up at a funny angle. It also did not seem very secure. I still made lots of contacts and had lots of fun.
Switched to MT-1(S) mount (2009):
Switching to the MT-1(S) mount did a lot to improve my operations. By having the antenna mounted right to the side of the bed, my ground (… and other half of the antenna) was greatly improved.

Using the iPortable (2009-2012):
I don’t usaully have a passenger in the front seat – just two kids in the back. But having a heavy weight passenger in the front seat was a no-go for IC-706 in the all too cramped location under the seat. The iPortable setup allowed me to consolidate the IC-706MKII and the TurboTuner in one spot. No more messy nest of wires. But the iPortable offered somewhat of an obstacle to the kids in the back seat.
Current (…and final?) install (2013):
I have had the TM-D710A installed for a while. The AVMAP makes a good pairing and you can find my location via APRS here.

Now the iPortable is in the large tool box mounted to the bed of the pickup.

The big task was to reroute all the cables: an extension to the powerline, pulling out the feedline, and moving the control cable for the Tarheel antenna. The IC-706 includes the AD5X fan modification.

I had to drill a hole on either side of tool box to route the cables in and out. So far, so good – everything works and I am getting a full 100 watts out on every band.

I did forget to run a line for a CW paddle… that is on the To Do List.
There are also a few additional improvements I would like to make.
– 12v booster to 13.8v
– Extra 12v battery
– amplifier? 
A Simple Wilderness Protocol: 146.52 MHz
![]() “The Wilderness Protocol” (ref. June 1996 QST, page 85), recommends that stations (fixed, portable or mobile) monitor the primary (and secondary if possible) frequency(s) every three hours starting at 7 AM local time, for five minutes (7:00-7:05 AM, 10:00-10:05 AM, etc.) Additionally, stations that have sufficient power resources should monitor for five minutes starting at the top of every hour, or even continuously.” The primary frequency is the National Simplex Calling Frequency…146.52 MHz. The secondary frequencies are 446.0, 223.5, 52.525 and 1294.5 MHz.
“The Wilderness Protocol” (ref. June 1996 QST, page 85), recommends that stations (fixed, portable or mobile) monitor the primary (and secondary if possible) frequency(s) every three hours starting at 7 AM local time, for five minutes (7:00-7:05 AM, 10:00-10:05 AM, etc.) Additionally, stations that have sufficient power resources should monitor for five minutes starting at the top of every hour, or even continuously.” The primary frequency is the National Simplex Calling Frequency…146.52 MHz. The secondary frequencies are 446.0, 223.5, 52.525 and 1294.5 MHz.
Here in Colorado, the summer months mean that many people head for the mountains. Mobile phone coverage has improved in many parts of the high country but is still not reliable in all areas. Amateur radio VHF/UHF repeater coverage is extensive but also does not cover the entire state.
The Wilderness Protocol is a good idea but is overly complex for practical use. Here’s my proposal to make it much simpler for practical backcountry use:
Principle #1: Don’t ever rely on a radio or mobile phone to get you out of trouble in the backcountry. Your primary strategy must be self-sufficiency. Avoid trouble. Be prepared for the unexpected.
Principle #2: Know what repeaters are available in your area. We have many wide coverage repeaters available but you need to know the frequency, offset and CTCSS tone (if any). The Colorado Connection is a linked repeater system that covers many remote parts of the state.
Principle #3: In remote areas, monitor 146.52 MHz as much as possible. This applies to backcountry travelers, mobile stations and fixed stations.
I’ve been making it a habit to monitor 146.52 MHz in the backcountry. I often come across hikers, campers, fisherman, 4WD enthusiasts, SOTA stations, mobile operators and others monitoring that frequency. It is fun to chat with other radio amateurs having fun in the mountains.
Just my opinion.
73, Bob K0NR
Note: This is a repost of an older article with minor edits.
The Mysterious Case of Alternator Noise
When I purchased my 2003 Ford Escape, I decided to install multiple ham radios and a bunch of antennas. Mostly I use a Yaesu FT-8900 FM transceiver for operating on the 2-Meter and 70-cm ham bands. A while back, I started getting reports that I had alternator whine on my transmit audio. I was perplexed because I thought I had done a pretty darn good job of installing the radio, including connecting heavy 12V power cables directly to the battery. (See K0BG’s web page for more information on battery connections.) I really wasn’t sure if this was a day one problem (and no one ever told me about the crummy audio) or something that had just started. My first course of action was to ignore it and see if it goes away. This strategy failed miserably as my FCC-licensed spouse continued to report that I was “whining”. Finally, I decided to put my alleged knowledge of electricity to work. I got out my trusty oscilloscope and took a look at the voltage near the transceiver. There was about 800 mV of ripple on the DC voltage, as shown below.
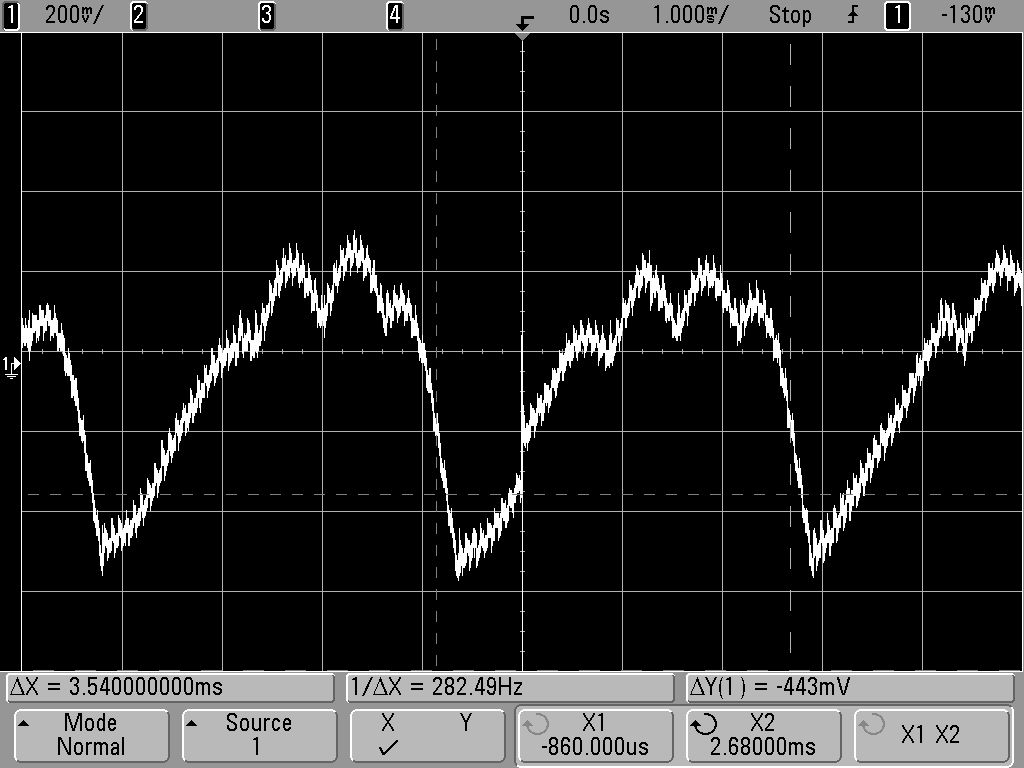
The frequency of the ripple was in the audio range, consistent with alternator whine. The frequency of the ripple increased when I rev’d the car engine, so it was clearly coming from the alternator. I was surprised to find that the size of the ripple did not depend much on whether I was transmitting or not. The transmit current is much higher than the receive current, so I expected the ripple to be worse on transmit.
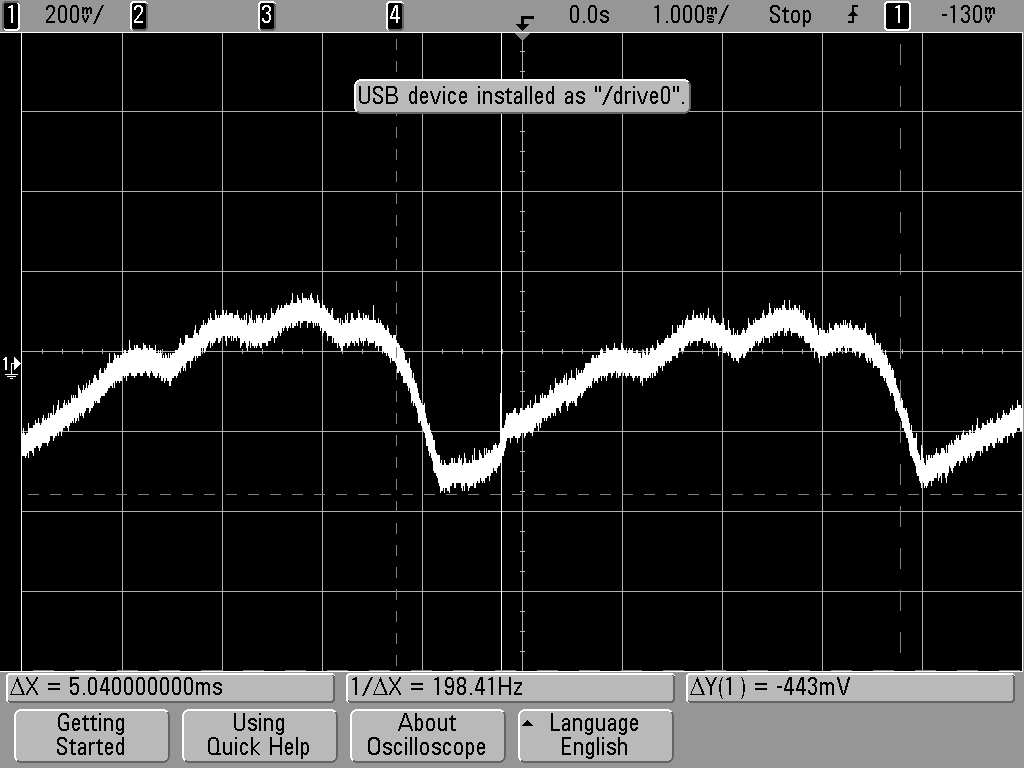
Then I decided to measure the ripple voltage right at the battery, which is shown below. The peak-to-peak ripple is smaller (about 400 mV) than at the radio but still present. I expected the the voltage to be mostly clean right at the battery.
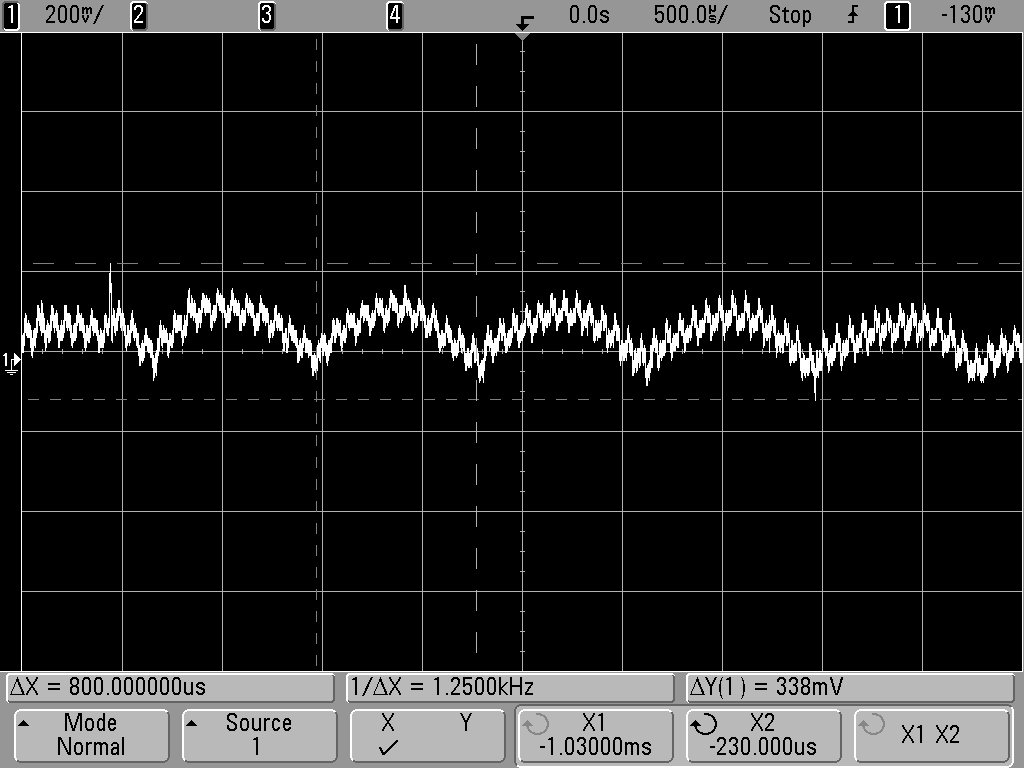
I pondered what to do next. One approach would be to install a filter to eliminate the ripple. However, filtering out a few hundred Hz signal while maintaining a low voltage drop on the 12V power feed is not trivial. More importantly, I had the sense that the Escape’s electrical system was just not operating properly. I decided to take it to my local mechanic, who tested the alternator and determined that a diode had failed. He replaced the alternator for me and the whine is now gone.
I did measure the 12 volt supply with the new alternator installed and the radio transmitting. I was surprised to find that there is still some ripple, a bit less than 200 mV (shown below). Apparently, this is not enough to disturb the FT-8900 signal.
So that’s the story about my alternator whine.
My spouse says “I still whine sometimes” but it has nothing to do with my ham transceiver.
– 73, Bob K0NR
This Interference Seems to Follow Me Everywhere
 A few weeks ago, I was at my day job working diligently on something. I popped up the SotaWatch web site to see of anyone was out activating SOTA summits. Sure enough, Steve (AKA Goathiker, AKA WG0AT) was headed up Mt Herman for the day. (I have recently declared Mt Herman to be the Most Radioactive Summit in Colorado…at least for amateur radio.)
When I had a few minutes break, I went out to my amateur-radio equipped SUV in the parking lot to call Steve on 146.52 MHz. Steve came back to my call and we made a quick contact and he was in the log. Even though he was an easy line-of-sight path away, I had trouble copying him. Opening the squelch revealed that I had a large noisy signal sitting on 146.52 MHz. I didn’t think too much of it and assumed it was coming from the vast array of electronic equipment inside the building.
As I left work that day, I tuned to 146.52 MHz to see how quickly the interference disappeared as I drove away. I was surprised to find that the interference did not go away, it was covering a wide area. On my commute home, the noise was remarkably constant. This interference seems to follow me everywhere! Eventually, it sunk in that the interference was coming from my own vehicle. Huh, I didn’t have that problem before.
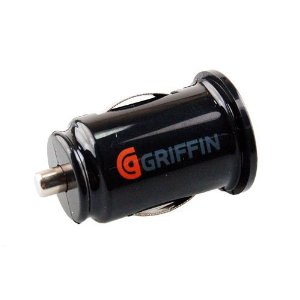
When I arrived home, I turned off the ignition and the noise was still there. I started disconnecting everything in sight, trying to make the noise disappear. Finally, I unplugged the cute little USB charger/adapter that was inserted into the cigarette lighter socket. Bingo, the interference disappeared. It seems that this little adapter has a switching circuit in it that is generating a large amount of hash. I have not investigated it fully, but it trashes out a substantial portion of the 2 Meter ham band.
It used to be my favorite adapter. Buyer beware.
73, Bob K0NR
How Much Does That Second Band Cost?
 I encourage newly licensed radio amateurs to go ahead and get a dual-band FM rig…handheld, mobile or both. I think the additional cost of the dualbander with both 2 Meters (146 MHz) and 70 cm (440 MHz) is justified by having the ability to operate on the additional ham band. I have noticed that the price of the single-band 2 Meter mobiles are pretty low, less than $200… a real bargain in terms of technology. This made me wonder what the price premium for the second band (70 cm) really is.
I pulled all of these prices from the same major ham radio web site, trying to keep some consistency among the price of the various models. (I ignored specials and coupon pricing.) I looked at a basic 2 Meter FM rig and any comparable dual band models from the same manufacturer. I tried to stick to the basic transceivers and not include models that had advanced features such as D-STAR and APRS in them.
The data is captured in the table below. Note that I differentiated between a single receiver (one frequency at a time) dual-band radio and a two receiver dual-band radio, since the latter variety is much more expensive. I calculated a percent premium for each of the dual-band transceivers, calculated as the percent increase in price over the single-band radio from the same manufacturer. I think this is the most objective way to describe the extra cost of a dual-band radio.
| Transceiver | Price | Bands | Percent Premium |
| Yaesu FT-2900R | $185 | 2M | |
| Yaesu FT-7900R | $330 | 2M/70cm | 78% |
| Yaesu FT-8800R | $460 | 2M/70cm Dual Receiver | 149% |
| ICOM IC-2300H | $260 | 2M | |
| ICOM IC-2820H | $670 | 2M/70cm Dual Receiver | 158% |
| Alinco DR-135T | $170 | 2M | |
| Alinco DR-635T | $320 | 2M/70cm Dual Receiver | 88% |
| Kenwood TM-281A | $145 | 2M | |
| Kenwood TM-V71A | $395 | 2M/70cm Dual Receiver | 172% |
It is worth noting that only Yaesu and Alinco offer a single-receiver dual-band rig. These two radios are 78% and 88% more expensive than their single band counterparts (less than twice the cost). The two-receiver dual-band radios are consistently more expensive, with a price premium ranging from 149% to 172%. While these rigs are often described as having two radios in one, they are more than twice as expensive as a single-band radio.
Although I appreciate the extra utility of the two-receiver radios, it looks to me like the best value is with the single-receiver dual-band rigs.
What do you think?
73, Bob K0NR


