Posts Tagged ‘TH-205E’
 Shootout on Tallentire Hill
 It has been a glorious day today. After lunch I set off for Tallentire Hill armed with the TH-205E and three antennas: a 2m telescopic quarter wave, a 45″ 2m 5/8 wave Black Whip telescopic from eBay seller jeepbangkok and the SOTA Beams MFD.
I set up the MFD in the vertical position strapped to a fence post and put out some calls. Despite my high elevation the 2m band was quiet and I only managed to raise “the usual suspects”. Richard MM1BHO/M heard me calling through the GB3DG repeater and we had a short QSO. Then Keith G0EMM heard me call on 145.500 MHz and was willing to spend a bit of time doing some antenna tests.
Prior to this I had heard a contact on the GB3CS repeater and had quickly swapped all three antennas to see what the difference was on receive. There was no noticeable difference between the MFD and the Black Whip but both were significantly superior to the 1/4 wave telescopic (which is itself an improvement over the short whips and “duckies” normally used with 2m handhelds.) However the signal was steady on the MFD whereas it varied depending on the position in which I was holding the TH-205E with the BNC mounted antenna. When using the MFD I was sitting on the ground so it was above my head and my body wasn’t interfering with reception. When using rig-mounted antennas it is best to stand up as an extra couple of feet above ground make a noticeable improvement. But it is also worth turning around and moving a short distance as the direction you are facing can make a big difference to signal strength.
Keith confirmed that there was no difference in my signal between the MFD and the 5/8 telescopic. I was 59 on both of them, whereas I was only 4 by 3 on the quarter wave. Keith also gave me my second unsolicited complimentary report on the TH-205E audio, saying it was “just like my voice.” I was using one of the cheap Kenwood speaker mikes which I bought on eBay originally for the TH-F7E.
We were then joined by Colin 2E0XSD who again said that I was the same strength, 59+ on both the MFD and the 5/8 wave. I was only 4 by 7 on the quarter wave.
After I finished the contact with Keith and Colin I tried some more calls. I was able to access the GB3CS repeater using the MFD and the 5/8 – when in the right position – but not with the quarter wave. Some repeaters I could hear but not access even with 3W, which is what the TH-205E appears to put out on “high power” with the 7.2V battery pack, but perhaps they don’t respond to 1750Hz tone-bursts.
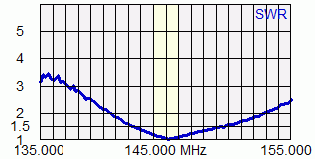 When I bought the Black Whip a few weeks ago I put it on the antenna analyzer and got this SWR curve. I seem to remember that I had to collapse the topmost section to get the SWR null spot on 145.000 MHz but I don’t suppose it makes any difference in practise.
I think the Black Whip 5/8 telescopic is a superb antenna for 2m FM use and well worth the few pounds it costs, as long as you have a radio that can handle it. The base is sprung to absorb any shocks but even with the HT Saver SMA to BNC adapter I was a little uncomfortable using it on the tiny TH-F7E. The big old TH-205E has no such problems with a large antenna, although its lower power output with the battery pack I have is a slight disadvantage.
Is it worth carrying the MFD instead of the 5/8, which telescopes down to the same length as a quarter wave telescopic antenna? Well, if you are using a modern hand-held radio then the MFD’s coaxial connection will avoid putting undue strain on the SMA connector. You can secure the MFD to a fence post or stuff the support mast in your rucksack allowing you to operate sitting down and even let go of the radio when receiving. The MFD is also convertible to a horizontal dipole for SSB use. So it still has several benefits. But I expect I will be taking the Black Whip on most of my hilltop outings.
Charger for the TH-205E
 The TH-205E transceiver was finally restored to full working order yesterday. After some thought I finally decided how to fit the 3A diode that was somewhat larger than the recommended part which was unobtainable. I extended the left-over wires from the old fuse using thin wire taken from the leads of a small capacitor. I then shortened to a few millimetres and tinned the leads of the new diode. I wound the thin wires on to the stub leads of the diode and then soldered them whilst using tweezers as a heat sink on the thin wire to prevent the other end coming unsoldered.
The radio now works off its new battery. It made its first QSO with Derek G1GDB via the GB3LA repeater, and received complimentary reports on the audio. I even took it along to the Workington Radio Club meeting in case there was a “largest 2m hand-held” competition!
I also finished up the drop-in battery charger which I built using this circuit using an LM317T voltage regulator. It is simple to make and has an LED to show that it is charging. The hardest part was cutting the rectangular hole in the plastic project box. It’s best not to look too closely or you can see that the edges are not perfectly straight.
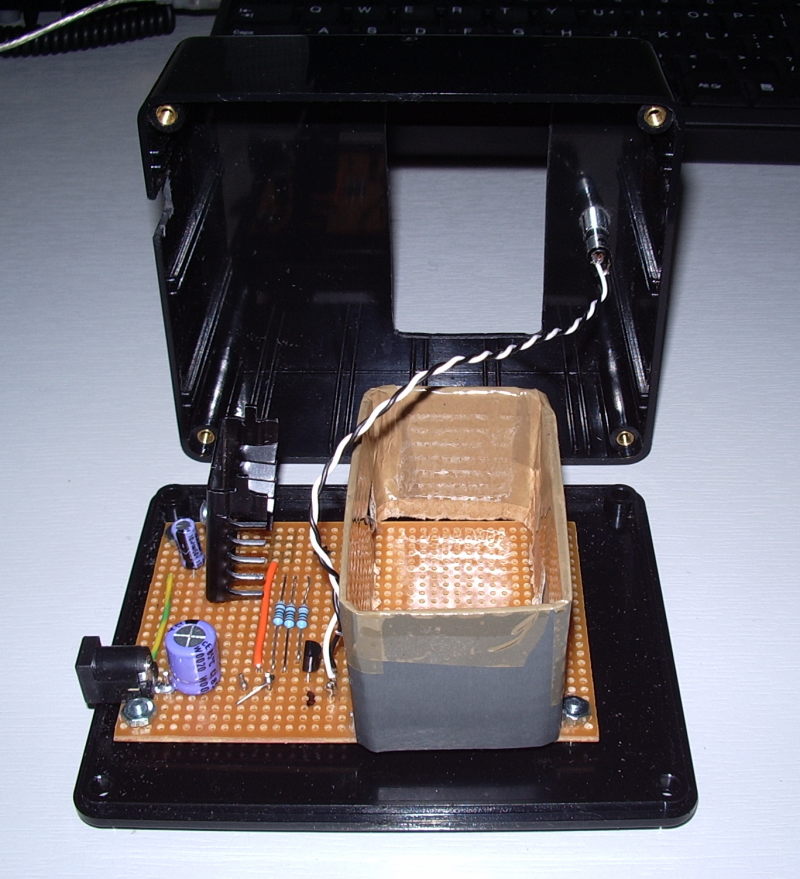 This picture shows an internal view of the charger. It doesn’t show the contacts for the charging tabs on the battery which were made from a paperclip. The sleeve that holds the radio or battery in position was cut from the cardboard box that my UNI-T Oscilloscope Digital Multimeter came in, and is super-glued to Veropins to hold it in place. Hopefully the heat sink for the LM317T will be adequate – the battery hasn’t lost the charge I gave it using the shack power supply so I haven’t yet had the chance to test it for a full 15 hours.
Snag
The diode I ordered yesterday to do the mod on the TH-205E came this morning, but it is a bit big.
 It looks as if I might have to use a thin wire link after all.
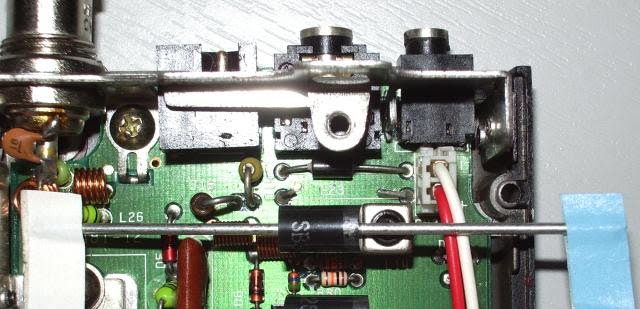
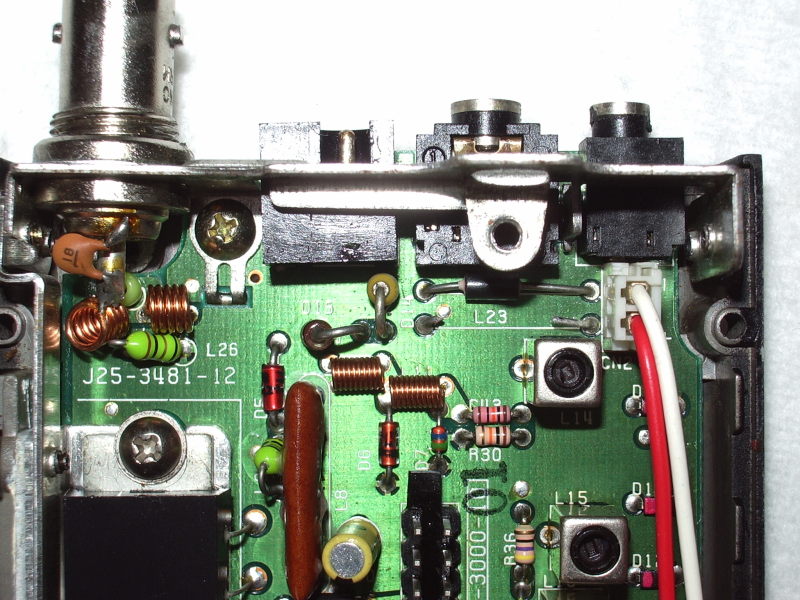
The diodes I ordered have a rating of 3A whereas the one specified by Kenwood – part number ERB83-004 – is rated at 2A. You can see an ERB83-004 which is used as a reverse polarity protection diode mounted vertically just to the left of where I hoped to put this one in. It is much smaller.
There is room for the big diode but it will not be easy to get a soldering iron bit in and trying to solder such heavy leads to the thin leftovers of the old one could result in more problems.
Back to the drawing board.
Blown fuse
My hopes that the TH-205E I bought on eBay would be fully operational after connecting the fully-charged new battery were dashed last night when I attached the battery, switched the radio on and got … precisely nothing. However I already had a suspicion as to what was wrong. Whilst searching for information about the radio I had found information about a design fault in early models of the TH-205 that was corrected by a modification in later versions.
 The original TH-205s had a miniature 4A fuse in line between the battery and the power switch. However if external power was applied using an incorrect type of DC plug, the battery was not disconnected from the supply line. The external power could overheat the battery and blow the 4A fuse. I suspected that the fuse had blown.
In fact, I’m afraid it was probably me that blew the fuse. When I first plugged in external power from my shack GSV3000 power supply I noticed the current meter quickly blip as contact was made before the power jack disconnected the battery from the circuit. I didn’t know at that time about the fault, or that the original battery was a dead short. It probably isn’t a good idea to plug in DC power leads while the power is on, but I expect I had other radios on at the time and didn’t want to turn the power off.
I opened the TH-205E up again. I could see the wires from the battery went to a jack on the RF board which is underneath the IF board, so I had to remove the IF board to get to it. This really is a nicely made radio and it is easy to take apart. The fuse, with a ferrite bead on one of the leads, was in the obvious position next to the red wire from the battery. In the picture you can see its position marked L23 after I had snipped the fuse out (I didn’t want to remove the RF board from the chassis to unsolder it completely, so I will solder the replacement to the lead ends that are left.)
I didn’t have a miniature 4A fuse to replace it with. The official Kenwood modification is to replace the fuse with a blocking diode to prevent DC power reaching the battery pack. But they use not just any old diode, but a Schottky barrier rectifier diode which has a low voltage drop of about 0.4V. (A regular silicon diode would cause a voltage drop of about 0.9V.) Of course, I didn’t have a 2A Schottky barrier rectifier diode in my parts drawer either.
I did consider simply replacing the fuse with a thin strand of wire. Since I only have the low voltage 7.2V battery pack I don’t really want any additional voltage drop. I know about the problem so I could simply avoid it by not hot-plugging external power into the power jack. But there is always the risk I might forget and I don’t want to do the repair again, so I decided to do the proper modification.
I ordered the diode from eBay supplier PIC-Projects. I have to say that eBay has become my main source of electronic components and is a major salvation when you need an odd part like this. There is no minimum order charge or handling fee that makes it uneconomic to order less than £30 worth of stuff, and the prices of both parts and postage are very reasonable. Sometimes you have to order cheaper parts in quantities of 10 or 50, just like the “professional” suppliers like Farnell, but the prices make it worth while and it helps to build up a stock of parts for future projects. I ordered 5 of these Schottky diodes because they were only 35p each, and I’m sure I’ll find a use for the other 4 eventually.
Hopefully the diodes will arrive in tomorrow’s post and I’ll finally be able to put the TH-205E on the air with its new battery!
A stroke of luck
 Sometimes you just get lucky. After I repaired the TH-205E I recently won on eBay, I was looking around for ideas on what to do about the dead battery pack and I found someone selling brand new Kenwood KNB-4 battery packs for £2.40. Well, not brand new, but never used, in the manufacturer’s box, though they would have been manufactured some time around 1993. The seller claimed that, although stored for a long time, after three full charge / discharge cycles they should be capable of holding a reasonable charge.
The KNB-4 was not actually made for the TH-205E. However due to Kenwood keeping the same form factor for its hand-held transceivers for several years the newer battery pack is able to be used in the older radio, as I was able to confirm from the W&W Manufacturing website, which claims it is equivalent to the PB-4 accessory battery for the TH-205. This is the large “high capacity” battery, with 1500mAH capacity as compared to the 500mAH of the one that came with the radio. Unfortunately it is only 7.2V which gives a power out of 1.5W according to the manual. It would have been nice to have had the 12V 1200mAH one which gives 5W out but you can’t have everything.
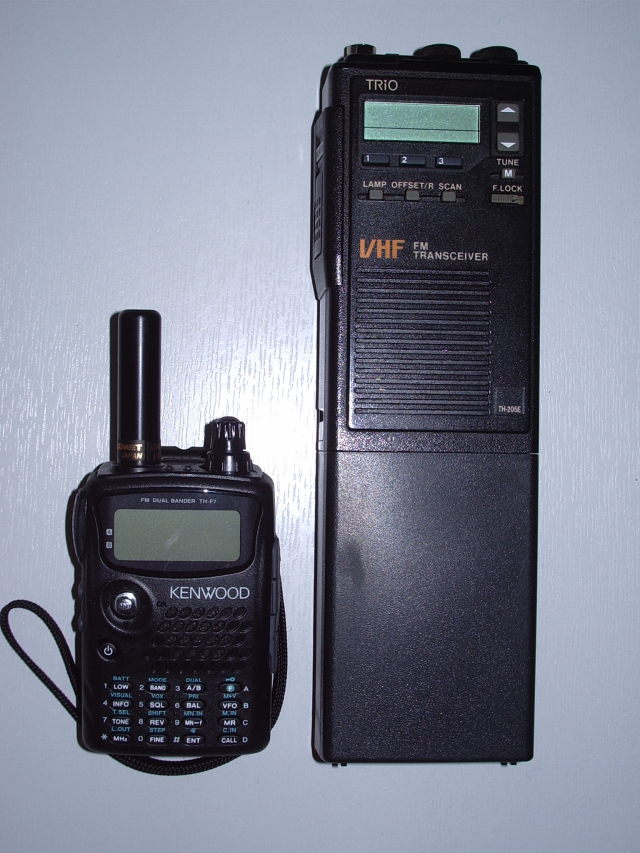 This is a big battery pack and it turns the already large TH-205E into a veritable giant, as the picture of it next to the TH-F7E shows. This is more than just a radio! You give your biceps a workout every time you use it. The radio will hold down your log sheets on a windy hilltop where lesser rigs would blow away and it also makes a handy weapon to beat off any assailants who might try to mug you whilst you are on the air.
Unlike the supplied battery, the KNB-4 doesn’t have its own charging socket, just contacts for a drop-in charger. So I will need to make a drop-in charger for it. I have already made a start using a piece of Veroboard with contacts made from a paperclip. The battery is charging at 240mA from the shack power supply, so after 10 hours I’ll know if it can hold a charge. If it does then I’ll make up a proper constant current charging circuit and put it in a nice box. Then I’ll have a great little, err, I mean great big 2m radio that will certainly attract a lot of attention wherever it goes!
Kenwood de-gunked
It’s probably a character weakness, but I have always had a tendency to push my luck a bit too far and end up regretting it. That thought was in my mind when thinking about what to do with the Trio / Kenwood TH-205E that I got for a song on eBay. The rig worked well enough already to do what I thought I would do with it if it worked. But I was finding it hard to resist the temptation to see if I could restore it to full working order even though there was a risk that I might end up breaking it completely.
 In the end, the temptation to try to restore it won. The radio came apart quite easily – it is a big radio, and fairly easy to work on, though surprisingly for 1986 vintage equipment it uses a lot of SMT parts. The back half is a solid cast metal chassis containing the IF and RF boards, and the front half is plastic and contains the front panel with the control logic. The two halves are linked by two ribbon cables and one had been inserted a bit crooked, which led me to hope that repositioning it might solve the problem of the inoperable buttons, but that proved not to be the case, so the front panel board had to come out.
The front panel board is secured to the front panel itself with a large number of small self-tapping screws. Once they were removed and the wires to the speaker and mic unsoldered, the board came out to reveal the sight shown above. The front panel buttons were not sealed units but capacitive switches operated by contact with the rubber buttons, and they were covered by a sticky mess of gunk – presumably the same stuff I had found on the outside of the case which a couple of readers informed me was a cleaning agent used to spruce plastic items up prior to sale. This hadn’t just distributed itself over the switch area, it had even penetrated through some of the vias to reach the other side of the board. What a mess!
Olga found me a few small pieces of rag and I went to work with some white spirit from the garage. I eventually managed to clean most of it off. My fears about causing even worse damage were raised when the LCD display fell off. It didn’t seem to be attached to the board and had perhaps become stuck to it with some of the gunk. However when I reassembled the radio I just rested it in place while I fixed the PCB in place and it still worked.
There was no way I could test if the switch contacts were clean enough without reassembling so eventually I decided that it looked good enough and back it all went. I applied power with trepidation. The display lit up and I could hear hiss in the speaker. I then pressed the Offset button and was able to select repeater shift! The Scan function set the receiver scrolling slowly through the entire 2m band in 5KHz steps – very useful that! I was also able to program and recall frequencies in the three memories, although the memory buttons still need a bit of persistence to get them to work. It isn’t worth taking it all apart again just to try to improve that.
While I had the rig apart I took the opportunity to reset the power levels to give 5W on High power with a 13.8V supply and 0.5W on low power. Some previous owner had probably tweaked the power controls to give 7W out. No point in stressing the probably irreplaceable power transistor for a barely detectable 1dB or so of extra power. Then I put it all back together. Job done, and the TH-205E restored to full working order. I was feeling pretty chuffed.
As usual, there was no-one around on any of the simplex channels to do a test with but I was able to access the GB3DG repeater and even GB3LA on 145.7125 (a 12.5kHz channel) by tuning to 145.715.
I’m starting to feel a bit of affection for this big old radio now that I’ve made it as good as new. I’m thinking that it would be worth trying to resurrect the NiCad battery pack, which at the moment is showing a dead short. But there I’m really stumped, as I can’t see a way in. Clearly the plastic case is made in two halves, but sticking a screwdriver in the crack and twisting is just going to chew up the plastic. Anyone know if it’s possible?
eBay bargain
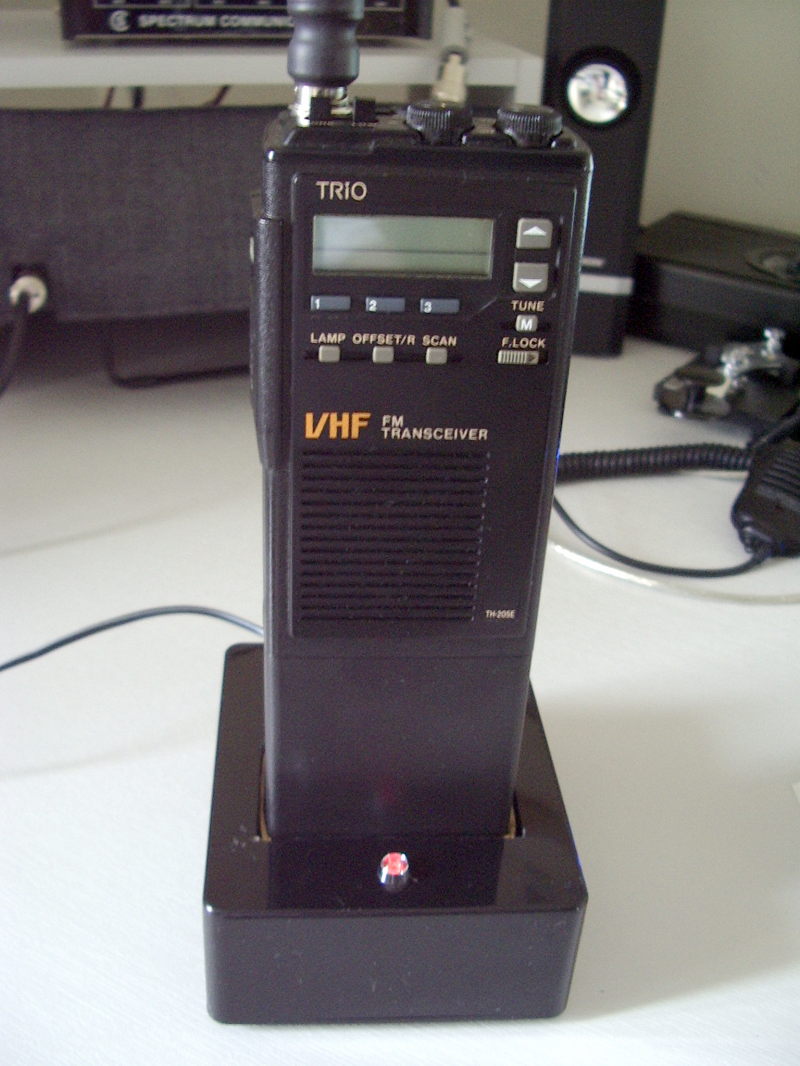
 Whilst buying on eBay can sometimes result in a piece of junk, it can also produce the occasional lucky find. The radio pictured on the right is my latest auction success which arrived this morning. It is a Trio / Kenwood TH-205E of 1986 vintage which was being sold as for spares or repair. It cost me all of ten quid ($15 for my US readers), four of which were for postage.
When it arrived it was a bit oily, for some reason, but a wipe over with some tissues took care of that. From the front it looks almost like new – no scratches or signs of wear on the markings or buttons. The rig has obviously had an active life though as on the back the paint has worn away and the serial number plate and the warning notice on the battery pack have been polished almost clean of lettering.
The seller stated that they could not get the radio to charge up, which is no surprise, as for 24 year old NiCads to still retain a charge would be nothing short of a miracle. I applied 9V of external power, switched on, and was pleased to see “144.000” appear on the display and hear the hiss of an unsquelched receiver from the speaker. My initial delight at having acquired a worker was short-lived, however, as the frequency display failed to respond to the up/down buttons and the squelch did not seem to work either.
After a while spent pressing buttons in the faint hope of getting the frequency to change, it suddenly did increment a few steps and the squelch also operated. Then the radio gradually became more responsive to the buttons and I was eventually able to persuade it up into the 145.500 region. I connected my QRP power meter and was delighted to observe that the TH-205E was putting out a good 5W in the high power position and 1W in low power. I could also receive the signal on the TH-F7E standing nearby, which was somewhat dwarfed by its older sibling. I’d forgotten hand-helds were still this chunky in 1986!
I connected an antenna and found that I could receive all the local repeaters, so sensitivity is acceptable. The TH-205E will only do 5kHz steps so it isn’t suitable for 12.5KHz channeling, but the receiver is broad enough to receive the GB3LA repeater on 145.7125 when tuned to 145.710 with perfect audio. There is no CTCSS, though there is a tone-burst switch (which I haven’t tested.)
Apart from the up/down frequency selectors the only other front panel button that appears to work is the Lamp button which backlights the LCD display. I can’t activate the repeater offset or program or recall any of the three frequency memories. Possibly these buttons will eventually spring to life after repeated pressing. Otherwise it may require a look inside to see if it is possible to clean the switch contacts. But to be honest I’m not all that bothered, as I’m unlikely to be using the TH-205E on any repeaters.
The most I hoped for when bidding for this was a radio that could easily be got working and could then be put to use as a dedicated rig for APRS on 144.800 or something similar. The least I expected was something I could cannibalize for £10 worth of useful parts. So already I have got more than I hoped for!


