Posts Tagged ‘Computers’
 One on one with the PC………
 December 7th, 2011 |
  Author:
was able to multi-task during the contest between two computers using two nice LCD monitors. The next day after the contest the net-book was snuggled in it's case and it was time to use
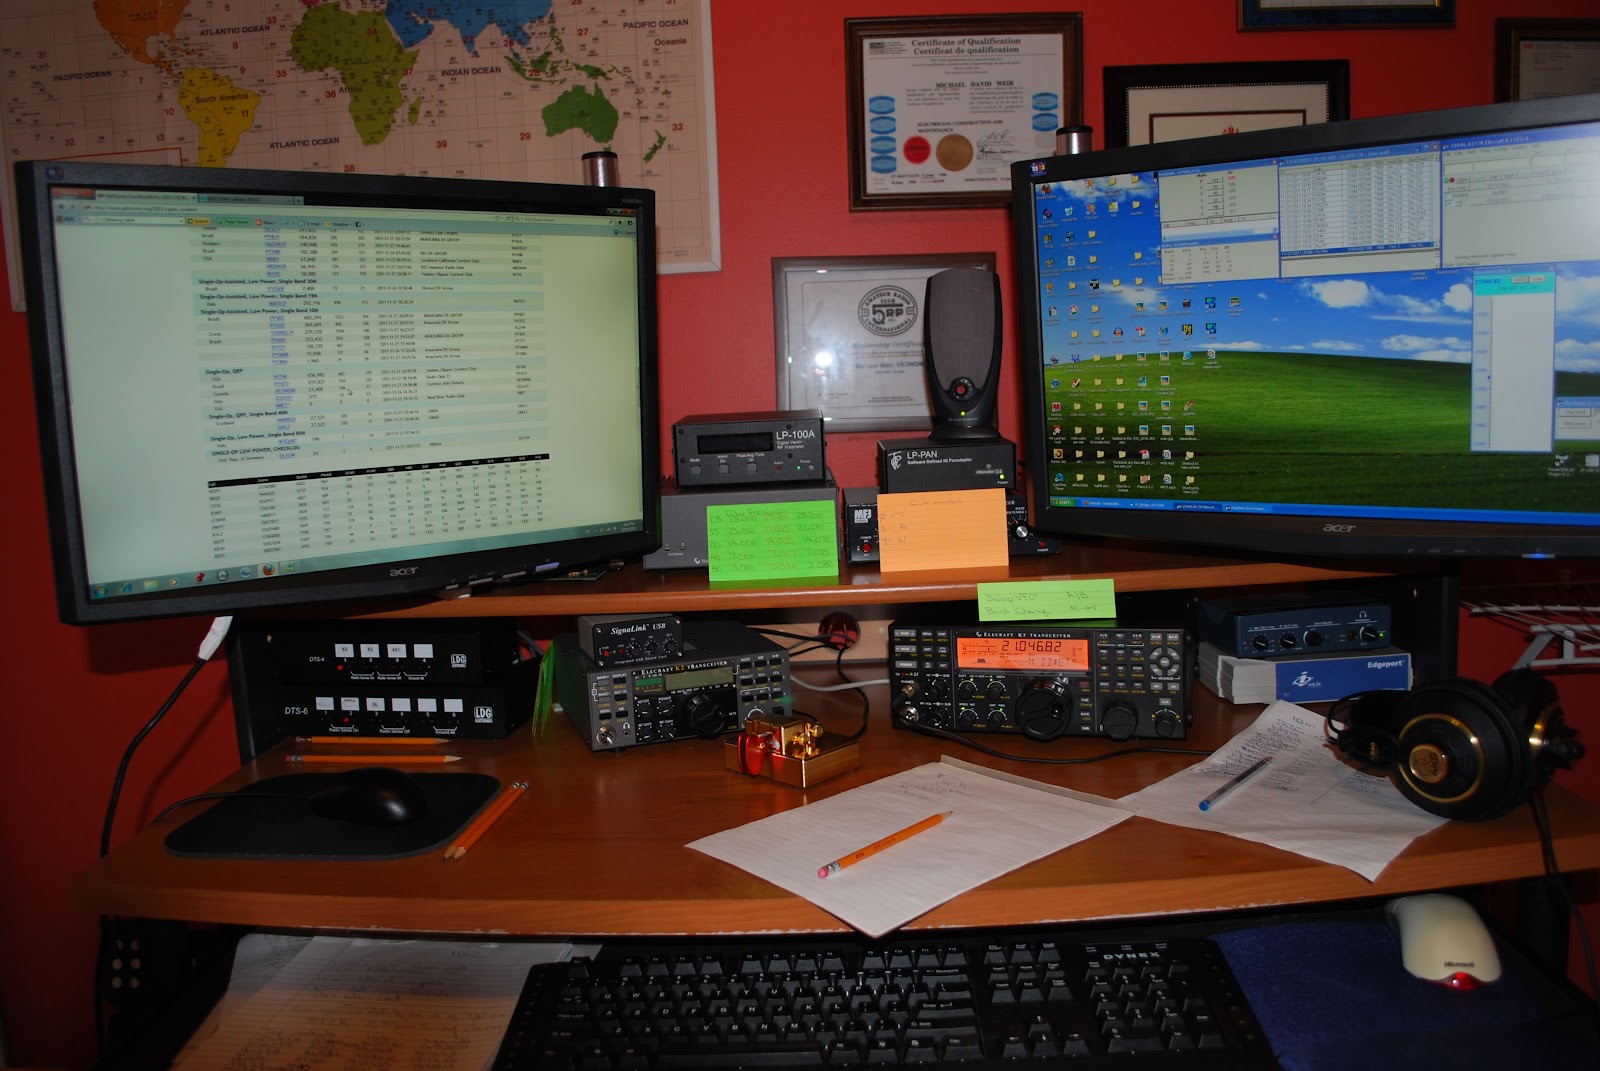 |
| During the contest with both monitors |
both LCD monitors on the main PC as it always had been done....As the PC booted up the one monitor display read "not connected". I then preceded to connect reconnect and change out the video cables but nothing had worked. I was still getting the "not connected" message floating around. I then in WinXP had a look at my video card. Maybe I just had to tell the PC to recognize the other monitor again. In the process of trying a dual monitor setting I did not read the warning that was counting down from 15 seconds. I just said "ok". Well now both monitors were blank with the message "not connected" Well that went well!!! It was off to Google to solve my troubles. Seems the net-book could had changed the monitor refresh rate and or resolution settings. Settings the main PC was not able to recognize and thus the message "not connected". According the the advice derived from Google searches I have to boot in VGA only mode. It was simple, I was told "wait for the Windows logo to appear and press F8". Easy if both monitors were not blank!!! So began the many restarts guessing when to press F8. Well in time I was successful and was able to get into VGA mode and repair both monitors. All is working well now and lesson learned. It turns out the net-book changed both the refresh rate and the resolution.

Linux Ubuntu here I come………..

could be loaded on my laptop along side Windows. Kinda have two OS's on one machine. Now I am not a fan of doing this for the long term and I don't think it is meant for that. It was a way of test driving Ubantu 11.10 and see how I liked it and how the laptop liked it. An installer called Wubi allows you to install Ubuntu on a Windows machine. If you don't care for Linux it can be removed also using Wubi. If you want to go ahead and install Linux Ubuntu using Wubi just follow the step by step instructions found on the Internet. There was no need for any fancy computer whiz bong knowledge it was similar to installing any windows program. Before you know it Uantu was up and running and each time I started the laptop I was asked if I wanted to load Windows or Ubuntu?? The first thing I noticed was it sure did load faster than Vista and that was a BIG plus. For a few days I gave Ubuntu a test drive. I had only done things the Windows way so the desktop and how programs were launched took some getting used to. I kept reading "take time to get used to Ubuntu it's not Windows" I went to YouTube to check out some tutorials on the operating system to learn more. This was were I thought I ran into my first Ubuntu troubles. At YouTube I was greeted with the messages "Adobe flash is required to view YouTube" The flash upgrade was painless and was a matter of just clicking on a link. The needed update was downloaded and installed then YouTube was up and running. After playing with Ubuntu for a weekend it was time to take the plunge and remove Vista and do a perminant install of Linux Ubuntu on my laptop. There are step by step instructions for this as well on the Internet. So after a week what is my impression of Ubantu....it's loads in 20 seconds compared to Vista's 3-5 minutes. It comes complete with a word processing program, spread sheet, a power point type program, workspace switcher were you can have four windows going at once and switch between them. You can run windows programs by using a program called wine. I have not venture down this road yet. One thing I did notice was it eats up the laptop battery time but there is something out there in Linux land to help that along. As times goes on I will continue to learn more. Have not tried it yet with any ham radio programs but my laptop was never used for that.

Seeing the big picture with PowerSDR
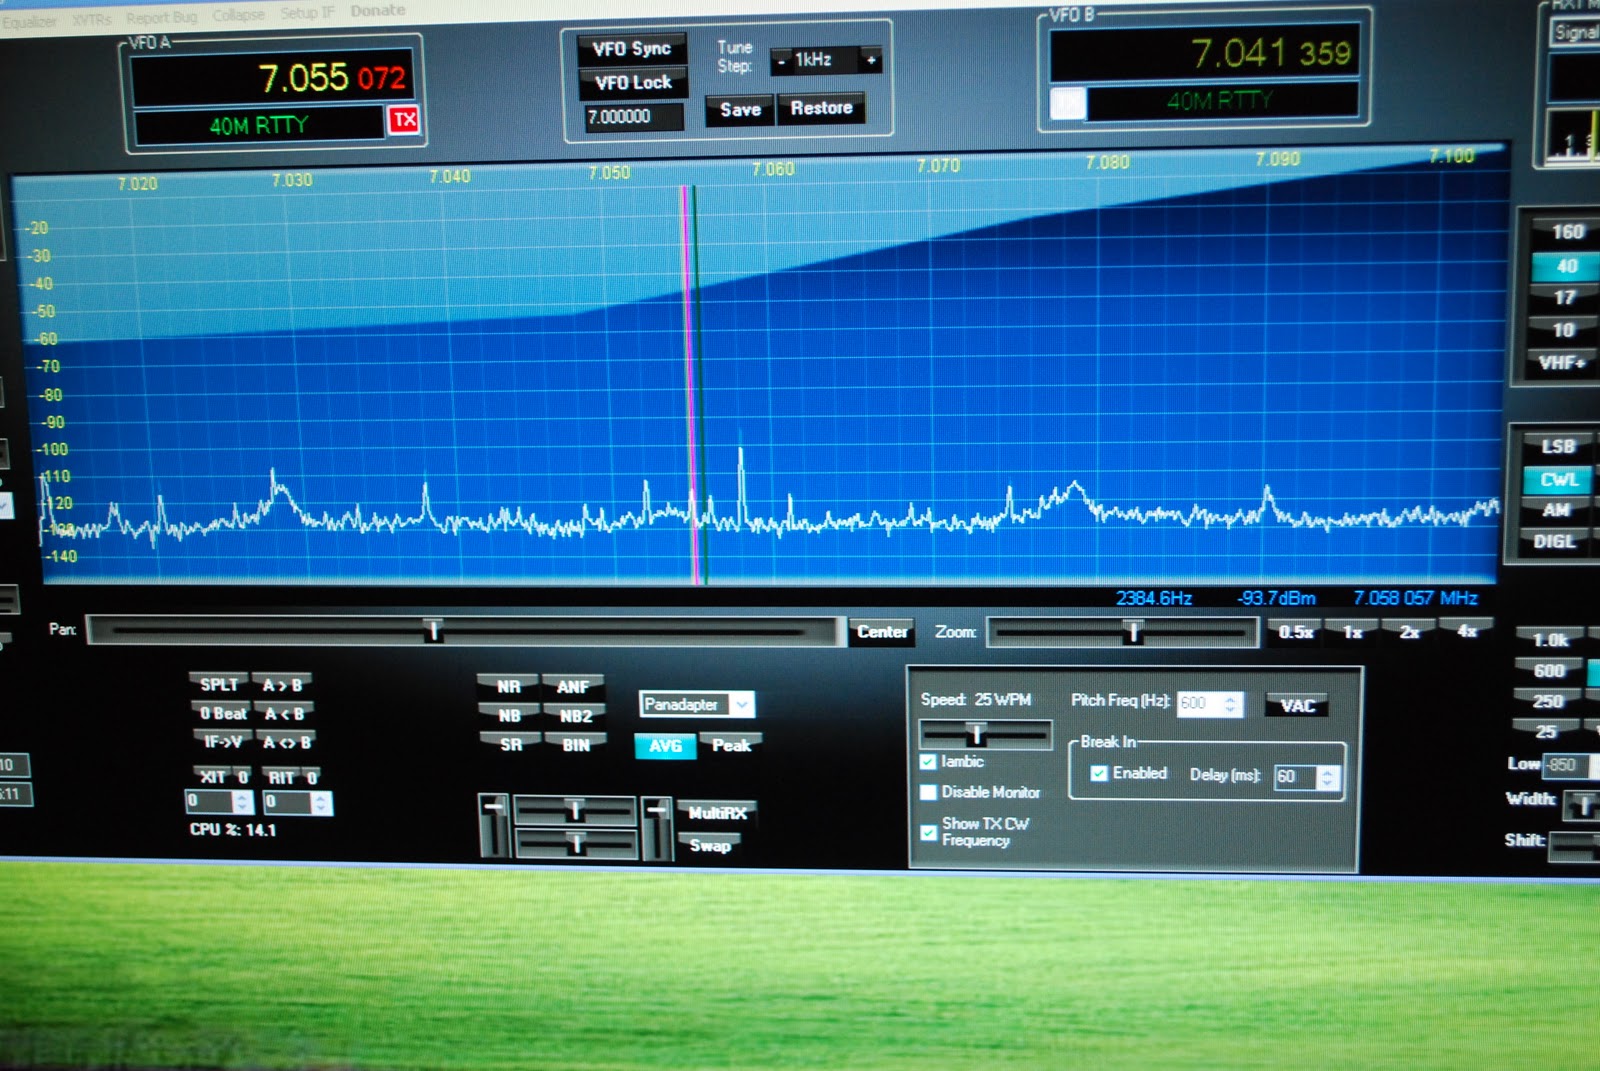 |
| PowerSDR screen |
the band that your radio is on. My setup is made up of the LP Pan, EMU 0202 Creative labs external sound card and the PowerSDR software. The pan-adapter gives my QRP station some nice advantages the main one is the ability to see the entire CW segment at one time. I can see a strong station or week station then point and click and I'm there. Before I would be spinning the VFO from on end of the band to the other. I may just miss a station calling CQ and is now waiting for a response but to me its static with no one there and I move on missing this station for his
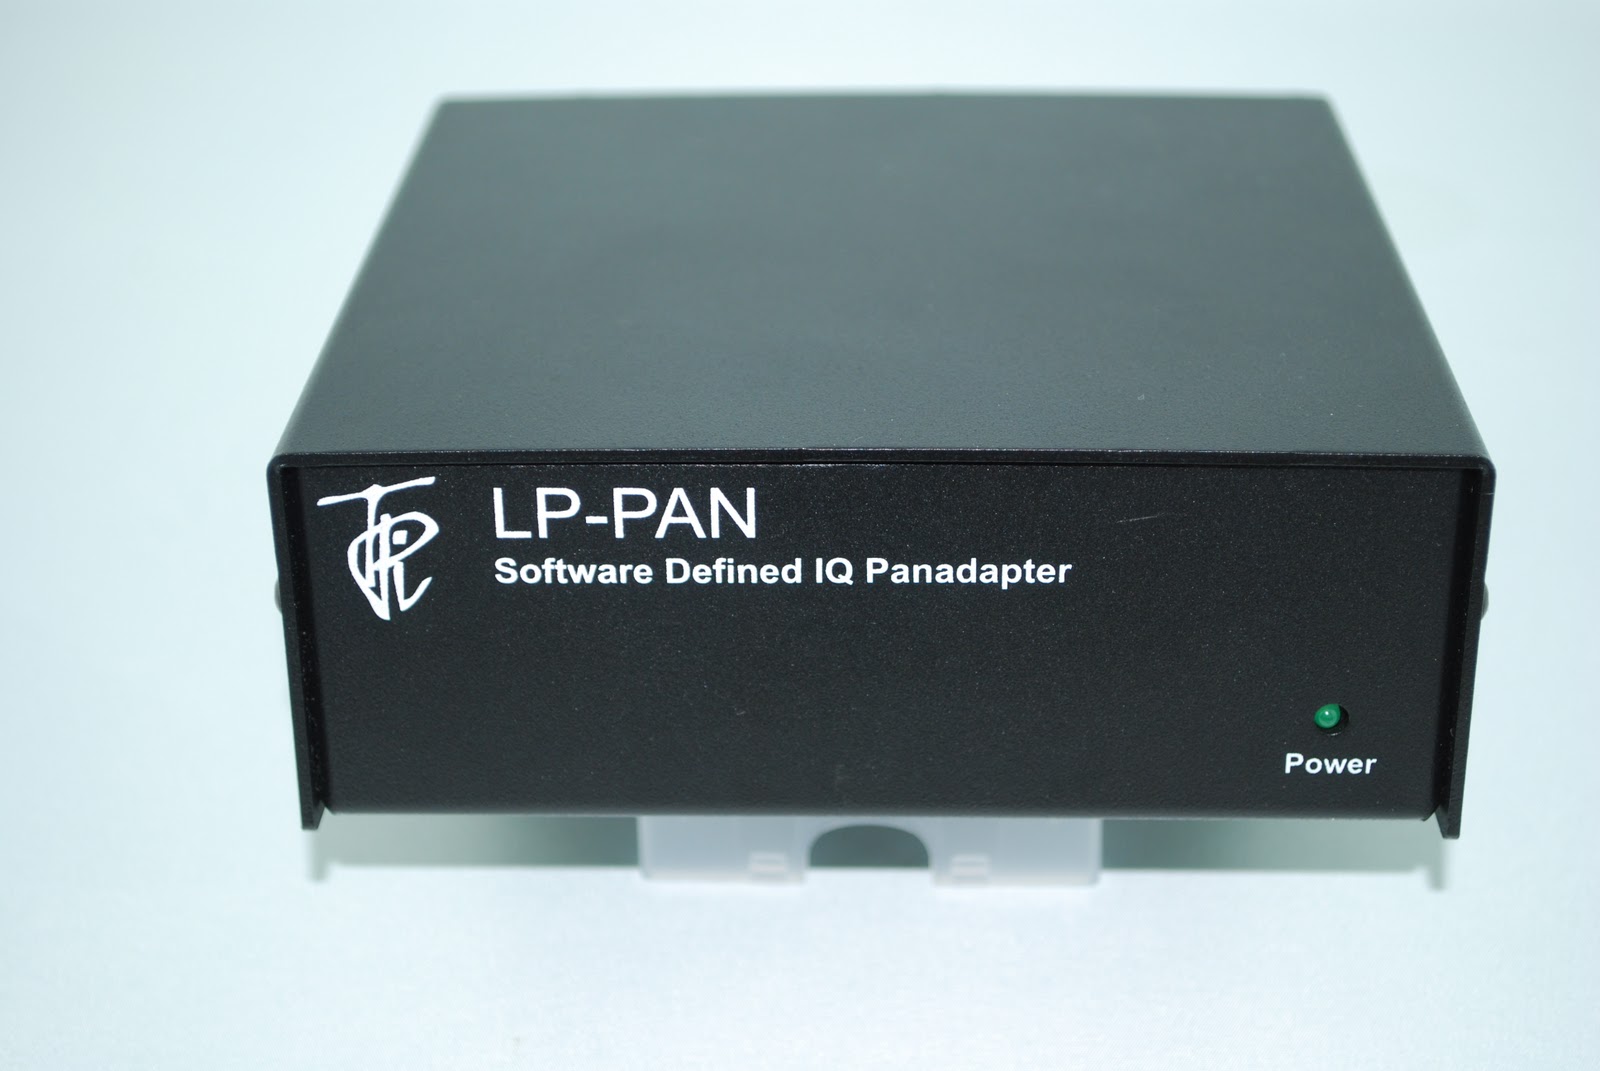 |
| My LP-Pan unit below, new TS-990s |
 next CQ call. Also I can flip to 10 meters and look at the pan-adapter to see if there is any action on the band or not....seeing if the band is open in a shorter time as opposed to spinning the VFO over the entire band. If you want to go down the Pan-adapter road at this time there are about 3 ways to do it. You can go all out and purchase a Flex radio system this is by far the most expensive way of going about it. Having said that it comes complete with all that is needed including a rig, processor for software and software all in one package. Or as I did you can order a pan-adapter, sound card and download the free software. Finally there is the stand alone Pan-adapter the only one at this time on the market I know of is the Elecraft P3. This unit is plug and play there is not need for software or a
computer...the only catch is you need an Elecraft K3. To be fair some
of Icom's rigs come with a band scope. I am not sure how interactive
they are. Also Yaesu has their DMU-2000 option that gives you more than just a band scope.
There is also some rumors of Kenwood coming out with a new rig.
I have seen some pictures and along side is an
next CQ call. Also I can flip to 10 meters and look at the pan-adapter to see if there is any action on the band or not....seeing if the band is open in a shorter time as opposed to spinning the VFO over the entire band. If you want to go down the Pan-adapter road at this time there are about 3 ways to do it. You can go all out and purchase a Flex radio system this is by far the most expensive way of going about it. Having said that it comes complete with all that is needed including a rig, processor for software and software all in one package. Or as I did you can order a pan-adapter, sound card and download the free software. Finally there is the stand alone Pan-adapter the only one at this time on the market I know of is the Elecraft P3. This unit is plug and play there is not need for software or a
computer...the only catch is you need an Elecraft K3. To be fair some
of Icom's rigs come with a band scope. I am not sure how interactive
they are. Also Yaesu has their DMU-2000 option that gives you more than just a band scope.
There is also some rumors of Kenwood coming out with a new rig.
I have seen some pictures and along side is an Elecraft type stand along plug and play Pan-adapter. Next question that most ham's ask is "how much for this toy" The option I chose I believe is the cheapest...the LP-Pan comes either as a kit or factory built unit. I chose the kit at 200.00. The EMU-0202 ran me 125.00 and the software is well what all hams want to hear....FREE!!! So for about 325.00 you can be in the Pan-adapter world. Oh and one last consideration is the speed of your PC. It is recommended on the LP Pan site the following be used for your PC:
2.8 GHz processor (the more the merrier), preferably Core Duo or Quad.
1 GB RAM (the more the merrier, limited to 3GB on 32-bit systems, which are recommended)
16-bit sound card, preferably not integrated into motherboard. 24-bit preferred (lower noise floor)
48 kHz sound card... 96 or 192 KHz preferred (display width is roughly equal to sampling rate)
Separate video card, or integrated video with sufficient dedicated memory. Most of the SDR applications are video intensive.
So there you have it a pan-adapter setup...Christmas is coming and maybe it might be something you would like under the tree??
JUST WANTED TO ADD A NEW ADDITION TO THE POST I WAS EMAILED BY JOHN AE5X. HE REMINDED ME OF ANOTHER OPTION I NEGLECTED TO INCLUDE IN THE POSTING. THE SOFTROCK AND IT'S A 20.00 KIT!!!! HERE IS A LINK TO GM0ELP'S BLOG DETAILING THE SOFTROCK.

Motorola Millstone
This weekend I had planned to write about my Android smartphone, a Motorola Milestone 2, which I bought in early July soon after I came out of hospital. It was a fantastic phone with a big, clear screen and a really usable slide-out keyboard. It became my main method of electronic communication. The Android user interface is great – far, far superior to Windows Mobile. It is well integrated with Gmail as you would expect and it has an excellent web browser that can display almost any website, unlike the IE browser in Windows Mobile which is just a piece of s***. I was also intending to write about an Android APRS application called U2APRS. Unfortunately, last night my Milestone turned into a brick.
The one thing I hadn’t got round to doing was install a good app to read the various blogs that I follow. Blogger Dashboard is one of the few sites that doesn’t work well in the Android browser. I decided to install Feedly, found that I liked it, and spent some time going through all the blogs marking all the posts as read. Having done that I was trying to figure out how to get back to the list of blogs now that there were no new posts when the screen froze and refused to respond to touch input.
Thinking that this was just a software crash, I pulled the battery. But when the phone started up again the screen still refused to respond to finger movements. And now I couldn’t get past the lock. This situation persisted after several attempts.
Time to go online. A Google search revealed that problems with the Motorola Milestone 2 touch screen were not uncommon and that the only diagnostic to try was to perform a factory reset to make sure that the trouble was not due to a software glitch. This would, of course, remove all my apps and settings. But there was no alternative. Except that the instructions for performing a hard reset – press and hold the Camera button while powering up the phone – didn’t work. Every time, the phone booted into its normal screen, which was still locked.
After wasting quite a lot of time making several attempts at this I found another forum post that suggested holding the X key on the keyboard whilst powering on the phone. This got me a step nearer to where I was trying to be – a screen with a warning triangle and an Android icon on it – but the instructions to bring up the menu – press and hold the Volume Up button and then the Camera button – did nothing. Again, a lot of time was wasted trying this several times, including different permutations of pressing and holding, and trying both of the Volume buttons since I couldn’t be sure which was Up and which was Down, to no avail. Deep frustration was setting in.
Olga found a forum post which suggested that pressing the keyboard Search button from the Android warning screen would bring up the reset menu. That didn’t work either. Then she found another one that said to use the the @ key. At last, the menu! I was finally able to format the system and wipe all my apps and data. When the phone rebooted it entered the initial configuration sequence, asking what language I wanted it to use. Which I was unable to select because the touch screen still didn’t work.
So my Milestone is currently as much use as a lump of rock. I’m missing it already. It will probably take several days to send it for repair and have it returned, which I can’t even start to do until Monday. But I’d rather do without a phone than go back to Windows Mobile, which may be a very good platform for running apps but is absolutely loathsome as a telephone and is totally useless for Gmail.
Deep frustration. Not to mention irritation over the valuable time I’ll have to spend reinstalling and reconfiguring everything once it’s back. And to add to my annoyance I’ve lost U2APRS because the developer JA7UDE’s web site has been offline for the last couple of weeks for reasons unknown and there is no longer any way to obtain it.
I’m not a happy bunny.

APRS iGate on a smartphone
Not that many will have noticed its absence, but the Cockermouth APRS internet gateway G4ILO is back on the air using APRSISCE running on a SIM-less HTC Touch Pro smartphone.

I had wished for a long time that I could run the gateway without having the shack PC on all the time running up the electricity bill. But when I looked at the documentation for things like aprs4r it looked too difficult. After I got my Android smartphone I was wondering what to do with the Windows Mobile I used previously and it occurred to me that I could use this for the gateway, since the Windows CE version of APRSISCE contains more or less the same functionality as its full-blown Windows counterpart. (Personally, most of the time I don’t consider that to be an advantage, and I had often wished that Lynn would release a cut-down version for mobile users with simplified menus, but that’s another story.)
In order to use the phone as a gateway I would have to set up a Bluetooth connection to the Kenwood TM-D710 TNC as the Touch Pro doesn’t have a serial port. Achieving this was one of those things that I wish I had never started, entailing hours of wasted time, failure and frustration. It also brought upon the first bad headache I have had since my brain operation. This is probably not helpful to the state of my health, so I have vowed from now on to give up the technical stuff and use the computer only for non-stressful activities like writing and web surfing. Life is, for me, literally too short to spend fighting with computers.
My first attempt at a Bluetooth connection involved using a Pico Plug. I bought two of these a couple of years ago when I saw them cheap on eBay (where they are still available, though not as cheaply) but I had never actually used them. However this first attempt got nowhere. My netbook – the only PC that had Bluetooth on it – would only see the Pico Plug as a modem and would only allow me to try connecting to the Internet through it. The smartphone saw the device but could find no services offered by it. So that idea went nowhere.
My next thought was to try one of the cheap Bluetooth serial modules being sold on eBay, as something similar had been mentioned in a thread in the APRSISCE Yahoo group. The one I ordered was described as a small size Bluetooth TTL UART full duplex data transmission module Class 2 10 meter range(30ft), 35mm by 15mm excluding pins length nicely sleeved in transparent nylon sheath supplied with 4 wire header cable. The module is based on the BT0417C chip and has a regulator to run off 3.3 – 5V. It arrived the next day by first class post and was quickly attached to a DB9 connector and power.
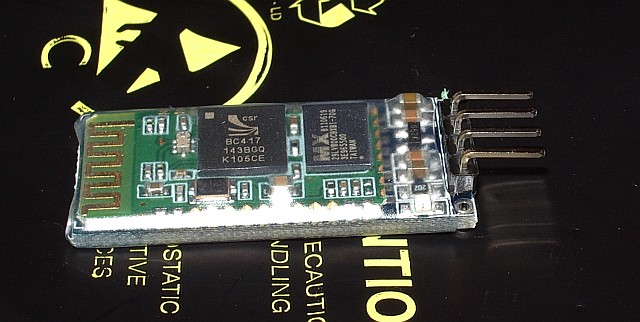
The BT0417C module was seen by the computers and advertised a serial port service. But whenever the Kenwood TNC sent any data what appeared in the terminal program was garbage. It was the same garbage for the same data, which made me think that the baud rate was wrong, though the default settings for the module were supposed to be 9600,8,N,1 just the same as the Kenwood. Try as I might – and I tried for a long time – I could not get the thing to display the proper data.
Eventually it dawned on me that changing the baud rate of the terminal program might not actually alter the baud rate used by the module to communicate with the device. I found some instructions that were supposed to describe how you could change the module’s baud rate by sending an AT command to it. This didn’t work either, after which I grasped that you were supposed to send the command by direct connection to the module, not over Bluetooth! To do this I needed to disconnect a serial cable from the back of the shack PC in order to free a gender changer that would enable me to connect a USB to serial cable to the BT module. When I disconnected the cable, one of the standoffs that the cable plug screws into decided to come off with the plug instead of stay on the PC and a nut dropped down inside the computer. So I had to disconnect the shack PC – not a simple task as it has 4 serial ports and 3 sound cards attached as well as the usual paraphernalia – in order to retrieve and replace the errant nut. Then we couldn’t get the backplane of the serial board seated back in the PC. I couldn’t see what I was doing properly so Olga had a go, and it took her half an hour of fiddling.
After all that I still couldn’t change the baud rate or get the data to be displayed correctly. I even tried connecting my Elecraft K3 to the module to see if I could send or receive commands from that, but I still got garbage at any of the K3’s available baud rates. I then wondered if I had damaged the module by doing that as I vaguely recall that the K3’s I/O module uses proper +/-12V RS232 signalling levels and the BT is a TTL module. I don’t know what the Kenwood’s serial output is either. At this point I decided to abandon the entire idea. Net result: a wasted day and a splitting headache – though at least we had taken the opportunity to vacuum all the dust out of the inside of the shack computer!
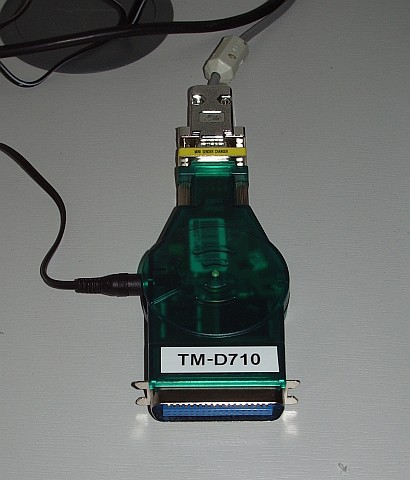
This morning, feeling a little calmer, I decided to have one last try with the Pico Plug. It suddenly occurred to me that perhaps there was some newer software or firmware for it. Sure enough, there was, though not a lot newer. I upgraded the firmware in the Plug, then installed the newer configuration utility. The result: still no advertised serial port service. 🙁
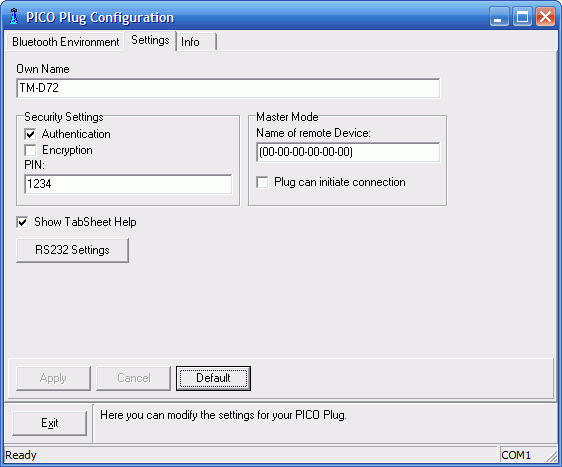
However, the new configuration utility had a few more options. By trying them at random I finally got a serial port to appear in Bluetooth on the smartphone! I connected to it with Pocket Putty, and the whoop of joy when the Kenwood packet TNC sign-on message appeared could probably have been heard five miles away. I quickly created an RF port in APRSISCE using the Kenwood(D710) APRS configuration and it put the radio into APRS mode just as it was supposed to. Stations started appearing on the display as “heard over RF.” So, finally, I was on the way to running an APRS iGate on my smartphone!
In case it is helpful to anyone else who wants to use a Pico Plug to connect a Kenwood APRS radio to another device using Bluetooth, here is a screenshot of the configuration utility showing the settings that worked. (Yes, I know, I set the device name to TM-D72 instead of TM-D710 as I intended. Believe me, by this point I was tired!)
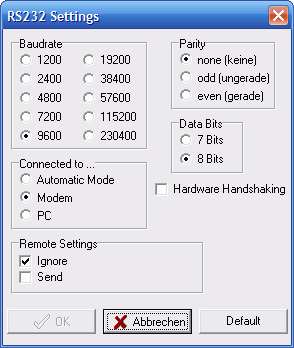
Here is one showing the RS232 settings. The important bit seems to be to set it as a Modem.
If you know what to do then that’s all there is to it. But my goodness what a frustrating nightmarish day or so it took getting there. I hate computers – and it would seem that the feeling is mutual!

A birthday to forget
As you may have noticed, I have been experimenting with making software instruction videos. APRSISCE/32 has been the beneficiary of my attempts, but my real intention has been to make videos that would bring traffic back to the website that for the last few years has provided us with a living. For the core of the videos – and for APRSISCE/32 videos – the screen capture software I have been using (BB Flashback Express) is good enough. But I wanted to make the videos more professional by including shots of me talking to camera – which meant that I needed to buy a camcorder and get to grips with video editing software.
I ordered by post an AgfaPhoto camcorder which captured good quality video, though the sound level was low. I struggled with the supplied Arcsoft Total Media Extreme software. Eventually, and quite by accident, I found that my work laptop which is running 64-bit Windows 7 had on it a program called Windows Live Movie Maker. This is a brilliantly designed piece of software and easy enough even for me to use. Unfortunately I found that the audio level on the video made with the camcorder was much lower than that recorded by the screen capture software. I tried reducing the level in BB Flashback to match that of the clips filmed using the camcorder, but once the video was uploaded to YouTube the audio was much quieter than other videos and even with the PC speakers turned up to the max you could hardly hear it.
Olga made a test clip using the video feature of her digital camera and the audio on that was much louder. So yesterday we decided the camcorder must have a fault and emailed to the supplier saying we wanted to return it. Not wanting to waste time we then went to Argos and bought a different camcorder, this time one from Hitachi, which had received good reviews. You can imagine the sinking feeling when, after waiting for the battery to charge up, we tried it only to find that the recorded audio level was no louder than on the Agfa.
I felt out of my depth, clueless with no idea what to do. Other people managed to upload videos to YouTube with speech you could hear – why was I finding it so difficult? I asked in a couple of familiar ham radio forums if anyone had experience of this and could offer some advice. One person explained how to change the audio level in Windows Live Movie Maker, but as I had already found, the volume slider was at maximum in the video clips and the only direction I could adjust the audio level was down. Few people seemed to have experience of using camcorders, most using smartphones or other pocket devices to make their YouTube submissions, which would not give the HD quality I was hoping for.
Olga, trying to be helpful because I was getting stressed, found what she thought was a Hitachi support forum. Twelve Hitachi technicians were online waiting to answer my questions, the site claimed. I wrote my question and immediately received the response that this had been passed to someone who was an expert in this particular field and I should pay £12 for an answer by email or £18 for a consultation by phone. Ready to try anything at this point, I handed over my credit card details, only to find that this was not Hitachi support at all, but some generic advice service claiming to answer all kinds of questions. More than 12 hours later we have not received any answer for our £12.
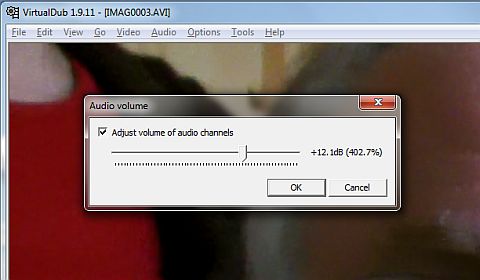
Eventually I stumbled upon a workaround. The Hitachi camcorder creates AVI files (unlike the Agfa whose video files are MOV.) Google found several answers to how to increase the audio in an AVI file, which suggests this is a common problem. Many of the answers were couched in gobbledygook I didn’t understand, using terms like “demux” that mean nothing to me. But eventually I found a “how to” procedure I could follow. It involved using a free utility called VirtualDub to rewrite the AVI file after processing and increasing the level of the audio track by 12dB. Even that didn’t work until I had visited a dodgy looking site and downloaded an iffy looking unofficial codec for the H.264 video encoding used by the Hitachi.
So I have a solution to the problem, though it’s a bit of a cumbersome one involving processing every video clip before I can start to assemble them in Movie Maker. To arrive at this point I have ended up buying two camcorders the first of which is probably not faulty as we first thought (it being unlikely they both are.) and been suckered into paying £12 to an internet scam site. This is not to mention the hours spent in front of the computer feeling frustrated and helpless on what was actually my birthday. Certainly not a birthday I particularly want to remember.
I think I’m getting too old for this tech stuff. I wish I could retire somewhere and keep chickens or something that did not require the use of computers at all. You would think that making home videos was something lots of people would want to do. Why is it so difficult?

A birthday to forget
As you may have noticed, I have been experimenting with making software instruction videos. APRSISCE/32 has been the beneficiary of my attempts, but my real intention has been to make videos that would bring traffic back to the website that for the last few years has provided us with a living. For the core of the videos – and for APRSISCE/32 videos – the screen capture software I have been using (BB Flashback Express) is good enough. But I wanted to make the videos more professional by including shots of me talking to camera – which meant that I needed to buy a camcorder and get to grips with video editing software.
I ordered by post an AgfaPhoto camcorder which captured good quality video, though the sound level was low. I struggled with the supplied Arcsoft Total Media Extreme software. Eventually, and quite by accident, I found that my work laptop which is running 64-bit Windows 7 had on it a program called Windows Live Movie Maker. This is a brilliantly designed piece of software and easy enough even for me to use. Unfortunately I found that the audio level on the video made with the camcorder was much lower than that recorded by the screen capture software. I tried reducing the level in BB Flashback to match that of the clips filmed using the camcorder, but once the video was uploaded to YouTube the audio was much quieter than other videos and even with the PC speakers turned up to the max you could hardly hear it.
Olga made a test clip using the video feature of her digital camera and the audio on that was much louder. So yesterday we decided the camcorder must have a fault and emailed to the supplier saying we wanted to return it. Not wanting to waste time we then went to Argos and bought a different camcorder, this time one from Hitachi, which had received good reviews. You can imagine the sinking feeling when, after waiting for the battery to charge up, we tried it only to find that the recorded audio level was no louder than on the Agfa.
I felt out of my depth, clueless with no idea what to do. Other people managed to upload videos to YouTube with speech you could hear – why was I finding it so difficult? I asked in a couple of familiar ham radio forums if anyone had experience of this and could offer some advice. One person explained how to change the audio level in Windows Live Movie Maker, but as I had already found, the volume slider was at maximum in the video clips and the only direction I could adjust the audio level was down. Few people seemed to have experience of using camcorders, most using smartphones or other pocket devices to make their YouTube submissions, which would not give the HD quality I was hoping for.
Olga, trying to be helpful because I was getting stressed, found what she thought was a Hitachi support forum. Twelve Hitachi technicians were online waiting to answer my questions, the site claimed. I wrote my question and immediately received the response that this had been passed to someone who was an expert in this particular field and I should pay £12 for an answer by email or £18 for a consultation by phone. Ready to try anything at this point, I handed over my credit card details, only to find that this was not Hitachi support at all, but some generic advice service claiming to answer all kinds of questions. More than 12 hours later we have not received any answer for our £12.
Eventually I stumbled upon a workaround. The Hitachi camcorder creates AVI files (unlike the Agfa whose video files are MOV.) Google found several answers to how to increase the audio in an AVI file, which suggests this is a common problem. Many of the answers were couched in gobbledygook I didn’t understand, using terms like “demux” that mean nothing to me. But eventually I found a “how to” procedure I could follow. It involved using a free utility called VirtualDub to rewrite the AVI file after processing and increasing the level of the audio track by 12dB. Even that didn’t work until I had visited a dodgy looking site and downloaded an iffy looking unofficial codec for the H.264 video encoding used by the Hitachi.
So I have a solution to the problem, though it’s a bit of a cumbersome one involving processing every video clip before I can start to assemble them in Movie Maker. To arrive at this point I have ended up buying two camcorders the first of which is probably not faulty as we first thought (it being unlikely they both are.) and been suckered into paying £12 to an internet scam site. This is not to mention the hours spent in front of the computer feeling frustrated and helpless on what was actually my birthday. Certainly not a birthday I particularly want to remember.
I think I’m getting too old for this tech stuff. I wish I could retire somewhere and keep chickens or something that did not require the use of computers at all. You would think that making home videos was something lots of people would want to do. Why is it so difficult?