Posts Tagged ‘Arduino’
 A SWR power bridge for uBITX
Something good has just caught my eye, especially if your into the uBITX right now.
This month there is an excellent article for a VSWR bridge for the Arduino, which confusingly KW5GP (Glen Popiel) appears to take all the credits? But it appears the article was written or most of it by KV4QB (DuWayne Schmidlkofer)? A better explaination of the confusion, might be to just nip down to DuWayne's Place to understand what has actually gone on.
Why is this article good for the uBITX builder or users? Well at the moment there is no SWR/PWR bridge hardware built into the uBITX, although VU2ESE's Arduino code does appear to implement something for a basic S meter.
The article has a full bridge directional coupler circuit, along with amplified outputs, which are then fed into the Arduino. Along with this, there is the code, that could be easily adapted to work with the uBITX Arduino. Anyway Duwayne, has been good enough to drop off the details along with the code at his Dropbox site here
Arduino Projects for Amateur Radio with Glen Popiel – ETH072

Do you want to get back to the original roots of Amateur Radio? Maybe you are a new ham and you have a DIY side? Maybe you just want to try something new? There are so many things that you can do with an Arduino that cost only $4 or so! Anything from a morse code keyer to a 40m QRP CW Radio and a whole lot in between. You can even do things with an Arduino that has nothing to do with amateur radio but you will find a use for.
In this episode with talk with Glen Popiel, KW5GP the author of the ARRL published books, Arduino for Ham Radio and his new book that just came out, More Arduino for Ham Radio. He is also the author of the ham mesh networking book, High Speed Multimedia for Amateur Radio.
We had a great conversation and it made me literally go to the ARRL website and buy his new Arduino book while we were recording! Check out the show notes of this episode to listen and to get more information about what we talked about. There are also links to his books that you can go to to buy one for yourself.
LoRa LoRa Laughs!
Until recently the preferred method was to use RTTY transmissions, however the advent of the IoT (Internet Of Things) has seen manufacturers of radio modules develop devices to increase both the range and reliability of communication between 'connected' embedded devices.
One such development are LoRa devices, primarily for devices to connect to a global wide-area network LoRaWAN, more information can be found at the LoRa Alliance in addition there are some open hobbyist networks such as The Things Network using these devices.
Using chirp spread-spectrum modulation these LoRa devices are marketed as being capable of robust, interference and fade resistant communication over longer distances and higher data rates.
The UK HAB community has begun experimenting with these devices and one of their keen proponents is Dave Akerman (M0RPI). Dave has developed both payload software for the "Pi In The Sky" PITS tracker along with Anthony Stirk (M0UPU) and gateway software in collaboration with Robert Harrison M0RJX. The 'gateway' is the necessary receiver element to upload the data to the tracking system. (all software is on the PITS Github page)
Dave gave an informative presentation on LoRa at the UKHAS 2016 Conference which is now available online (starts around 3 minutes in)
I had intended to fly a LoRa transmitter on my 2015 Hamfest balloon but it stopped working at the eleventh hour and hadn't done anything else with LoRa till recently.
Spurred on by the conference presentation and the fact more and more flights are carrying LoRa I invested in one of the Raspberry Pi expansion boards sold by Uputronics and built up another prototype tracker with a working LoRa module.
I have done talks at various radio clubs and societies and demonstrated it working but hadn't actually received a 'real flight' as opportunities have been scarce due to the weather. However in the few weeks I have tracked a couple of flights receiving both telemetry and image data, getting a couple of complete images from the imaginatively named 'SPACE' flight.

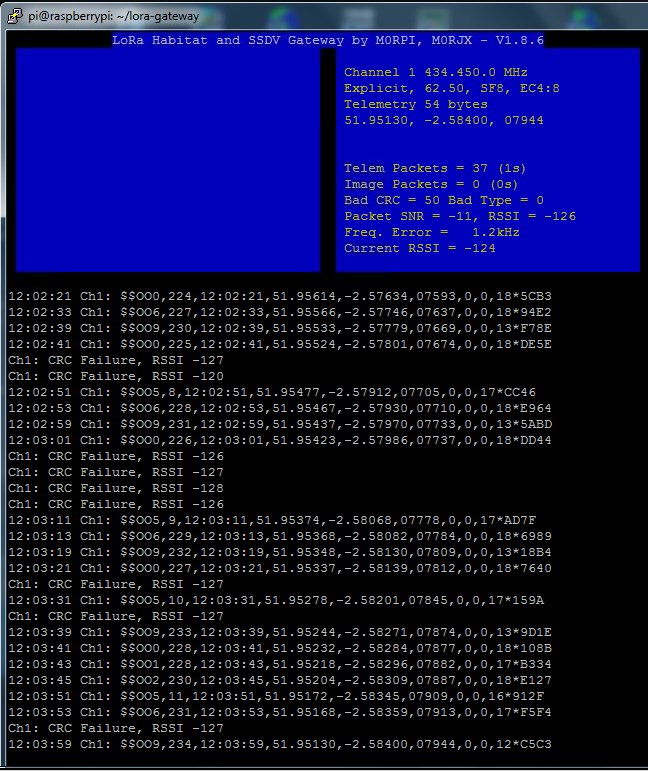
Dave Akerman also flew a flight experimenting with multiple payloads using Time-division multiplexing (TDM). It had 10 small of "AVRLoRaNut" trackers (of Anthony M0UPU's design) all set to the same frequency (434.450MHz) and same transmission mode. The trackers took turns to transmit, with each one allocated a particular transmission slot in a 20-second cycle. The cycle was GPS-timed but, if any tracker lost GPS lock then it derived timing from the transmissions from the other trackers (the LoRa devices are also receivers) All 10 trackers were suspended from the same balloon. This was in preparation for the 'Operation Outward' re-enactment next year (Steve Randall gave a presentation on it in the above conference video starts 1 hour 16 mins in)
I successfully received telemetry despite the flight not being local and constantly heading away from me as can be seen in the screen shots.
Always a busy man Dave also flew a flight with an experimental camera setup. The SSDV images this time came from a Nikon compact camera, connected to the Raspberry Pi via USB, and using gphoto2 software to take and transfer images to the Pi where they were stored, resized and converted to SSDV format for transmission. These were large images with a high quality SSDV setting so lots of packets per image, approx 1400 per image in testing.
This flight was using a 868MHz LoRa device, rather than the usual 434MHz due to the IR2030 restriction on bandwidth and duty cycle. Dave was using his Turbo-X or Mode 4 setting which is as fast as LoRa will go within IR2030 bandwidth restrictions (approx 8 packets / 2k bytes per second)
I hastily ordered a 868MHz device and soldered it in the spare slot on my gateway and built a collinear for 868MHz similar to the one I built for ADB-S reception (see video here).

You can see it lashed up just below the dual-band collinear - not ideal mounting and it wasn't tested in anyway, built blind! The less than optimal setup at UHF, the insane data rate and the distance (>100miles) were going to make reception difficult, so I was pleased I did manage to receive telemetry and image packets.

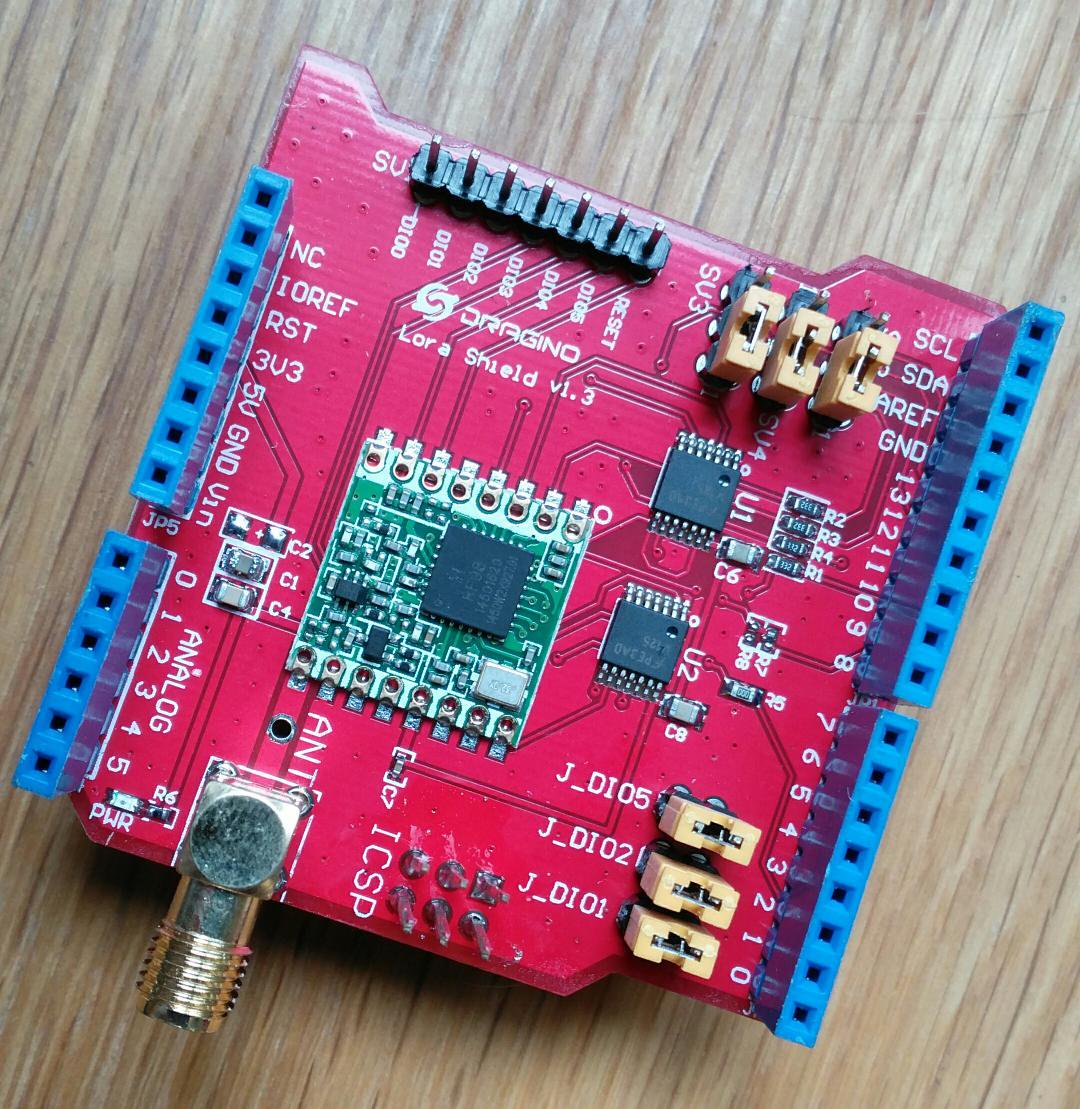
Most of the current LoRa development in the HAB community has tended to be on the Raspberry Pi due to the use with SSDV and the easy availability of cameras and ready built kit. LoRa is of course available on the Arduino platform and I had purchased a couple of 'Dragino' shields (pictured below) with a LoRa device on.
Dave has done some work on a AVR tracker software and a simple Arduino 'Serial' LoRa receiver. The receiver connects to a host PC appearing as a serial port and by running some gateway software the receiver can be configured via the serial link and received data is sent back to the gateway to be uploaded to the Habitat tracking system and SSDV system - the software can be seen here during the 'Operation Outward' test flight.

This gateway software is written in Pascal using Delphi and is not as functional as the Raspberry Pi Gateway software. Dave has made the source code available but I am not au fait at all with Delphi however I installed the free development IDE and intended to get in and make modifications but it seems to require a non-free(?) library for the serial comms so ditched the idea.
Instead I have spent the last few days developing a C# .NET version using Microsoft Visual Studio (the community version is free) and also have been modifying the Arduino code in the receiver to add functionality, such as storing the SSDV images locally.
It is still a work in progress but I have made a video showing the current state
Anyway as Cilla Black would say it's been a Lorra Lorra Laughs!

LoRa LoRa Laughs!
Until recently the preferred method was to use RTTY transmissions, however the advent of the IoT (Internet Of Things) has seen manufacturers of radio modules develop devices to increase both the range and reliability of communication between 'connected' embedded devices.
One such development are LoRa devices, primarily for devices to connect to a global wide-area network LoRaWAN, more information can be found at the LoRa Alliance in addition there are some open hobbyist networks such as The Things Network using these devices.
Using chirp spread-spectrum modulation these LoRa devices are marketed as being capable of robust, interference and fade resistant communication over longer distances and higher data rates.
The UK HAB community has begun experimenting with these devices and one of their keen proponents is Dave Akerman (M0RPI). Dave has developed both payload software for the "Pi In The Sky" PITS tracker along with Anthony Stirk (M0UPU) and gateway software in collaboration with Robert Harrison M0RJX. The 'gateway' is the necessary receiver element to upload the data to the tracking system. (all software is on the PITS Github page)
Dave gave an informative presentation on LoRa at the UKHAS 2016 Conference which is now available online (starts around 3 minutes in)
I had intended to fly a LoRa transmitter on my 2015 Hamfest balloon but it stopped working at the eleventh hour and hadn't done anything else with LoRa till recently.
Spurred on by the conference presentation and the fact more and more flights are carrying LoRa I invested in one of the Raspberry Pi expansion boards sold by Uputronics and built up another prototype tracker with a working LoRa module.
I have done talks at various radio clubs and societies and demonstrated it working but hadn't actually received a 'real flight' as opportunities have been scarce due to the weather. However in the few weeks I have tracked a couple of flights receiving both telemetry and image data, getting a couple of complete images from the imaginatively named 'SPACE' flight.
Dave Akerman also flew a flight experimenting with multiple payloads using Time-division multiplexing (TDM). It had 10 small of "AVRLoRaNut" trackers (of Anthony M0UPU's design) all set to the same frequency (434.450MHz) and same transmission mode. The trackers took turns to transmit, with each one allocated a particular transmission slot in a 20-second cycle. The cycle was GPS-timed but, if any tracker lost GPS lock then it derived timing from the transmissions from the other trackers (the LoRa devices are also receivers) All 10 trackers were suspended from the same balloon. This was in preparation for the 'Operation Outward' re-enactment next year (Steve Randall gave a presentation on it in the above conference video starts 1 hour 16 mins in)
I successfully received telemetry despite the flight not being local and constantly heading away from me as can be seen in the screen shots.
Always a busy man Dave also flew a flight with an experimental camera setup. The SSDV images this time came from a Nikon compact camera, connected to the Raspberry Pi via USB, and using gphoto2 software to take and transfer images to the Pi where they were stored, resized and converted to SSDV format for transmission. These were large images with a high quality SSDV setting so lots of packets per image, approx 1400 per image in testing.
This flight was using a 868MHz LoRa device, rather than the usual 434MHz due to the IR2030 restriction on bandwidth and duty cycle. Dave was using his Turbo-X or Mode 4 setting which is as fast as LoRa will go within IR2030 bandwidth restrictions (approx 8 packets / 2k bytes per second)
I hastily ordered a 868MHz device and soldered it in the spare slot on my gateway and built a collinear for 868MHz similar to the one I built for ADB-S reception (see video here).
You can see it lashed up just below the dual-band collinear - not ideal mounting and it wasn't tested in anyway, built blind! The less than optimal setup at UHF, the insane data rate and the distance (>100miles) were going to make reception difficult, so I was pleased I did manage to receive telemetry and image packets.
Most of the current LoRa development in the HAB community has tended to be on the Raspberry Pi due to the use with SSDV and the easy availability of cameras and ready built kit. LoRa is of course available on the Arduino platform and I had purchased a couple of 'Dragino' shields (pictured below) with a LoRa device on.
Dave has done some work on a AVR tracker software and a simple Arduino 'Serial' LoRa receiver. The receiver connects to a host PC appearing as a serial port and by running some gateway software the receiver can be configured via the serial link and received data is sent back to the gateway to be uploaded to the Habitat tracking system and SSDV system - the software can be seen here during the 'Operation Outward' test flight.
This gateway software is written in Pascal using Delphi and is not as functional as the Raspberry Pi Gateway software. Dave has made the source code available but I am not au fait at all with Delphi however I installed the free development IDE and intended to get in and make modifications but it seems to require a non-free(?) library for the serial comms so ditched the idea.
Instead I have spent the last few days developing a C# .NET version using Microsoft Visual Studio (the community version is free) and also have been modifying the Arduino code in the receiver to add functionality, such as storing the SSDV images locally.
It is still a work in progress but I have made a video showing the current state
Anyway as Cilla Black would say it's been a Lorra Lorra Laughs!
Yet another Arduino clock
Does the world need more Arduino clocks? Maybe not.
But I needed another Arduino project as I had made a K3NG morse keyer. I love this keyer because it is unique in supporting a display where you can see what you send. But I wasn’t using the morse keyer all the time, so I wanted the hardware to serve two purposes. That’s the excuse for also making a clock.
Its main features are:
- Controlled by a GPS module outputting data over an RS232 serial interface, and handled with the TinyGPS++ library
- Shows raw GPS data such as UTC time and date, position, altitude, and number of satellitess
- Shows derived GPS data such as 6-digit locator
- Finds local time and handles daylight saving automatically using the Timezone library
- Finds local sunset and sunrise, either actual value, or civil, nautical, or astronomical. The library is Sunrise.
- The clock also gives local solar height based on the Sunpos library from the K3NG rotator controller.
- Finally, the clock also provides the lunar phase based on ideas found here and using a reference new moon on 11 November 2015, 11:47 (UNIX time 1447264020)
 |
Local time, solar and lunar state Line 1: Local day, date, time Line 2: Sunrise, maximum solar elevation (actual solar angle during the day), sunset Line 3: Civil dawn, local time at maximum solar elevation, civil dusk Line 4: Lunar phase, arrow showing that it is rising, days since new moon |

 |
| UTC and position display Line 1: UTC time, locator Line 3: latitude, longitude Line 4: Altitude, number of GPS satellites |
 |
| Dual time display with local time, UTC time, and locator |
The post “Yet another Arduino clock” first appeared on the LA3ZA Radio & Electronics Blog.
Yet another Arduino clock
Does the world need more Arduino clocks? Maybe not. But I needed another Arduino project as I had made a K3NG morse keyer. I love this keyer because it is unique in supporting a display where you can see what you send.
But I wasn’t using the morse keyer all the time, so I wanted the hardware to serve two purposes. That’s the excuse for also making a clock. Its main features are:
- Controlled by a GPS module outputting data over an RS232 serial interface, and handled with the TinyGPS++ library
- Shows raw GPS data such as UTC time and date, position, altitude, and number of satellitess
- Shows derived GPS data such as 6-digit locator
- Finds local time and handles daylight saving automatically using the Timezone library
- Finds local sunset and sunrise, either actual value, or civil, nautical, or astronomical. The library is Sunrise.
- The clock also gives local solar height based on the Sunpos library from the K3NG rotator controller.
- Finally, the clock also provides the lunar phase based on ideas found here and using a reference new moon on 11 November 2015, 11:47 (UNIX time 1447264020)
|
Local time, solar and lunar state Line 1: Local day, date, time Line 2: Sunrise, maximum solar elevation (actual solar angle during the day), sunset Line 3: Civil dawn, local time at maximum solar elevation, civil dusk Line 4: Lunar phase, arrow showing that it is rising, days since new moon |
|
| UTC and position display Line 1: UTC time, locator Line 3: latitude, longitude Line 4: Altitude, number of GPS satellites |
|
| Dual time display with local time, UTC time, and locator |
The post “Yet another Arduino clock” first appeared on the LA3ZA Radio & Electronics Blog.
SatNOGS lives
The 3D printed satNOGS rotator that a few of us are building lives. Its a big deal for us as its taken us a while to get to this point. There’s still quite a few things to sort out but its good to see the thing running. Here’s the proof


