Posts Tagged ‘amateurradio.com’
 The ARRL Radiogram, Part 1
 July 13th, 2012 |
  Author:
  Who knew the ARRL radiogram could be so easy to send and receive — and so enjoyable? All those old-time NTS operators, of course! The National Traffic System — the “Relay” in the American Radio Relay League — has been around since 1915, yet never have I had the courage to take part until now. I wish I’d done it sooner. My son, a ham for only a month, has already passed two radiograms of his own! How about you? Would you like to give it a try?
 The first step is to find a net that is part of the NTS. I found one by searching the ARRL database (click here) for a “Section Net” in Minnesota. Unfortunately the database is a bit cluttered, so it may require a bit of patience as you sift through the listings and tune around listening for a listed net. But that’s not a bad way to start, really. Patient listening will get you far in this hobby, especially when you’re trying to learn something new.
Once I found the MN Section Phone Net on 3860 kHz I listened to a few sessions before checking in. My biggest fear was that I might be asked to receive a radiogram without understanding the procedure. But I didn’t have anything to worry about — surprisingly, very little traffic is actually passed these days. The same is true of the SD NEO Net which immediately follows the MN Section net on that frequency.
We need more radiograms in the system. It doesn’t matter how trivial your message is, honestly. Know somebody who has a birthday coming up? Send him a radiogram! It is a novel way to send a greeting, and it helps keep the NTS running the way it’s supposed to. As the ARES EC for my county I have a vested interest in the proficiency of the NTS, which works closely with ARES during a disaster. But I digress.
 To learn how to send and receive a radiogram I turned to The ARRL Operating Manual For Radio Amateurs. The chapter on traffic handling is very well written; read through it a couple of times and you’ll be ready to handle radiograms by a voice-mode. CW is a little tougher because it involves unique prosigns and Q-signals — the book is indispensable as a starting-point, but I’m still not ready to check into a CW traffic net quite yet. I’m listening when I can, though, and learning.
Before passing a radiogram in the NTS, I practiced sending and receiving a test-radiogram with my son on 2 meter simplex. Then I practiced sending a test-radiogram to the Yellow Medicine County ARES Training Net on our local 2 meter repeater. We were ready to do it for real. On the next Training Net my son sent me a bona fide radiogram bound for his friend in Virginia. No turning back now — I couldn’t let my son down! The next chance I had to put it into the NTS was with the SD NEO Phone Net, so I tuned in, gulped, and took the plunge. Pretty soon the radiogram was on its way and I was grinning. This is easy!
In my next post I’ll describe how to compose a radiogram. Obviously I’m new at this, but that also means some of these things are fresh in my mind. I hope it will help one of you get on the air and send a radiogram!


Heartwarming: My Son Takes My Old Novice Callsign, KAØCEM

Novice Station KAØCEM, circa 1978.
Today my son, Antonio, was granted my old Novice call sign from 1978: KAØCEM. He has wanted this call sign ever since he began studying for his Technician license. What a moving thing this is to behold my son showing such honor to his father, if even in such a trivial matter as an amateur radio call sign. It gives me pause to contemplate my relationship with Antonio and the man he has become.
Back in 1996, when he was born, I could not foresee the year 2012. I’ll never forget that day when we came home from church to hear a message from Antonio Maset, the director of our adoption agency. Our hearts leaped to hear him say that a baby boy had been born the night before in Guatemala City. Mr. Maset said he would call back later that evening. We spent the afternoon with another adoptive family with a boy from Guatemala, and my wife and I looked at each other in awe when the mother told us we should have a name picked out when Mr. Maset called us back. Watching her boy and imagining a son of our own like him, our minds whirled as we tried to grasp the magnitude of what was happening.
When we went home and waited for the phone to ring, the minutes crawled by like hours. Finally, the phone rang and my wife and I each picked up. Antonio Maset was on the line with Helen de Rosal, the lady who ran the home where this little baby would spend his early days. We eagerly told them that we did indeed want to adopt this little baby, and we told them we wanted to name him after Mr. Maset. Thus was my son named Antonio before he left the hospital that day. Five months later, after our lawyer in Guatemala City finalized the adoption with the courts, I flew to Guatemala to bring Tonito (as we called him then) to the American Embassy for a visa. And a day later, I delivered him into my wife’s loving arms at the Minneapolis-St. Paul airport as my daughter and a host of smiling friends and relatives looked on.

Antonio’s last lab in book one of the Electronic Learning Lab: a frequency meter using 555 & 4046 chips.
Now Antonio is sixteen, and he has chosen my old Novice call sign as his own. As heartwarming as it is, this symbolic gesture reminds me of far more important things about my son. Most importantly he has given himself to Jesus Christ; as a Christian he is as much my brother in the church as he is my son. He has grown up to be a respectful, hard-working young man who disdains teen culture and loves ham radio because he gets to talk with adults who treat him as an adult. He adores his sister, respects his mother, and honors me not only as his father but as his homeschool-teacher. He keeps up with his chores, and he willingly tilled and planted the garden this year. He loves playing classical guitar, riding and training horses, and reloading various kinds of ammunition.
And now, he’s a ham radio operator — with my old Novice call sign. He wants to master CW, but until then he is active on 2 meter FM and 10 meter SSB. He has registered as an ARES operator, and last night he even passed his first radiogram on the Yellow Medicine County ARES Training Net (a radiogram that I need to pass along on the MN Section Net today!). Not bad for being a ham for only one month!
I pray that God will guide Antonio as he continues to grow in wisdom and stature. Son, may you always keep amateur radio and your other pursuits in their proper place, and strive above all else to bring glory to God as you seek to know him and love him — not only to live well, but to die well.


The $20 Software Defined Radio
Despite my interest in boat-anchors I do find myself peeking ‘over the wall’ from time to time and taking a look at new and emerging technologies. After several demonstrations from friends I had become convinced of the incredible potential of software defined radios and even found thinking about owning one … one day.

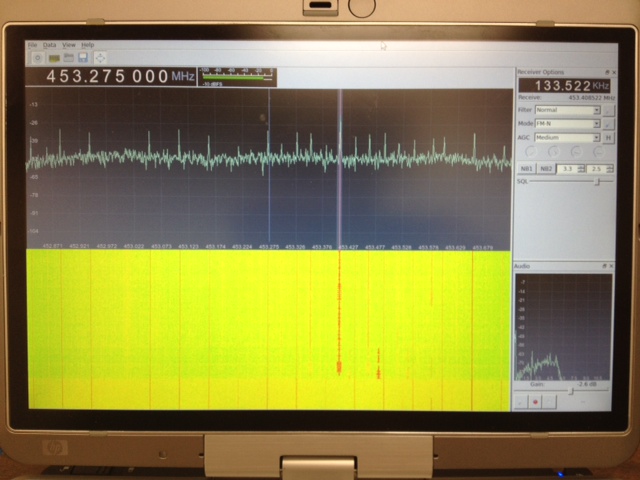
Software (Linux) : After poor results with the software running on MS Windows I moved across to Linux and got it working well there. I can’t point you to a single howto for this because I used several different guides and tried a few things before it started working. The most helpful, and probably all you really need, are the build-gnuradio script which gets hardware support and gnu-radio running and the “Getting Started With RTL-SDR” page by Tom Nardi which covers installing Gqrx. All the software used is in development and requires familiarity with the command line to install and use at the moment.
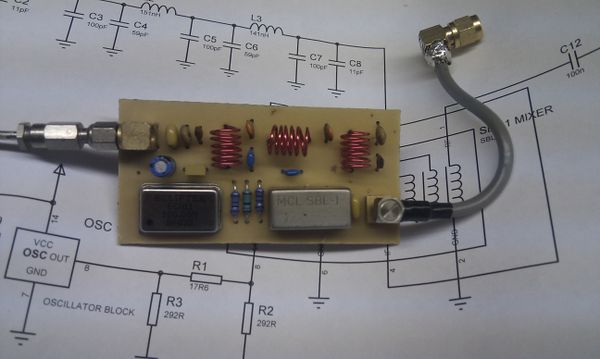
Update : Thanks to a link from Neil W2NDG to an EBay sale I’ve been able to track down a pre-assembled HF up-converter on this page : New HF Converter Kit for the SDR Fun Cube Dongle The price seems to be 45 euros, or about $55 US.
The KARS 2012 Summer Field Day Video
It took a little while but I finally got the video for the Katy Amateur Radio Society summer field day together. I didn’t shoot as much video or as many photographs this year as I actually spent time a fair amount of time operating for a change!
Hopefully it will still be an entertaining, if short, reminder of those two days in June.
Katy Amateur Radio Society – Summer Field Day 2012 from Owen Morgan on Vimeo.
 Posted with Blogsy
 I Posted This Using 40 Meters!
Wow! Would you believe I’m posting this by email using WINMORE and Winlink 2000? That’s right, the words you’re reading were transmitted over HF.
My laptop is hooked up to my Kenwood TS-440S with a DigiMaster Pro+, and as soon as I finish this email I’m going to send it over 40 meters. RMS Express will send it off to a Radio Mail Server (RMS) station, which will then send it over the Internet.
For all you CW lovers, I’m still with you. This technology doesn’t hold a candle to the feel of a key in my hand! But it is tremendously valuable for ARES work, no doubt about it. If you lose cell phone, long distance service and Internet in your area during a disaster (as happened just a few days ago up on the North Shore of Lake Superior during the catastrophic flooding in Duluth), this is the only way to get an email out — and email is perhaps the single best way to convey detailed information to the outside in a situation like that. The software is free, and it’s easy to use. What a great way to cover that “extra mile!”
That’s all I have time for right now because I have a bunch of things waiting for me that are more important than ham radio. But I wanted to take a few minutes to give this a whirl since I just got my WL2K account last night before hitting the sack. Have you used Winlink 2000 to some good purpose, perhaps in an emergency? If so, please share your story.


Inexpensive Programming Cable for Kenwood Mobiles


I bought this HOSA cable to connect my Kenwood TM-D710A 2M/70CM ham radio transceiver to my shack computer. Hosa advertises this cable for use in connecting a computer to various electronic musical instruments. They need to widen this recommendation – the cable will work on any device that uses a 8-pin mini-DIN connector for an RS-232 port that is wired in the standard Apple layout (crossover of data & control signals from the DB-9 end to the mini-DIN end).
I’ve seen cable from other vendors for this purpose, and some of the prices are just nuts (Kenwood wants $38 for an equiv. cable!!) and the construction quality of some of the other cables I’ve looked at is a bit suspect. The Hosa cable is well built with good strain reliefs on both ends & uses good quality shielded cable. That last item is very important when the cable is to be used in a radio shack, since one does NOT want to get RF feedback back into the radio’s control ports, especially when you are doing packet radio.
I’d HIGHLY recommend this cable to any ham that has a radio or other equipment that requires such a cable – it is a HIGH quality cable at a very attractive price.
Since the Kenwood TM-D710A takes the same cable as the TM-V71A, I figured this was the solution for me. I went with the longer version, though: the $12.75 Hosa DBK-110 10 Foot Synthesizer Controller Cable, 8-pin Mini-DIN to DE9
To make serial cables work with my laptop I need a serial-to-USB adapter. These adapters have a chipset in them that require a driver on your computer. The two most common chipsets are the FTDI and the Prolific. I’ve had mixed success with Prolific before (if you’re using Ham Radio Deluxe, stay away from it or you’ll get the blue screen of death!) so I went with the excellent FTDI chipset and purchased this adapter
After the UPS truck arrived this morning I went out to my pickup, plugged these cables together and connected my laptop to the Kenwood. They work great!


How a Cross-band Repeater Helps My Family
Yesterday my son, Antonio, got his call sign: KDØSGL! He’s been putting his HT to use, too. It came in handy yesterday evening when we were at opposite ends of Walmart, and this morning he took it along with him when he went to mow grass for a widow. My daughter dropped him off along with the lawnmower, and I waited to hear Antonio on the radio so she could go pick him up when he finished. We have a couple of “private” channels programmed in our radios for simplex on 2m and 70cm with a sub-audible tone set for CTCSS.

My own personal repeater, sitting in the driveway!
The thing is, our handhelds don’t go quite that far if one of us is indoors — and I was. No problem! Once my daughter returned with the pickup, I just set my new (used) Kenwood TM-V71A to cross-band repeat between our two channels. It is as simple as turning it off and turning it on again while holding down the [TONE] button, so it only took a second. When my son finally called me, he was sending to the high-gain antenna on my pickup on 2m and being rebroadcast on 70cm at 50 watts. Needless to say he boomed in on my handheld on 70cm when he finally called, even though I was indoors. And when I replied on 70cm, the Kenwood in my pickup rebroadcast my signal on 2m at 50 watts, booming in on his handheld. He would have to have been mighty far away for us to have had trouble communicating.
One thing I like about the Kenwood TM-V71A is that you can set it to identify every 10 minutes using morse code when it is in repeater mode. I have it set to do just that. Sure enough, while I was working indoors waiting for Antonio to call, I heard “NØIP/R” a couple times in morse as my own personal repeater announced itself.
My friend tells me to watch out lest I drain my battery doing this, so I’m being careful how much I use my mobile radio in cross-band repeater mode. But for short periods for just my son and I, it is the perfect solution to extend the range of our handhelds.