Posts Tagged ‘Hustler 4BTV’
 Hustler 4BTV continued.
 |
| The days finished product |
Once again we had a nice weather friendly antenna installation day on Monday. It was time to run the coax out to the vertical antenna mounting pole. I chose to run RG8X coax, the main reason for this was I had lots of it on hand. From the house to the the vertical I dug a trench about 16 inches deep and I was fortunate the ground was nice and soft and tree root free.
The RG8X coax was placed in 3/4 inch PVC electrical pipe and at each end for the PVC pipe I affixed ENT tubing. This is very hardy plastic tubing that usually is encased in concrete and used to pass electrical wires in. Now you may wonder why I did not just use ENT for the complete job? The main reason is I had PVC pipe on hand and ENT here is either sold in 10 or 30 foot rolls. If I chose 30 feet I would have a majority of it leftover and ENT is pricey as well.
I now attached the base section of the Hustler 4BTV to the ground pipe but before doing so I ordered from DX Engineering the SO-239 add on kit. This is a fantastic kit made of stainless steel and allows a PL-239 connection and it can be mounted in 3 different directions. Also for all the connections I picked up some pure copper anti seize compound. This allows great connectivity and also very good for all stainless steel connections.
As an added precaution I wrapped the screw located on the bottom of the 4BTV antenna with self amalgamating splicing tape. I also wrapped the PL-239 connection with the same tape. I find water has a way of getting in at the most inconvenient times so I like to make it very difficult for this to happen.
My next step is to install the radials and tomorrow the weather man is telling me it's a great weather day to put down some radials.
 Moving along with the Hustler 4BTV install.
Now I realize in my last post regarding the new Hustler 4BTV installation I said my next step was to dig the coax trench from the house to the base of the antenna BUT rainy days have taken over here. Oh for those of you who read this blog on amateurradio.com site click this link to read the first instalment regarding the new antenna. I have changed my blog address and my last post to the amateurradio.com site did not fully make it.
Now where was I....today I decided to start cutting radial wires. I purchased 150m (500 feet) of 14 gauge stranded green wire and the radial production line began. I am using ring terminals for 1/4-20 bolts and I choose to purchase 10 gauge terminals as I can solder 2 14 gauge radial wires to them. My property is small and I have certain areas where the radials can be 25 feet and other spots only 4 feet. I am putting out as many as 500 feet will allow me and if I need more then I will purchase another roll of wire.......but that stuff is not cheap!!
I have been doing some reading on the internet regarding the radial length. The consensus seems to be if your vertical is ground-mounted (mine is) and the radials are just below the ground (mine will be) then length theory is..make them as long as you can but being in the ground and not raised radials certain lengths are not important.
 And so it begins….
And so it begins
In April I posted that my birthday gift had arrived which was the Hustler 4BTV vertical antenna. Well, this week the installation began and weather permitting I can move closer to the complete installation. We have been having more days of rain than sunshine for June along with some vacation time away from home the antenna had to wait. A few days ago I began by installing the support pole for the antenna. To me this is one of the most important steps as the antenna is no good to me if it falls over, begins to lean or becomes loose and unstable.
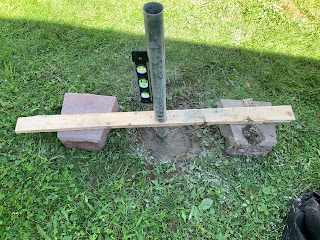
The hole was about 4 feet deep and I used fast-setting concrete, this product is poured into the hole and you then add water and stir. I placed my 1 5/8 metal post in the hole, made it level and waited. I decided to use a metal post used for fences as this was readily available at the building supply store. It was also a lot cheaper than buying a 10-foot piece of metal electrical pipe (called EMT).
 |
| Making certain it's level |
As advertised the concrete was dry in about 40 minutes, having said that I also had to fully understand once the concrete was mixed with water I have very little time to make sure the support pipe was level before things started to harden.
Once finished I added a cap that was temporarily taped in place but will become permanent once the job is complete. At this point that was it for the day as it was very hot and humid out as well I wanted to leave the concrete overnight just to make sure it was fully set.
 |
| The finished product |
The next step in the dig a trench from the house to the antenna base for the coax.


