Posts Tagged ‘QRP’
 Isn’t QRP amazing?
The Royal Society for the Protection of Birds, a British wildlife conservation charity, has a slogan “aren’t birds brilliant!” I think QRPers should start promoting low power operation using the slogan “Isn’t QRP amazing!” Because whenever I try using low power the results simply amaze me.
Until starting on my QRSS adventure I had never tried very low power, sometimes called QRPP. I was inspired by Paul PC4T who yesterday wrote about using WSPR on 20m using 50 milliwatts. At the moment I am QRSSing with 50mW on 30m using my magnetic loop, but that still leaves my multiband dipole antenna for some QRPP WSPR experiments.
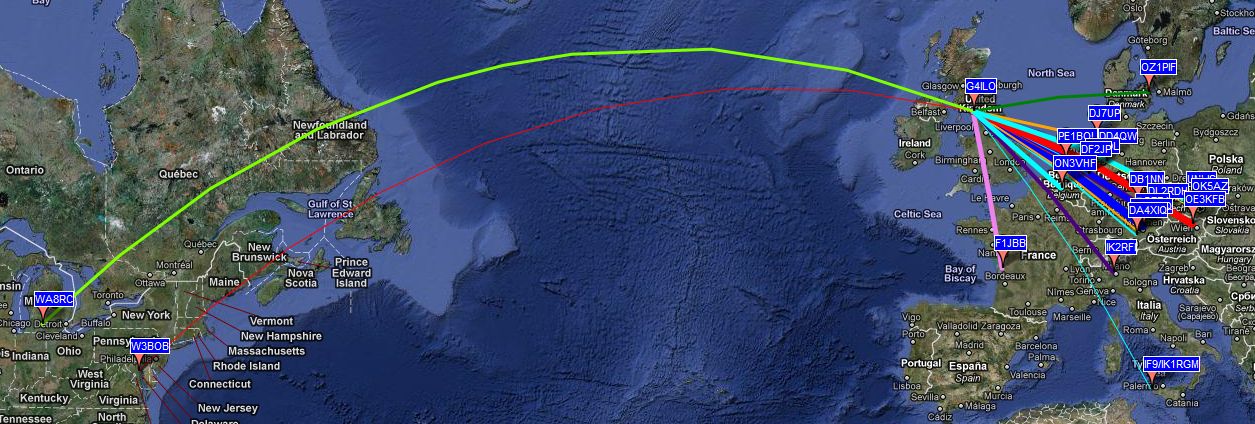
I connected my QRP power meter to my K3, turned the power control to the lowest setting (0.1W) and sent a Tune signal from the WSPR software. The meter read about 65mW. I thought that I would be lucky to get any reception reports at all at that power level so I was amazed to be spotted by around 20 different stations in the space of a couple of hours, including two from the USA. One, WA8RC, was at a distance of more than 5,800km! To be heard, consistently, over that kind of distance across the Atlantic Ocean using less than 100mW to a dipole zig-zagged into a tiny attic is simply incredible.
I think we all use too much power, myself included. We do it because it makes copy easier or because it increases the chance of someone hearing us calling CQ. Even WSPR users mostly use 5W or more, despite the fact that the “WS” in the name of the mode means “weak signal.” Because of our macho desire to have a bigger signal than the other guy we never discover just how far a little power will really go. And that’s a discovery that’s far more enthralling than receiving yet another 599 report, surely.
Isn’t QRP amazing?
QRSS success
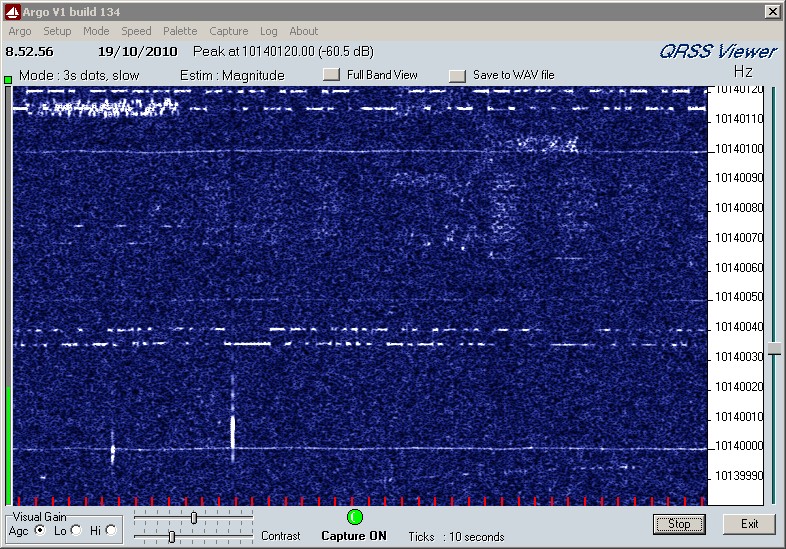
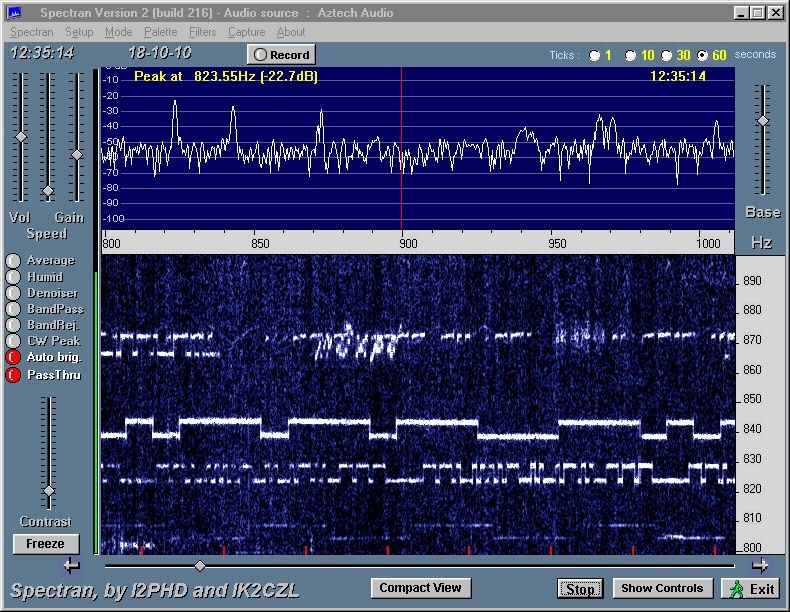
My 30m QRSS beacon transmitter is working very well. It has been on the air for more than a day now and has been received in Italy, Belgium, Holland and the UK. This is a 50 milliwatt signal being radiated by a magnetic loop antenna in the attic! Isn’t QRP amazing?
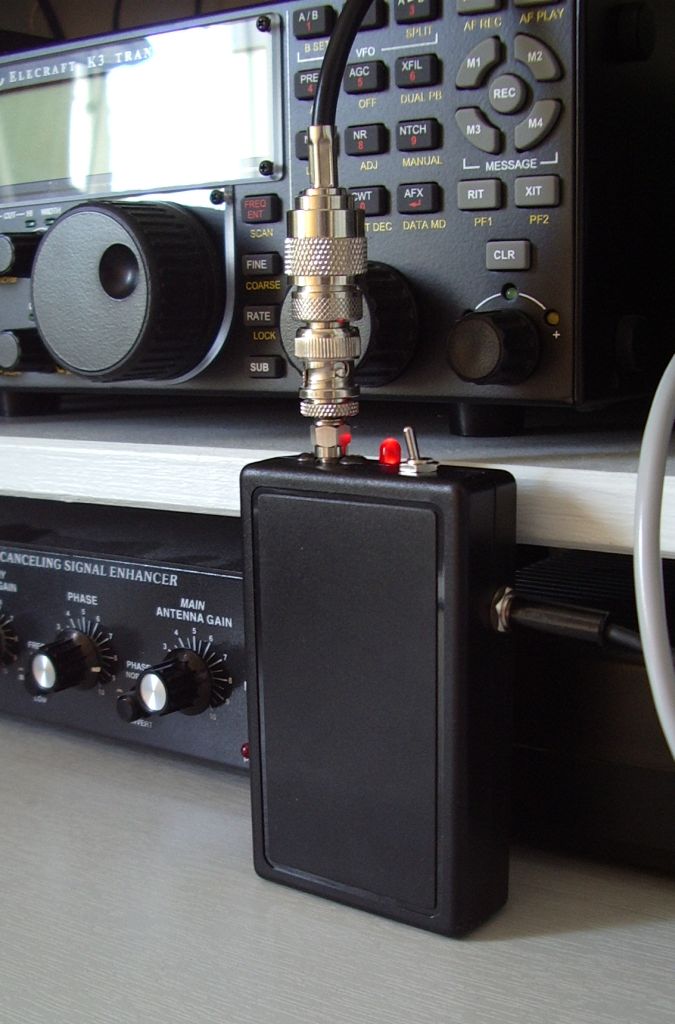
On Sunday I assembled the QRSS beacon into a nice case. This is not my favourite constructional task – give me toroids to wind any day! – but I do like the projects I build to look reasonable. The case I used was one I bought for the abortive 2m FM Fredbox project. I even used the SMA chassis socket I bought for that project as the case wasn’t really suitable for a BNC socket and I didn’t have any of the RCA phono chassis sockets I often use for QRP projects in my junk box.
This case has a compartment for a PP3 9V battery. I had toyed with the idea of using a PP3 battery and building in a regulator to reduce the voltage to the required 5V but space was tight and I was concerned that the heat given off by the regulator would affect frequency stability. Also with a current consumption of 70mA at 50mW output a rechargeable PP3 battery with a capacity of 280mAH would last for less than 4 hours between charges.
I observed that it is possible to squeeze 4 x AAA cells into the same space. Rechargeable NiMH AAA cells have a capacity of 1100mAH. Four of them will provide a voltage of 4.8 – 5.2V which will give 15 hours of operation and require no regulation at all. So that is what I will use.
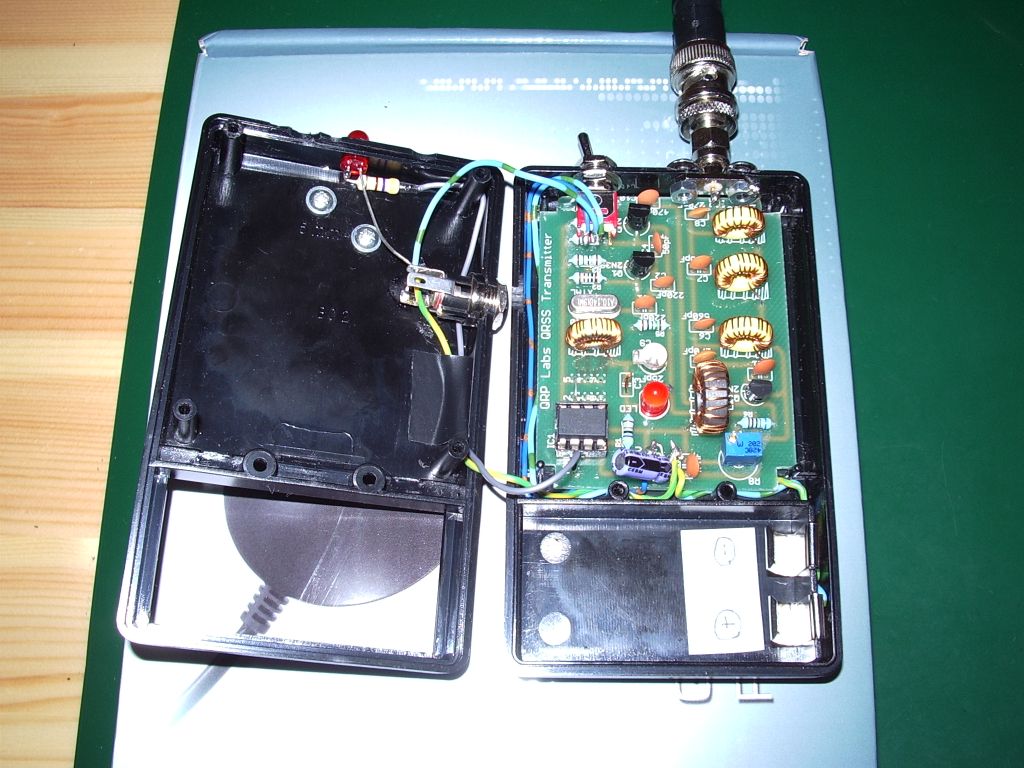
Fitting the project into the box took a bit of time because it was a tight fit in the case. I had to be very careful positioning the antenna socket, switch and external power / charger socket to ensure they didn’t foul any of the components. One of the frustrating things about boxing-up projects is that you can never find a case of exactly the size you want.
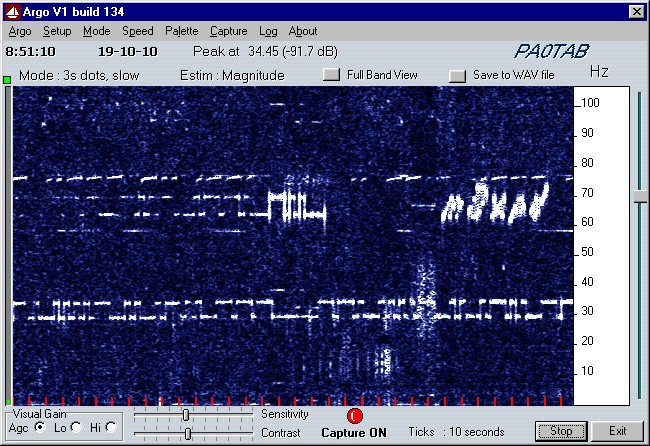
As I didn’t have a suitable battery pack I started off powering the transmitter from the computer. I took a redundant USB cable, cut the end off, determined the +5V and GND leads and soldered a DC power connector to them. That got the rig on the air, where it was almost immediately spotted by PA0TAB. The stability of the transmitter is excellent. There is a slight drift down in frequency by 10Hz or so during the first few minutes of operation. After that it appears to be pretty steady. There does not seem to be any need to encase the crystal oscillator in insulating material or use an oven as some QRSS builders have done.
Later on I dug out a charger for a mobile phone which has a USB socket on it and I switched the power over to that so I could keep the QRSS transmitter on overnight after I had shut down the computer. Nobody spotted me overnight, but I will leave it on for a few days to see whether I can be received further afield than Italy. To be received on the other side of the Atlantic would be a great thrill!
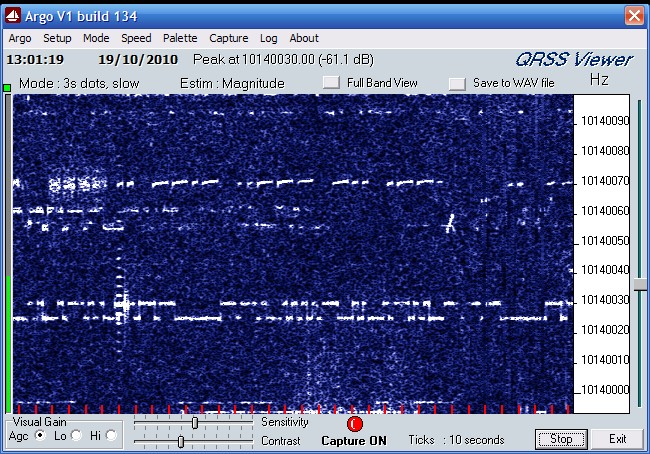
Here is a selection of grabs from stations that received my signal in the last 24 hours:
Keyboard Trays, QRP Rig, and SoftRocks
Time, as they say, has been of the essence of late. So, when I do have time to play radio, I rarely have a chance to write about it. Here are some photos of my latest tinkerings.
Keyboard Trays
Sarah has always talked about using a keyboard tray at work as a part of an ergonomic workstation. Until recently, my work invovled enough variety of computer and non-computer time that I did not think about it. But, after coming home from work with stiff shoulders and wrists, I decided something should be done. While I was at it, I upgraded the HF and VHF/SDR operating positions at K8GU with pull-out trays, as well. These were $10 each at IKEA and pretty easy to install, although I told Sarah that I was grateful that she didn’t witness my contortions to hold them up with my knees while driving the first screws.

Liberating my inner QRPer
Back in high school, I built a Small Wonder Labs SW-40 that I had seen in a QST article. It lived in a variety of enclosures, but spent the last decade in the ugly PC board half-enclosure that looked like a redneck pickup truck at right. I decided to put it into a proper enclosure, being the diecast box at left.

Despite the fact that I made the radio impossible (no room for front panel controls) to assemble the first time I drilled the board mounting holes, I’m pleased with the result. Four dabs of gray epoxy cover the errant holes. I probably could sand and polish those now. The power connector is a pair of Anderson Power Poles.

VHF Softrock and Enclosures
Readers of the blog have seen the screen capture from my new Softrock Ensemble II VHF. Tony does not advertise these on his site because they are not 100% supported with documentation yet. Robby, WB5RVZ has done a great service to the community by preparing step-by-step instructions for most of the SoftRock series. I’m not a step-by-step kind of guy, so I just used his photos showing the locations of the 0.1 uF and 0.01 uF chip capacitors and built the rest my way: mount all chip caps, all SMT ICs, all through-hole ICs and sockets, all through-hole resistors and diodes, all through-hole capacitors, all inductors, and all connectors. It worked right away.
I also have two v6.0 SoftRocks that I built a few years ago while I was in grad school. One of these (for 160) has been a bare board all these years and the other (for 40 and 80) has been living in an ugly little RadioShack black plastic project box. I decided to upgrade them to diecast boxes with external power connectors (also PowerPoles—I’m slowly switching the station over) and a switch for 40 and 80 meters. Here’s the happy family of little radios…

The 160-meter SR v6.0 is on top of the diecast box holding the SR v6.0 40/80. The Ensemble II VHF is on the right. It’s unfortunately too long for either size diecast box. I don’t like the commercially-available box for it. So, we’ll have to see…
Giving Out Points Again!
Nice weather and an open schedule allowed for some radio time this weekend. The QRP ARCI Fall QSO Party made some buzz so I loaded up the gear and headed out by the lake. I put up an 88ft doublet in an inverted vee. I shoot a line over a tree limb at about 40ft and use that for the center and have two 17ft Crappie Poles that I use for end supports. That allows me to reorient the antenna to suit the conditions.

Ground Mount Closeup
One of the things I threw together is a simple mount for the crappie poles. I use a 2ft piece of PVC with a couple bolts inserted at right angles to one another at the base to keep the pole from going all the way through to the ground. The PVC is attached to a 3ft piece of aluminum angle iron that with 3 stainless steel hose clamps.

Crappie Pole End Supports
The poles are pretty limber and take a bit of a bend but do a good job of handling the 24 gauge teflon wire I use. As you can see in the pictures, the mounts do the job and don’t cost as much as commercial counterparts.
So it was a good day and I made a few contacts, enjoyed the outdoors and had a nice picnic lunch with my XYL down by the lake between QSO’s. The bands were pretty decent and I gave points to 20 of the more serious contestants out there.
72,
Kelly K4UPG PB #173
p.s. The Polar Bears will be out and on the air next weekend. Give a listen, hear?
KN-Q10 SSB/CW 5W kit – US$280
Recently there was an interesting discussion here on vk2rh.com about some of the barriers to a wider takeup of the new wave of Chinese QRP or DIY ham radio kitset activity. One of the hurdles of course is language and the current lack of an English language user base to grow and deliver email support for kit builders.
Overnight Adam, BD6CR has made available an English translation of the construction manual for the KN-Q10 QRP kit designed by Ke Shi BA6BF. The KN-Q10 is a four band (3.5, 7, 14 & 21MHz) 5W SSB/CW transceiver kit.

The KN-Q10 4 band SSB/CW QRP kit designed by Ke Shi BA6BF
Adam has also revived the Yahoo group China_QRP -
“I have made a decision to turn this yahoo group into a forum to support overseas Chinese kit builders and merchants. We will see more overseas kit builders and merchants joining.”
John AE5X posted a report about the manual translation earlier today. He also included a link to a discussion thread about the kit on the Chinese language HelloCQ forum. The photos here are sourced from the designer Ke Shi, BA6BF’s own postings and give some sense of the finish and quality of the project. There’s a large number of photos of the Q10 under construction on the thread.

A view of the BA6BF designed KN-Q10
John AE5X noticed the current lack of a schematic & parts placement diagrams and an operating manual for the kit even though this appears to be referenced in the translation. Certainly this version of the manual doesn’t offer the comprehensive ‘hand-holding’ guidance Elecraft, SWLabs or Softrock kit builders are used to. John sees no inherent problem with this – as long as prospective buyers are aware. I see this manual translation as an important first step towards opening up this exciting DIY/QRP activity to a wider audience.
Today on the China QRP Yahoogroup Adam has explained that he is selling the KN-Q10 kit for US$280 which includes air parcel delivery anywhere worldwide and that he accepts PayPal. If you’re keen to buy, it might be best to contact Adam via the Yahoogroup to identify the appropriate email address for that.
UPDATE 15 October: Adam BD6CR has already posted an updated version of the manual and it now also includes photos and links to the schematic diagram of the KN-Q10 and a Chinese language document with photos illustrating the modification to the encoder.

One of the photos from the currently Chinese language KN-Q10 encoder modification guide
Computer Does Not Save Time
Remember when we used to think computers would save us time?

Why did we think the computer would save us time?
I spent the last 6 hours running updates, fixing the problems the updates created and figuring out how to install the updates that would not install automagically. Grrrrrrr!
Think I need some time to play radio, but I won’t be taking a SDR radio with me for a bit. Grrrrr…. need to recover from the 26 reboots and all the time wasted surfing and reading the small print.
Good thing there is a QRP ARCI event this weekend and the following weekend is our Polar Bear Moonlight Madness Event. Grrrr! I’m ready for some CW. CU on the bands!
72,
Kelly K4UPG PB #173
QRSS Keyer
I have operated most of the reverse beacon and weak signal modes but one that I have never tried is QRSS. “QRS” is the Morse Q code for “send slowly” so QRSS means send very slowly indeed. QRSS beacons send your call using very, very slow Morse, which listeners receive using a “grabber”, which is a slow moving waterfall display. If you’re lucky, they will email you a reception report, but you can also look for your signal yourself on one of the various online grabbers.
One day I planned to build my own QRSS beacon. When I found out that Hans Summers G0UPL had produced a QRSS beacon kit I was disappointed to learn that all the kits had been sold at the US Dayton hamfest. However I recently discovered that he had made a new batch of kits and not wanting to wait and find out they were all sold at the G-QRP Convention I ordered one at the weekend. The order process was extremely professional (amateur components suppliers who expect you to email your order and credit card details please note) and the kit arrived this morning.
I opened the envelope and was very impressed to find that the package included a printed copy of the instructions as I had expected to have to print them myself from the website. The PCB is of very high quality. But as I tipped the parts on to the workbench my heart immediately sank.
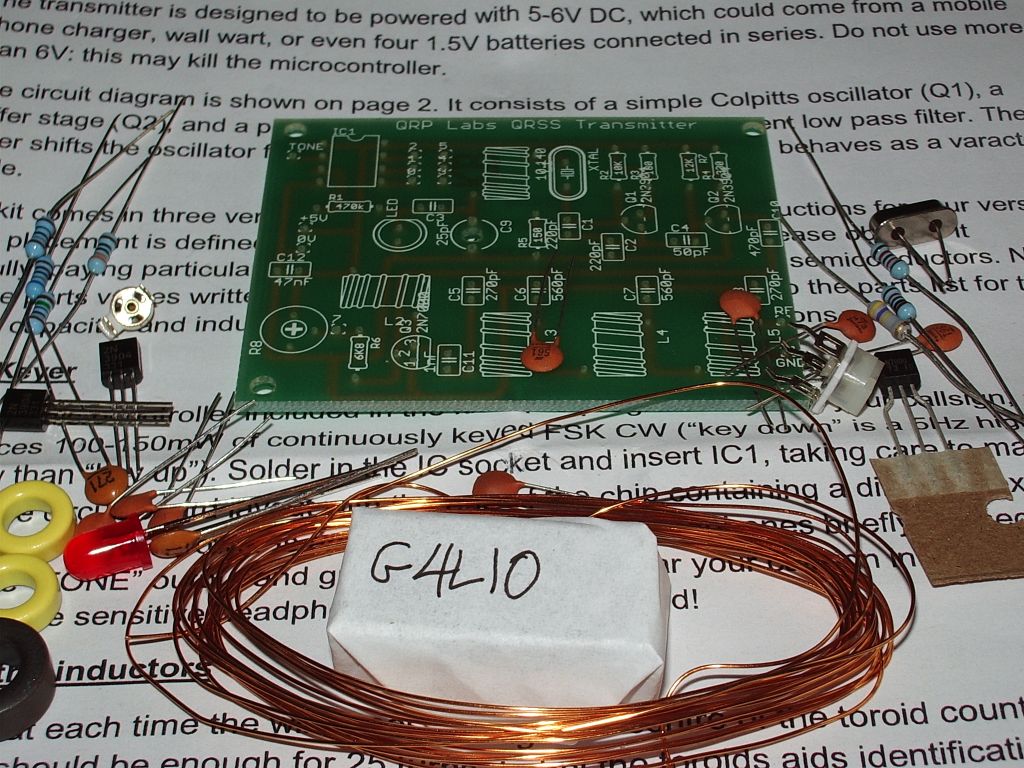
Because the microcontroller chip which keys the transmitter and has been preprogrammed with my callsign was wrapped in a slip of paper on which was written G4LIO, a transposition of my call that often afflicts people on the air as well – I don’t know why. The incorrect call was also written on the jiffy bag the kit came in. I checked the emailed copy of the order and the mistake was not mine.
After an exchange of emails with Hans I installed the chip in its socket, applied power and connected an earpiece to pin 2 which produces an audio tone to verify whether the chip had been programmed incorrectly. It sent G4LIO. 🙁 Why is it always me that gets the kits with the missing or faulty parts?


