Posts Tagged ‘Products’
 A new “touch” paddle for the shack.
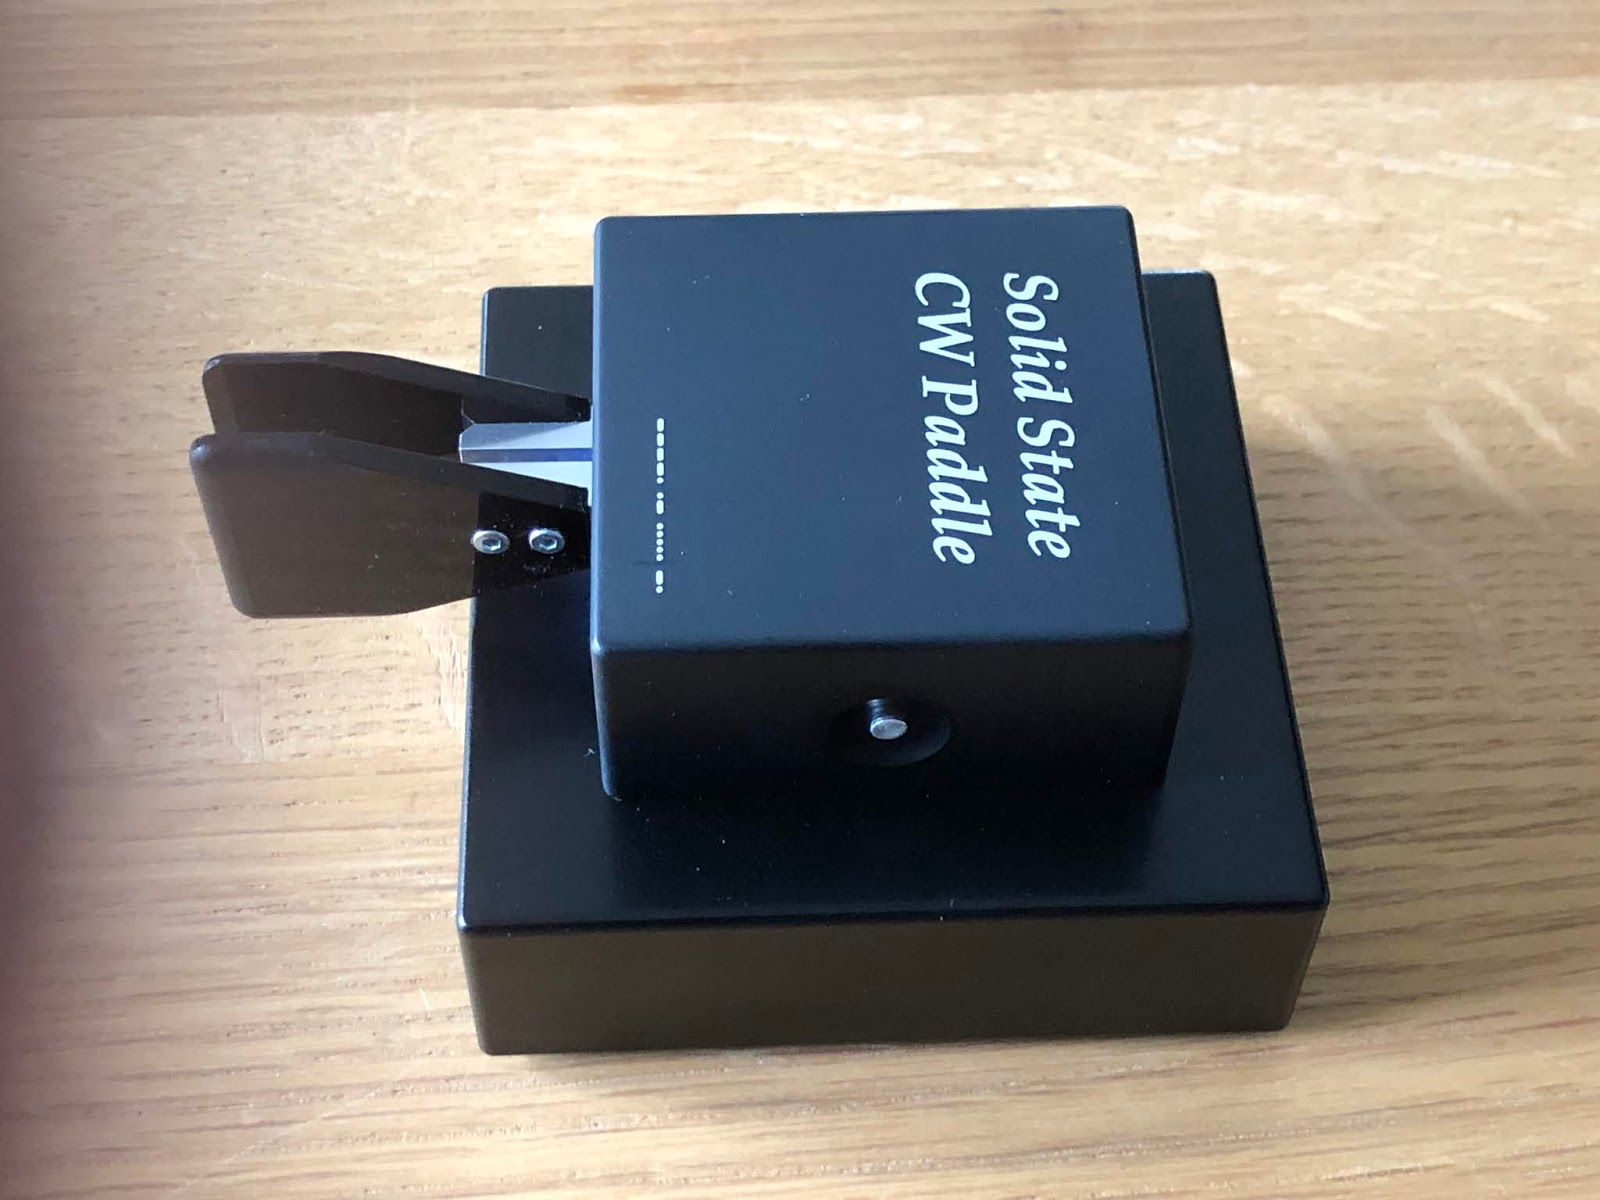
- No moving parts to ware or make a clicking noise.
- You just turn it off when not in use so no accidental dit's or dahs sent when inadvertently touching the paddle.
- There is not maintenance (other than changing the batteries) no periodic mechanical adjustments.
- If you have owned a iambic key there really is no learning curve just turn in on and away you go.
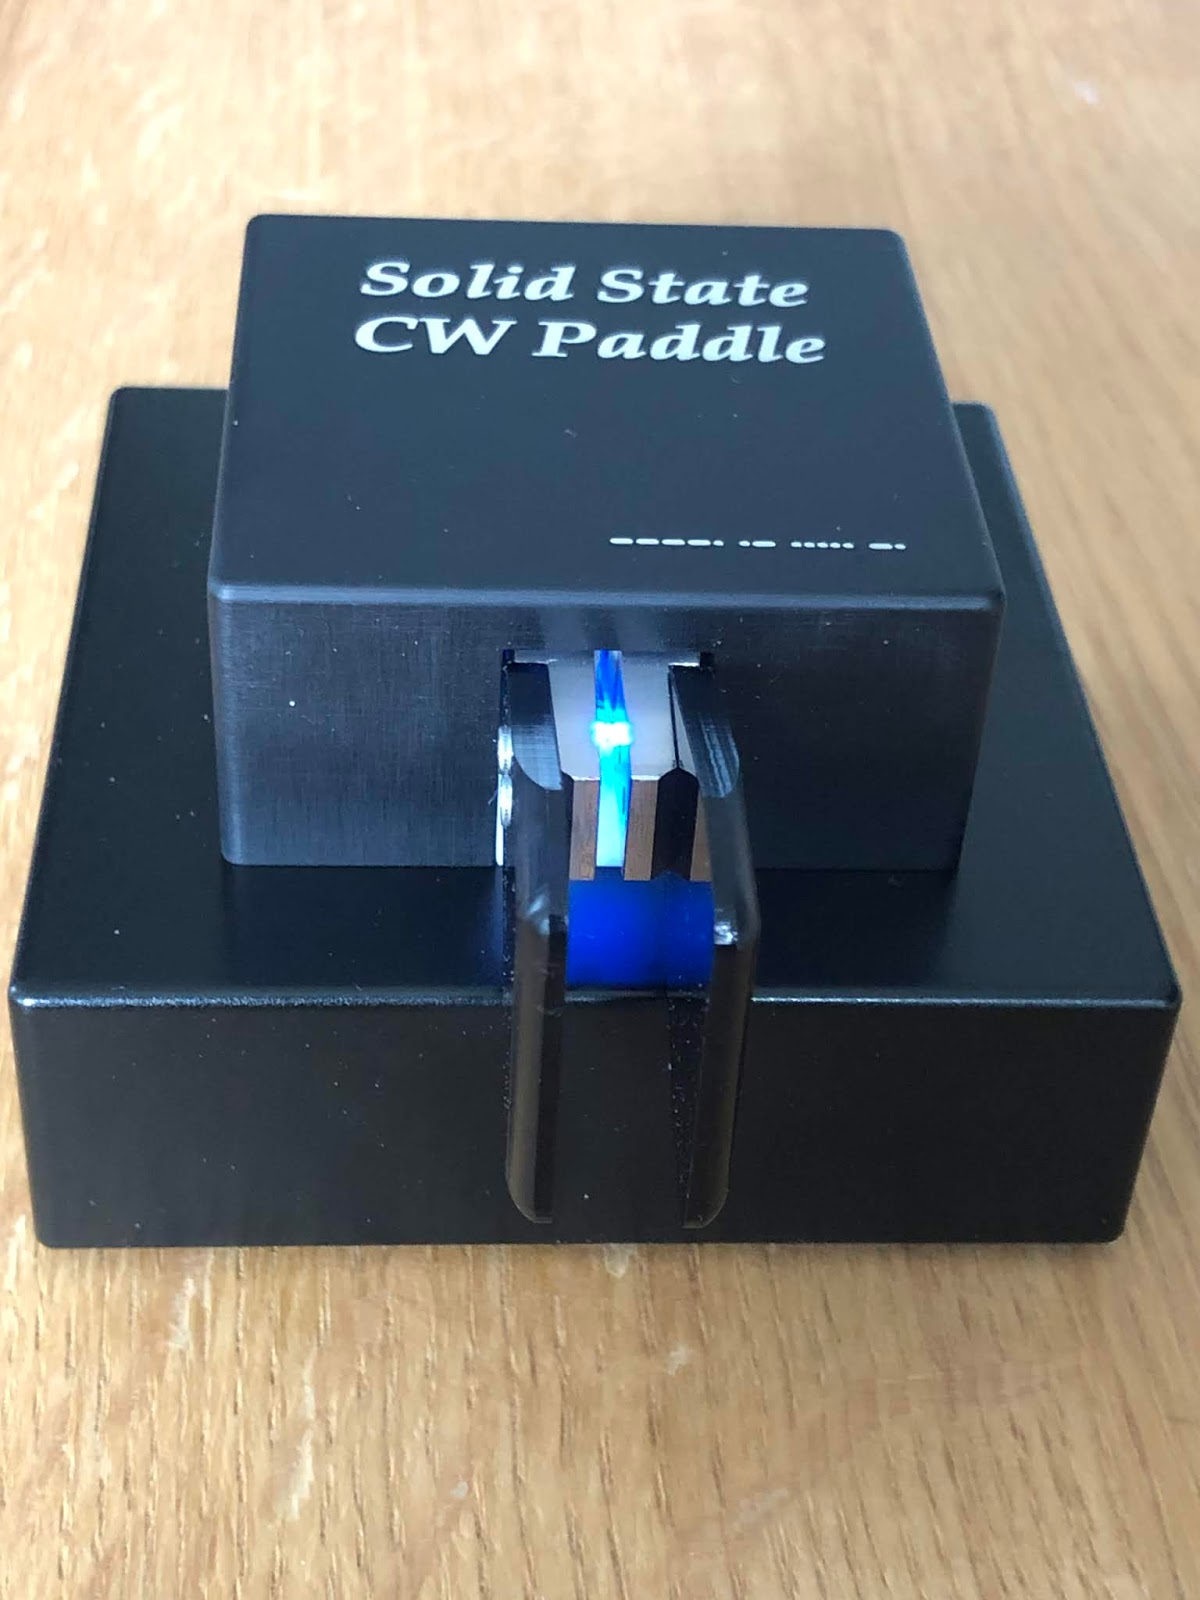
The only adjustment that you may want to do is adjust the touch sensitivity with the key factory set at 10 grams and adjustable to 50 grams in 5 gram steps. Seeing this is a touch paddle depending on your "touch" you may want to increase or decrease the sensitivity. I seemed to be happy with were it was factory set to at 10 grams.
The only other menu change you can do is place the keyer in contest mode and what this means is the keyer will not time out and turn off on you. Normally If you forget to turn the paddle off it will do so after 40 minutes of non operation.
To enter contest mode make sure the key is off then push and hold the on button until the LED flashes then release the button. So in a nut shell to adjust the key paddle touch sensitivity start with the key turned on and hold the power button. To put the key in contest mode (meaning it will not turn off on it's own) start with the key off and hold the power button.
The key is very well made and the base is 1.8 kilo's so it's not going anywhere on your desk as you use it.
The last item I wanted to mention was yes it does take batteries (2 AAA) according to Neno's instructions the battery life should be up to 800 operating hours. The blue LED which is on during operation will indicate low battery life when it gets dim. So you do have an indication when its time to change out the batteries. Finally the paddle is warrantied for 24 months from date of purchase.

Heathkit has a new product out.
 |
| The HM-1002 |
The spec's are below:
Power / SWR / Return Loss Accuracy:
- Meter: 2% nominal for Power, SWR, Return Loss.
- Sensors: Specs vary per sensor model. 5% or better when assembled as directed (no promises yet but we actually hope to beat 2%).
Frequency Accuracy & Precision: 6-digit precision, displaying 100Hz units with +/- 100Hz accuracy for MF, HF, 6 meters. Accuracy and precision always depend on sensor as well as meter. Frequency measurement requires a Heathkit® frequency-capable sensor; one is provided with each meter purchase.
Range: Frequency and power range depend on the sensor model(s) in use. With standard sensor, meter range is 50mW to 2kW power (17dBm to 63dBm) nominal, and 1.6MHz to 54MHz frequency nominal, when assembled as directed. (Subject to change) As with any power device, true SWR handling capability varies with sensor and depends on applied power level, and we will report lab results here as they are confirmed.
Front panel: Sensor/mode cluster, power cluster, SWR/return cluster, color graphic LCD display, calibrated DigilogTM bargraph, configurable visual alert.
Rear panel: Power jacks, sensor jacks, digital jack, audio annunciator.
Enclosure: Hardwood sides, plastic top/bottom, screwless top & front design with integral feet (patent pending).
Size: Approx. 2.2" high x 5.5" wide x 4.75" deep (6 x 14 x 12cm).
Weight: 1 lb (0.5 kg) nominal.
Included: All kit parts, any required assembly hex wrenches, one sensor, silver solder, one six-foot (2m) indoor sensor cable.
Compliance/legal: RoHS. Optional AC power adapter is UL approved. Patent pending.
AC power: Optional AC adapter accepts 90-130 VAC 60 Hz pure sine wave (North American standard), approx. 4 watts. 6ft (1.9m) power cord. (UK, Europe: 50 Hz compatible, but requires a different power adapter.*)
DC power: Accepts 12VDC nominal. Anderson PowerPole jack.
Tools required: Low-wattage soldering iron, wire cutters, needlenose pliers.
RFI/EMC & safety: No switching power supply brick. No mains line voltage (no 120VAC or 230VAC) in the box.
Accessories: (Coming soon) AC adapters, cables, more sensor models.
The cost for all this is 575.00 U.S.
Heathkit has a new product out.
|
| The HM-1002 |
The spec's are below:
Power / SWR / Return Loss Accuracy:
- Meter: 2% nominal for Power, SWR, Return Loss.
- Sensors: Specs vary per sensor model. 5% or better when assembled as directed (no promises yet but we actually hope to beat 2%).
Frequency Accuracy & Precision: 6-digit precision, displaying 100Hz units with +/- 100Hz accuracy for MF, HF, 6 meters. Accuracy and precision always depend on sensor as well as meter. Frequency measurement requires a Heathkit® frequency-capable sensor; one is provided with each meter purchase.
Range: Frequency and power range depend on the sensor model(s) in use. With standard sensor, meter range is 50mW to 2kW power (17dBm to 63dBm) nominal, and 1.6MHz to 54MHz frequency nominal, when assembled as directed. (Subject to change) As with any power device, true SWR handling capability varies with sensor and depends on applied power level, and we will report lab results here as they are confirmed.
Front panel: Sensor/mode cluster, power cluster, SWR/return cluster, color graphic LCD display, calibrated DigilogTM bargraph, configurable visual alert.
Rear panel: Power jacks, sensor jacks, digital jack, audio annunciator.
Enclosure: Hardwood sides, plastic top/bottom, screwless top & front design with integral feet (patent pending).
Size: Approx. 2.2" high x 5.5" wide x 4.75" deep (6 x 14 x 12cm).
Weight: 1 lb (0.5 kg) nominal.
Included: All kit parts, any required assembly hex wrenches, one sensor, silver solder, one six-foot (2m) indoor sensor cable.
Compliance/legal: RoHS. Optional AC power adapter is UL approved. Patent pending.
AC power: Optional AC adapter accepts 90-130 VAC 60 Hz pure sine wave (North American standard), approx. 4 watts. 6ft (1.9m) power cord. (UK, Europe: 50 Hz compatible, but requires a different power adapter.*)
DC power: Accepts 12VDC nominal. Anderson PowerPole jack.
Tools required: Low-wattage soldering iron, wire cutters, needlenose pliers.
RFI/EMC & safety: No switching power supply brick. No mains line voltage (no 120VAC or 230VAC) in the box.
Accessories: (Coming soon) AC adapters, cables, more sensor models.
The cost for all this is 575.00 U.S.
Upgrade to K1EL Winkeyer USB
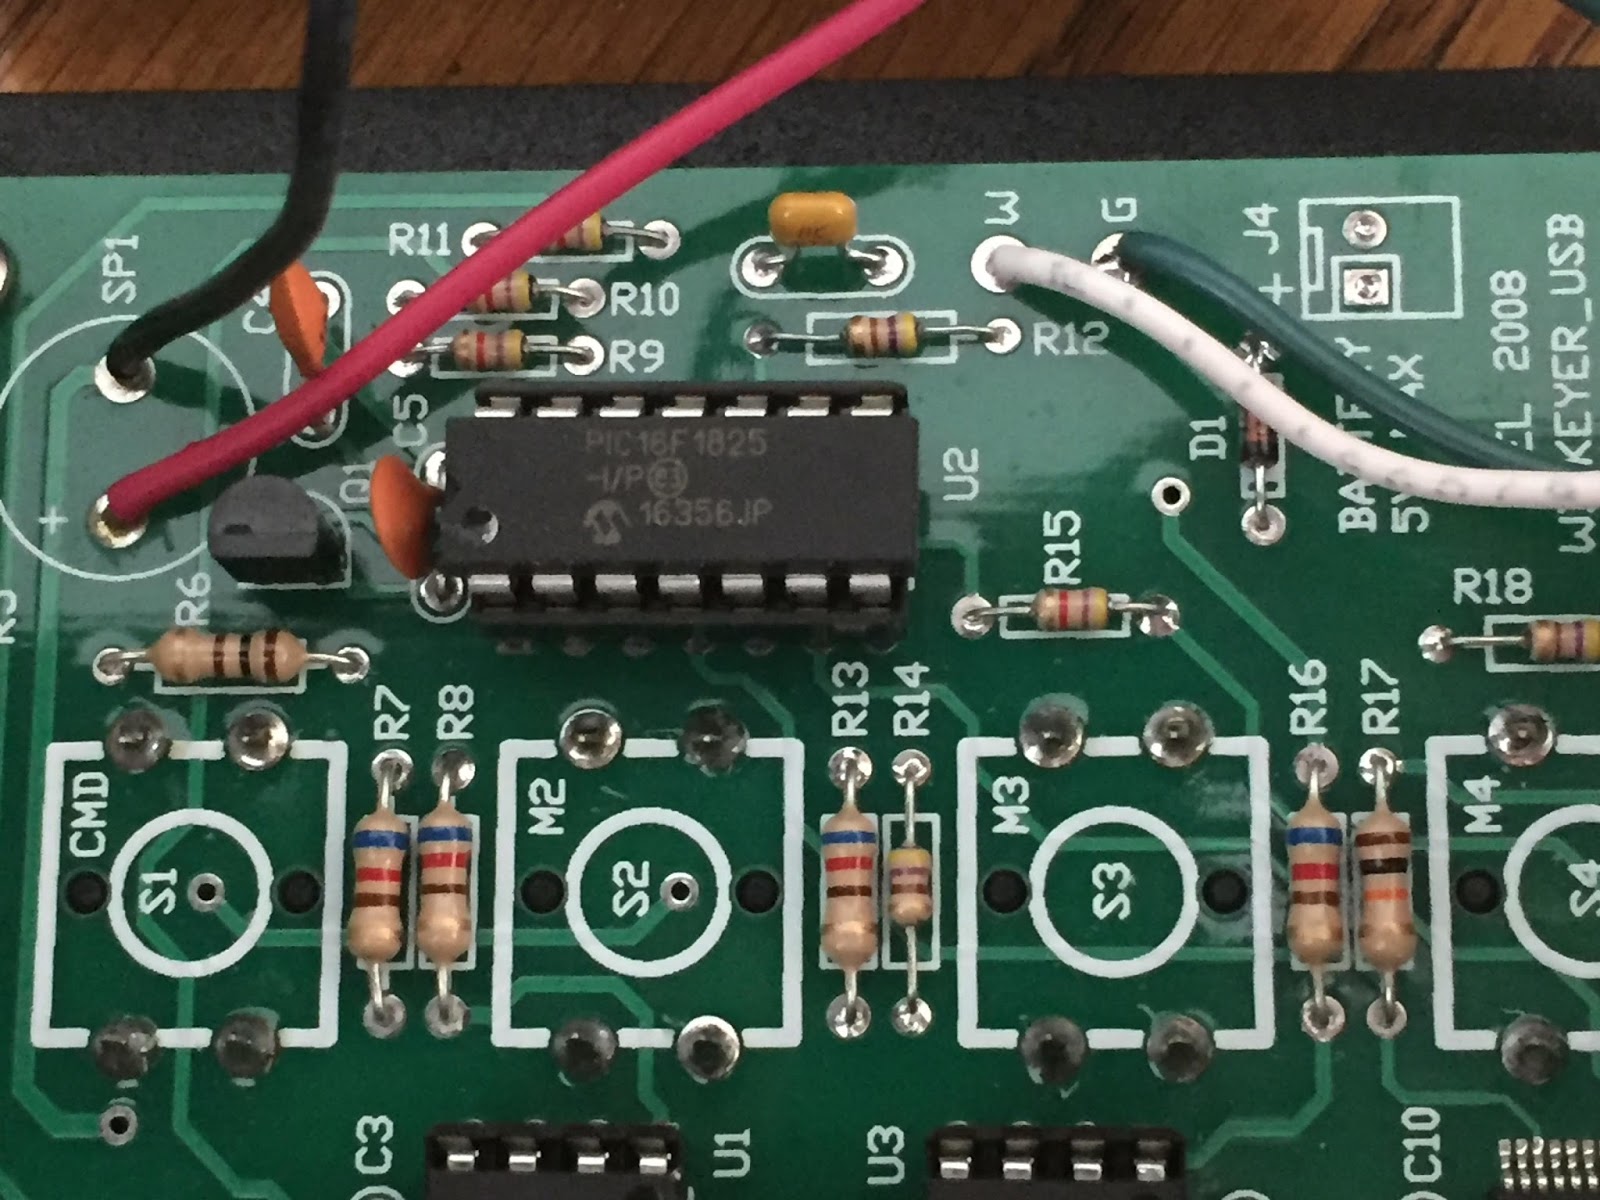 |
| New IC chip installed |
I recently upgraded the IC chip in my K1ELWinkeyer USB to version 3, it was only a 10.00 upgrade that gave me some nice advantages over the old IC chip. It was a very straight forward change out as the IC chip was not soldered in place. One of the main advantages is this IC chip has the ability (via supplied software) to be upgrade over the internet. As new functions become available in the future the upgrade is just a click away. Some of the other new features are:
1. With WK3tools downloadableprogram software you can store messages and retrieve messages. For example in contests you can store the contest exchanges, give the file the name of the contest. In the future when setting up for the contest just download the file to the keyer and your 4 push buttons (that can be preprogramed for 8 messages) can be used for that contest. When the contest is done simply reprogram the keyer with the file for calling CQ.
2. You can custom configure the keyer for 2 separate users or like me if you’re the only one using the keyer…..then have one configuration for contesting and one for QSO’s.
3. You can now adjust the side tone frequency which is not a big deal for me but for some it may be.
4. You can put your rig into tune with just the pressing of 2 of the Winkeyers top buttons the command and PB4 buttons.
5. During the transmission of a message a simple tap of the keyer will stop the message.
6. When and if you operate the unit from an internal battery the battery life has been extended by less drain.
7. Finally on the K1EL’s website under the software tab you will find some great finds. WK3tools, Winkeyer3 test app, WKscan that finds out what comport your Winkeyer is using, WK remote app and a software tools that is in the development stage and according to the website soon to be released a Winkeyer QSO simulator app,
 |
| With added volume and headphone jack |
These are just a few of the changes in the new IC chip to get a full rundown go to K1EL’s site where you can read thingsin more detail.
You may notice from the picture, if you are familiar with the insides of the Winkeyer USB that is I have done some upgrades to the unit of my own. I removed the internal speaker and added a headphone jack, I also added a volume control for the headphones.
Upgrade to K1EL Winkeyer USB
|
| New IC chip installed |
I recently upgraded the IC chip in my K1ELWinkeyer USB to version 3, it was only a 10.00 upgrade that gave me some nice advantages over the old IC chip. It was a very straight forward change out as the IC chip was not soldered in place. One of the main advantages is this IC chip has the ability (via supplied software) to be upgrade over the internet. As new functions become available in the future the upgrade is just a click away. Some of the other new features are:
1. With WK3tools downloadableprogram software you can store messages and retrieve messages. For example in contests you can store the contest exchanges, give the file the name of the contest. In the future when setting up for the contest just download the file to the keyer and your 4 push buttons (that can be preprogramed for 8 messages) can be used for that contest. When the contest is done simply reprogram the keyer with the file for calling CQ.
2. You can custom configure the keyer for 2 separate users or like me if you’re the only one using the keyer…..then have one configuration for contesting and one for QSO’s.
3. You can now adjust the side tone frequency which is not a big deal for me but for some it may be.
4. You can put your rig into tune with just the pressing of 2 of the Winkeyers top buttons the command and PB4 buttons.
5. During the transmission of a message a simple tap of the keyer will stop the message.
6. When and if you operate the unit from an internal battery the battery life has been extended by less drain.
7. Finally on the K1EL’s website under the software tab you will find some great finds. WK3tools, Winkeyer3 test app, WKscan that finds out what comport your Winkeyer is using, WK remote app and a software tools that is in the development stage and according to the website soon to be released a Winkeyer QSO simulator app,
|
| With added volume and headphone jack |
These are just a few of the changes in the new IC chip to get a full rundown go to K1EL’s site where you can read thingsin more detail.
You may notice from the picture, if you are familiar with the insides of the Winkeyer USB that is I have done some upgrades to the unit of my own. I removed the internal speaker and added a headphone jack, I also added a volume control for the headphones.
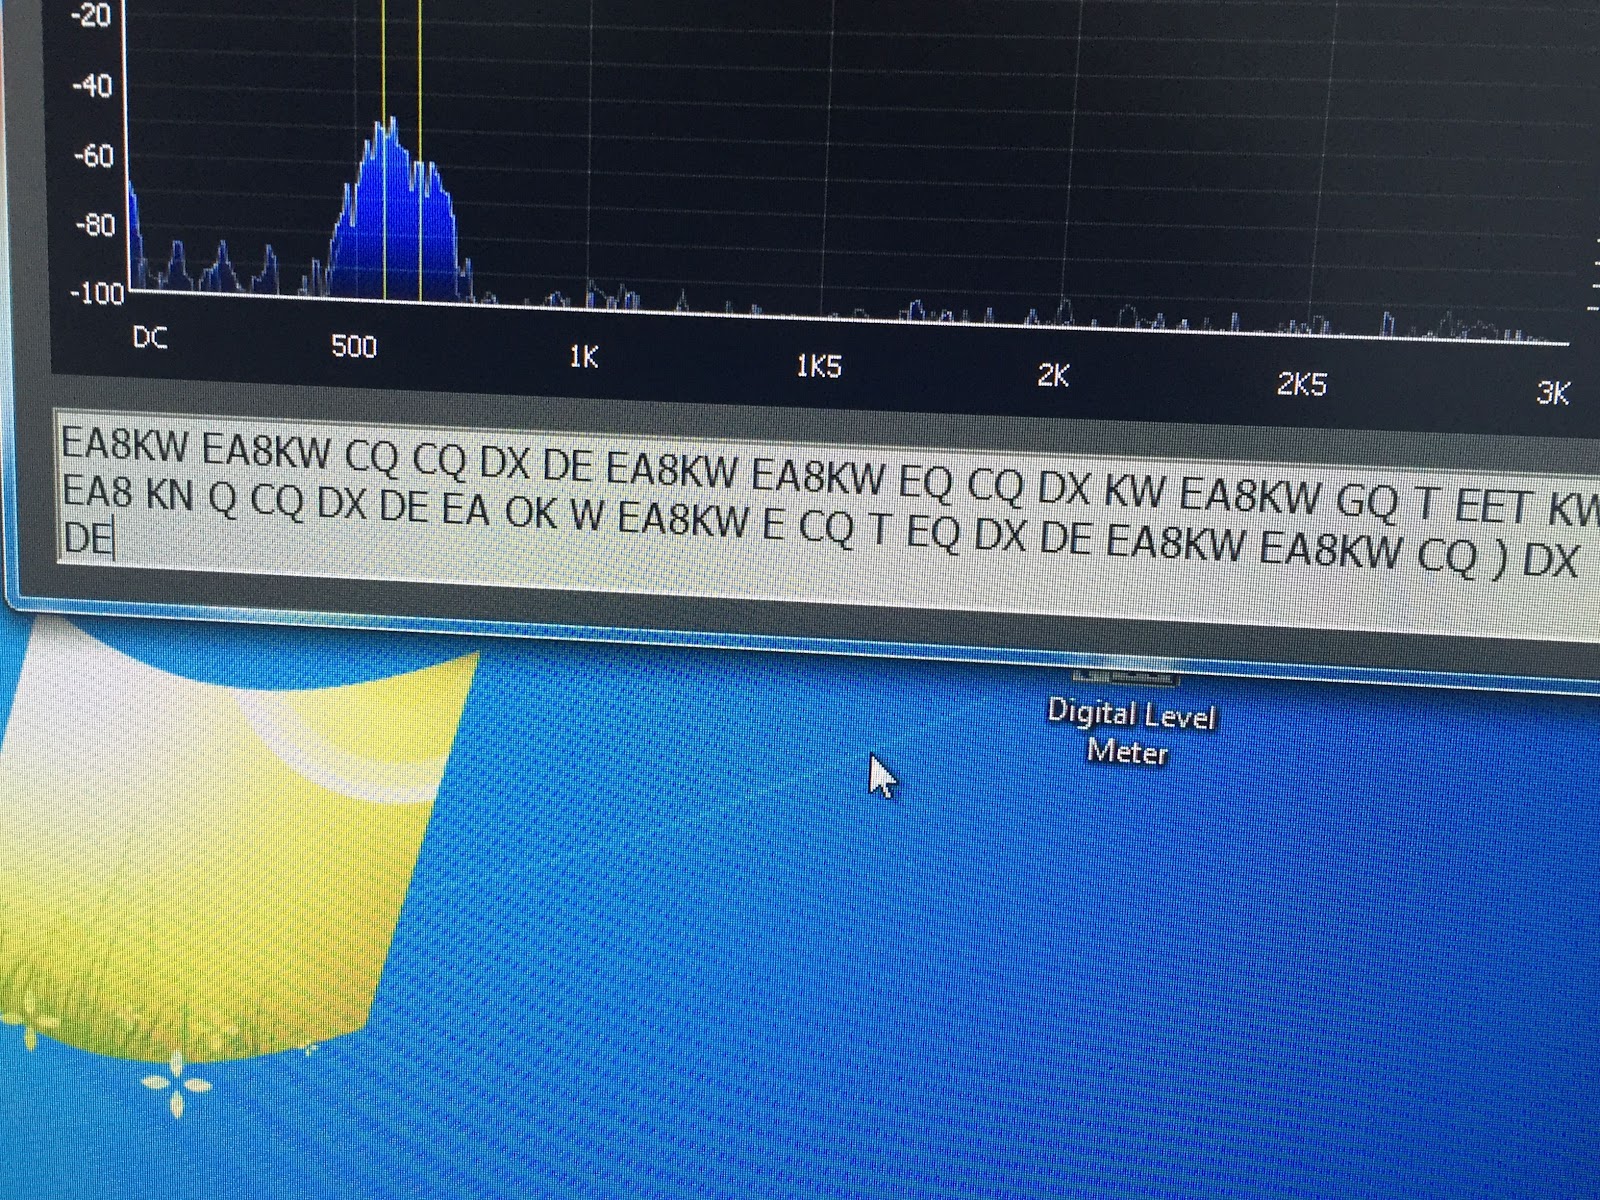
Comparing two CW decoding programs.
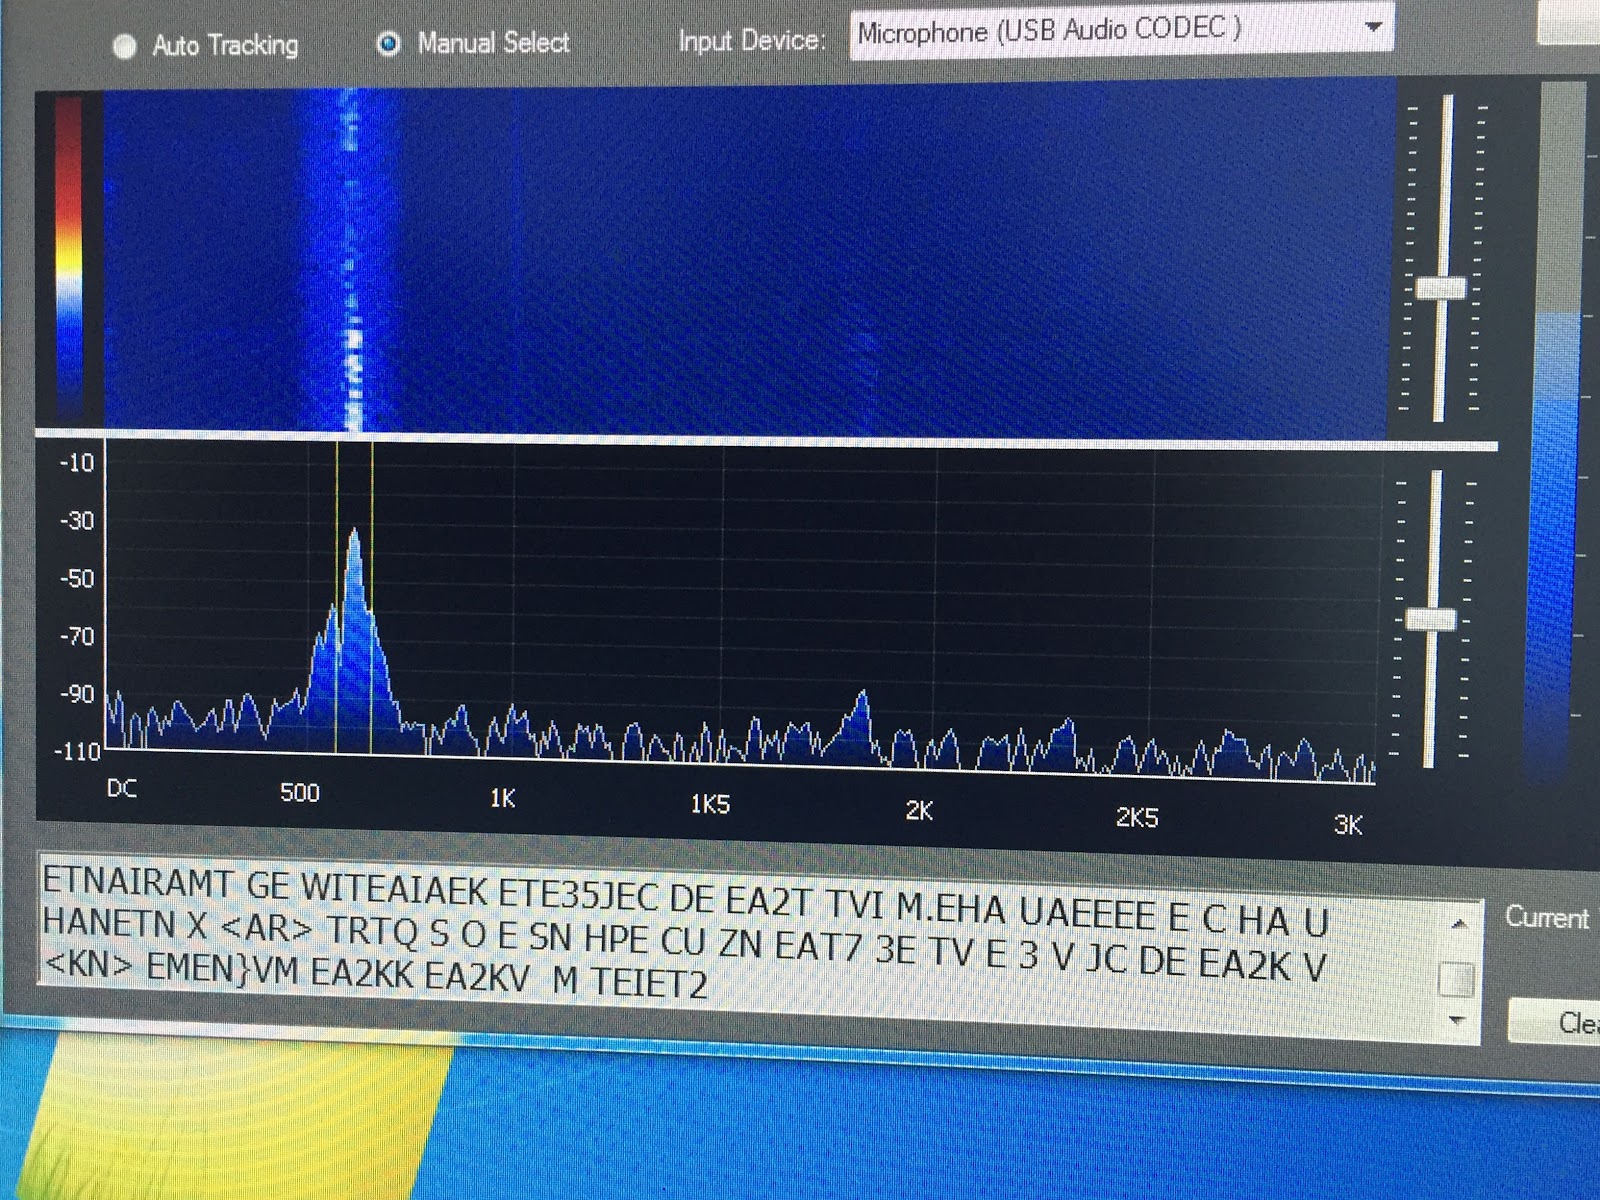 |
| LY3H CW decoder logic program MRP40 compared to CW decoder logic by LY3H MRP40 CW decoder 1. Decodes all speeds up to 60wpm Decodes but not mention top decode speed. 2. Has good documentation No documentation 3. Auto tracking very smooth Auto tracking hunts between long letter spaces 4. Text formatting-format mode works great Only option is manual or auto decode 5. Will not decode when APF is on Will de-code when using APF 6. Great weak signal decode S1 and below Poor weak signal de-code (not using APF) 7. Great email support Upgrades come out regularly 8. See's noise as code sends radium letters Only sends letters not radium noise as code 9. Does have save QSO but awkward to use. Just added cut and paste QSO to word or clipboard 10. Has “always on top” option Just added “always on top” option. 11. Added a mini log book No log book as of yet 12. You can send code At this time only able to read code A more in-depth look at some of the above comparisons: A) Auto tracking- When wanting to decode a CW signal it helps when the program can lock onto a signal. MRP40 will lock onto a CW signal and stay locked on. CW decoder on the other hand once the CW signal stops or has long gap between letter the program starts to hunt small segments on either side of the CW signal for other CW signals. Once the code starts again CW decoder has to relock onto it and you lose some decoding. If slow code is sent you are in a battle of lock and relock of the code. B) Text formatting options- with MRP40 you have the option on how you want to decode. - Correct word spacing…..this will attempt to add spacing between decoded words even if sender is running them together. - Expand abbreviations…..KN, AR and DE to mention a few. - Expand Q codes…self-explanatory. Both of these programs do the job of decoding CW very well, you have more options and customization option with MRP40. CW decoder logic is very easy to setup and in no time you are decoding CW. I have not had a chance to compare both programs in a CW contest situation. The major drawback to each program is….. MRP40…….no matter what test formatting option I used the program when idling would send radium code as it listened to static were as CW decoder logic would not. CW decoder Logic……when the receiving code stopped the program would start “hunting” for other CW signals. This created two issues, the first being if you are decoding slow code I found the program between letters words would start to hunt. When it does this it bounces back and forth from decoding and hunting and your decode is not reliable. The second is if I second CW op appears close to the op you are decoding the program will bounce between the two QSO’s. The major positive of each program is….. MRP40…..it will decode CW that is almost down at the noise floor and do a great job of it too. CW decoder Logic……it will not send random letters when it is not decoding and does a great job of adding the breaks between words and not running them together. Also this program is free. These code programs will always decode what is sent so you must consider if you are reading odd words and letters it may have to do with poor code sending. CW signals that are close to each other (CW contesting) if your rig cannot filter out the one CW signal your decoder will be confused. CW decoder by LY3H free. MRP40 will cost you 50.00 Euro. 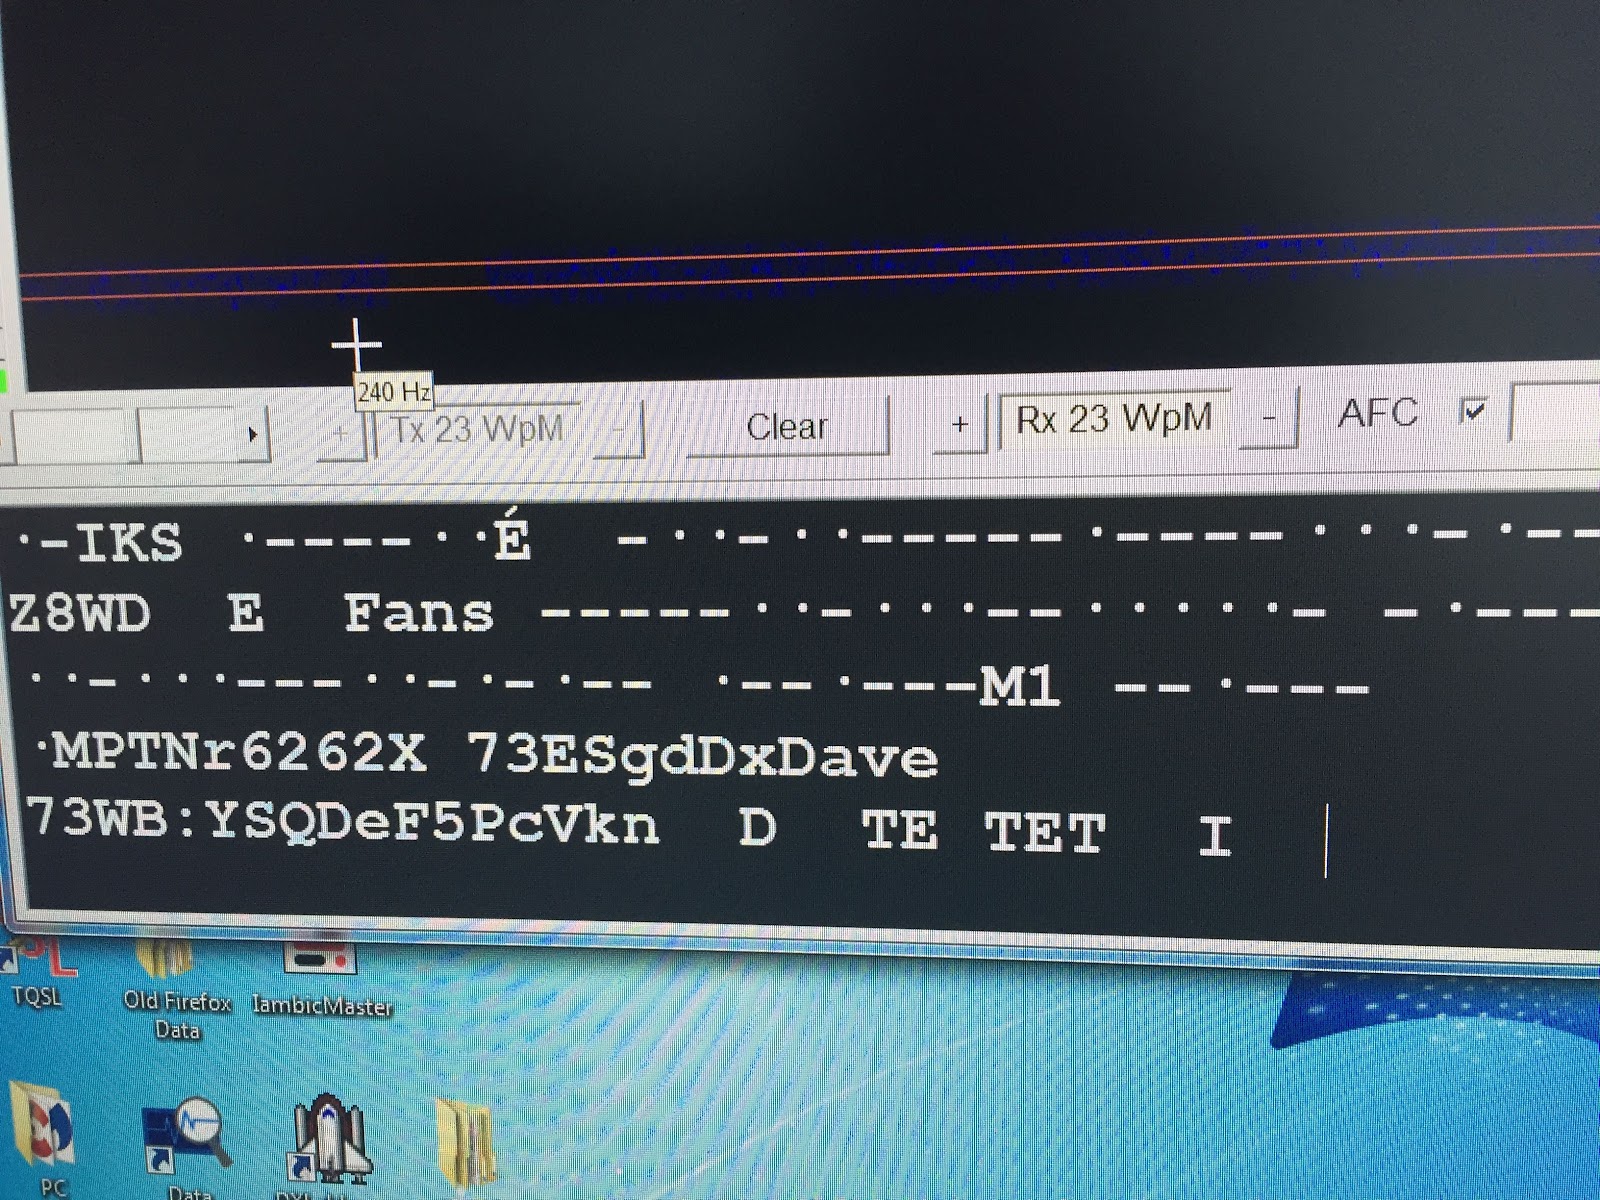 The picture to the left shows MRP40 trying to decode static. |
Comparing two CW decoding programs.
|
| LY3H CW decoder logic program MRP40 compared to CW decoder logic by LY3H MRP40 CW decoder 1. Decodes all speeds up to 60wpm Decodes but not mention top decode speed. 2. Has good documentation No documentation 3. Auto tracking very smooth Auto tracking hunts between long letter spaces 4. Text formatting-format mode works great Only option is manual or auto decode 5. Will not decode when APF is on Will de-code when using APF 6. Great weak signal decode S1 and below Poor weak signal de-code (not using APF) 7. Great email support Upgrades come out regularly 8. See's noise as code sends radium letters Only sends letters not radium noise as code 9. Does have save QSO but awkward to use. Just added cut and paste QSO to word or clipboard 10. Has “always on top” option Just added “always on top” option. 11. Added a mini log book No log book as of yet 12. You can send code At this time only able to read code A more in-depth look at some of the above comparisons: A) Auto tracking- When wanting to decode a CW signal it helps when the program can lock onto a signal. MRP40 will lock onto a CW signal and stay locked on. CW decoder on the other hand once the CW signal stops or has long gap between letter the program starts to hunt small segments on either side of the CW signal for other CW signals. Once the code starts again CW decoder has to relock onto it and you lose some decoding. If slow code is sent you are in a battle of lock and relock of the code. B) Text formatting options- with MRP40 you have the option on how you want to decode. - Correct word spacing…..this will attempt to add spacing between decoded words even if sender is running them together. - Expand abbreviations…..KN, AR and DE to mention a few. - Expand Q codes…self-explanatory. Both of these programs do the job of decoding CW very well, you have more options and customization option with MRP40. CW decoder logic is very easy to setup and in no time you are decoding CW. I have not had a chance to compare both programs in a CW contest situation. The major drawback to each program is….. MRP40…….no matter what test formatting option I used the program when idling would send radium code as it listened to static were as CW decoder logic would not. CW decoder Logic……when the receiving code stopped the program would start “hunting” for other CW signals. This created two issues, the first being if you are decoding slow code I found the program between letters words would start to hunt. When it does this it bounces back and forth from decoding and hunting and your decode is not reliable. The second is if I second CW op appears close to the op you are decoding the program will bounce between the two QSO’s. The major positive of each program is….. MRP40…..it will decode CW that is almost down at the noise floor and do a great job of it too. CW decoder Logic……it will not send random letters when it is not decoding and does a great job of adding the breaks between words and not running them together. Also this program is free. These code programs will always decode what is sent so you must consider if you are reading odd words and letters it may have to do with poor code sending. CW signals that are close to each other (CW contesting) if your rig cannot filter out the one CW signal your decoder will be confused. CW decoder by LY3H free. MRP40 will cost you 50.00 Euro. The picture to the left shows MRP40 trying to decode static. |


