Posts Tagged ‘Elecraft K3’

The numbers are down.

Not really this bad 
It's not ground breaking news to any ham who has had their rig on and searching for contacts that the conditions are not all that great. I have seen the SF index hit over 100 but the low sunspot numbers  are really not supporting a sustained up swing in conditions. I was on the radio this past weekend and was very surprised that my CW QRP signal was not making it to the East coast. That has always been an easy contact for me. I then tried to contact a K6 station calling CQ and I was not even heard! There is this very dusty knob on my K3 and it's called "RF power" knob. I am going to be venturing beyond the QRP limits and jacking things up to 10 watts. It's not a real drastic move but I want to make sure I am not causing any RF issues here at the condo. Having said that I have read of ham's who are in condos using 100 watts without any issues. I'm not going to take that change, not into the "lets see what happens" way of doing things.  So let's see what doubling my output from 5 to 10 watts nets me.

Slow time on the bands.

I took an extra few days off over the Easter weekend with the intention of getting some solid radio time in. As it turned out the only day I had was yesterday afternoon most likely because I knew my vacation was coming to an end and the plan was to get on the rig! I was planning on doing some JT-65 as with the solar conditions not so great and my 5 watts signal to boot it seemed to be the logical move. Before getting on the radio I looked up a website called Band conditions. This is a very nice site that gives you up to date band conditions via nice easy to read bar type graphs. Each HF band is displayed and is update automatically every 30 seconds. There is an arrow for each band graph that is either in the Red, Yellow or green portion of the bar graph……you can guess what color means what. Seeing that 20m and 30m seemed to be the go to bands I booted up WSJT-X and ended up finding 30m not so great but 20m was booming with lots of European stations.  Unfortunately my calling CQ was not being answered. I did check with PSK reporter and my signal was being spotted all over the U.S as well as some places in Europe.  I then closed down WSJT-X and opened Fldigi and now the plan was to give PSK 31 a whirl on 20m. I was not disappointed as there was lots of signals in the waterfall. After spending about 45 min’s on the band I only was able to get the attention of one Spanish station to hear my QRP signal……BUT conditions seemed to change and we never completed the QSO. One thing I took away from the time on the radio is that I have to review what PSK-31 macro’s and simplify some and rename some of the buttons to make them more user friendly to me. 

Can this be done??

I have been using a PC program called Morse runner and going to the LCWO website to increase my contest cw receiving speed and keyboard skill. I wanted to take it up a notch to what I consider a must have contest skill. The skill I am referring to is the ability to exchange contest info with my Iambic key ( Begali Contour) and not only the keyboard. Both Morse Runner and the tools from the LCWO site have been a great help with improving my keyboard and receiving speed and moving it forward. What I'm looking for and asking my blog readers input on is......a PC program similar to Morse Runner were I can use my key to interact with the program. Morse Runner sends you a call, you enter the call in the program (it checks you have enter proper call) then a contest report comes your way you enter it and the program sends your report. If all the info checks out as correct you are able to move on the the next contact. Does anyone know of a PC program out there were I can use my key and not keyboard to brush up on my key proficiency within a contest environment.

Oh and by the way of a radio report..... I was on the rig yesterday not much going on the CW portion of 20m and 30m during the early part of the afternoon. I ventured back around 22:00 UTC and 20m was sending some DX my way. Some of the stations heard but I was unable to contact were LZ300MSP (that call is a key full), T77CS, EA3AIZ from Spain struggled to hear my QRP signal but there was just to much QSB at his end. All was not lost DL3DXX heard me in Germany and gave me a 559 report.

One step closer to being a ham techie!


 Now that I can use one Signalink USB unit on either my Elecraft K3 or KX3 I thought it was now due time to investigate operating my rigs remote from my laptop using my router. I have read many ham who do this  so it’s not anything new…BUT….for me this is cutting edge and can be “kinda fun” to get it up and running.  I can across software called Teamviewerwhich allows you to remotely access your PC from another PC. Once logged on and a connection is made you have (on your remote PC) a mirror image of your home PC. You have the same control over your home PC as if you were sitting in front of it. The software allows you to access your Windows PC via a Mac and so on. This Windows/Mac cross over was great for me as my home PC is Windows and the laptop is a Macbook Pro. I set out to download and install the software on my Windows PC. It went very smooth and error free, I then installed it on my Macbook pro laptop and all went well until I started the program. The program just
would not start it just got hung up and I had to do a force shutdown. I tried a few things but just could not get the program to run. I then installed it on my wife’s Macbook pro laptop and it operated without
a hitch! The only thing I can figure is my Macbook is a bit older and may not be up to the task. I was on the internet to see if I could see what the issue might be but could not find anything. I am going to email the company and see what their input is. On the weekend I was not interested in troubleshooting or emailing for an answer I just wanted to get the program up and running. With the program installed on both PC’s and it was time to make the link. It is very straight forward to do, you open the program on each PC. You are given a 9 digit ID number on each PC and since I want to use my laptop to control my main PC on my laptop I enter the 9 digit ID number from my main PC and press “connect to partner”. I then enter a password (setup during program install) and in no time I have full control of
My remote PC operation
my main PC from my laptop. Note: if you want to have control of your laptop from your main PC justenter on your main PC the 9 digit ID number shown on your laptop and press “connect to partner” along with the password. After using this program several times I can honestly say it works flawlessly and very smooth. I was able to open Win4k3suite and WSJT-X and make contacts with JT-65 from my laptop. There was absolutely no latency issues, lockup or programs refusing to operate or open. One great piece of news is if you use Teamviewer for personal use the program is FREE!! If any of my readers has ever wanted to toy with remote desktop operation or you are using a program that has issue give Teamviewer a go!

Win4K3suite added to shack.

Win4kSuite up and running
I have decided to change up my rig control software to Win4K3 suite I downloaded the trial version and was very impressed. I would had done it sooner but my PC was not up to the grade to properly run Win4K3 software and to be honest it was long over due for a PC upgrade. The PC was upgraded and if your interested that can be viewed here.  I decided to purchase the Win4k3 software (50.00) and change from my long time 
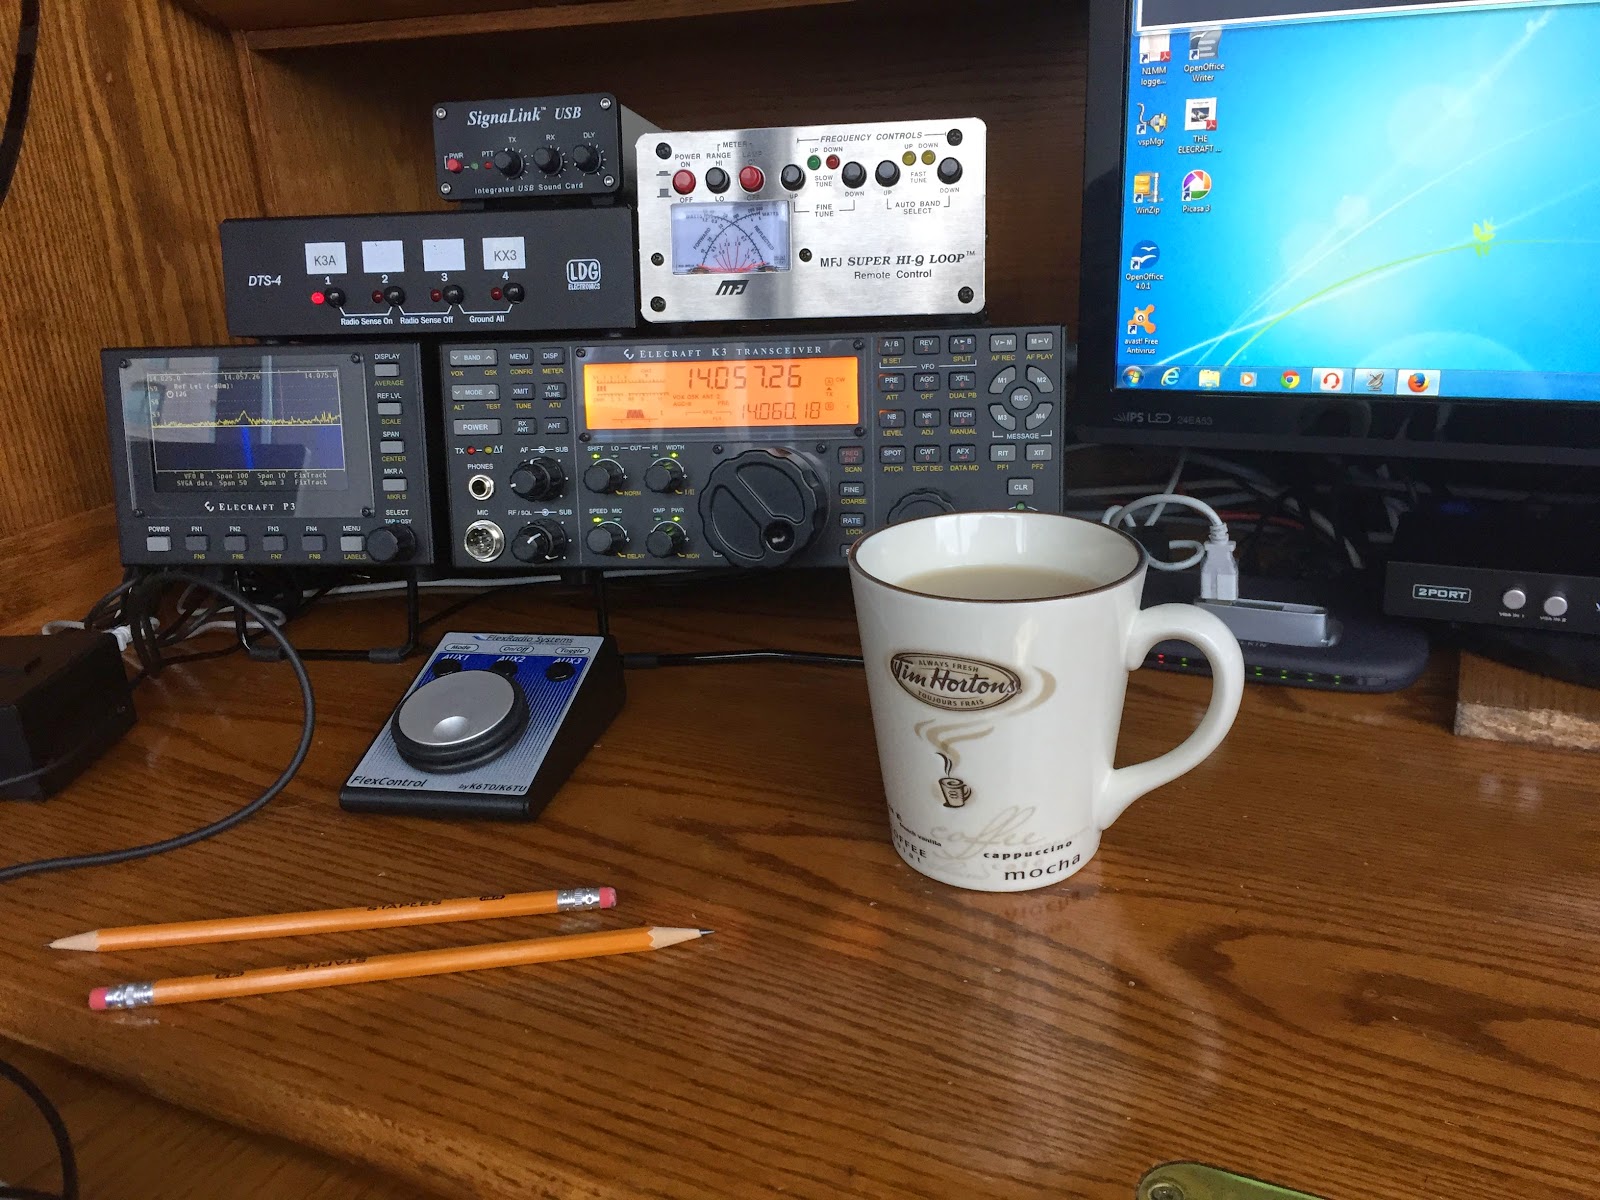
N4PY's Pegasus Plus rig control program. Carls Pegasus Plus program is very good and the support that Carl offers is excellent but I found the Win4k3 software was more catered to my Elecraft rigs. Once installed you have full rig control including the Elecraft P3, KPA500 amp and KAT500 tuner and the Sub receiver if you have these installed. (I did have the sub but sold it and I look back on that with regret)  I have the K3, P3 and KX3. The software installation has very good documentation and there are videos as well. Im the type of person who picks up much more from videos than written instructions. With the Win4K3 suite I was able to have PC control of all my K3 functions that some other software programs did not offer, such functions as spot, test, equalizer setup, terminal program, cw decode, Auto tuner and APF just to name a few. I also have the Elecraft P3 and with my PC upgrade I added a VGA capture board and since my P3 already had the SVGA board installed I N1MM contest software and Log40M. (More about Log40M in another post…. great software)
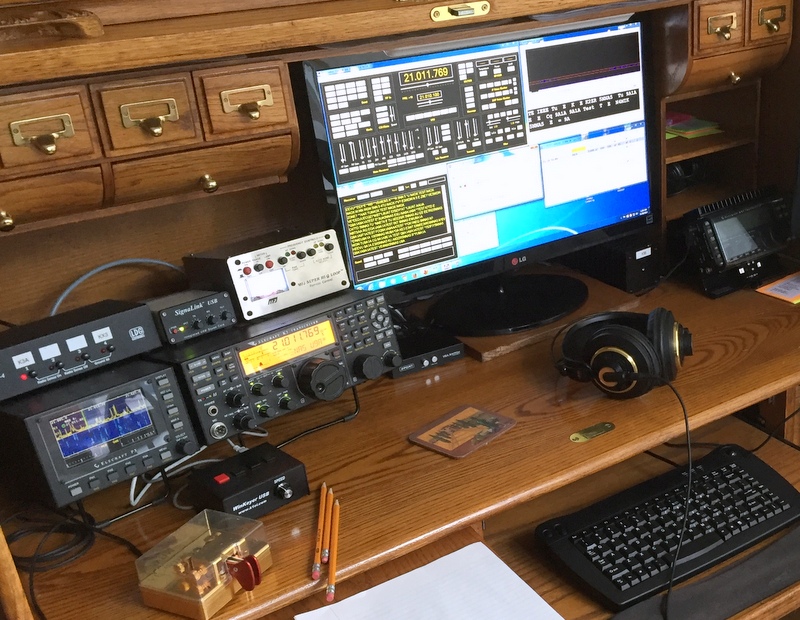
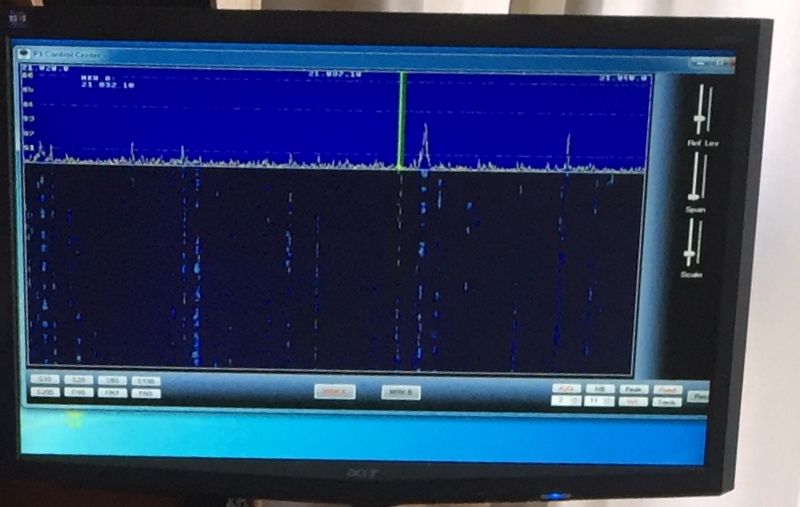
P3 on the monitor
was able to add point and click with my mouse to my P3 and this is great during contests. The SVGA board also allows me to view my P3 on a second monitor and mine being a 22" LCD monitor the P3 looks great on it. This software also has the availability to set up virtual ports. Now in the past just hearing "setting up virtual ports" made me nervous I really never had to much luck setting them up and getting them to work! With Win4K3 suite VA2SFQ makes it almost plug and play with both very detailed easy to follow steps and software that makes it painless…..and best of all IT WORKS!! The 3rd party software I set up to "play" with Win4K3 so far are If you have either the Elecraft k3 or KX3 (I have not setup my KX3 rig with the Win4k3 yet) and you are looking at PC controlled software then consider downloading Tom's trial version and give it a go!

It’s been just too long since my last post!

New Elecraft synthesizer
Old synthesizer board
The time sure has been flying here at VE3WDM! I just can't believe it has been over a month since my last post. I have been off and on the radio more off than on, not sure why other than the evenings seem to get away from me. As for the weekends it's sunny out and the weather has finally changed from snow and cold to nice sunny days with great weather need I say more..........guess what I am saying is Julie and I have been out and about. My last post was when I modified the K3 and since then I also installed the new Synthesizer board as well. I have not even had a chance to really give the new addition to the rig a workout. I have been reading very positive reviews on the Elecraft user group site. I am looking forward to getting on the air and trying this new board out. This weekend the WPX CW contest is on and that would had been a great time to check out how this new and improved synthesizer board improved things!
The board installed in the K3


Elecraft surgery part 3 of 3

Back to life again
It's time to solder in the new P30 and P35 headers into the K3 then put the rig together hold my breath and plug it in! Now that the old headers are out and the solder pads are cleaned off I now want to fit each header into it's spot and see how they fit. Then I will solder them in and it's very important these headers sit flat on the board. Here is the process I use to solder the headers in, I first only solder the 2 outer most pins. This allows me to reheat the pads if the header is not flat on the board if you solder 4 or more pads at once it's very hard to reheat them if you have to reposition the header. Once I am happy the header is sitting properly on the board I then solder the rest of the pins to the board. I
Soldering end pins 
don't solder them one after the other but instead I solder every other pin and then go back and solder the other pins. I do this because the plastic that supports the pins do get hot. I found if you solder one pin after the next the plastic supports have melted on me. Once the top side has been soldered I then turn the board over and solder the bottom solder pads in the same manner. Now that the pins are in I take a break and then come back and take a very close look at the pins. I am looking for proper soldering job,

Imports of checking both sides of board
also there has been no flow of solder from one pad to the next. Finally that I did solder all the pins, I have had this happen in the past were I have missed a pin. This is why I take the break as I have found if I don't I end up seeing what I want and I miss the unsoldered pin because I want to get to the rig put back together and try it. Satisfied with the solder job its time to clean the solder pads and I use a tooth flossing brush with 99% alcohol. This cleans off any residue and the alcohol evaporates. With the new headers installed it's time to put the rig back together and do the smoke test. At this point it's very important to take your time as you put the rig back together. There is the excitement in getting the rig back together and see how it work! This is the time you forget parts, not tighten parts, rush and misalign parts. Great care has to be taken when mating up the new headers. I had all go together well and as you can see from the picture at the top of the post the smoke test went well.
Flossing tool used to clean board
New header lines up with front board. 

Subscribe FREE to AmateurRadio.com's
Amateur Radio Newsletter

 
We never share your e-mail address.


Do you like to write?
Interesting project to share?
Helpful tips and ideas for other hams?

Submit an article and we will review it for publication on AmateurRadio.com!

Have a ham radio product or service?
Consider advertising on our site.

Are you a reporter covering ham radio?
Find ham radio experts for your story.

How to Set Up a Ham Radio Blog
Get started in less than 15 minutes!


  • Matt W1MST, Managing Editor


Sign up for our free
Amateur Radio Newsletter

Enter your e-mail address: