 |
 A first QSO on the FO-29 satellite and some 50/70MHz Es
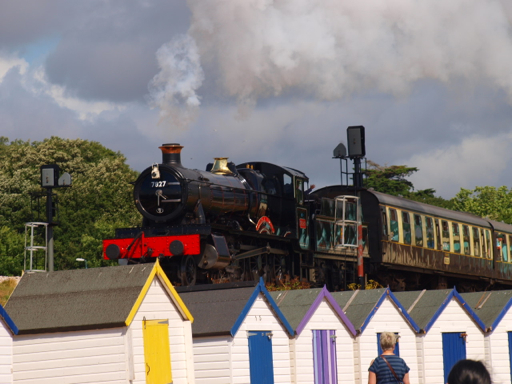
We’ve just returned from an excellent week’s holiday in South Devon. I took the picture at Goodrington Sands, which has the dual benefit of being a nice beach and having a steam railway behind it.
I took the FT817, whip antennas for 21, 50 and 144MHz as well as the Elk 144/432MHz log periodic. In the event, the only radio operating that really ‘called’ was satellite operation.
I listened on a few SO-50 passes, most of which were quite busy, but without managing to make any contacts.
However, I did take the plunge and try FO-29 for the first time. The lack of full duplex on the FT817 makes this a bit of a challenge, but thanks to some sage advice from Pete 2E0SQL on where to transmit and where to listen, I managed to work DG0ER for my first contact on this satellite. I heard some other interesting stations such as UA9CS as well, so must make an effort to feel a bit more competent on FO-29.
Back home today, after I’d finished writing the Practical Wireless column, I switched on and found 50 and 70MHz buzzing with Es. I was pleased to work IW9HII (JM67) on 70MHz for what must be my best DX on the band this summer at around 2000km as well as I3VWK. On 50MHz, I was pleased to work old pal T77C who was coming through nicely on CW.
Tim Kirby, G4VXE, is a regular contributor to AmateurRadio.com and writes from Oxfordshire, England. Contact him at [email protected].
K3 gets a hearing aid
There was a slight lift on 6m this afternoon, enabling me to try out my latest acquisition: an Elecraft PR6-10 preamp for the K3. A few days ago I noticed that the KX3 had a more sensitive receiver than the K3 on 6m. I couldn’t allow my K3 to be outshone by its baby brother so the preamp was ordered. I felt that the K3 could do with a boost on some of the lower bands as well so I opted for the new PR6-10 dual band preamp which despite the name covers the range from 6m to 12m. It was obtained and delivered to me very speedily by Elecraft’s UK agents Waters and Stanton. This was one Elecraft item that actually worked out cheaper to buy from the UK!

The preamp was very easy to install. It is designed to fit on the back of the K3 using the BNC connectors for RX IN and RX OUT provided by the KXV3A board. The preamp’s connectors are exactly the same distance apart as the ones on the K3 so you just need a pair of BNC couplers which Elecraft thoughtfully provided. I saw from the manual that the preamp was installed like this but I was afraid I would not have enough distance between the back of the K3 and the wall so I had ordered a couple of BNC patch leads as a precaution. In the end they weren’t needed.
Elecraft also provided a made-up cable to link the preamp to the K3’s switched 12V output and its ACC socket so you can select the bands the preamp is enabled for. On other bands a pair of pass-through connectors are enabled. This was the main factor for choosing the ready-made Elecraft preamp instead of a cheaper home-brew one as it meant I didn’t lose the use of the RX IN and RX OUT sockets that are utilized by the MFJ noise cancelling unit which is essential here on the 20m band.
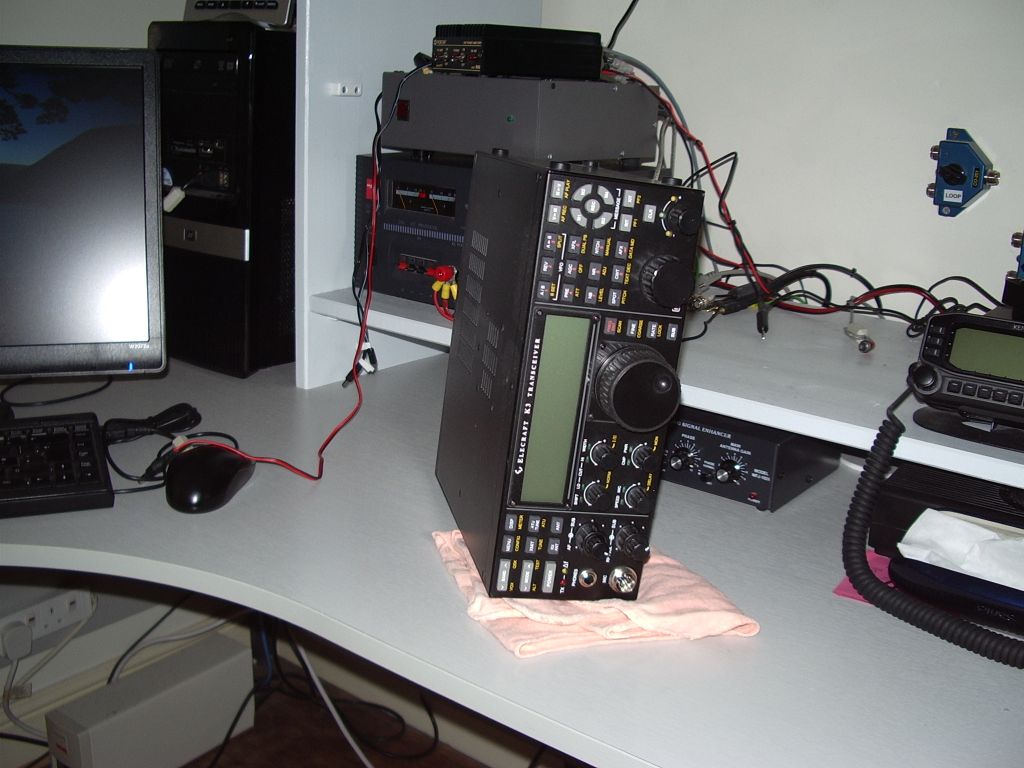 |
| Installing the preamp involved dismantling the entire station. |
Although fitting the preamp to the K3 was easy, getting access to the back of the transceiver was not, and entailed the dismantling of almost the entire G4ILO station. Taking it apart may have been one thing, but putting it all together again is another. Labels fell off disconnected cables, other cables disappeared down the back of the table and had to be fished out again. If that wasn’t enough, the meter illumination lamp in the MFJ magnetic loop control box chose this moment to fail, resulting in a lot of time wasted after I had reconnected it trying to find out what I had done with its power supply.
Despite these hassles, installing the PR6-10 was worth the trouble, producing a clearly audible improvement in signal to noise ratio even on 12m. I can now hear stations that can’t hear me!
Julian Moss, G4ILO, is a regular contributor to AmateurRadio.com and writes from Cumbria, England. Contact him at [email protected].
End of the holiday
After a good 7 months of work without much time off I’ve come back off a lovely holiday in Ile de Re, France. The island is 4km off the coast of La Rochelle and is a fantastic place and a popular place for ‘Le Weekend’. It reminded me how bad my French was but nice to practice what poor language skills I have.
Famous for salt and donkeys in pyjama’s as well as good wine and sea food. Gros Jonc is the long vertical beach on the right hand side at the top of the picture. Lovely in the sun and 2 minutes walk from where we were staying.

The closest I got to radio was seeing a chap with a TM25H (Le Mans 24 hour race special event station) T-shirt but as he was heading for the gents I wasn’t going to strike up a conversation.
Alex Hill, G7KSE, is a regular contributor to AmateurRadio.com and writes from Cumbria, UK. Contact him at [email protected].
I guess it works – but not the best design!
I had a little more trouble when I went to the Jeep on Friday for my lunchtime QRP session. I just wasn’t hearing anything! I know the bands can get that way, but the past few days had been relatively decent. Like any other Ham Radio operator, my mind immediately went to “There’s something wrong with the radio!”
As I disconnected the coax from the KX3, I noticed that the radio’s BNC post turned a little bit as I removed the coax fitting. I knew that by itself wasn’t the problem, but I didn’t like the fact that it was a tad loose. I broke out the tools and did some field surgery on my KX3 right in the back of the Jeep! I felt like Hawkeye Pierce, BJ Hunnicut or Trapper John from MASH. I opened the KX3, removed the auto tuner board, and with a pair of needle nose pliers, I snugged up the nut that holds the BNC post against the inside housing of the radio. Then I put everything back together and turned the radio back on ….. still nothing.
I just recently replaced the PL259, so I twiddled that around, thinking that perhaps I didn’t do as good an installation as I had thought. Nope, no difference – that wasn’t the problem either. So even though I had taken the magmount assembly apart the previous night, I decided to look again there – a mistake on my part there? Once again, all was good there. But I did notice that as I twirled the cable around, I was getting signals to appear, disappear and then re-appear. A break in the coax cable!
So I brought the magmount back in the house once again. I decided that I was going to take it apart, cut back about 8 inches of coax and then put it all back together. In the process of taking everything apart again, I just happened to pull on the center conductor of the cable and a six inch piece came out with my fingers. It had indeed broken, back in the main part of the cable, and my plan to cut it back by a foot and reassemble turned out to be a good plan.
But I have to tell you, after working on this, I’m not really impressed with the design of this magmount. I hope you can figure out what I’m trying to describe. The coax goes into a plastic housing. This plastic housing is roughly the diameter of a quarter and is maybe a 1/4 inch thick. Each half has a hole. The shield of the coax (which has been pigtailed) goes through the bottom hole, while the center conductor (which is kind of flimsy) goes through the upper hole. There are channels or depressions on each side for the wire to sit.
The is the order in which it all goes back together – from the bottom working towards the top.
1) Through bolt
2) Plastic insulator, so that the through bolt does not touch the magmount body (ground).
3) Magmount body
4) Coax housing with the braid sandwiched down, between the coax housing and the magmount body.
5) Metal washer. The center conductor lays in a channel and is pointing up, to be sandwiched between the coax housing and the washer.
5) Threaded hex sleeve for the radiator.
Everything is held in place by the holding pressure created by screwing the through bolt into the threaded hex sleeve! The center conductor is NOT soldered or otherwise electrically connected to the metal washer underneath the threaded hex sleeve, as I had previously thought. And as I noted before, the braid is simply sandwiched between the plastic coax sleeve and the magmount body. I made sure all metal surfaces were clean and shiny and used plenty of Deoxit to help ensure good electrical contact (there really are no true connections!) as best possible.
It seems to me that it would have been better for the coax to be soldered or otherwise connected to the metal sleeve and the magmount body other than just using physical contact and screw pressure to hold everything together. But then I suppose that would have increased the cost of the product significantly.
In the near future,I think I am going to upgrade the quality of the coax, too.
72 de Larry W2LJ
QRP – When you care to send the very least!
Larry Makoski, W2LJ, is a regular contributor to AmateurRadio.com and writes from New Jersey, USA. Contact him at [email protected].
A Summer Trip to Greenland

A professional colleague who is the principal investigator of the Sondrestrom incoherent scatter radar facility announced at a conference that they no longer had a scientific high-rate GPS receiver at the site for making ionospheric measurements. I enthusiastically volunteered to ship them one that I had on the shelf. She suggested that instead I should come install it myself and I found some support to do it (the National Science Foundation heavily subsidizes U.S. Greenland and Antarctic scientific travel during their respective summers, making this trip possible). Therefore unlike my previous trip in the winter, this trip did not involve travel with the most perverse of arrangements flying to Copenhagen only to hop on another plane and fly half-way back to the States. I set off for my second trip to Greenland, leaving Scotia, NY, early on Monday and returning mid-day on Friday.
On the past trip, conditions were really awful for radio with plenty of visible Aurora. I didn’t really mind that because the auroras were beautiful, but with only a small chance of NLC/PMC (noctilucent/polar mesospheric cloud) sighting in the summer, I was eager for some good radio conditions to sate my appetite for other nerdy activities. I set up the radio equipment almost right away the first evening to make sure that everything tuned up and immediately made 10 or so QSOs on 20-meter CW before heading to bed.
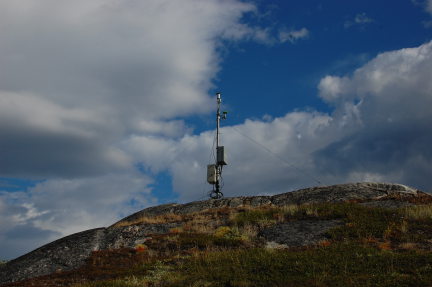
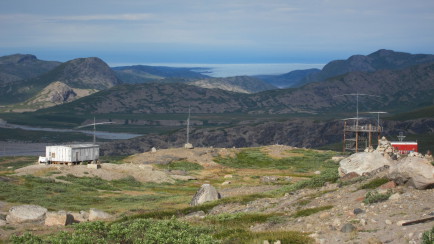
Instrument installation is always a hairy business, especially when you can’t just run to a hardware store, let alone going to RadioShack or calling McMaster-Carr. Sometimes, everything works smoothly; other times it doesn’t. In any case a flexible attitude (and some good old ham practicality) goes a long way. Wind gusts of 40-50 mph (18-22 m/s) on top of the hill made for exciting work, but having a couple of helpers made it go smoothly. Here is a photograph of the installed instrument on its hilltop (the box and green antenna on the right-hand side of the pole, which also held a weather station).
Work, especially some recalcitrant Windows 7 issues (At one point, I was running Windows 7 in a VirtualBox virtual machine on a Linux machine and logging into the Linux machine from a Mac!), kept me pretty busy on Tuesday and Wednesday and I only managed a few minutes of operating on each of those days. But, by Thursday, my schedule broke loose a little and I was able to operate for a few solid hours in the afternoon and evening. I had no idea that Greenland would be so popular on 30 meters! Wow. That’s definitely the most intense pileup I’ve ever experienced. Thanks for being patient.
There was some about S3 hash on 20 and 30 meters that the K3′s NR function would take care of but the NB function wouldn’t. NR is not good for running pileups, so I often had to get the caller isolated to use NR. On the receiving end, there was a lot of fast QSB, with a period of a few seconds (this is consistent with magnetospheric and plasmaspheric waves that impinge upon the auroral and subauroral regions.) In any case, callers were up and down, often in the span of a call. You all on the other end may or may not have observed the same from me.
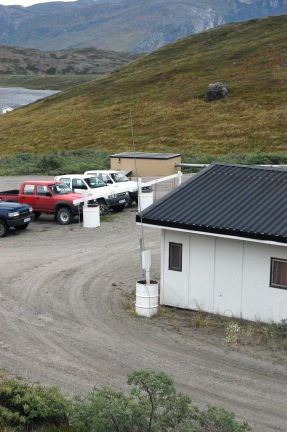
Per usual, the setup was an Elecraft K3 and the GU Special vertical with 2x 1/4-wavelength radials for each of 20 and 15 meters. Everything else was tuned by adjusting the length of the radiating section. This is a substantial improvement in performance-to-size ratio over the previous station I carried in January 2012, which was a Yaesu FT-840, DK9SQ 10-meter telescoping pole, and a variety of wire antennas. Below is a photograph of the GU Special deployed (it’s in the center, unceremoniously ty-wrapped to a wooden sign post sticking out of a barrel). The diesel Toyota HiLux pickups are the most popular vehicle in town. We gave a visiting graduate student lessons in driving a manual transmission. Great vehicle to teach/learn on with lots of torque and low gearing!
Although I was unable to connect with them, we did drive past the OX2A/XP1AB site on Black Ridge that overlooks downtown Kangerlussuaq:
Thanks for the QSOs. The log has been uploaded to LoTW this morning and QSL cards are ordered. I never ordered cards after the last trip, so it will be a shared card with a photograph of the aurora.
Ethan Miller, K8GU, is a regular contributor to AmateurRadio.com and writes from Maryland, USA. Contact him at [email protected].
RSGB IOTA Contest expedition to NA-140

I forgot my camera at home and my mobile phone battery died so there are no photographs of this adventure…
I first experienced the passion of those pursuing RSGB’s Islands on the Air (IOTA) programm(e) when I was active from Adak (Andreanof Islands, NA-039) in August/September 2012. Matt, KB9UWU, and I made some tentative plans to do the 2013 RSGB IOTA Contest from NA-139 (Maryland State East, Assateague), returning to the site where he and W3CF had done the same contest over a decade prior. During the planning stage, I cast about for the nearest IOTA groups to activate. For the DC area, the easiest groups are surrounding the Delmarva Penninsula, NA-083 (Virgina State), NA-139 (Maryland State East) and NA-140 (Maryland State West). We did not execute the plan to go to NA-139 and I had really given up on the idea of doing anything for the IOTA contest…
That’s when work interviened. I scheduled a trip to Greenland (story about this to follow in a future posting) leaving late on Sunday of the IOTA contest weekend. My wife Sarah had a cousin with a baby shower in Ohio on Saturday…so, we did the logical thing…packed her and Evan off to Ohio on a Saturday morning flight. After dropping them off at the airport, I headed to the Eastern Shore for some IOTA action.
The principal mission for this trip would be to understand the difficulties in activating NA-140 and to make it widely available to the IOTA community because it is apparently rather rare (25% claimed, versus 19% claimed for Adak).
The station setup was simple and typical—an Elecraft K3 and an updated version of the GU Special. The GU Special had just returned Tuesday from KL2HD’s KL7NWR expedition to NA-064 back in June (he had left it on the research ship until it returned to port, so technically, it’s probably visited some other rare IOTAs, too).
In order to avoid discharging the car’s battery, a mistake that could leave me stranded far from home, I lugged along a few SLA batteries to power everything. I selected a couple of candidate sites using aerial imagery and ended up using my preferred site, which was very accessible to saltwater and the road, making it trivial to setup the radio in the car and
the antenna on the beach. I now understand why NA-083 and NA-139 have much more activity—they’re close to civilization! Nevermind, I love the middle of nowhere. So, it was fun.
I configured the antenna for 20 meters and launched a few CQs on CW. It took a while to get a run established, but after that the pileup was pretty much non-stop for about 3 hours. I even worked some JAs, which was pleasing considering that NA-140 is very rare there and I was not QRV during the peak hours for JA.
Unfortunately, I hadn’t rigorously tested the batteries beforehand (except for one) and only one (the one I tested, of course) of the five performed well. One performed acceptably and was relegated to running the inverter for the laptop once the battery warning came on. Even the “good” battery sagged under load at 100w transmitter power. So, I cranked the K3 down to 50w and let it rip. That was enough to produce a commanding signal in Europe, with RBN Skimmers showing my signal peaking at 47 dB SNR with many hits in the 30s of dB. As Matt said when we talked after I returned home, “I have trouble getting those kind of numbers with a small beam and the legal limit!” Verticals on saltwater rule. End of story. Hearing was a different issue as there was some line noise and the occasional passing boat, who provided more QRM in the audio range than the RF range.
My pileup thinned out a little bit around 2020 UT and I was exhausted. Evan didn’t sleep well the night before and that didn’t help anybody else sleep, either. Plus, it was hot, even with the nice breeze and pleasant temperatures. If all of that wasn’t enough, the battery in my mobile phone had discharged, the battery in the laptop was nearly dead and both the K3 and the inverter began
throwing low-voltage alarms. It was time to pack up. Fortunately, the GU Special deploys and stows in 15-20 minutes, so it wasn’t bad.
I ended the three-hour window with 215 QSOs and 11 (!!! that’s what you get for CQing the whole time) island multipliers, all on 20 meters. I’ll take it! Thanks for the QSOs. I just ordered cards today and they should be printed and ready to send by mid-August.
Ethan Miller, K8GU, is a regular contributor to AmateurRadio.com and writes from Maryland, USA. Contact him at [email protected].
Contest wall paper…….

Mike Weir, VE9KK, is a regular contributor to AmateurRadio.com and writes from New Brunswick, Canada. Contact him at [email protected].
 Ham Radio Deluxe |
 W5SWL Electronics |
 Ham Radio Prep |
 KB3IFH QSL Cards  Hip Ham Shirts  HamRadioAuctions HamRadioAuctions Reliance Antennas Reliance Antennas Enigma Shop Enigma Shop |  morseDX  Ni4L Antennas  R&L Electronics R&L Electronics antennas.us antennas.us QRV QRV |
- Matt W1MST, Managing Editor
