 |
 Ionosondes, the “Fish Finders” of the Ionosphere, and How Ham Radio Can Help Advance Ionospheric Science
Part 1 of a 3 part Blog
Part 2 will cover the RBN – Reverse Beacon Network & DXMaps.com
Part 3 will describe the RBN Node @ WØLFA
An ionosonde is a portmanteau for “ionospheric sounder,” instruments managed by educational, government, military and scientific agencies around the world to monitor and measure the ionosphere. You can think of Ionosondes as “fish finders” that find, instead of schools of fish, regions of electrons and electrically charged atoms and molecules in the upper atmosphere.
The first ionosondes were invented in the 1920s, grew in sophistication during the 1930s, and were used by both sides during WWII to identify the best shortwave communication frequencies. A thorough history of ionosondes written in 1998 by Dr.Klaus Bibl is downloaded in PDF from the Annals of Geophysics Website here:
http://www.annalsofgeophysics.eu/index.php/annals/article/download/3810/3874
Ionosonde systems incorporate a transmitter tunable from as low as 500-kHz to as high at 40-MHz (1.6 to 12-MHz sweeps are a more typical range), antennas usually pointed straight up, and a receiver that tracks the transmitter listening for echoes reflected back to earth. It is, in other words, a radar system.
One of the four crossed-loop receive antennas used at the now-decommissioned ionosonde site in Lerwick, Shetland Islands (http://www.ukssdc.ac.uk/ionosondes/lersite.html)
Ionospheric weather, like tropospheric weather closer to earth, is in constant flux. The global ionosonde network is periodically mapping the ionosphere measuring the highest frequency reflected back to earth (this is Fc, the critical frequency) and at what height above earth that occurs (which reveals which ionospheric layer is in play). The critical frequency is proportional to charged particle density in each ionospheric layer. Signals at frequencies above Fc at the F2 layer (highest ionospheric layer) continue off into space instead of coming back to earth. Here is an example of an ionosonde ionogram (vertical axis is km above ground, horizontal axis is frequency in MHz):
Annotated ionogram from Wikipedia (en.wikipedia.org/wiki/Ionogram)
Knowing the critical frequency at various points around the world enables calculation of MUF (Maximum Usable Frequency) for shortwave radio broadcast and two-way radio communication in those regions. A useful rule of thumb is the MUF will be around three times the Fc. So, for a Fc of 6.2-MHz the MUF for signals transiting that region of the ionosphere would be around 18.7-MHz. In such conditions, the amateur 17-meter band, centered on 18.1-MHz, would be a great choice for long distance communication, as would the 20-meter band (14-MHz). The 15-meter band (21 MHz), on the other hand, would likely be ‘dead’ for paths across that region.
Q: why is the MUF so much higher than the Fc? A: radio waves propagated over long distances are refracted (bent) back to earth at acute angles, not ‘bounced’ back to earth like a handball off a wall. Less ionization is needed for refraction at low angles than for a return of a signal transmitted straight up.
(In addition to electron density profiles, ionosondes can measure Doppler shifts and polarization of ionospheric echoes. Why hams should care about ordinary and extraordinary waves and the polarization of ionospheric propagated signals will be the topic of a future WØLFA Blog post.)
How many ionosondes are in regular operation around the world and are reporting their data publicly? Best I can tell, it’s something around one hundred. The UK Solar System Data Centre has an interactive map (reproduced below) with data on each site, more info at www.ukssdc.ac.uk/wdcc1/ionosondes/world.html.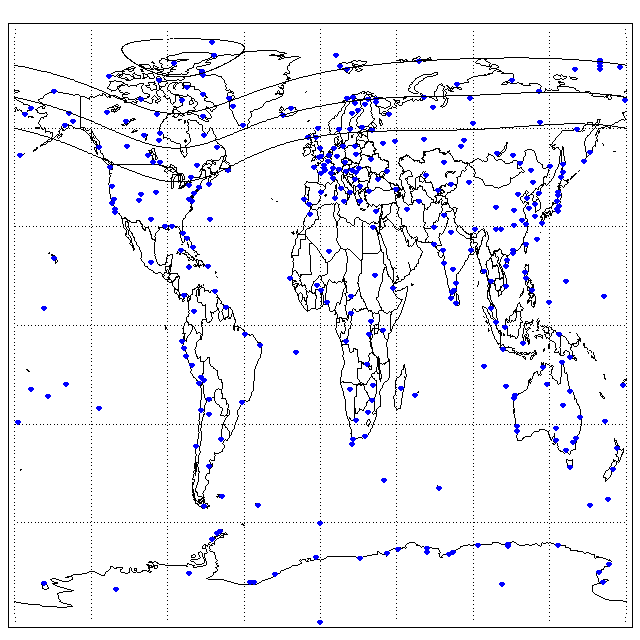
A hundred ionosondes (+/-) is ‘not nothing,’ however, the world’s a big place, and there are large ionospheric regions going unmapped by the ionosonde network. That’s where ham radio comes to the party.
The number of amateur radio operators communicating long distances over shortwave on any given day vastly outnumbers active ionosondes by orders of magnitude. Two of the most popular ham activities are contesting, making as many contacts with as many other hams in as many countries as possible in a given period, typically over a weekend, and DXing, contacting as many countries as possible in one’s lifetime during or outside of contests, the more obscure and hard-to-contact, the better.
“Contesters” and “DXers,” which are not mutually exclusive groups, tend to be very knowledgeable about radio propagation from their own extensive observations. Knowing what bands to operate on and at what times given the current state of the ionosphere can give a contester a winning edge or help a DXer snag an elusive country.
Hams have developed several innovative tools to collect, correlate and analyze the large number of ionospheric observations taking place on the ham bands every day. Every successful contact, a “QSO’ in ham-speak, is a data point. The American Radio Relay League’s Logbook of the World database is closing in on a billion QSO records from over 80,000 contributors! More data = better science.
Part 2 of this Blog will discuss two of the ways hams are collecting and analyzing ham radio-generated ionospheric propagation data in real-time: RBN, the Reverse Beacon Network, and DXmaps.com.
Part 3 will describe the RBN Node @ WØLFA.
Bill Hein, AA7XT, is a regular contributor to AmateurRadio.com and writes from Colorado, USA. He is co-owner of Force 12 and InnovAntennas. Contact him at [email protected].
Series Eight Episode Twenty-Two – Icom ID-51 Review (18 October 2015)
In this episode, Martin Butler (M1MRB / W9ICQ) is joined by Leslie Butterfield (G0CIB), Chris Howard (M0TCH) and Martin Rothwell (M0SGL) to discuss the latest Amateur / Ham Radio news. Colin (M6BOY) rounds up the news in brief, and this episodes feature is Icom ID-51 Review by Martin Rothwell (M0SGL).
- Fall in Australian Ham Radio Licences
- Electricity from Air
- Plans for PLT in The Netherlands
- New Radio Station for Sylvan Grove Hospital
- Amateur / Ham Radio Operators Behind Warning System
- dogparkSDR Version 1.0 Released
- RSGB Young Members Down by Nearly 50%
- ISS Danish CubeSats Deployed
Colin Butler, M6BOY, is the host of the ICQ Podcast, a weekly radio show about Amateur Radio. Contact him at [email protected].
RadCom and the IC7300
My RadCom arrived by post today. Unlike in the recent edition of PW, the advertisers were publishing details of the new ICOM radio and were keen to take deposits. Perhaps they have got later data? I quite like the look of the new IC7300 radio, but feel the price will soon fall to £799 or less. I can wait. I may wait to see what the FT817 replacement looks like. A 5W (or maybe 10W) radio would suit my needs better.
The latest RadCom has a review of ICOMs latest flagship radio, the IC7851, selling for around £9000. Does anyone really spend this sort of money on amateur radio gear? With PSU, tower, big beam and big rotator this implies over £10000 on amateur gear. I suppose some people must spend this sort of money. My FT817 has served me for over 14 years now. To me, this was an investment and I had to give it careful thought. I wonder how many XYLs are happy for their husbands to spend over £10000 on a hobby?
Each to their own. If you really have that kind of disposable income how you spend it is your decision.
Roger Lapthorn, G3XBM, is a regular contributor to AmateurRadio.com and writes from Cambridge, England.
Amateur Radio Weekly – Issue 81

DV4mini: All-in-one USB hotspot for D-STAR, DMR, Fusion
USB stick containing 70 cm data transceiver. Works with D-Star, DMR, Fusion, APCO25 and other digital modes which are based on GMSK, 2FSK or 4FSK.
YouTube
ARRL releases excellent Parity Act explanation video
ARRL President Kay Craigie, N3KN, said the video will be made available on Capitol Hill to make sure that Members of Congress have correct information, instead of misrepresentations.
ARRL
Kickstarter: Tiniest APRS tracking device
The Tracksoar APRS tracker is the smallest, lightest, ready to fly open source APRS tracker.
Kickstarter
Criticisms around ARES October SET
These groups rarely (if ever) properly train on the challenges of trying to use NVIS nets around the clock. Many don’t realize that 60 meters is not optional and they will likely need 160 meters in the mix too.
The Kentucky Packet Network
Field Day logging: A study in pain (PDF)
A local area network based logging system shared between stations, stored in a single database.
KK4SXX
AMSAT live OSCAR satellite status page
This page shows the most up-to-date status of all satellites reported in real time.
AMSAT
How a drug cartel took over Mexico with walkie-talkies
Inside the communications infrastructure of the ultra-violent syndicate.
Popular Science
OS X contest software overview 2015
Whether you are a serious contester, a casual contester, or someone who is just getting started, there is a contest logger that can meet your specific needs.
Mac Ham Radio
Curtain antenna for shortwave radio broadcasting
The curtain antenna is a dipole array, consisting of rows and columns of dipoles.
Broadcast Belgium
D Layer absorption
We learn in Technician Class and General Class studies that the ionosphere’s D layer is created in the daytime by ionizing solar rays and fades away completely at night, and we learn that the D layer absorbs HF frequencies below the 20-meter band.
Ham Radio School
How to
Dealing with urban radio interference on shortwave
The levels of urban radio frequency interference, or RFI, have increased dramatically in the last two decades and the proliferation of poorly engineered electronic gadgets is largely to blame.
The SWLing Post
Video
Amateur Radio: A 21st century hobby
Whether you enjoy writing software, getting hands-on with practical equipment, developing new technology or simply want to use what’s already there to communicate with others across the world, you’ll find all of this – and more – within amateur radio.
RSGB
Basic amplifiers: 1963 U.S. Army training film
An electronic amplifier is used for increasing the power of a signal.
U.S. Army
Amateur Radio Weekly is curated by Cale Mooth K4HCK. Sign up free to receive ham radio's most relevant news, projects, technology and events by e-mail each week at http://www.hamweekly.com.
Amateur Radio Newsline Report 1981 October 16 2015
- QSOs IN CUBA
- A HOSPITAL HAM SHACK
- YES, YOU CAN SURPRISE A HAM OR TWO OR THREE
- JAM SESSION
- POPE SPECIAL EVENT BLESSED BY BIG NUMBERS
- IARU SPEAKS OUT FOR ANTENNAS
- RUNNING FOR THE WARRIORS
- FCC TO WEIGH IN ON TINKERING
- COASTING TO ANOTHER ANNIVERSARY
- DOLLARS FOR SCHOLARS
- HAMS REVISIT NEPAL'S EARTHQUAKE
- THE WORLD OF DX
- HAM SCHOOL
Religion and Ham Radio
 We need to get the religion out of ham radio. No, I am not talking about the HF nets that support missionaries or similar activities. (Those people might actually be doing something good for the world.) I am talking about the religious debates concerning new technology…this technology is better than that technology.
Amateur radio is a technical hobby, one based on technology, hobbyist pursuits and mutual interest. One might think that this means issues are looked at objectively and discussions are based on logic, scientific principles and facts. Of course, this is completely wrong. What often shows up in ham radio are religious debates about technology or operating modes.
Here’s a definition of Religion:
a specific fundamental set of beliefs and practices generally agreed upon by a number of persons or sects: the Christian religion; the Buddhist religion.
You can tell when you are stuck in a religious debate…the facts quickly fade and statements like “this is the right way to do it” become louder. Underneath this is a fundamental belief trying to come out that the person may not even be aware they have.
A long running example of a religious debate is Linux versus Windows. On the surface, people argue about which one has more defects, which one is more secure and which one ultimately serves their needs better. Underneath the surface is the religious belief: software should be free, Microsoft is evil, etc. Then there are those Mac enthusiasts (you know who you are)….these folks tend to act like a cult as they attempt to convert other people to their group. (Where is the line between enthusiast and cult member?)
The latest one on the ham radio front is the debate over digital technology in the VHF and higher bands: D-STAR versus DMR (and now Fusion). The debate starts out rational with a discussion of the merits of each but soon the deeply-held beliefs come out: D-STAR is bad because ICOM is pushing it, DMR is good because it is the commercial standard, D-STAR is good because it is an amateur radio standard, D-STAR uses a proprietary vocoder chip so it is bad, etc. Then don’t forget the guys that say “all digital is bad, analog FM is good.”
Again, you can tell when the religion kicks in because the facts start to fade and the beliefs rise to the surface. Usually, these arguments can’t be resolved because you can’t really debate beliefs. What you get instead are flame wars on the various email groups.
What other religious debates are out there? Android versus iOS, Open Source Software versus Commercial Software, My favorite rig versus Your favorite rig, … what else?
-73, Bob K0NR
This post is recycled and updated from a 2007 post. Some things never change.
The post Religion and Ham Radio appeared first on The KØNR Radio Site.
Bob Witte, KØNR, is a regular contributor to AmateurRadio.com and writes from Colorado, USA. Contact him at [email protected].
 Ham Radio Deluxe |
 W5SWL Electronics |
 Ham Radio Prep |
 KB3IFH QSL Cards  Hip Ham Shirts  HamRadioAuctions HamRadioAuctions Reliance Antennas Reliance Antennas Enigma Shop Enigma Shop |  morseDX  Ni4L Antennas  R&L Electronics R&L Electronics antennas.us antennas.us QRV QRV |
- Matt W1MST, Managing Editor
