 |
 DVAP Tests–Range
As I recently blogged, I purchased the DV Access Point Dongle a few weeks ago. It really came down to trying to do something to enhance my interest in D-STAR or sell my ICOM IC-92AD. I was first introduced to D-STAR back in early 2008 and purchased the IC-92AD in the fall of 2008. I spent the first several months having QSO’s on the local repeaters with the growing number of D-STAR users in the Rocky Mountain region. But I’ll admit I did get a little bored with just speaking with the same group of guys. I mean no disrespect, but I never really got into the local VHF/UHF repeater scene. I think I would have more interest in local repeater operation if I had a longer commute. But with less than 5 minutes in the car, there’s just no time to try.
Anyway, a few months ago I grabbed the D-STAR radio and re-educated myself on how to use it and connected to the local Denver repeater and connected to the REF005 London repeater. I really enjoyed just listening with that reflector dialed up in the background. Not wanting to tie up the local repeater just for my enjoyment, I began looking into the DV Dongle and the DV Access Point Dongle. I was first leaning towards the DV Dongle as I figured I would do more listening that actual talking and it could just play in the background. I could use my IC-92AD when I wanted to QSO. But as I began comparing the two dongles (no dongle is created equal) I began leaning more towards the DV Access Point Dongle with the ability to still use my radio.
It didn’t take long before I had a short list of ideas on how the DVAP would come in handy around the house and in the office. In the office I work in a lab which is a RF black hole. Nothing comes in and nothing gets out. I could take the DVAP and my IC-92AD to the office and either just listen or perhaps even strike up some QSO’s during lunch.
If you’re not familiar with the DV Access Point D-STAR Dongle, it is a simple looking little device that connects to your PC via USB and allows you from your D-STAR radio to connect into the D-STAR network via the Internet. The DVAP has a small antenna and transmits at a mere 10mw. But the nagging question was just how far will 10mw travel?
I had read many blog postings from other hams who were enjoying the world of D-STAR from their DV Access Point. They were finding out they could successfully operate from other rooms, the back deck, the back yard and even to the henhouse as in the case of my friend, Tim Kirby G4VXE in the United Kingdom.
Now before I go any further, allow me to type out some fine print. The DV Access Point Dongle is truly designed to provide a licensed ham the ability to connect to the D-STAR network from inside and around their home or location. It is not intended to be used as a neighborhood D-STAR repeater and send RF signals across the neighborhood or across town.
Having said all of the above, I still wanted to know the range. My ham shack is in my basement. With the DVAP setup and using the little stubby stock antenna, I tested by walking all around my basement, then going upstairs to the ground level, then upstairs to the second floor and then finally on my back deck and courtyard. No issues.
Like many, the experimentation aspect of the hobby is something I enjoy. I don’t have a lot of time to build radios and living in such an antenna restricted neighborhood, I don’t have a lot of need to build and experiment with antenna design. So my eagerness to know just how far I could move away from my QTH really excited me. I know I’m a nerd…but if you’re reading this so are you. ![]()
So I decided to connect the DV Access Point Dongle up to my Diamond X-30A external VHF/UHF antenna. This antenna is attached to the side of my house where a Directv satellite dish once was mounted. The antenna works great for working the front range repeaters (including the D-STAR repeaters) and I’ve also managed to hear ARISSat-1 via this stationary antenna. As a point of reference, the antenna is approx. 16 feet off the ground and it does not stick up above the roofline. It is totally hidden from view of neighbors and as such it not as efficient as it could/should be.
With no other modifications to the DVAP, I connected it to the external antenna and hopped in the car to go to the grocery store. From my QTH to the grocery store parking lot (based on Google Earth measurements) as the crow flies or the RF travels, it is .75 miles, 1.20 kilometers, 3,941 feet, 1201 meters…I think you get the idea. I honestly figured I wouldn’t make it out of my neighborhood. As I reached the end of my street I was able to do a successful echo test. I continued up the road and to the exit of my neighborhood. Another echo test proved successful. I then proceeded down the street towards the grocery store and with IC-92AD in hand and in the car I did another successful echo test. I reached the grocery store parking lot, stepped outside and conducted the final echo test….yep successful. I was .75 miles from my QTH and had solid copy on the echo test to the DVAP dongle.
Again…let me add the fine print. The DV Access Point Dongle is intended to provide the licensed amateur radio operator access to the D-STAR network in and around their house/yard. It is not intended to provide connectivity at 3/4 of a mile away.
I was short on time this particular day and plan to conduct further testing to determine the limit. The neighborhood I live in is relatively old with tall, mature trees. Another test in the dead of winter might also prove to provide additional range since less foliage on trees will get in the way. A final testing to just fulfill my interests will be as far as I take the range experiment. I’m not interested in trying to amplify the 10mw signal as I believe that is taking the DVAP in a direction not intended by its developer. However, the next time I go to the community pool which is located just about 100 yards from my QTH, I believe the IC-92AD might just come along.
Look for an updated blog post on the additional range testing to see if I can go a full mile. I’ve read reports from hams in the NY area who have been successful at one mile in all directions (N, E, S, W). I may just wait until winter to try this as I stated above. Finally, I do want to do a little testing to see just how this setup could perform in a portable setup using an AT&T 3G data card. I’ve certainly read blog posts from other hams stating they have had no issues with a configuration like this. Again, it’s more to fulfill my experimental interests.
Until next time…
73 de KD0BIK
Jerry Taylor, KD0BIK, is a regular contributor to AmateurRadio.com and writes from Colorado, USA. He is the host of the Practical Amateur Radio Podcast. Contact him at [email protected].
Motorola Millstone
This weekend I had planned to write about my Android smartphone, a Motorola Milestone 2, which I bought in early July soon after I came out of hospital. It was a fantastic phone with a big, clear screen and a really usable slide-out keyboard. It became my main method of electronic communication. The Android user interface is great – far, far superior to Windows Mobile. It is well integrated with Gmail as you would expect and it has an excellent web browser that can display almost any website, unlike the IE browser in Windows Mobile which is just a piece of s***. I was also intending to write about an Android APRS application called U2APRS. Unfortunately, last night my Milestone turned into a brick.
The one thing I hadn’t got round to doing was install a good app to read the various blogs that I follow. Blogger Dashboard is one of the few sites that doesn’t work well in the Android browser. I decided to install Feedly, found that I liked it, and spent some time going through all the blogs marking all the posts as read. Having done that I was trying to figure out how to get back to the list of blogs now that there were no new posts when the screen froze and refused to respond to touch input.
Thinking that this was just a software crash, I pulled the battery. But when the phone started up again the screen still refused to respond to finger movements. And now I couldn’t get past the lock. This situation persisted after several attempts.
Time to go online. A Google search revealed that problems with the Motorola Milestone 2 touch screen were not uncommon and that the only diagnostic to try was to perform a factory reset to make sure that the trouble was not due to a software glitch. This would, of course, remove all my apps and settings. But there was no alternative. Except that the instructions for performing a hard reset – press and hold the Camera button while powering up the phone – didn’t work. Every time, the phone booted into its normal screen, which was still locked.
After wasting quite a lot of time making several attempts at this I found another forum post that suggested holding the X key on the keyboard whilst powering on the phone. This got me a step nearer to where I was trying to be – a screen with a warning triangle and an Android icon on it – but the instructions to bring up the menu – press and hold the Volume Up button and then the Camera button – did nothing. Again, a lot of time was wasted trying this several times, including different permutations of pressing and holding, and trying both of the Volume buttons since I couldn’t be sure which was Up and which was Down, to no avail. Deep frustration was setting in.
Olga found a forum post which suggested that pressing the keyboard Search button from the Android warning screen would bring up the reset menu. That didn’t work either. Then she found another one that said to use the the @ key. At last, the menu! I was finally able to format the system and wipe all my apps and data. When the phone rebooted it entered the initial configuration sequence, asking what language I wanted it to use. Which I was unable to select because the touch screen still didn’t work.
So my Milestone is currently as much use as a lump of rock. I’m missing it already. It will probably take several days to send it for repair and have it returned, which I can’t even start to do until Monday. But I’d rather do without a phone than go back to Windows Mobile, which may be a very good platform for running apps but is absolutely loathsome as a telephone and is totally useless for Gmail.
Deep frustration. Not to mention irritation over the valuable time I’ll have to spend reinstalling and reconfiguring everything once it’s back. And to add to my annoyance I’ve lost U2APRS because the developer JA7UDE’s web site has been offline for the last couple of weeks for reasons unknown and there is no longer any way to obtain it.
I’m not a happy bunny.
Julian Moss, G4ILO, is a regular contributor to AmateurRadio.com and writes from Cumbria, England. Contact him at [email protected].
Elecraft K3 Assembled in 7 Minutes [VIDEO]
So after oversleeping this morning, I managed to find a nice video that I can share with all of you. It’s nothing groundbreaking. It’s just a time lapse video of a gentleman putting together an Elecraft K3 from unboxing to finish. Pretty interesting to see the process. I have yet to build from a kit, but this is pretty cool. So watch it and enjoy. In the mean time, I’m going to go have a snooze or something. But here ya go.
Rich Gattie, KB2MOB, is a regular contributor to AmateurRadio.com and writes from New York, USA. Contact him at [email protected].
The WSPR Boss
I ordered a GymBoss workout timer – not as a keep-fit aid but as a timer controller for the VCXO-AXE WSPR transmitter.
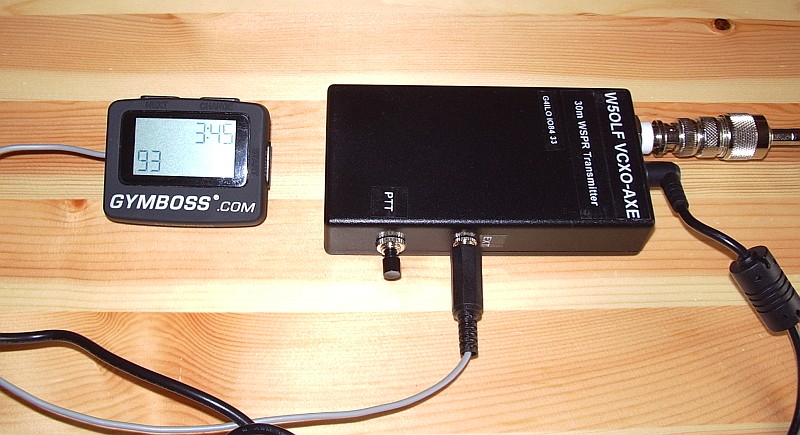
W5OLF doesn’t provide a lot of detail on how to modify the GymBoss but it isn’t difficult – especially if you don’t have fuzzy vision, shaky hands and fingers the size of Cumberland sausages. As I have all of those things I experienced an initial panic as I thought I was more likely to break the GymBoss than successfully modify it. Consequently I neglected to take any pictures of the process as I just wanted to get the job done without additional distractions.
Two screws secure the base of the GymBoss. Lift this away carefully as it is secured to the PCB by two short, flimsy and not particularly well soldered wires from the battery compartment. Once the base is clear you can remove two more smaller screws which hold the PCB to the front panel. At this point the pushbuttons will fall out – hopefully you will have made a note of exactly how they were installed so you can put it back together without too much difficulty.
The LCD display rests on the back of the PCB and can be hinged clear to reveal the bottom of the board. The beeper which has to be removed has two connections. The easiest way to remove it I found was just to grasp it between finger and thumb whilst applying the soldering iron to each of the two pins in turn, pushing the board away a bit at a time with another finger until it was clear.
I then soldered a thin screened cable to the two holes that had been used by the beeper. Using my ohmmeter I identified one hole that was at ground potential, so the braid was soldered to that one. I made a small hole in the case near to the “reboot” switch hole to allow the cable to exit. Then I carefully reassembled the GymBoss.
I attached the beeper to the end of the screened cable to check that the GymBoss still worked. To my relief, it did. I then attached a plug to match up with the socket I had already installed for P2 when I built the VCXO-AXE. The braid goes to the ground connection and the beeper signal to the Start pin. I then checked the transmitter with my power meter / dummy load to ensure that the GymBoss was turning it on at the interval I had chosen.
The timer works well and has maintained adequate accuracy for the 12 hours or so it has been running so far. It will start up to 99 transmit cycles at any interval you specify, so you can’t have it run indefinitely if you leave it unattended.
As of right now I am running a transmit cycle every 8 minutes using 2 watts into a home-made loaded whip antenna inside the shack using the central heating system as a ground. This has received plenty of spots from Europe and a few overnight from W3HH in the USA which I would not have been able to obtain if I had to key the transmitter manually.
Although manual keying is simple and fine for occasional use, I’m in no doubt that the timer makes the WCXO-AXE much more useful.
Julian Moss, G4ILO, is a regular contributor to AmateurRadio.com and writes from Cumbria, England. Contact him at [email protected].
File: Batteries, What Not To Name Them

Do you ever look at a product and wonder if someone was asleep at the switch when they named it?
Trust Fire? For batteries? REALLY?
Believe it or not, they actually get great reviews:
Matt Thomas, W1MST, is the managing editor of AmateurRadio.com. Contact him at [email protected].
TWiT.TV Special Event Station W6KB On The Air Aug 20 and 21
With the new opening of the TWiT Brickhouse studios, Leo Laporte, W6TWT is going to be hosting a special event station to celebrate the opening of the new studio, with the help a few area Hams.

Photo Courtesy of Leo Laporte – W6TWT
The Redwood Empire DX Association, who have been helpful in getting the new Amateur Radio station setup in the TWiT studios, will getting part of the special event station where visitors will be able to see the new studio and the classic Collins AM Broadcast station that will be on display and available for Hams to use 10am to 7pm on Saturday and 10am to 3pm on Sunday. The news release says each day, so I am assuming this is only for the special event. But I do remember Leo saying something about the station being available for other times, during an episode of Ham Nation. I’m sire someone will clarify this info.
The special event will use the call sign W6KB, but no word on specific frequencies to watch for the station, just that it will be on 40 and 20 meters in the afternoon and evenings. If any new info comes out, I would think it’ll show up on either Leo’s Ham Radio page or on the thread discussing this on QRZ.com.
Anyone who does make a contact with the station, can QSL direct to W6TWT, P.O. Box 1018 in Petaluma, CA. 94953 .
Wish I could work these, but I still don’t have HF and will be out of the loop for a couple days because of my other job in broadcast radio. But hey, I get to hang out with some real kick ass bands this weekend. So it’s not a total wash.
73.
Rich also writes a Tech blog and posts stories every Tuesday and Thursday on Q103, The Rock of Albany’s website, as well as Amateur Radio stories every Monday thru Friday here on AmiZed Studios.
Rich Gattie, KB2MOB, is a regular contributor to AmateurRadio.com and writes from New York, USA. Contact him at [email protected].
5V noise generator
An increasing number of electronic devices can be powered or charged from a USB socket. To charge them independently of the computer they usually come with a small switched mode wall-wart. Finding enough wall sockets for these broadband noise generators – in addition to all the wall-warts that already exist in the ham shack – can be a challenge. It would be nice if ham radio power supplies had a few 5V DC outputs.
When I started using my HTC Touch Pro smartphone as an APRS iGate I wanted to avoid using the HTC charger as I knew it created a few warblies on some of the HF bands. I wondered if I could power the phone from the shack supply instead. In the junk box I found a car charger for an old satnav that had the same mini-USB plug and fitted the cigar lighter type socket on my Diamond GSV3000 power supply. That seemed to do the job very well and didn’t appear to generate any RF noise (though the noise level here is now so high that the incremental difference made by one more switched mode device is hard to detect.) The only annoying thing about it was that it sticks rather a long way out of the front panel of the GSV3000, which is a bit of a nuisance on my narrow operating desk.

My next thought was that it would be nice to have more than one 5V outlet, perhaps in USB format, to occasionally charge other devices without requiring the computer to be on or plugging in another wall wart. Browsing eBay I saw a Griffin Dual Power USB Car Charger. This would give me two 5V USB outlets. And it was also designed to be flush with the top of the cigar lighter socket so it would look like an integral part of the GSV3000 once installed.
When it arrived I was quickly disappointed. As soon as I plugged a USB cable into one of the outlets, even with no load attached, broadband HF noise jumped up about 3 S-points. The device also got surprisingly hot even though nothing was drawing any current from it. I guess I should have anticipated that a device that size would use some kind of switching regulator and that this might result in noise. For the typical user wanting to power or charge two USB devices from their car, the noise is unlikely to be a problem. So I guess this particular solution to eliminating wall-warts is a non-starter.
Julian Moss, G4ILO, is a regular contributor to AmateurRadio.com and writes from Cumbria, England. Contact him at [email protected].
 Ham Radio Deluxe |
 W5SWL Electronics |
 Ham Radio Prep |
 KB3IFH QSL Cards  Hip Ham Shirts  HamRadioAuctions HamRadioAuctions Reliance Antennas Reliance Antennas Enigma Shop Enigma Shop |  morseDX  Ni4L Antennas  R&L Electronics R&L Electronics antennas.us antennas.us QRV QRV |
- Matt W1MST, Managing Editor
