Archive for the ‘Uncategorized’ Category
 Delta Loop for 10 Meters on a Buddipole

- Vertical Polarization

Horrizonal Polorization of Delta Loop Good for DX
The magic that makes this antenna possible is a TRSB, Triple Ratio Selectable Balun. There is a 2:1 ratio position on this balun that is reversed for a 1:2 ratio to match the coax to the 100 ohm antenna. Any balun with this ratio will work.
-

- Vertical Polorization, Good for Talking to Mobile Ops
-

- Horrizonal Polorization of Delta Loop Good for DX
-

- End of whip burinshed to metal base with Dremel tool
Ten meters is doing pretty good lately. It sure is nice to have this band open again. I worked Alaska and Argentina on 10 meter CW using this antenna. I replied to an Ea7 station on SSB but he didn’t hear me.
The Delta loop is easy to configure and easy to deploy. These photos were taken on the porch of my condo. I’ll take this delta loop to the beach when the WX clears. I needed a rainy day to catch up on things around the house.
For more information on Buddipole Delta Loops; join the Yahoo Buddipole group
Here’s a nice video featuring a Buddipole Delta Loop http://www.youtube.com/watch?v=Ikm-HICGcrI&feature=youtu.be
This antenna can be used on 12 meters also and on 15 and 17 with additional Buddipole Arms and a longer ‘home brew connecting wire’ to close the loop.
I’ll be trying these bands out at the beach, my usual ham radio portable venue.
73
de AA1IK
Ernest Gregoire
Last weekends contest disaster

I did participate in the EPC Ukraine PSK63 contest on 80/40m and the 10m RTTY contest last weekend for a while. Goal was to score some points for the “afdelingscompetitie” (local divisional contest counting). I did make 105 QSOs in total. 78 in the EPC contest and 27 in the RTTY contest. Not much, but not bad since I didn’t spend hours on the radio. Unfortenately N1MM did not support the EPC contest, I could not fill in the exchange UR12 for example, and I had to switch over to DM780 to continue. After all I cannot merge both ADIF files to a good one for conversion to cabrillio and I do have some errors counting as well. I actually made a total mess of it, so I’m sorry I will not send in my log. These russian contests are supported well by mixW, but that is not a free program and I don’t like to work with it. It doesn’t have the “feel” I like from a digital modes program. It could be personal.
Win a Wouxun KG-UV6D Dual-Band HT

AmateurRadio.com is offering a free prize drawing!
With the help of our generous sponsor,
Import Communications (formerly Wouxun.us),
we’re holding a giveaway for a
Wouxun KG-UV6D Dual-Band HT
(KG-UV6D 144/440 version)
This is a US$175 value.
Enter now to win!
All licensed hams in the U.S. are eligible to enter
Welcome to the future
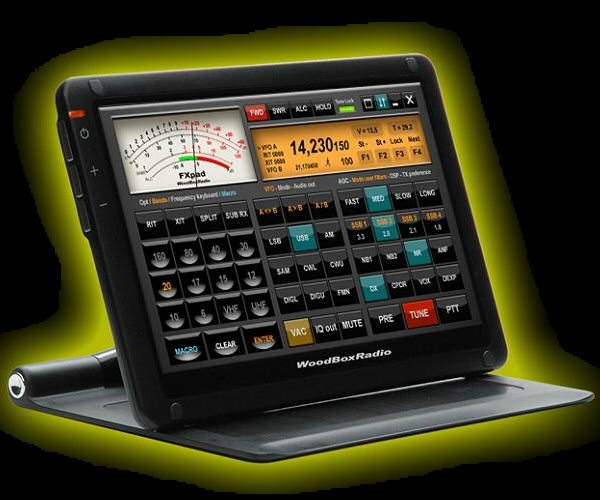
Casey TI2/NA7U recently wrote in his blog about the Elecraft KX3 which has a rather outdated look. Of course that’s just a opinion. Others will tell that it has just what they search for in a radio. But…I would rather have a flexible design were I can design my own front and knobs instead of being dependable of what the designer has in mind. With the technology of today it should not be that difficult. So, I was thinking and searching on the internet for pictures and found the site of WoodBoxRadio which already invented and sell part of my idea, the FXpad. It’s basically a Ipad for your SDR (Flexradio system) or of course any other radio. Now, you think that probabely costs a lot of money. Well just look around at that site. FXpad is just software. The pad itself only costs 179 euro, that’s not too expensive if you compare it with for example a Ipad or similair. I remind you it’s only a touchscreen, not a computer! I certainly want to have a screen like this in my new shack! Anyway, to get back to a idea for a new (QRP) radio with such a configurable touchscreen instead of knobs buttons and a display. What about a radio that is for example just as thick as a Elecraft KX3 but then with a configurable touchscreen. Software/hardware options like a internal keyer, digital modem, build in wireless LAN, progammable voiceprocessing, software updates for new features. There are endless possebilities. Just for example if you want it to look like a old Argonaut radio or just the KX3 if you like, you just change the display and it’s features to what you like. Another idea I would like is a self learning mike connection, a kind of USB plug for your mike. Just plug in any brand of mike and the radiocomputer learns the connections itself. That should be on the radio of the future….any other ideas? You’re welcome to write it as a comment on this post.
Low-profile 2-meter mobile suggestions
A fellow blogger, Brick O’Lore, wrote me with a question that I don’t have a good answer for. Would anyone care to weigh in on this?
I’d like to add a 2M mobile rig in my wife’s car. Sounds simple enough, but the trick is that I need something that is as small as possible and will have a really neat installation. I’d prefer to have a mobile rig that I can wire in (power and an antenna) and see the display (versus cobbling together something with an HT). A detachable faceplate/remote would be fine. I want 2M to hit the repeaters – any other bands or advanced features would be a bonus, but not required. The car is a 7 year-old Audi A4 and there is very little room in the footwells. It does have a neat feature – a drawer under each of the front seats. So what’s small and installs such that it will score well on the WAF (Wife Acceptance Factor) scale?
My suspicion is that there are a lot of good choices — and none are going to be particularly “affordable.” If you have a photo of your creative radio installation that might help others, send it to me (editor at amateurradio dot com) and I’ll attach it to this post. I think that would be especially helpful. If not, your insight and tips via comments are always very much appreciated!
Great Cheap Toy for those of us over 40!
OK.. I’ve been debating about getting one of these for over a year.

USB "2.0 Megapixel" Web-cam based Microscope
I finally decided to “risk it”…
At about $30 from China on e-bay (look for “joinnew”) .. they are cheap.. but are they good enough for electronics work?
Lets see. Most claim to be 2.0 MP but like mine the are really noisy above 640×480 resolution because the sensors really are 640×480 webcam sensors. They are backlit with 8 white “high brightness” LEDs.
There are issues with the setup, and are not good enough for a true scientific instrument. But a true scientific instrument would be too much for surface mount work, anyway. So one of the “20x-200x” variants would be better for electronics than a “50x-500x” unit, anyway.
Here are the results:
Highest magnification of a offset print catalog that came in the mail:

Printing press color image at max usable resolution
BATC Digilite board– various parts shot at differing magnifications. The IC is a TSSOP, so it’s pretty small. This shows that I about have hand SMT soldering down.. this is what it should look like at magnification, BTW. (See My other blog for some tips IMHO on how to SMT solder!)

TSSOP I/Q Modulator at "medium" magnification

Chip Tantalum and leads from TSSOP at "low" magnification

Leads on TSSOP at medium magnificaion, but higher magnification than IC package picture
As you can see, it’s quite adequate for board inspection. As the magnification setting increases, the unit needs to be closer to the board. At low (20x or less) magnification the unit can be a couple of inches away from the board. It *may* be possible to actually mount and solder the part on the board when using the USB Microscope at a low magnification setting.. but I’ll have to experiment.
The units come with a poor quality stand, but I plan on getting a stand off a spring loaded arm lamp (I saw a neat one on a small little lamp at IKEA the last time I was in Chicago.. maybe if I ever get back to visit mom).. I suspect if a stand could be fabricated to keep the beast out of the way of the soldering iron, it could actually be used when soldering.. especially with the protective lens cap it comes with on. I’ll figure it out later and post somewhere.
For $30, it’s adequate for electronics use and I actually recommend it as a tool for construction. The only “rip-off” part is that it’s not really usable above 640×480– the higher “res” modes overtax the capabilities of the sensor and are very noisy. (Dont believe the 1.3 or 2.0 MP claims!) Despite this, as you can tell it’s about right for circuit board work.
I used to laugh when someone told me that “right at age 40” you get presbyopia — but I literally woke up one morning 6 months after my 40th birthday, looked down at my (out of focus through my glasses) watch and thought… “oh crap!”…It literally happened to me overnight!… Now I have to take off my glasses to do close in work. I suspect as I further deteriorate with age that it will even get worse.
This seems like an inexpensive tool to cope.
Recommended for the price. Shipping was only one week from China during the “holiday rush” time. Great deal.
The Zen of Arduino
Well, I shoulda gotten out into the detached garage this weekend and worked DX.. but the weather was nice on Thanksgiving and the day after (when I had to do family stuff thankfully) and freaking cold and windy the rest. (I can heat it but it takes some planning…)
So instead, I decided to catch up on building/hacking projects from the past and ones on a weird tangent to my current construction project the BATC DigiLite.
The past project is rebuilding my ORIGINAL 1998 Dallas Semiconductor “iButton” WS-1 One Wire weather station w/humidity and the tipping rain gauge (it’s been ten years since I had it up and running last– it took me several hours to find it!). I plan on stripping all of the one-wire garbage (sorry, it never worked reliably with any cable length at all) except for the temp sensors out of both units and embedding an AVR and running RS-485 to the units.. and connecting to an Ethernet connected Arduino to report to APRS and/or Weather Underground. My kids are interested and I’m also adding a Real Time Clock and a Barometric Pressure sensor (to the inside unit since my house isn’t pressurized) and having a fairly complete station. No PC will be required and the little 8-bit processors are misers when it comes to power usage!
I want to get my older boys interested in the systems engineering aspect and the coding and the weather station is starting to peak there interest a bit. Keeping my fingers crossed!
This is actually connected to the BATC project in that I want to use the Arduino development system and the extensive library of code instead of taking time I don’t have and writing everything from scratch on a PIC or AVR (non-Arduino). I discovered that except for the bootloader and the sometimes bloated code in some of the libraries (most are very good) that it is not that much less efficient than straight-C on the AVR’s. (The Arduino environment conceals a full open source GCC C++ complier and yup, you can write in C and C++.. you actually are even under the “sketch” environment– but they conceal that well to beginners.) Yes they are small, and slow.. but at $2.50-$6 a pop for DIP IC’s that you can hack together in a hurry.
Here is a picture of some of the AVR based toys I’ve bought and put together over the years. The “real” Arduino shields are recent.. for prototyping your own stuff they suck (since one header isn’t on 0.1″ centers.. DUH!).. but since they are a standard certain modules are cheap (at least the non-Italian “bad labor condition” clones from China) and readily available. You can put together relatively inexpensively and quickly since most of the core code can be borrowed from libraries.
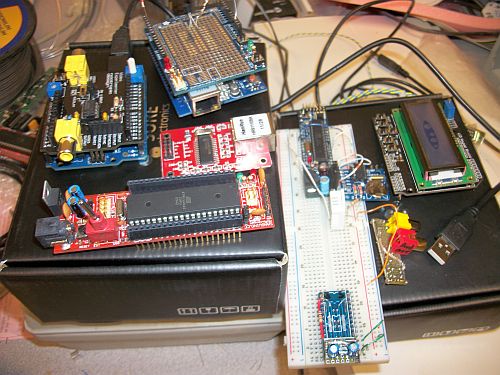
Some AVR based "Arduino" toys-- Arduino 2009 clone with a Nootropic Designs Video Experimenter's Shield, a Sanguino board, an Ethernet module, a Adafruit Proto shield on top of a Clone W5100 Ethernet/SD card shield, a "Boarduino" board with a humidity/temp sensor DHT-22 on it, and a DS1307 Adafruit RTC board attached.. and a homemade video/audio out and a e-bay "DFRobot" LCD Shield 16x2 -- "Unknown" proto card at bottom will be a 5V to 3.3V bidirectional 8-bit I/O board with a 3.3V regulator on it for prototyping.
In relearning the coding, I wrote a lot of odd stuff. Here is an example of a ATMega644 (in an Sanguino PCB) doing a bunch of stuff.. talking to a LCD (via the library in 4-bit mode) and shifting data to a 74HC595 driving the LED’s in a row.. reading from a Dallas (yes, one-wire) Temperature Sensor (those are great units if not parasite powered!) with two debounced switches… doing math for the PLL synth (the numbers in the left bottom corner).. Here is a video:
Sanguino board doing all sorts of stuff
Anyway.. I am going to use the ShiftOut function on the Arduino to program the "Ultram Technologies" PLL board (That I bought preset to 1255 MHz) for the DigiLite LO on the DVB-S modulator. I was going to use that Arduino 2009 / "DFRobot" (clone) LCD Shield to do a GUI. But most of the time the little AVR will be idle. So sad. So I came across the Nootropic Designs Video Experimenters Shield and I thought… really since the BATC project needs the real time MPEG-2 chip in the Hauppage PVR-150 board.. I might as well also do a callsign overlay.
Since the Arduino 2009 has a FTDI chip on it.. it has USB to Serial functionality on it. I can poll the UART at the Vertical Blanking interval and if it receives a PLL tune command, that can be sent to the PLL and displayed (for a short time?!?) on the Video overlay as well. For now, the video overlay shows a callsign message and the system timer in ms for debugging.
Here’s a shot of that too:
Arduino/Nootropic Designs Video Experimenter Shield Overlay Example Video
The video callsign overlay is done with this "sketch":
#include <TVout.h>
 #include <fontALL.d>
 #define W 136
 #define H 104
 TVout tv;
 char s[32];
 unsigned int n = 0;
 int index = 0;
 int messageLen = 34;
 char message[] = "...W0FMS Digital Amateur Television";
 char saveChar;
 void setup()  {
 tv.begin(NTSC, W, H);
 initOverlay();
 tv.select_font(font6x8);
 tv.fill(0);
 }
 // Initialize ATMega registers for video overlay capability.
 // Must be called after tv.begin().
 void initOverlay() {
 TCCR1A = 0;
 // Enable timer1.  ICES0 is set to 0 for falling edge detection on input capture pin.
 TCCR1B = _BV(CS10);
 // Enable input capture interrupt
 TIMSK1 |= _BV(ICIE1);
// Enable external interrupt INT0 on pin 2 with falling edge.
EIMSK = _BV(INT0);
EICRA = _BV(ISC11);
}
 // Required to reset the scan line when the vertical sync occurs
 ISR(INT0_vect) {
 display.scanLine = 0;
 }
 void loop() {
 saveChar = message[21];
 message[21] = '\0';
 for(int x=6;x>=0;x--) {
 if (x<6) {
 tv.delay_frame(3);
 }
 tv.print(0, 92, " ");
 tv.print(x, 92, message);
 }
 message[21] = saveChar;
 saveChar = message[0];
 for (int x=0; x<messageLen; x++)
 message[x] = message[x+1];
message[messageLen] = saveChar;
 sprintf(s, "%dms    ", millis());
 tv.print(0, 0, s);
 }
Assuming that you’ve downloaded the Enhanced TVOut Library into the \arduino\libraries directory.. the code above is how simple something like this can be with Arduino and the libraries. This compiles to less than 10K or 1/3 of the ATMega328P (on the Arduino 2009, or 1/6 of the ATMega644 on the Sanguino).
This is why I like Arduino. It took me less than an hour to build the shield and write the example code. I am not easily impressed and even that isn’t that impressive.. but the Closed Captioning decoder example is impressive. It works really well.. and is so simple really for what it is.
I know that hopefully some day the TV input portion of the BATC project will go from SD analog to SD/HD full digital and a little hack like this won’t be appropriate anymore. But I’ve had a blast with it and I really hope I can leverage it into a learning experience for the kids also.
Pick up a few of these Arduino gadgets (now you can buy them at Radio Shack if you are in a hurry– and want to pay 3x the clone price from e-bay/China) and give it a try– it’s quick fun experimentation and I can now see the ZEN.
73, Fred W0FMS


