Archive for the ‘ham radio’ Category
 Sandpiper 23cm 19 Element Yagi
It didn't help that the elements were supplied in the wrong sequence with a couple of 'wild card' elements from another antenna design altogether. Marc, the manufacturer, was extremely apologetic and helpful in sending me the antenna measurements straight away by email. However, it meant the additional purchase of a metal rule and measuring callipers from our local excellent ironmonger to get cracking.
After what seemed an afternoon of measuring and re-measuring, the beam started to take form. This involved discarding one element and chopping down another to size. In the initial construction the reflector ended up as the first director. What was supposed as a reflector must have come from a 70cm design. No wonder the thing worked better sideways.
But now, all is well. Coupled with my 1W Alinco DJ-G7 I worked Stoke on Trent (2E0DDD) simplex from a local Anglesey hilltop thanks to a slight tropospheric enhancement. It seems to offer the best combination of gain and beam width. This means your calls will be heard reasonably widely with enough gain (17.1dBi). You won't be losing out too much due to de-pointing either. Its size also means that it can be supported by a modest pole/guys or tripod without offering too much windage.
I think it's possibly the most optimal solution for hilltop and portable operating.
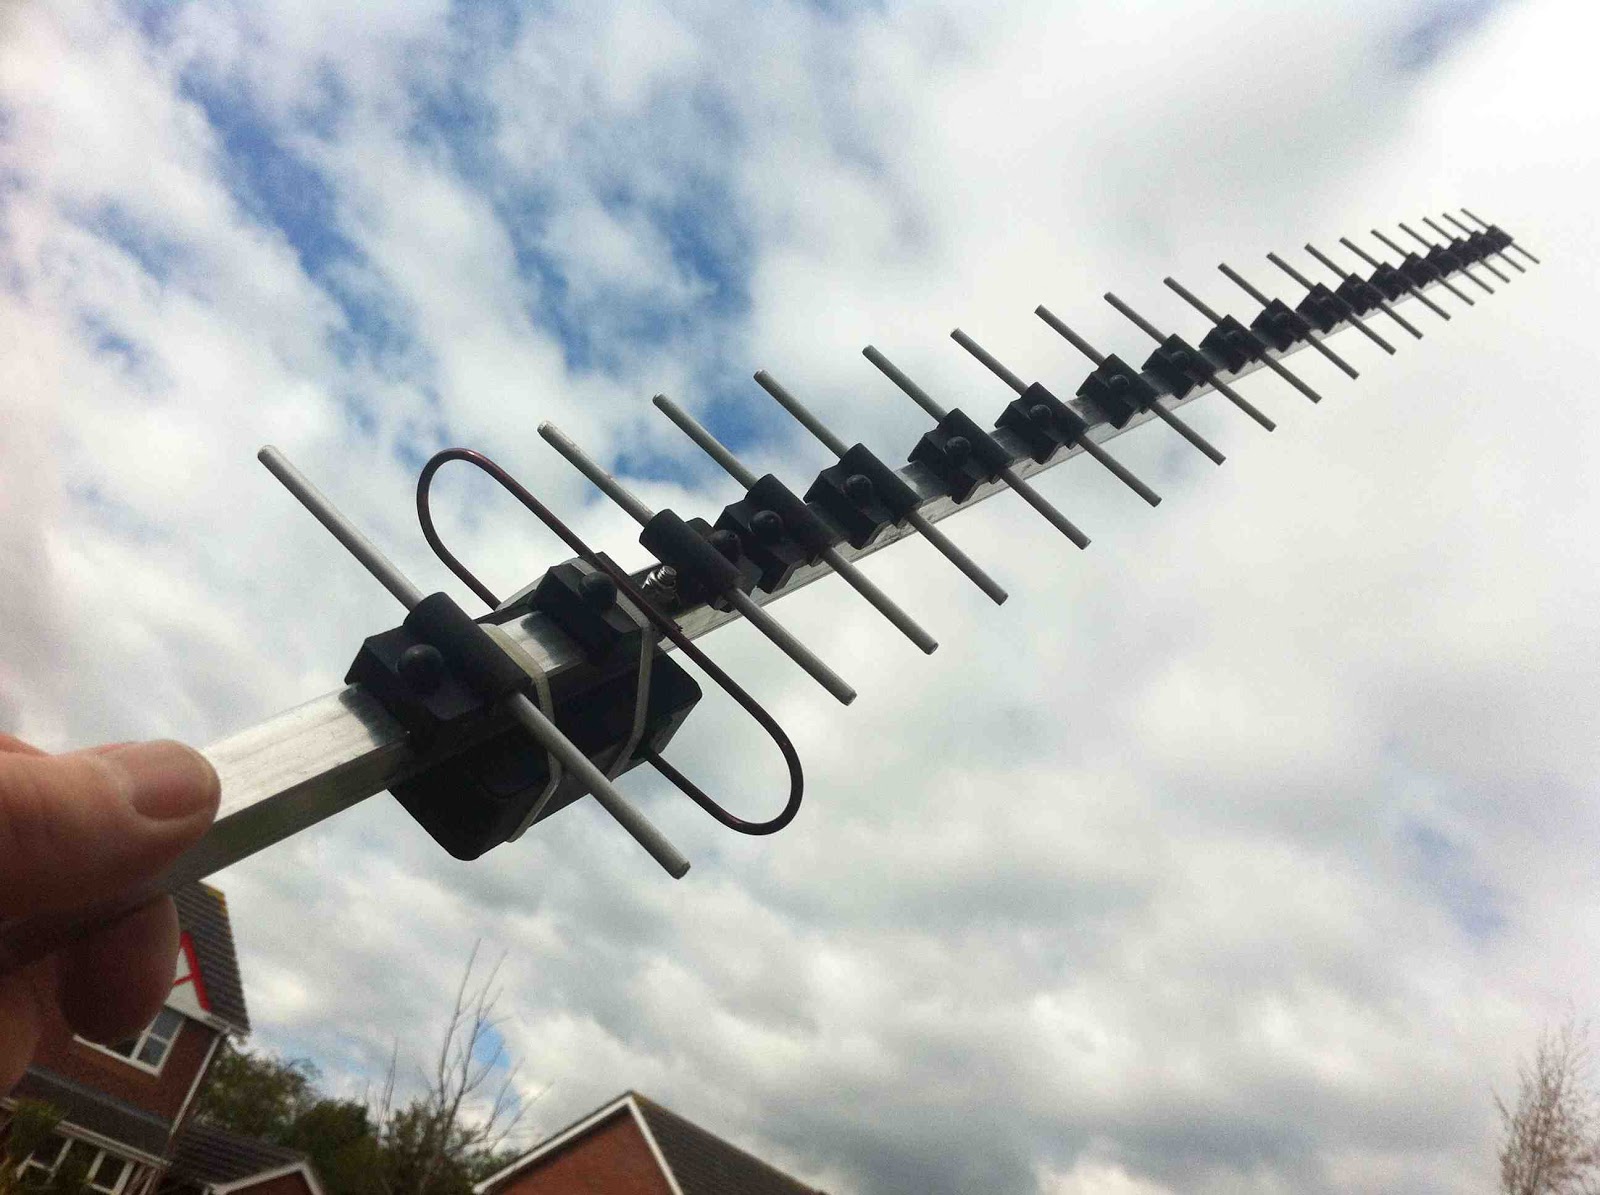 |
| The completed 19 element 23cm Sandpiper yagi |
Finished with “Introduction to Emergency Communication!”
Assuming my final assignments are acceptable to my mentor, I’m finally done with my online ARRL course! “Introduction to Emergency Communication (EC-001)” began on February 29, and it officially ends next Friday, April 27. I wrapped it up tonight since next week is going to be pretty full.
When I signed up for this course I had no idea I would learn so much. I highly recommend it to every ham, no matter how long you’ve had your license. The text really is well done, the assignments are far from busy-work (they took me places I’d never gone before, and probably wouldn’t have gone had I just read the book), and if all the mentors are like the mentor I had (Sena Frank, NI1Y), you’ll receive sound advice and have a great time.
Now I’d like to take the next course in the sequence! “Public Service and Emergency Communications Management for Radio Amateurs (EC-016)” is free, I see. But I’ll probably take a week or two off before taking that on. You can learn more about these online courses at http://www.arrl.org/online-course-catalog.
I’ll end this post with the syllabus of the course I just completed, so you can see what is covered:
Course Syllabus for Introduction to Emergency Communication (EC-001)
Section 1: The Framework: How You Fit In
1. Introduction to Emergency Communications
2. Amateurs as Professionals
3. Network Theory and Design
4. Emergency Communications Organizations and Systems
5. Served Agency Communications Systems
A. Served Agency Communications Systems
B. Working Directly with the Public
Section 2: The Networks for Messages
6. Basic Communications Skills
7. Net Operations:
A. Basic Net Operations
B. Introduction to Emergency Nets
C. Net Operating Guidelines
D. The FCC Ruling on Drills and Employees
8. The Net Control Station
9. Net Control Station Operator Practices
10. The Net Manager
11. Introduction to the National Traffic System
12. Specialized Net Operations
13. Severe Weather Nets
Section 3: Message Handling
14. Basic Message Handling – part 1
15. More Basic Message Handling – Part 2
Section 4: What Happens When Called
16. The Incident Command System
17. Preparing for Deployment
18. Equipment Choices
19. Emergency Activation
20. Setting Up, Initial Operations and Shutdown
Section 5: Considerations
21. Operations & Logistics
22. Safety & Survival
23. ARES® PIO: The Right Stuff
24. Alternative Communication Methods
25. What to Expect in Large Disasters
26. Hazardous Materials Awareness
27. Marine Communications
Section 6: Alternatives and Opportunities
28. Modes, Methods and Applications
29. Other Learning Opportunities
Final Assessment


![]()
Handiham World for 18 April 2012
Welcome to Handiham World.
You can do it!
Today, just as we did last week, we are going to begin with Troubleshooting 101 as part of our initiative to help new ham radio operators (and even some of us older ones) learn how to do some basic troubleshooting for ourselves. Yes, it can be tempting to ask someone else to do things for us. This can become a bad habit when it keeps us from learning new things, especially things that we could – with a bit of practice – learn to do for ourselves. Knowing these basic things can serve us well in the future when no help is available. This next simple exercise is one that we will be practicing at this summer’s Radio Camp. You can do it yourself once you learn a few basics.
Troubleshooting 101
Help! My HF radio is dead!
One of the things we grow used to is turning on the radio and hearing stations, even if they happen to be weak or off frequency. We quickly learn, as new operators, how to tune around and adjust the VFO to hear stations clearly. Sometimes we turn the radio on first thing in the morning and hear nothing but static from far-off thunderstorms, but that is nothing new. We know that we can tune across the band and find some really strong stations.
But this morning is different. You turn the transceiver on, but there is nothing – no sound at all, at least any that is loud enough to detect without headphones. What could be wrong?
Well, the best thing to do is to follow the advice in “The Hitchhiker’s Guide to the Galaxy” and don’t panic. Many of our Handiham members are blind, so we will include some troubleshooting steps for them. We are going to check off everything without making assumptions. Some of our readers will think that this stuff is obvious, but in the grand scheme of things we must allow for a wide range in the knowledge and experience of amateur radio operators. Some will be familiar with the “dead radio” problem and others will be experiencing it for the first time. Let’s cover all the bases.
- Yes, I know this is obvious, but did the radio really turn on when you flipped the switch? Did the radio make a telltale sound when switched on? Even if I could not see the lighted display of my IC-7200, when it is powered up I hear a click as a relay energizes in the connected autotuner and my computer makes a connected sound to tell me that a USB device is now on line. Keying the PTT in SSB mode and not talking should trip the transmit relay without sending any RF, so you can hear the click of the relay. Have you checked the power supply switch?
- Make sure that you have not left headphones plugged into the PHONES jack. Doing so on most radios will mute the speaker.
- Check the AF gain (volume) control. Maybe you turned it all the way down the last time you used the radio. Don’t laugh – I often do this if I am in the radio room and get a phone call or start listening to something else. Turn up the volume and if you can hear stations, you have solved the problem.
- Check the RF gain control. Sometimes this gets turned down by accident, or perhaps you turned it down in a previous session because you were dealing with a very strong signal. Turn it back up and try tuning around again. Incidentally, I often find that users of the Handiham remote base stations leave the RF gain turned down on the TS-480 radios. No wonder the bands seem dead!
- Okay, so now we have power to the radio, the RF and AF gains are adjusted, and there is still no sound. Many radios have squelch controls, and this little feature can cause all but the very strongest signals to be completely muted. Perversely, this control is sometimes a concentric one that shares the same spot as the volume control. It is easy to misadjust, by which I mean setting it to anything but completely off! With the volume turned up to mid-range turn the squelch all the way down. Note that you don’t want the volume cranked up to max when you do this, as the sound may be startlingly loud!
- Don’t forget the other adjustments your radio may have to tailor the sound. Filter settings and pass band tuning might be set incorrectly. If they have detents, return them to “normal”.
- Still nothing at all? Retrace your steps to make sure there is power to the radio. Check the power supply and connection to the radio. Check the fuses and breakers at the station equipment and at your home’s breaker box. Make sure everything is connected as usual.
- Assuming that you do actually have power and that the radio is powered on, you could have a problem with the radio itself. Sometimes oxidation occurs on the mechanical connection in the headphone jack. Push a headphone plug in and out to clear it. Don’t forget to listen via the headphones to eliminate the unlikely possibility that the speaker coil has opened. If any of this resolves the condition, you are good to go. If not, take further steps to have the radio checked. Ask for help from your local radio club before assuming that the radio has failed. There are probably club members who are experienced with that radio and who can help you determine what is wrong and whether it needs service.
- Let’s say that you do actually hear a gentle hiss from the radio but that you can’t tune in any stations. Check to see if you have locked the main tuning dial by mistake. If the tuning is locked, you can twirl the dial all day long and the frequency will not change!
- Now you have tuned across the band and there are no signals. Try another band and check again. Still nothing? Check to make sure that the antenna’s feedline is connected. If you have an antenna switch, make sure that it is in the correct position. Don’t forget the radio’s antenna selector if your transceiver has one!
- Try WWV on 5 and 10 MHz. Both put out awesomely strong signals. If you hear a weak or warbling signal, conditions may be poor.
- Next, tune your radio to a local commercial AM radio frequency. You may not be used to doing this, so be aware that to direct enter such a frequency you may need to key in something like
zero dot eight three via the direct entry on your keypad to get “830” on the AM radio dial as I do here for local station WCCO. Of course you will choose your own local station if you don’t live here in the Twin Cities. If you can hear a local AM station it is likely that the radio is fine and that HF sky wave band conditions are just extremely poor. By tuning the local commercial AM station, you can hear a ground wave signal that does not depend on sky wave propagation. - If the local commercial station comes in fine, try checking the SWR on your antenna system. If that passes muster, it is likely that your station is intact and functioning normally and that HF band conditions are just really, really poor following a solar event. If the SWR is terrible, perhaps the feedline or antenna have failed. That is a separate troubleshooting issue.
- If the HF conditions are indeed so bad that you cannot hear sky wave stations, you can confirm this by checking various solar weather and propagation websites. It is generally a matter of waiting a few days for conditions to return to normal. When I was a young lad and had only recently gotten my General license, I ran into just this situation. I even went out side to check to see if my antenna was still up in the air! It was the first time I had experienced what amounted to a radio blackout of sky wave propagation caused by a solar event. Today we can confirm our suspicions about solar weather via the Internet, but back then it was a very puzzling thing. Eventually I did learn more about solar weather and HF propagation so that the next solar storm did not catch me by surprise and make me think my antenna had fallen down!
Email me at [email protected] with your questions & comments.
Patrick Tice
Handiham Manager
Handiham World for 11 April 2012
- The cable is good and ready for use.
- The cable is open through the outer shield.
- The cable is open through the center conductor.
- The center conductor is shorted to the shield.
- An intermittent condition exists that causes a short or open when the cable is flexed.
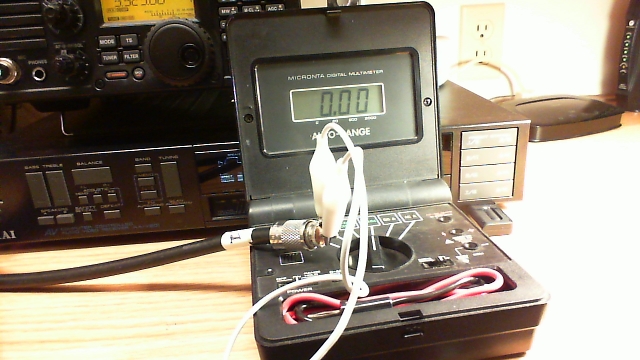
Photo: Simple test gear for a continuity check includes a clip lead and a multimeter with a continuity buzzer.
- Take one end of the disconnected coax. Remember, we are NOT able to test continuity with the coax connected to any equipment or antennas. Touch one multimeter lead to the center pin of the PL-259 plug and the other to the outer metal part of the plug. You should hear nothing, indicating that the cable is not shorted. This is always the first test, because we must eliminate the possibility of shorts before we can make any assumptions about the center conductors or the shield.
- Next, take the clip lead and use it to short the coax at one end by connecting the center pin of one of the PL-259 connectors (it doesn’t matter which one) to the shield side of that same connector. Take the free end of the coax and touch one multimeter probe to the center pin and the other to the metal shield of that PL-259. You should now hear the buzzer that indicates continuity.
- You have now completed the basic tests, because you have determined that the cable is not shorted and by passing a current through the entire length of the center conductor and back through the shield, you have determined that both the center conductor and shield are intact. The final test is to flex the cable and wiggle the connectors while performing both of these tests again. If it helps, you can add two additional clip leads to connect the multimeter probes so that you don’t have to try to hold them in contact with the PL connectors. This will help determine if the cable is intermittent.
- If the cable fails any of the tests, feel free to test the shield to shield and center pin to center pin connections separately. Never use a cable that is suspect, because it could cause damage to your equipment.
- Last but not to be missed is a final check along the length of the cable for any obvious bad spots, such as a break in the outer jacket or any suspicious bends or bumps in the cable.
Patrick Tice
Handiham Manager
Update to the FM VHF Operating Guide
I did a little updating on my FM VHF Operating Guide. Take a look.
Your feedback is appreciated.
73, Bob K0NR
A Wasted Trip Thoroughly Unwasted
Last Saturday I picked up Andrew (KCØYFY) and his wife Joleen (KDØDOT) at 8:00 A.M. and headed for the monthly meeting of the West Central Minnesota Amateur Radio Club. It’s a 45 minute drive from Granite Falls, so we had plenty of time to talk. But once we got to the location of the meeting, our conversation took an abrupt turn. We were the only ones there!
Andrew asked, “You don’t think the meeting got canceled because of Easter weekend?”
I groaned. No way! “Here,” I said, grabbing my cellphone, “let me give Dean a call.” Dean (NYØI), the fellow who first invited me to join the club, is the Energizer bunny rabbit of ham radio — especially when it comes to building and maintaining the VHF/UHF repeaters out our way. But we quickly discovered that none of us had his phone number.
“Wait a minute!” I said. “We’re HAMS! Let’s call somebody on the radio!” What a novel idea. To think of using a radio instead of a cell phone to call another ham! I put down my cellphone and grabbed my HT. “NØIP monitoring,” I called on the local repeater.
“NYØI,” came back Dean! “The meeting has been rescheduled to next Saturday,” he explained when I inquired. “We published it on our Facebook page and announced it on the net. Sorry!” Again, I groaned. Down in Granite Falls I can’t hear the repeater they use for their net, and I long ago suspended my infernal Facebook account. “But how about I meet you for breakfast?” Dean asked.
I looked at Andrew and Joleen, who nodded. “Sure!” I replied. “Where do you want to meet?”
After getting directions to a small-town diner just up the street, we headed there and found a table. Within minutes, Dean arrived. When the waitress came by, he asked, “What’s your birthday special?”
“It’s your birthday?!” I asked. Sure enough, it was his birthday, and he had dropped everything to meet us at a moment’s notice. What a guy!
After a great conversation that ranged from ham radio to church life, Dean invited us up to the repeater site on the edge of town. We piled into our cars and headed over to the tower of the local FM broadcast station, where Dean pointed out three verticals mounted partway up. These were the antennas for the two repeaters he had there, he explained. Two huts crouched at the foot of the tower; one was the FM broadcast station’s, and the other the local sheriff’s (for their own repeater which used an antenna at the very top of the tower). Dean took us into this second hut, which also contained his two repeaters — one on 2 meters, and the other on 75 cm.
I had never seen a repeater in my life. Dean explained how they worked, and he told us about past equipment and current plans to improve what they had. Having been an HF CW guy all my life, I felt like a tourist in a foreign country — and I enjoyed every minute of it! After thanking Dean, the three of us headed back to Granite Falls.
On the long drive home, we continued the conversation we’d begun on the way there. The local ARES® Emergency Coordinator position is open, and Andrew is wondering if I might consider taking it. I promised him I’d contact the DEC and learn more about what is involved. Lots to think about!
As far as attending the club meeting that never happened, I suppose it was a wasted trip. But thanks to Andrew, Joleen, and Dean it most definitely was not wasted! After all these years as a ham, I’m finally meeting fellow hams in person. I wish I’d done it sooner.


![]()
Part II: Say Goodbye to the BNC
I had previously commented on the how most of the handheld radios are adopting SMA connectors instead of BNC connectors. See Say Goodbye to the BNC. For example, the Yaesu FT-60 uses a female SMA connector for the antenna connection. I’d say this is the standard approach for the amateur radio market.

Female SMA on Yaesu FT-60
A few manufacturers have decided to use the male SMA connector as the antenna connection for their handheld radios. I suspect that these manufacturers are following the lead of commercial manufacturers (e.g., Motorola) who use the male connector.

Male SMA on Wouxun KG-UV2D
Many hams will want to adapt these SMA connectors back to the good old BNC, to connect to existing BNC connectors or HT antennas. I had commented that these adapters are mechanically weak but recently I have come across some more sturdy adapters.

SMA-BNC Adapters
The adapter in the center is the common adapter for cable use but arguably mechanically weak for adapting HT antennas. The adapter on the left adapts BNC antennas to an HT with a male SMA connector. The adapter fits snugly on the top of the HT and provides mechanical support. Similarly, the adapter on the right adapts BNC antennas to an HT with a female SMA connector.
The adapter on the left is available from Import Communications. The other two adapters came from Affordable Radio.
I have just started to use these more capable adapters so I am not sure how reliable they are in regular use. In any case, it makes sense to be careful to minimize the strain on any radio connector.
73, Bob K0NR


