Archive for the ‘aprs’ Category
 Sainsonic AVRT7 iGate
For the past few months I have been having a love hate relationship with a Raspberry Pi Model B and Direwolf. The software runs perfectly well on my Pi3 but makes my other Pi fall over relatively easily. When this is at home it is no problem at all. I just reset and it will restart the software but the trouble is it has been at the clubs QTH. Ok I can log in remotely and deal with it but when it refuses to connect to the internet it becomes a pain. So I was looking for alternative solutions.
I came across the Dorji DRA818v module a little while ago and though that would work. It is a simple module that just needs a PCB and some connections to the Pi. But hang on, there are PCB’s you can already buy. But they don’t have filtering. Now hang on again there are those with filtering too. Now that looks good. Then hanging on for a third time the Sainsonic AVRT7 does it all simply!

So, now there are a bunch of choices for the same module. I’ve ordered a AVRT7 and around 30+ working days later I should receive the new toy.
There are a few warnings about counterfeit Prolific chips and trouble programming. I can see some frustrating times ahead but I’ve never been one to shy away from a challenge. I just hope it’ll be one that can be beaten. I will also get myself a SV1AFN pcb when I get around to it for home / experimental use. Just don’t tell Mrs g7kse!
Whilst we are on the subject I am really impressed with Direwolf. WB2OSZ has produced a really great bit f software that is easy to install on that Raspberry Pi and RTL Dongle you bought that you’re not using. The world can only get better with loads of iGates 
What it takes to make the AP510 APRS tracker useful

This small VHF APRS tracker can easily be improved with some simple measures:
- The 1 Watt of output power is often too little to reach the desired APRS digipeater reliably enough. It is much simpler to improve the antenna than to add an amplifier and it can be done as follows:
- Use a longer telescopic antenna. In the picture I have used an antenna that can be extended from 16.5 cm to 45.2 cm. Depending on how you use the tracker, always extend the antenna as much as practically possible.
- Add an external counterpoise or “tiger tail” of length a quarter of a wavelength. That’s about half a meter. In the picture it is fastened on the antenna’s BNC connector by means of an 8 mm ring terminal.
- Update the firmware, if you haven’t done so already, to the version from 3 Nov 2015. I have written before about my experience with that firmware.
- Get rid of the pirated USB chip in the interface cable. I did that last year and now interfacing it to the PC and updating it is so much simpler.
These simple steps have made my AP510 tracker much more useful.
The post “What it takes to make the AP510 APRS tracker useful” first appeared on the LA3ZA Radio & Electronics Blog.
What it takes to make the AP510 APRS tracker useful
This small VHF APRS tracker can easily be improved with some simple measures:
- The 1 Watt of output power is often too little to reach the desired APRS digipeater reliably enough. It is much simpler to improve the antenna than to add an amplifier and it can be done as follows:
- Use a longer telescopic antenna. In the picture I have used an antenna that can be extended from 16.5 cm to 45.2 cm. Depending on how you use the tracker, always extend the antenna as much as practically possible.
- Add an external counterpoise or “tiger tail” of length a quarter of a wavelength. That’s about half a meter. In the picture it is fastened on the antenna’s BNC connector by means of an 8 mm ring terminal.
- Update the firmware, if you haven’t done so already, to the version from 3 Nov 2015. I have written before about my experience with that firmware.
- Get rid of the pirated USB chip in the interface cable. I did that last year and now interfacing it to the PC and updating it is so much simpler.
These simple steps have made my AP510 tracker much more useful.
The post “What it takes to make the AP510 APRS tracker useful” first appeared on the LA3ZA Radio & Electronics Blog.
Raspberry Pi APRS iGate
Further to my previous post(s) on APRS and Specifically Direwolf, here’s something with a bit more meat.
APRS has always been a bit of a thing for me. I like to go for a ride or a walk on the Lakeland fells and whilst I don’t get to go on as many SOTA trips as I’d like I do nearly always carry a hand held when I’m on the mountain bike. I know that there are a few local hams who like a bit of APRS and you never know when you’ll need a way of communicating when you’ve gone over the handbars and smashed your phone….
So what?
Well I also have an early Raspberry Pi model B and an RTL-SDR dongle. I live quite close to a digipeater and also have a terrible QTH for an iGate. So, I thought I’d combine the two with my liking f APRS. I’m glad to say the process was really easy and very robust. Want to have a go yourself? Ok…
So lets start
- Get you SD card and load it with the OS (I used the Raspian image from the Raspberry Pi site)
- Get a copy of the Direwolf software from WB2OSZ (and simply excellent documentation) from GitHub
- Have a look in the Direwolf docs folder. Follow the Raspberry-Pi-SDR-IGate instuctions and the Raspberry-Pi-APRS. I’m definitely not going to try and replicate of better these docs as they are perfect
- Get an APRS passcode from Magicbug
- Off you go, simple as that. Any issues then the Direwolf Yahoo Group should sort you out

That’s it really. There are a few little odds and sods like beaconing your iGate. This can be achieved by adding a line into the sdr.conf file so it looks a little like this:
# # Sample configuration for SDR read-only IGate.
#
# We might not have an audio output device so set to null.
# We will override the input half on the command line.

ADEVICE null null
CHANNEL 0
MYCALL MX0WRC

# First you need to specify the name of a Tier 2 server.
# The current preferred way is to use one of these
# regional rotate addresses:
# noam.aprs2.net - for North America
# soam.aprs2.net - for South America
# euro.aprs2.net - for Europe and Africa
# asia.aprs2.net - for Asia
# aunz.aprs2.net - for Oceania

IGSERVER euro.aprs2.net

You also need to specify your login name and passcode.
# Contact the author if you can't figure out how to generate # the passcode.

IGLOGIN MX0WRC 12345 (your passcode)
PBEACON sendto=IG delay=0:30 every=10:00 symbol="igate" overlay=R lat=54^38.5611N long=3^3$

# That's all you need for a receive only IGate which relays
# messages from the local radio channel to the global servers.
I’ve not managed to get it to start up automatically if it falls over with the dw_start.sh script but that is a work in progress. Here we are on APRS.fi

Ok, thats all very well but mine is remote. There are a few suggestions from the RPi people but I plumped for Weaved and tightVNC as a solution. Here are the instructions I followed for Weaved, and for TightVNC . If you don’t fancy a link then try this:
Install Weaved and run the installer
sudo apt-get install weavedconnectd
sudo weavedinstaller
Then TightVNC
sudo apt-get install tightvncserver
Run it once to do the password thing, then to run at boot
sudo su
sudo nano vncboot.sh
Enter this into nano
#! /bin/sh
# /etc/init.d/vncboot

### BEGIN INIT INFO
# Provides: vncboot
# Required-Start: $remote_fs $syslog
# Required-Stop: $remote_fs $syslog
# Default-Start: 2 3 4 5
# Default-Stop: 0 1 6
# Short-Description: Start VNC Server at boot time
# Description: Start VNC Server at boot time.
### END INIT INFO

USER=pi
HOME=/home/pi

export USER HOME

case "$1" in
 start)
  echo "Starting VNC Server"
  #Insert your favoured settings for a VNC session
  su - $USER -c "/usr/bin/vncserver :1 -geometry 1280x800 -depth 16 -pixelformat rgb565"
  ;;

 stop)
  echo "Stopping VNC Server"
  /usr/bin/vncserver -kill :1
  ;;

 *)
  echo "Usage: /etc/init.d/vncboot {start|stop}"
  exit 1
  ;;
esac

exit 0
Then chmod
chmod 755 vncboot
Lastly
update-rc.d -f lightdm remove
update-rc.d vncboot defaults
I can’t tell you how useful to follow the steps enough. I found that one RTL dongle isn’t quite the same as another so there can be issues. So much so that I wiped the SD card a few times so as to get right and simple. If you didn’t want to run Jessie, Jessie lite will do but you’ll need to find an alternative way to remotely access the RPi, with something like SSH as VNC doesn’t work (easily) without the X server.
As always, comments, suggestions and alternative approaches are always welcome, after all this is a hobby and none of this hard work belongs to me, I just follow the instructions 
HF Email From The Mobile?
Last summer when we were camping in the national parks, there were many campsites where we had no cell phone service. I am not complaining about that, but our work around to communicate back home to the XYL often required a trip to the pay phone (sometimes hard to find). I thought about perhaps using APRS’s capability of relaying short pieces of text as emails. Part of the problem is that there are many areas of the parks that don’t have any APRS digipeater coverage (Glacier and Yellowstone National Parks for example). How to get a message through?
Then I remembered my MARS station (AEN5AC) in Iraq. I was using an ICOM IC-7000 and an SCS PTC-IIusb modem to pass MARSGRAMS from my location north of Baghdad to another station at the US embassy in Qatar. The pairing worked quite well and I was consistently able to connect and pass traffic using PACTOR 3 at the 1400 baud rate. Could I use a similar setup to provide an HF email option while camping this summer?
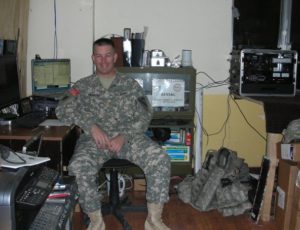
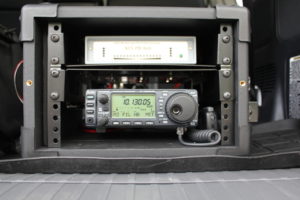
I dug out my SCS PTC-IIusb modem. I had not used it since shutting down the MARS station in June of 2008. Everything was still in the box. To include the cables necessary to interface the modem with an ICOM IC-706MKIIG… the same rig I use for HF mobile.
I pulled out my spare IC-706MKIIG. Coming back to Kansas from Field Day in California back in 2009, my IC-706MKIIG quit on me. I ended up buying a second at the HRO in Denver and sent the broke one to ICOM. ICOM fixed it and returned it. I kept it in the box and it went back on the shelf. I did order a 6 pin Molex connector with powerpoles to allow for an easy power connection (#9). I connected the two cables from the modem to the rig. Once cable is for the data and plugs into the 706’s 13 pin accessory connection (#4). The other cable connects to the 706’s CI-V interface (#6) to have the radio change frequencies based on what station is being contacted.

I had the basic hardware of a HF email station, except for a computer. I would need one that would function out of the vehicle. This would probably require a laptop. I also decided for the ease of simplicity that the computer should be Windows driven (instead of Linux). Gasp! The bottom line is that the software and drivers required to send email via HF and use the SCS PTC-IIusb modem is Windows based. The answer ended up being an Dell XPS 15.

Using a Windows based computer helped me with a number of summer travel tasks that could not be accomplished by my small Linux laptop:
(1) Run the software required for HF email (more on Winlink and Airmail later)
(2) Run ARRL’s TravelPlus for Repeaters
(3) Run RT Systems radio programming software for my TM-D710A
(4) Run RT Systems radio programming software for my VX-8RGs
(5) Read the SD card from my Canon digital camera
Interestingly enough, the new laptop does not have a CD/DVD drive nor an RJ-45 connection for a LAN cable. Neither of these have been a show stopper yet.
ARRL’s TravelPlus for Repeaters
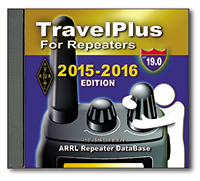 I had purchased TravelPlus for Repeaters with the intent of installing it on my existing Linux laptop and running it under a VirtualBox Windows session (similar to how I run iTunes on my Linux laptop). However the software failed to install. I tried troubleshooting and looking at suggested fixes found on the forum sites but still had no luck. I tried installing TravelPlus using WINE. It installed but would not run as well.
Dell XPS 15 to the rescue. As the laptop does not have a CD/DVD drive, I copied the drive onto network storage. I then was able to install TravelPlus over the network and it is working without issue.
RT Systems Programming Software
The RT Systems programming software works fine under a VirtualBox Windows session. As I was moving all my vehicle related radio/computer tasks to the new Windows laptop, I attempted to install the programming software for the TM-D710A (used for beaconing the location of my vehicle and talking on VHF/UHF). Following a similar procedure that worked for TravelPlus, I copied the programming software from the install disks to a network drive. The software installation for the TM-D710A worked without a hitch. The software for the VX-8RGs (HTs we use for around camp and hiking) failed to load. The error said that I must use the original disk to install. A big challenge when the laptop doesn’t have a CD/DVD drive. The work around is that you find another Windows computer with a CD drive, load the software CD, then back on the driveless laptop, map the CD drive (like you would map a network drive). That worked and I was able to install the programing software for the VX-8GR.
HF Email Software
There are two main choices for software to allow for HF email: RMS Express and Airmail. I installed both. Airmail was the same program I used in Iraq and it offered easy configuration with the IC-706MKIIG and the SCS PTC-IIusb.
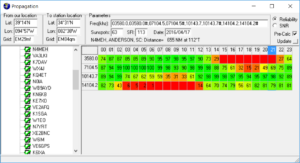
I now had all my equipment for a test run setup in my basement hamshack: spare IC-706MKIIG, SCS PTC-IIusb, and the Dell XPS 15 with Airmail. I connected the IC-706MKIIG to my Elecraft tuner and used my existing G5RV antenna. Airmail configures easily. The software has a list of stations offering mailbox services that can be viewed on a propagation chart by frequency and distance. Based on time of day, I selected a station in Texas that offered a 40M PACTOR 3 connection. Airmail allows me to click on the frequency in the propagation chart which then changes the dial frequency of the radio. After listening to see if there were any ongoing connections, I initiated contact. The modem lights flashed and the rig clicked between transmit and receive. The connection was made and I was able to send a test email as well as a position report.
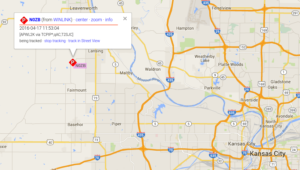
Success! The position reports that go into the Winlink system are copied over into APRS. Now, even if I am not able to reach a digipeater with my VHF APRS beacon, I can send a position report over HF to let the XYL know where we are.
I then thought about the steps I would have to take of transitioning my IC-706MKIIG configured for HF mobile to be ready to work with the PTC-IIusb to send email. As the remote head is located up near the drivers seat, this would present problems with being able to observe the modem, laptop, and radio control head all at the same time.

What if I just dedicated the spare IC-706MKIIG rig to the task of HF email? It would save me time and bother in pulling and plugging cables. It would also give the camping option of being able to operate HF from outside the vehicle.
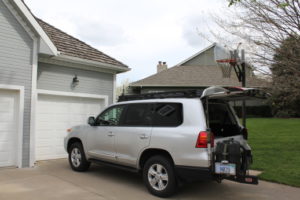
Using an additional iPortable box, I rack mounted the spare IC-706MKIIG and the SCS PTC-IIusb. Now I will have a spare HF rig with me, so if one goes out I will still be operational. I also attached the Tarheel screwdriver antenna’s rocker switch to raise and lower the antenna on the side of the box. During normal HF mobile operations, the TurboTuner (connected to the other IC-706’s tuner connection and CI-V connection) manages achieving a correct match between the operating frequency and the screwdriver antenna.
I only have the one TurboTuner. The TurboTuner requires a connection to the CI-V. So does the SCS PTC-IIusb. My solution was to leave the TurboTuner alone. Instead, using the rocker switch, I can manually tune the antenna while visually observing the 706’s SWR meter.
To transition between using the 706 dedicated to HF mobile to the 706 now dedicated to HF email, I have to do the following:
(1) disconnect the antenna feedline from the TurboTuner
(2) disconnect the control line that goes from the TurboTuner to the Tarheel screwdriver antenna
(3) connect the antenna feedline directly to the HF email 706
(4) connect the control line to the rocker switch
(5) connect the laptop to the SCS PTC-IIusb via a USB cable
(6) connect the iPortable’s powerpole connection to the junction box in the back of the vehicle
… then I am ready to go. The iPortable box rests nicely on the vehicle’s tailgate, next to the laptop. All at about lawn chair height. Not only can I use this setup to send email via HF, but I can also use it for causal National Parks On The Air contacts as well.
What’s left to do:
(1) Constant cooling fan modification for both IC-706s (see AD5X’s article)
(2) An extended control cable for the Tarheel screwdriver antenna. This will allow me to further remote away from the vehicle, but still use the antenna.
(3) A length of antenna feedline for remoting.
(4) A length of powerpole-ready powerline to attach to either the travel trailer battery or directly to the spare vehicle battery… again for remoting away from the vehicle.
(5) I have a set of Heil headsets that worked with my IC-7000. I think if I get the AD-1ICM, I should be able to use them with the 706.
(6) A Heil HS-2 hand PTT switch to use with the headset.
RPiGate again
For a few weeks I have been attempting to use an RTL-SDR and a raspberry Pi 2 as an APRS iGate. Dutifully following a number of tutorials I failed to ‘Kalibrate’ the dongle several times and so put it to one side. Today however I have managed to get the thing running. Not with the original tutorial but with a different application called ‘Direwolf’.
There are quite a few clever sods kicking about and the guy who pulled this together is no exception. John Langer,WB2OSZ has not only produced a cracking application but also one of the most straightforward and detailed installation documents as well. What I particularly liked was the way that there was a step followed by an explanation of what the step was meant to achieve. I’m no great linux fan, partly because I don’t understand what the hell is going on and more importantly for me, why its not doing what I thought it should do and why. This small success may point me more in that direction though.
More to the point see. I told you it was working!

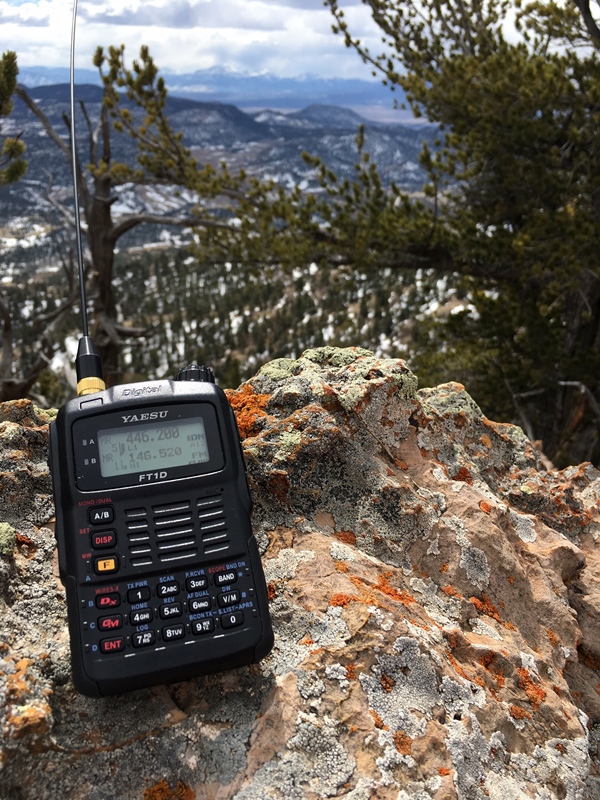
Yaesu FT-1DR: A Trail Friendly SOTA HT
A common topic in the QRP community is the Trail Friendly Radio (TFR) concept for backpack-style operating on the high-frequency bands. I’ve adapted the concept for the VHF/UHF bands, calling it the VHF Trail Friendly Radio (VTFR).
Strong candidates for the best VTFR include the Elecraft KX3 (with 2m option) and the Yaesu FT-817. Heck, both of these radios deliver all of the HF bands, 6m and 2m in one portable package. (The FT-817 also has 70cm.) See my blog post that compares the two rigs.
But the other set of strong contenders for the best VTFR is one of the many dualband HTs available on the market. It is hard to beat the compact, portable attributes of these great little radios for casual use on the trail. I’m not going to review them all but instead talk about my current favorite: the Yaesu FT-1DR. (Yaesu has recently replaced the FT-1DR with the newer model FT1XDR, which is the same design but with an improved GPS receiver and larger battery pack.)
My main usage of the radio is when hiking and doing Summits On The Air (SOTA) activations. This radio has a lot to offer in terms of capability and features, but the main things that stand out are 2m/70cm band coverage, two independent receivers and built-in GPS/APRS capability. Most SOTA VHF operating is on 2m fm so that band is critical, but I also make contacts on 70cm. More important is that together 2m and 70cm covers that vast majority of fm repeaters in my state, providing the best backcountry repeater coverage. The built-in APRS features allow the HT to be an effective tracking device as I move down the trail. SOTA chasers can see my position in real-time and anticipate when I’ll be on the summit. The radio has two separate receivers which turns out to be very useful when on the trail. With two receivers, I can monitor 146.52 MHz (2m fm calling frequency, often used for SOTA) while also keeping an ear on a local 2m or 70cm repeater. Another configuration is using one side of the radio to ping my location via APRS while the other side monitors 146.52 MHz.
The extended receive capability of the radio opens up lots of listening options: AM broadcast, FM broadcast, airband, shortwave and NOAA weather radio. I don’t use these very often but there are times that I want to tune to weather or news.
I am not a huge fan of Yaesu’s C4FM digital mode but do use it on occasion. The DN (digital narrow) mode supports voice and position information simultaneously, so Joyce KØJJW and have been using it to keep track of each other on the trail. The radio provides a basic indication of distance and direction to another C4FM radio.
One final note: if you buy an FT-1DR, I recommend upgrading the belt clip to the BC-102 clip from Batteries America. It is way better than the standard one from Yaesu.
73, Bob KØNR
The post Yaesu FT-1DR: A Trail Friendly SOTA HT appeared first on The KØNR Radio Site.


