Author Archive
 Xiegu X108G Review Continued

Xiegu X108G Outdoor Version
Continued Review: October 14, 2015
Having played with the radio mostly doing some CW operations and some shortwave listening I have stumbled across a few little issues that I am hoping can alos be fixed by Xiegu by way of firmware issue.
I have to say once again that this little radio does pack quite a punch for what is in the box, and at the same time this radios performance is guaranteed inside the amateur radio bands, anything else like expecting a hard headed shortwave radio or am broadcast band radio for DXing might be just a bit naive.
Again I have operated this unit on cw and have still to test it on SSB. But in my cw tests I can tell you that the cw tone tested against other radios seems to be spot on. When up against the FT-857 the blue light flashes right along on the same frequency. The 500hz filter also works extremely well and takes all that noise out and allows working the intended station easy. I run the radio with the ATT off and signals are clearly heard without a problem on my windom. I used straight key for my operations but there appears to be an issue with the built in keyer, it wants to add extra characters so until this is fixed stay with a straight key.
So what have I found that needs to be addressed on this radio, let me start:
I was attempting to check into a voice net on 40 meters one evening as they were looking for checkins on phone or cw. So I figured I would test the split function out and set one VFO to cw and the other to SSB, well I was surprised to find that the radio will not transmit cross mode, I would have to have both VFO’s in the same mode to do anything which did not work obviously.
The second issue that brought me to this split mode was the fact that no CWR (CW Reverse) is present that will allow me to listen to the required SSB while in cw mode to check into the same net.
This has been addressed with Xiegu to see if there is a firmware fix for the issues stated, including the Iambic keyer problem. As the radio is now it would make a good SSB rig, but performance as a dedicated cw rig and not being able to check in using CWR kind of takes away the joy of portable use and using the radio as a go-kit emcomm rig. The 20 watts of power and its size is nice when you need that extra bit of punch.
The multikey microphone as well as the two programmable keys makes the mike a handy addition to this radio. HRD can be used and the IC7000 is the settings that are used in HRD to use the radio. We are still working on pin outs for the ACC jack to figure out if full PTT and audio in and audio out are present for digital operations and HRD.
Voltage Test: I did a voltage test to see what the minimum lowest power was to allow this rig to operate, this was asked of me by another portable radio operator. So I found 11 volts is the absolute minimum that the X108G will operate, once 11 volts is reached the radio will then start to motorboat and funny things happen to the radio, many of my battery packs I use for portable operations and teh other radios I use will cut off at 10.6 volts.
The other test that I want to do is to test the radio against an SDR radio like my KX3 or even by SDR dongle to see if any transmit spurs exist outside of the ham bands while in cw. This radio has attained FCC Certification so I know it has already gone through some hoops and hurdles.
So while I await a response from Xiegu I will continue to enjoy this little radio that has been designed as a minimalist radio with no extra bells and whistles attached to it.
Xiegu X108G Outdoor Version First Test
X108G Review October 2015
By: Fred Lesnick VE3FAL
Note: All firmware updates are done at your own risk and caution should be used when installing or updating any firmware into this radio. The removal of any covers or mods will void your warranty. Never hit the RST button while in the engineering menu. All settings should be written down and stored in a safe place in the event that RST is hit or if a firmware update makes any changes as all radios are aligned individually. To find these setting do the following then take a picture or write them down:

| “Hold the F1 button while powering up the radio, a list of 14 items will appear. If any changes are made you hit the SAV button, if no changes are made you can power the radio off and then back on without any changes made.” Sometimes Menu 11 will set itself to 1, it needs to be at 0 or you will not hear anything on the radio. |
I placed an order for the Xiegu X108G and it was shipped from China via D.H.L. on Sept 25 and arrived here on Sept 29 2015 at 12:30 PM. The unit was well packaged and no damage to the box at all after the trip from China. Inside the box was the X108G, Xiegu sticker, power cable (much longer then first models, but still no in-line fuse), microphone and microphone cable, as well as USB cable for firmware updates. Manual for radio was in the box and a warranty card with serial number of radio attached. The radio is equipped with front and back handles.
Unboxing the unit after its arrival:


Powering The Radio Up
An inline fuse should be installed on either one or both of the power cables before the radio is powered up to avoid any damage to the radio. I finally got the chance to power the radio up and see how this unit plays after all the updates and fixes that Xiegu made to make this radio a seller. First thing I did was to put my call-sign into the radio, this is undocumented but was found by a fellow X108G owner while playing with the radio.
This is how it is done:
Press F3 on powering up. Use the VFO to select letters/numbers then to move onto the next letter press INS button for each letter or number, when finished hit save. The radio will power back up. Switch it off and on again and you will see your call sign where the word Xiegu used to be.
Powering the radio up (continued)
After going through the supplied Operating Manual and getting familiar with what each button does (many changes to these buttons since versions 1 and 2) I was ready to hook my windom antenna to the SO239 connector and listen on 20 meters SSB for a bit. Tuning across the band with the 2.3k filter on signals were clear and clean, I was in AGC-S and pre-amp was in off position. Signals on 14.300 were an S5 with the pre-amp off and came up to a solid S8-9 with the PRE on, no distortion or overmod was heard or encountered nor was any splatter from adjacent signals heard. A move to 40 meters and LSB I was able to pick up a station on 7.188, and just like USB signals were right on where they should be, I was listening on my VX1700 with windom as well and noted the similarities in signal and quality. Once I was happy there I went to 20 meters and tuned to CW and went to 14.020 and monitored a station in the UK working an N3 station stateside, both signals were S5 and I had .5k filter on and no stations nearby were heard breaking through. A quick tune by the PSK frequency on 14.070 yielded a bunch of PSK signals. Next will be to hook up a key and attempt some contacts using a straight key and testing the waters that way. I will also hook the microphone up and try make a few SSB contact and get reports on both USB and LSB to compare. Videos of the radio in use and contact’s will be recorded so others can see and hear how well this unit works.

So what are some of the features this radio offers? First off is the display on the outdoor version, this display is bigger and brighter and designed for use outside where it is brighter, of course a video and pictures to show this will follow. Next is low current operation, with my power supply set at 13.1v on receive my meter shows 600ma of current draw, the stated current draw on transmit at 20 watts is rated at 7.5A, but again I will test this later. 2.3k and .5k filters for SSB and CW choices. The radio offers SSB,CW and AM modes and can be tuned from .5-30mHz and includes all shortwave bands in between the filtered amateur bands. Multi-function microphone. Variable power output from .5 to 20 watts. Adjustable microphone compression, Dual VFO’s, Split feature, accessory port for digital modes as well as jack for morse code key and external speaker. Many other options to list but will talk about those in a later review.
So this is a start and looking forward to playing with this radio and putting it to the test. I should add there is a 1 Year Warranty on this unit from date of purchase.
Communication‘s with Xiegu as well are fast. Xiegu also monitors the X108G Yahoo Group which can be found here if you are looking for more information as well about this radio and what other radio owners think of it, the group can be found here:
https://groups.yahoo.com/neo/groups/X108-Transceiver/info
I look forward to taking this radio out portable and testing it and bringing more information out there for potential radio buyers.
73
Fred
VE3FAL
Thunder Bay, Ontario Canada
Pofung UV-6R Dual Band Handheld
Pofung UV-6R 136-174MHz & UHF:400-470MHz Dual Band Handheld FM Professional Two-way Radio

Lots of radio in a small package. Built well and performs well.
http://www.radioddity.com/skin/frontend/default/lanting/download/UV-6R%20User%20Manual
Brilliant Easy to read display
The first thing that impressed me aside from the size and quality was the brilliant and easy to read display of this radio. The two line display and the choice of display color make this radio easy to use and navigate through the menu system. The various option for screen color lighting also make the radio easy to read. The fact that the display lighting can be changed to suit the operator is a nice feature.
Superb audio quality
I have to say that after owning a few of the big 3 brand of radios I was thrown back by the outstanding and loud audio this radio has. I was not sure what to expect at first with such a small radio but the audio is outstanding, sounds great and no distortion even at full volume.
Features and Specifications:
- Dual Band Transceiver
- Brilliant L.C.D. Display
- D.C.S. and C.T.C.S.S. encoding
- VOX function
- Flashlight/Alarm feature
- FM radio band receive
- 128 memory channels
- Dual watch
- Menu driven programming
- Software available for programming (cable sold separately)
- Drop in Li-On charger
- 7.4v 1800mah Li-On battery
- High (5w) and Low (1w) power settings
- Accessory ports for adding speaker microphone (sold separately)
- Belt clip ( Soft case also sold separately)
- Selectable frequency steps
- Selectable repeater offsets
- Adjustable squelch via menu
- Adjustable TOT (Transmission Timer)
- Cross band receive/transmit
- Dual VFO
- Narrow and Wide FM selectable
And much more to even include in features.
The radio itself is great little performer. Battery life on receive is fantastic, battery life on transmit has yet to be determined. Looks rugged and fits nicely in the hand.
For the price of this radio (under $50.00 with free shipping to Canada and U.S.A.) you cannot go wrong for a radio to throw in your shirt pocket or your backpack as a take along radio to listen to N.O.A.A. weather stations, FM stations and monitor local repeaters. Accessories are all about one third each of the cost of the radio, which makes the low price of this radio even more impressive. The small antenna with SMA connector though lacks in receive performance of course, but other antennas can be purchased and used with this radio to get out of those fringe areas.
The Pofung UV-6R is a great introduction to the increasing line of radios on the market. It makes it affordable for the first time user and easy to operate; it also performs well and gets great audio reports into the repeaters. It’s light weight and long battery life make a great emergency radio for that go-kit or to have on hand when needed for that last minute hike.
Fred Lesnick
VE3FAL
**** (4 out of 5)
Plagued with noise in radio room, culprit? Battery (Smart) Chargers
I do not do much operating in my radio room in the house, most of my operations are done portable. But for some time now I have been plagued with some major noise to my rigs, the noise is about S9 or more at times and varies on certain frequencies and sometimes with odd sounds.
Not too long ago I had rebuilt my 24v battery pack for my PRC-104 with NiMh batteries, what I had found when the charger was working was the noise was atrocious, once battery was charged the noise would subside but I guess it was never totally gone. So one day when all of our power was down for a tree on the line I tested the radios with battery and found zero noise levels, none what so ever, so it lead me to start searching a bit deeper, looking at TV noise, routers etc, but still no luck nailing the problem.
So I continued to do a bit of more pulling of plugs and seeing what and where the noise could be coming from. I own many types of battery packs and chargers, batteries for radios, cameras and scanners, so I had to start one at a time. I leave the chargers always plugged in ready to go, so never really anticipated that this would be my issue. But I was very surprised when I found two of my chargers that were the problem.
The one charger was indeed my smart charger for my NiMh battery pack for my PRC-104.

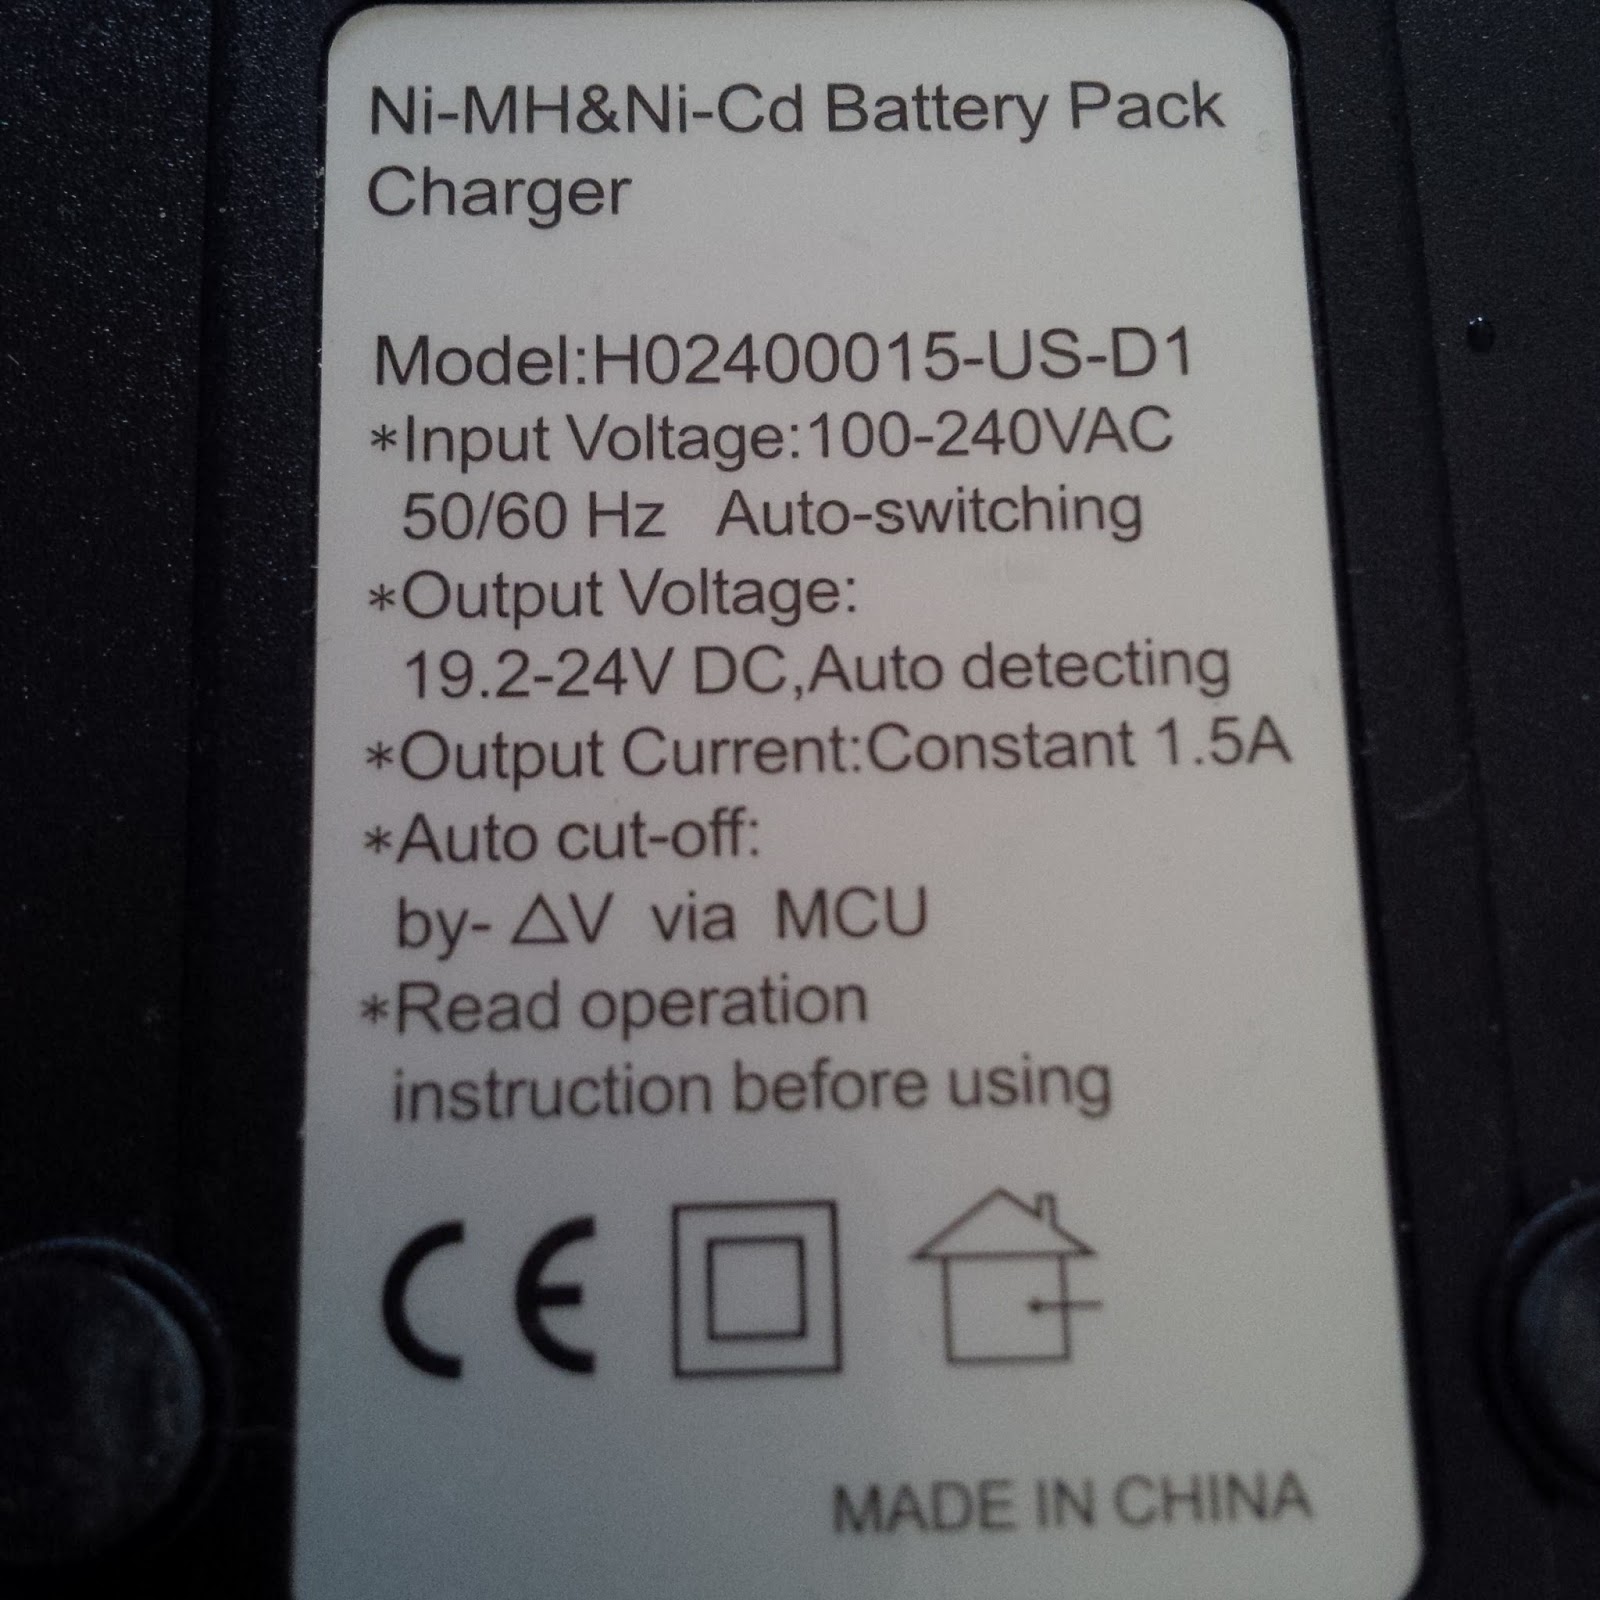
The other charger that turned out to be an issue was a Duracell battery charger that I use for my camera batteries. It was amazing at how quiet things got once they were unplugged. The noise on my VX-1700 with these chargers plugged in and not being used would be a solid 9 and more, once I unplugged both of these units the noise dropped to a 3 and I could hear stations once again. I need to look at some of the other chargers in the house that are used for routers and other items in the house.
The NiMH charger when charging makes all bands useless when it is actually charging, the charger for my VX-1210 is the same, very loud noise levels emitted from these units.
So I am glad I did a bit of unplugging and checking and have found some of the issues that have plagued the home shack. Many of today’s electronics is just plain noisy and does emit all kinds of stray RF and noise.
RaDAR March 28th 2015 with VE3FAL/PM
Temperatures this morning were still cool(-10c) when I got up but the sun was starting to shine nice through the tree’s.

I was looking forward to the RaDAR event as well as the regular gathering of HFPack, HFNow and RaDAR gang that will congregate on or near 18157.5
I once again donned my favorite rig, the PRC-104, with the Chameleon Whip, a 10’7″ counterpoise and headed out around the property.
 Once on 17 meters the first I heard was Greg N4KGL who was QRP with the KX3, he was maybe a 2×2 but was unable to hear me call him. I called a number of times but no joy. I then heard my friend Budd W 3 Fast Freddie calling and he worked Greg, I then called as well and when Budd was clear with N4KGL he called me and we were able to have a 2 way 5×9 exchange on the band. Budd then asked if anyone else was hearing me and Warren KD4Z in GA. came back to me with a great report, so we exchanged reports and had a good qso, Warren then worked Tom G0SBW who was very weak to me, I asked Warren to pass along to Tom that I said hello and that he was just audible here.
I then came in the house for a minute and noted that Paul W0RW was portable with his Green Radio on 18.088, so I tuned the PRC-104 down to 18.088 and put the leg key on and worked Paul, we were both 599 reports so great signals on 17 meters.
After about an hour outside I was happy with the contacts I made and the propagation conditions as well as teh weather outside as I was able to operate with no gloves on again today.
So thanks to Budd, Warren, Paul and of course the RaDAR gang for being on the air and playing radio and going portable, thus the Rapid Deployment Amateur Radio group.
Next weekend, April 3rd and 4th (0000z-2359z) will be the 24 Hr. RaDAR event and I will be out portable for that one as well operating SSB,CW and digital modes.
RaDAR Information Below:
1. Aim
The RaDAR “Challenge” is a unique event aimed at promoting the use of Rapidly Deployable Amateur Radio stations. This challenge is for all licensed radio amateurs not limited to South Africa. A RaDAR operator can take part in any of the three defined categories (see point 7) which may be changed at any time during the challenge. The
points system is so structured as to encourage portable RaDAR operations, especially moveable RaDAR stations. Moveable RaDAR stations rely on fixed and portable stations as a point of contact using channelised frequencies. “Search and pounce” techniques are also allowed.
2. Date and Time
From 00:00 UTC to 23:59 UTC on Saturday 4 April 2015 and from 00:00 UTC to 23:59 UTC on Saturday 7 November 2015 – 24 hours will give equal opportunity to the international community of RaDAR operators. RaDAR operators can define their own operating time schedule or remain active for the full 24 hours.
3. Bands and Modes
All amateur bands are allowed including cross band contacts via amateur radio satellites.
Modes – CW, SSB, AM, FM or any legal digital mode. QSOs via terrestrial repeaters will NOT be allowed.
4. Suggested HF calling frequencies
See http://zs6bne.wordpress.com/2013/03/06/radar-calling-frequencies/ for the latest international list of frequencies. The WARC bands can be used considering this is a RaDAR Challenge and not a contest as such. It provides better opportunities for Ra-
DAR contacts during difficult propagation conditions.
Recommended digital modes frequencies – Refer to the South African Radio League Contest Manual, General Rule 15.
5. Exchange
The RaDAR challenge requires more than a minimalistic information exchange. Accurate information exchange is considered more important than a large QSO count.
Call sign, name, RS(T) report, QTH and grid locator. Note the grid locator can change as RaDAR operators are allowed to move position at any time. The grid locator of six characters is acceptable but should preferably be accurate to 10 characters for higher
position accuracy. Smartphone applications are generally used to establish more than a 6-character grid locator. If working non-participating stations, call sign, name, RST and QTH is acceptable.
6. Scoring
1 point per QSO.
Individual QSOs – per mode, per band, per satellite, per call sign.
If the moving RaDAR station has moved the required distance (see point 7) contact can be made with a previously worked station, again.
7. Categories and multipliers
The following multipliers are applicable to determine the final score. If category/mode of transport changes were made during the challenge, than calculate accordingly.
X 1 – RaDAR Fixed station (At home or in another building)
X 2 – RaDAR Field station (Portable – away from home)
X 3 – Moving RaDAR station – See modes of transport below.
Modes of transport and required movement distances (moving RaDAR stations only)
Vehicles, motorcycles and motorboats etc. (Motorised transport) – 6 km
Bicycles – 2 km
On foot and paddle canoes – 1 km
Wheelchairs – 500 m
Aeronautical mobile stations are considered moving stations and can communicate at any convenient time.
Note: Moving RaDAR stations can move at any time but are required to move to the next destination after five contacts have been made from the present location. The move needs to cover the required distance before further contacts are allowed to be made. This requirement tests the ability to rapidly re-deploy your amateur radio field station.
9. Bonus points (All categories)
Five (5) points (The equivalent of five QSOs) for a minimum of one satellite or any digital modes QSO involving a computer, smartphone or digital modes device. (For clarity thereafter 1 point per Satellite / Digital modes QSO).
Five (5) points for the first successful same continent RaDAR to RaDAR QSO (As may be confirmed by the extensive information exchange.
Five (5) points for the first intercontinental (DX) QSO
Ten (10) points for the first successful inter continental (DX) RaDAR to RaDAR QSO (As may be confirmed by the extensive information exchange).
10. Log Sheets
Log sheets must be submitted by 14 April 2015 and 17 November 2015 and sent by e-mail to [email protected].
See https://zs6bne.files.wordpress.com/2015/03/11046905_10152762072212759_727315224761083499_n.jpg for a log sheet specifically designed for the 2015 RaDAR contest.
Note: A photo of the station (JPG format) MUST accompany every log entry. A photo is required for each new location that moveable stations visit. These photos are used to promote amateur radio and the RaDAR concept showing where amateur radio can be used to communicate from and in the many different ways.
Have a great weekend one and all and a good week coming up.
72/73
Fred
VE3FAL
The “Ice Man”
Chameleon F-Loop inside testing
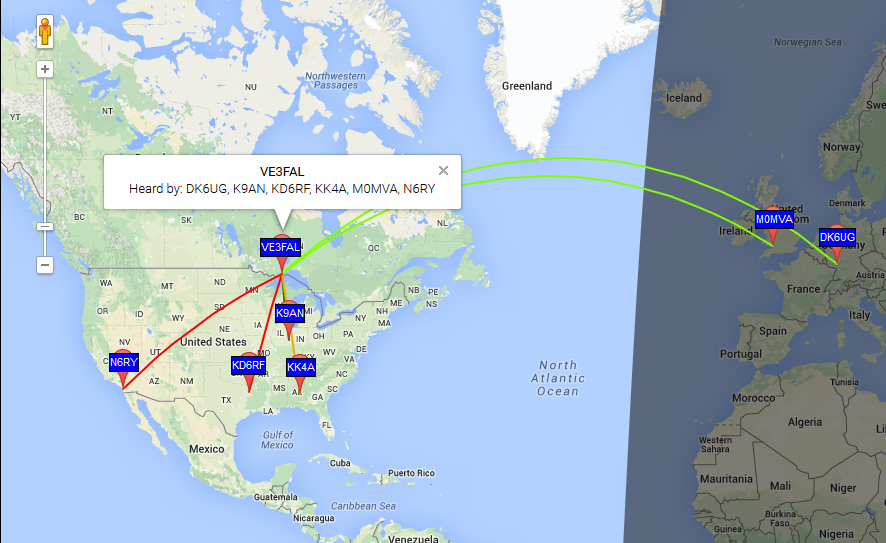
I started testing the F-Loop inside the house on the kitchen table because it has again gotten cold out with 45km.hr winds, and -19c with windchill. So I set up the CHA F-Loop on the table, FT-817 and WolphiLink TNC to the Samsung tablet using WSPR and decided to test. I tested last night on 20 meters with the 36″ aluminum radiator loop on and thsi is what I got:

Was heard in Alaska and into the USA, I was running about 3 watts before I set the Wolhpilink transmitter levels up to proper settings.
So once I set the drive level and receive levels the FT-817 was running perfect with WSPR.
I did some tests on 20 meters. 17 meters with much of the USA being heard, so I switched to 15 meters and turned the loop so that the radiated sides were transmitting east and west, the results are seen below:
So good results considering my house is finished on the outside with stucco plaster which means it has mesh steel wire all the way around and then finished with the stucco.
http://www.chameleonantenna.com
http://www.wolphi.com/interface/
Fred
VE3FAL
Chameleon Antennas F Loop Field Test 03-21-2105
The nice thing about the area we are operating from is not only the view of Pine Bay and Lake Superior but there is no line noise or man-made noises that affect us, only things we hear are the wind, birds and small wind chime that is hanging in a tree.


So I then switched to the KX3, I think the cold was affecting the radio though as I had to crank the volume to 50 in able to hear the signals, combine that with weak signals on the band and was a bit of a chore to hear with the small speaker, but the best thing was I made a contact into Florida with KD4ZU running 5 watts on SSB from this rig. He said I had a great signal at his end was very much copyable with no problems. So 3 contacts on initial setup of the new Chameleon F Loop was indeed a great success for us, assembly was easy with no issues at all, and packing and unpacking into the Condo bag was easy as well. The tuner can also be mounted on a tripod if needed as it has a hole pre-drilled for that purpose, as you seen we had it sitting on the rock and had no issue running it.
A quick test of WWV on 10 megs also showed the directivity qualities of the side of the loop and the signal peaked quite well. It was now 1900z and we decided to pack up and head back down from the lookout and head home knowing we had another successful RaDAR and HFNow operating day after bands being so bad all week.
My latest video can be found here on my YouTube Channel:
Thanks goes out to:
Carl at Chameleon Antennas
HFNow group
RaDAR Group
Gary VE3ODE (Camera man and friend)
Teresa (VE3TLL) my YL who encourages me to get out and play radio
Elecraft for making a great radio like the KX3
ICOM for the hardy IC-703 of which Gary and I both own
Propagation Godz for opening up the bands
George and Mary-Anne who have allowed this beautiful spot to be viewed by others
Take care gang and be back shortly with more reviews, test and just plain fun.
Fred VE3FAL
The Ice Man


