 |
 1 KW 4:1 Ruthroff (Voltage) Balun
Building baluns is just about the easiest construction project there is in ham radio. It pays to build your own, too. I’ve read reports from some disappointed hams out there who have paid good money for poor-quality baluns. The ones worth buying might cost you almost twice what you’ll pay to build your own. So I decided to build my own balun for the New Carolina Windom that I’m putting up. The total cost of materials was $40.  Balun")
The New Carolina Windom is essentially an off-center-fed (OCF) dipole. The big difference is in the balun that you use to feed the antenna. A current balun is the proper choice for an OCF dipole, since it effectively chokes common-mode current from standing on the feedline. But for a New Carolina Windom you want common-mode current on the feedline, since you deliberately use a portion of the feedline as a radiator (an additional RF choke is necessary to clamp off this common-mode current at a certain point on the feedline, but I’ll discuss that in a future post). Therefore, you use a voltage balun, not a current balun. The voltage balun allows some common-mode current to stand on the feedline.
Now, before I go any further I must warn you that I am not an electrical engineer. Baluns are a bit mysterious to me, but from the discussions I’ve read on the internet it seems I’m in good company. If you want to learn more about baluns, I recommend Jerry Sevick’s book, Understanding, Building, and Using Baluns and Ununs, available here.  This book has everything — easy-to-follow instructions for building different kinds of baluns, helpful tips from Sevick’s own experience, as well as some deep discussion of theory that should satisfy even a graduate student of electrical engineering. I followed his instructions for building a 4:1 Ruthroff (voltage) balun.
When building a balun there are several factors you must take into consideration. Do you want it to handle a full kilowatt, or are you willing to be forever limited to QRP? Now, I enjoy QRP (I love my little HW-8!), but I also want to have the option for QRO. Therefore, I chose to use not just one toroid, but two — and to use teflon-coated wire instead of the cheaper stuff you can get away with for QRP. I bought 100 feet of stranded (that’s right, stranded — it works fine!) 14 AWG silver-plated copper teflon-coated wire off of ebay for $34, shipped. That’s enough to build quite a few baluns!
When choosing the wire you’ll use in your balun, you must choose the wire size carefully. The diameter of the conductor and the distance between the center of each conductor determines the impedance of the pair you’re winding around the core. In a 4:1 balun, you want an impedance of 100 ohms. Since impedance around a core is only about 80% of that in free space, that means you want a guage and spacing that gives you 125 ohms. You can use the handy caculator for “Impedance of 2-Wire Transmission Line” at KW2P’s website, or you can figure it out yourself using this formula:
Zo = 276 * log 2(S/D)
S = distance between the centers of the two wires
D = diameter of the wire
Any unit of measurement works (inches, mm) as long as you use the same unit for both S and D.
You’ll notice that the spacing between the wires is critical. I used thin strips of strapping tape to tightly bind the wires together every couple of inches, and watched closely to make sure no gaps appeared as I wound the pair on the toroid.
Another thing you have to decide on is the permeability of the core. There’s lots of debate about this. I followed Sevick’s recommendation to use a permeability of 125 (ferrite mix 61). I purchased my two FT-240-61 cores from kitsandparts.com, stacked them, and taped them together using 3M Scotch glass-fiber strapping tape.
Now, what to put the thing in once you have it wound? The last time I built a balun, I put it in a project-box from Radio Shack. I won’t do that again — the plastic is just too thin. You want something strong enough to stand up to the stress put on the box by the eyebolts that you use to hang the balun and connect the antenna-wire to it. PVC pipe and end-caps are popular, but to house a balun this big it ends up being fairly expensive and downright heavy! I found the perfect solution at Menards for just under $7. It is a weatherproof enclosure made from PVC plastic and comes with a neoprene gasket to seal the cover to the box. I used neoprene washers for all the bolts and sealed all the entry-points (except for the binding posts and the bulkhead SO-239 coax connector) with silicone.
I spent a little time in the hardware store picking out the nuts and bolts for this thing. You want to make sure the bolts don’t work loose, so use lock-washers and lock-nuts where you can. I also used star-washers for each lug that I fastened to a bolt. Star washers have teeth in them that cut into the metal, ensuring a good connection. A fellow at the hardware store also cut me a small square of heavy plexiglass for 50 cents to use for securing the wound toroid inside the box.
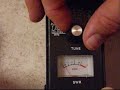
When you have built your balun, you can test it by putting a pure-resistive load across the terminals and measuring the SWR across the spectrum you intend to use. For a 4:1 balun, that means a 200 ohm load (4*50=200). The SWR should be 1:1 across the spectrum. Here’s a video showing the test of the balun I built:
It looks good! I’m looking forward to using this balun. If you would like to build one of these and have any questions, ask away. I’ll give you whatever advice I can. Just remember — you’ll get what you pay for!


![]()
5 Responses to “1 KW 4:1 Ruthroff (Voltage) Balun”
 Ham Radio Deluxe |
 W5SWL Electronics |
 Ham Radio Prep |
 KB3IFH QSL Cards  Hip Ham Shirts  HamRadioAuctions HamRadioAuctions Reliance Antennas Reliance Antennas Enigma Shop Enigma Shop |  morseDX  Ni4L Antennas  R&L Electronics R&L Electronics antennas.us antennas.us QRV QRV |
- Matt W1MST, Managing Editor

*Very Nice* article. Sevick’s book is like the Bible for RF transformers, but you added quite a bit by the writeup.
One thing I’d like to add is that whenever winding a toroid for any use, if you can physically use stranded Teflon wire– do so. It’s much better than magnet wire and is actually easier to work with. PVC insulation will distort and break through eventually due to the high localized pressures at the windings. (Look up wire-wrapped connections for the idea of actual PSI’s at those bends.) Teflon is tough enough not to deform and can’t scrape off like varnish on magnet wire.
Now where very small AWG’s are required, then magnet wire is the only practical choice. But on “bigger” toroids, always use Teflon!
Fred W0FMS
Thanks for the encouragement, Fred. Coming from you (I read your bio at QRZ!) it means a lot.
I’ll sure be glad when this antenna is up. The project has hit the point where I have to keep reminding myself that this is supposed to be fun! 🙂
73,
Todd NØIP
I bought the wrong type, resulting in a minimum 3.5 swr. Is it possible to easily modify a COMTEK 4:1 current balun to a voltage type. COMTEK does not have/sell a voltage version.
Regards, Ray
COMTEK looks like a good balun, Ray. If you’re going to modify it anyway, you might consider building your own like I did. I don’t presume to know your particular needs and constraints, but you can build it for less than half the cost.
very good i have built many of these baluns and chokes for the windom best thing since sliced bread ha ha best 73s and good dx derek