Posts Tagged ‘learn’
 Arduino CW decoder – Conclusion
1. Line in or Microphone input
2. Easy to read display – all boxed neatly
3. An LED that shows the Zero beat
4. Easily accessible Reset Switch
5. Powered from a 12v supply.
I did want to create a usable PCB, something that could be used by a student or someone wanting to build the kit. So using the Fritzing application I set about laying out a circuit board.

This was my very first attempt at creating a PCB , so nerves were a wee bit on the tense side. I also wanted to box the project, so my rationale was to find a box first to work out the physical dimensions of the finished project.
As with the Vero Version – I created a layout that would fit on top of the UNO.
After submitting the design, and waiting a week I managed to get hold of 3 boards. They looked awesome. All white and exactly how I laid them out.
I did make 2 small errors on these boards. The first issue was sitting the capacitors a bit too close to the LM567 IC. That is an easy fix for the next version. But the 2nd and more serious issue is I forgot to ground 2 caps. They were floating and in parallel. I did fix this by attaching a wire to ground from one of the caps. That solved the issue, and I have already corrected the fault for the next batch of boards.
2 further observations of the boards & the project as a whole have highlighted 2 further improvements to the project. The location of the pins for the display / reset switch and audio OUT should be on the other side of the board. That would make a far better layout. Also adding in an audio oscillator / switch & plug to insert a key on the oscillator – then feed the output to the Arduino would immediately mean this kit could be used as a practice oscillator too. – that would show the letters as you transmit them out.
So here is a review of the project so far, and what I intend to do with the project going forward.
Radio propagation and space weather course
As the propagation columnist for several amateur radio magazines, I hear from a diverse group of interested people that find space weather and the propagation of radio waves fascinating. I admit: I am a space weather and radio propagation nut, and it is always good to correspond or meet with other interested folks. This is an aspect of our hobby that never grows old, as there is so much that we don’t yet know–we communicators are in a perfect space to make discovery and to make improvements to our understanding of this science. Over the years, I’ve heard a lot from readers of my columns, expressing their fascination with the science of radio and solar phenomenon.
Are you interested in learning about the Sun and the Sun-Earth connection (space weather), including topics of sunspots, solar flares, coronal mass ejections, and so on? Do you want to delve deeper into topics including the ionosphere, the magnetosphere, and how radio waves propagate from transmitter to receiver?

The critical frequency (foF2) for mornings during June 2014.
You might consider a time-proven “course”–material that is very comprehensive–that you can self-study, to become well-versed in this information. The course (one that has been used in professional disciplines) is offered either stand-alone, or bundled with the ray-tracing PropLab PRO software.
Some may say, “But, I like the magic of just getting on the air and trying my luck! If I learn all this stuff, then it becomes science, and not a hobby.” It is true that there’s a joy at being dazzled with the magic of radio; buy a super cool transceiver, and a factory-made antenna with coax already fitted with connectors, adding the necessary accessories to make it come alive, then begin exploring the shortwave frequencies. Magical, indeed! But, there are many in the hobby that wish to learn how all of that works. Some even begin learning how to build antennas, radio kits, and discover the joy of the “science” of radio. A few eventually take the step with gained “scientific” knowledge of electronics, and they design and build equipment for their hobby. The course is part of that mix: learning how the Sun affects getting a radio signal from point A to point B, and how to leverage their time and efforts, is a joy, indeed.
Interested? Here’s the web page: http://hfradio.org/swp_course/

PropLab PRO creates ray-traced radio wave analysis
If any disclosure is necessary, here you go: The proceeds from a purchase of this course go to the funds I use to keep cw.HFRadio.org, swl.HFRadio.org, and other resources at HFRadio.org, plus http://SunSpotWatch.com up and running. There are monthly fees, yearly fees, and software licensing to cover, as well as the purchase of hardware from time to time. These operating and maintenance funds are mostly covered by me, Tomas, NW7US, out of my personal funds. Any donations and sales helps out. Haters and Hecklers can send their comments to the bit bucket.
73 de NW7US
Intermediate is go

We have started another intermediate class both in class and distance learning. This course is primarily run on Edmodo. We have run a couple of classes on Edmodo and we think we have the concept correct now. So we have our weekly quizzes set and our 3 week homework assignments all loaded and ready to go.
In class students are also welcomed to join the distance learning students so missing a lesson is no longer such an issue.
Over the coming weeks I will be creating some companion videos showcasing the practical elements of our in lesson activities.
So far we have 5 in class and around 30 distance learning joining us for the next 10 weeks.
Foxx 3 TRX build
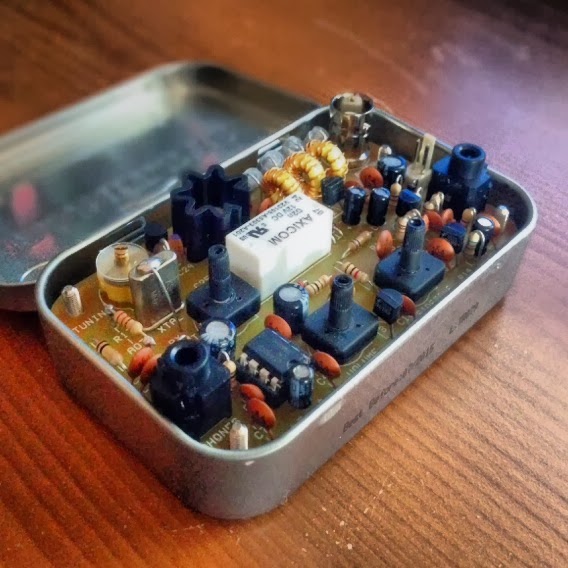 So it was my birthday recently and to celebrate the turning of another year and that I had indeed taken a day off – I decided to build a FOXX 3 QRP CW transceiver. These little kits are available from Kanga-products.co.uk and are designed to fit in a Altoids tin.
The kit comes pre bagged up in separate bags, and its just a case of soldering the correct component to the correct area on the circuit board. The kit itself is a 1 Watt QRP transceiver that can be bought on various bands. Mine was for the 20m band.
The board has a clear and easy to read Silkscreen and the pads are suitably wide enough to allow anyone with different levels of skill to create the kit. Each step allows you to test each part of the board, so you learn how each part of the kit relates to the transceiver as a whole.
I had a great time building it, it’s a simple, easy and great fun little kit. I hope to take it out and about – so hopefully you can hear my tiny signal on 20m soon.


