Posts Tagged ‘Construction’
 Iler progress
The Iler 40 QRP SSB transceiver kit proceeds apace – a snail’s pace. I wasted a lot of time correcting stupid errors – like soldering a resistor in the wrong place and putting a diode in back to front. I mean, I know diodes have to go the right way round and the banded end is clearly enough marked on the board. Removing parts from boards with plated through holes is a nightmare. Why didn’t I check it?
 |
| Part completed Iler 40 board |
Another reason for the slow progress is that building circuits does my back in. It’s the bending forward to see the parts under the magnifying lens that does it. Eventually there is a twinge from my lower back that says: time to take a break. So I’ll put everything to one side and do something else for a bit.
Solder fume extractor
If you were wondering why you hadn’t seen any more about the Iler 40 transceiver kit I bought then here’s the reason. First I was distracted by making contacts using the new JT9-1 mode. But I also decided to get a solder fume extractor so I have been waiting for that to arrive.
It’s probably a bit late in the game to start worrying about the carcinogenic effects of flux and lead solder fumes. But as the price of peace of mind was only £20 on eBay, I thought “better late than never” and decided to get one.
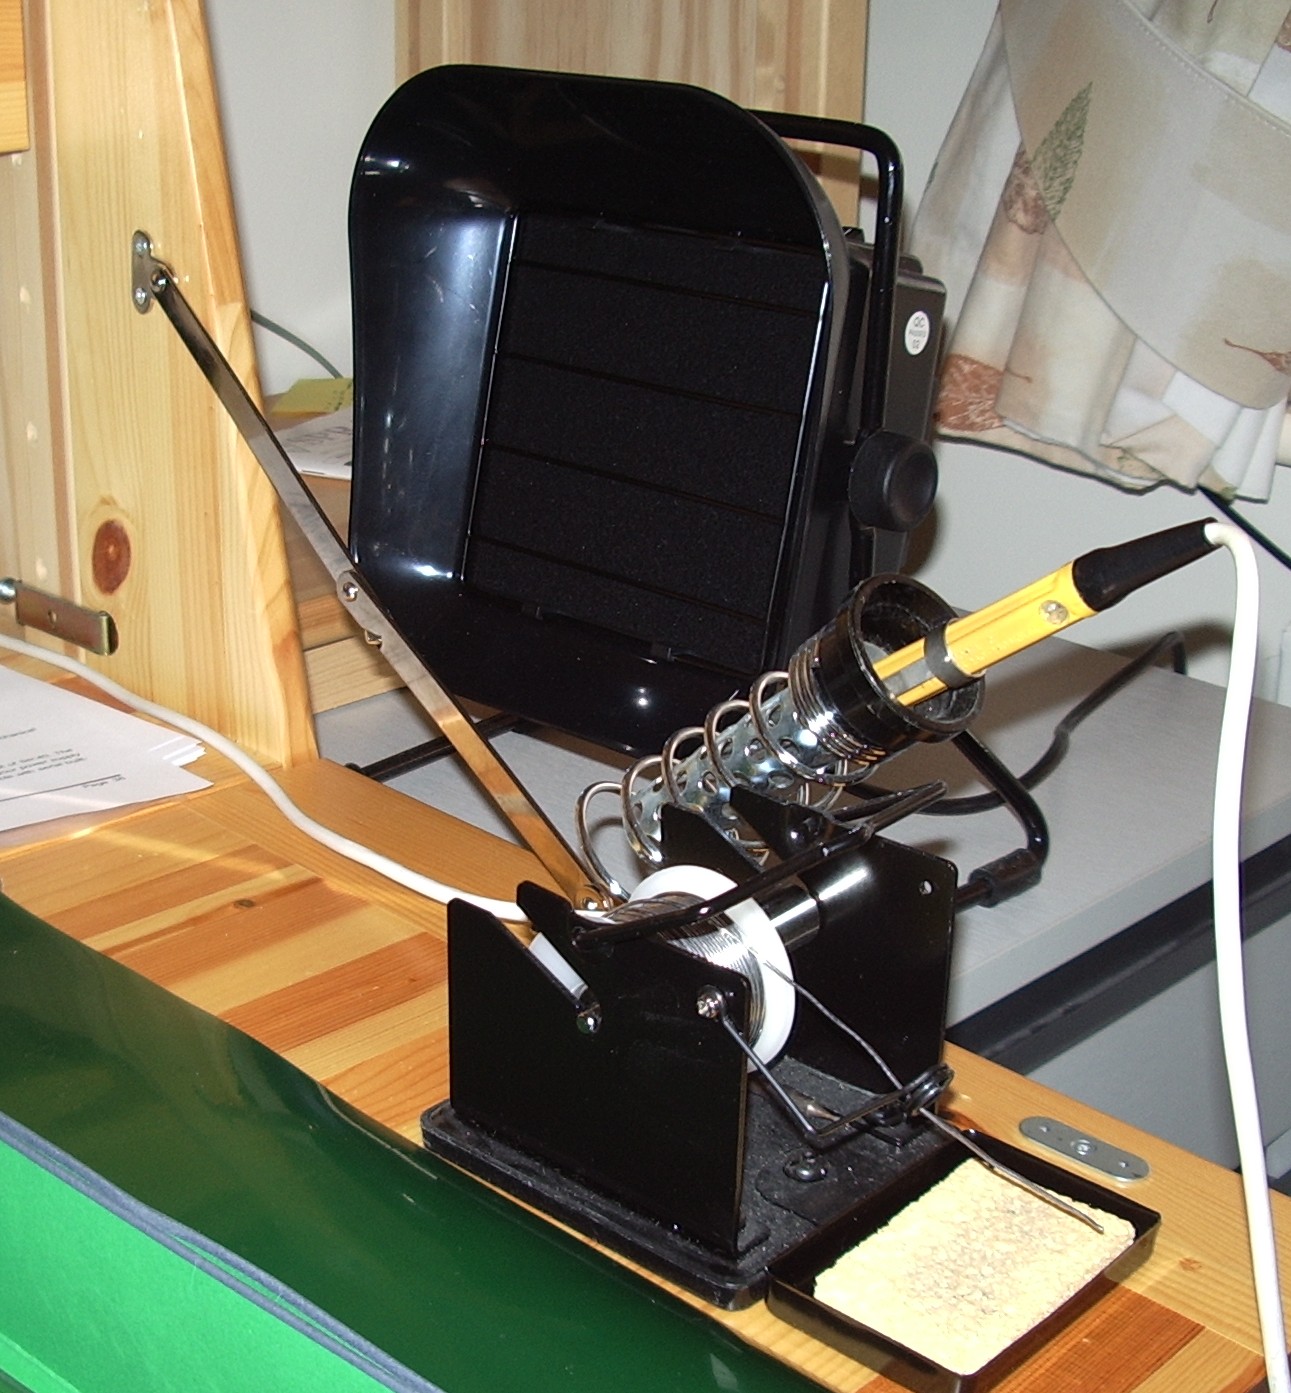
I was a bit surprised by how big it was. I was expecting something more the size of a 12 volt computer fan. But it sits nicely on the filing cabinet next to my drop-down workbench. I just have to think of somewhere to put it when it is not in use!
Iler 40 arrives!
It took its time getting here, but the Iler 40 QRP SSB transceiver kit from Spain has finally arrived! Opening the package confirmed my expectations that this is a very high quality kit indeed.
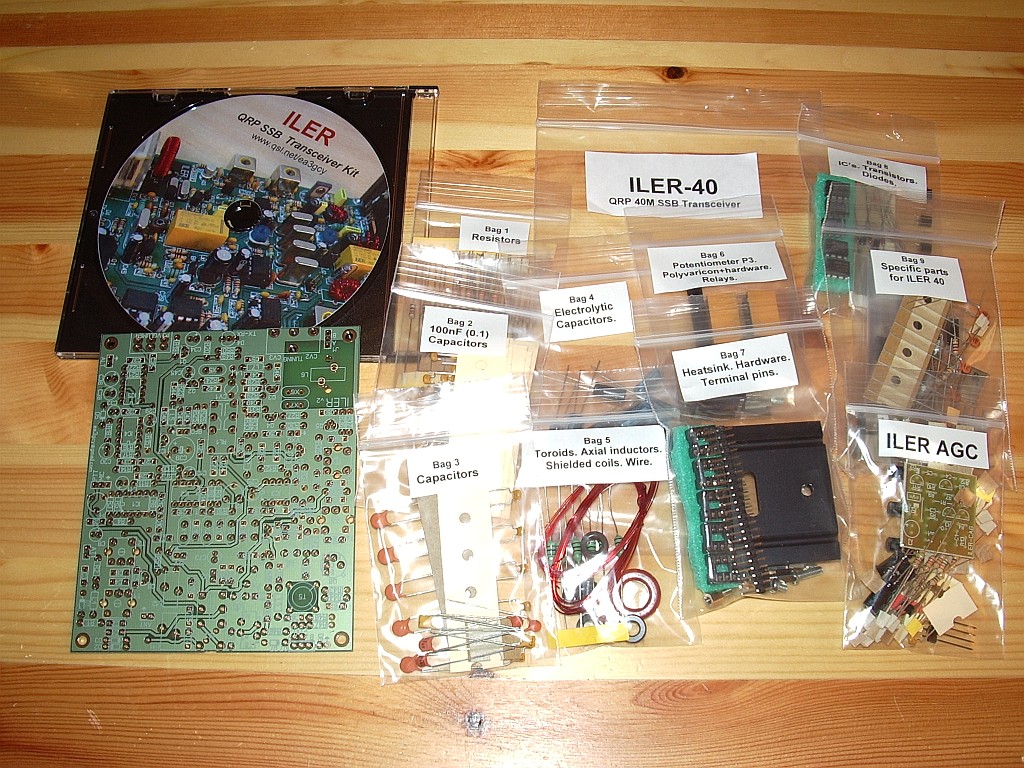 |
| Iler 40 kit contents |
The printed circuit board is top quality and screen printed with plated through holes. Quite a contrast to some kits of UK origin that look as if the board has been etched and drilled in someone’s garage.
The components of each type are individually bagged. The CD containing PDF manuals in both English and Spanish has a custom colour printed label. A quick glance inside showed that the assembly instructions have been professionally produced and are of the a similar standard as the manuals for kits by Heathkit and Elecraft – if not better. Javier has even included data sheets for all the active components making this the most fully documented kit I’ve ever encountered. I’m going to enjoy building this.
It’s going to be a while before I can get started, though. There are some major home improvements going on at the moment chez G4ILO and with all the hammering and sawing I’ll have to wait for a peaceful and relaxed atmosphere. I also need to print off a copy of the 39-page assembly manual so I can cross steps off as I go along – and as you may have read our printer doesn’t want to play ball.
A 40m transceiver kit
It has been a while since my soldering iron has been warmed up and I have been feeling the urge to build something. The challenge of building something from scratch has usually proved too much, so I have decided to build a kit. I’ve read a lot of good things about the “Iler 40” and its 20m brother so I decided to get one.
 |
| Iler 40 transceiver (EA9GCY photo) |
I thought that this kit was sold on Ebay but a search for “Iler 20” came up blank. A more generic search produced some interesting hits including this 40m transceiver kit from a UK seller. This kit is quite a bit cheaper than the Iler kits but without any reviews it is a bit of an unknown quantity. I eventually found that the Iler kits can be bought from the maker’s own site. The excellent reviews plus a higher output (4w vs 1w) were the decider. I was a bit unsure of which version to go for but I eventually plumped for the 40m version. More to follow once it gets here.
Colorado QSO Party and KD0BIK’s Ham Shack Grand Opening

It’s time for the 2012 Colorado QSO Party and likewise, it’s time to officially open my new ham shack, home office, podcast studio and general man cave that I’ve been talking about for so long.
One of my New Year’s Resolutions for 2012 was to finish the basement ham shack and home office. This was a project that began eons ago (or certainly felt like it), but actually I began framing the walls for the new space in 2008. While the framing stage went fairly quickly, not a lot of work was done between mid 2009 and 2011.
My wife has always been supportive of my hobbies, especially amateur radio. I believe she could sense my frustration in finding the motivation to finish the new space. Some of the delays had centered around decisions on sheetrock (drywall) or paneling or ???. We began making decisions and started the sheetrock installation phase in February.
In the February timeframe I began looking down the road to select a date and goal to work towards. Let me state that I realize the work I’ve done (even including the framing from 200![]() all could have been completed in a very short time. Perhaps two people could have done everything in a short span of just 2-3 weeks working each day for several hours. Unfortunately, I didn’t have that luxury. Sure I could have hired a carpenter, but I wanted to do the work myself.
all could have been completed in a very short time. Perhaps two people could have done everything in a short span of just 2-3 weeks working each day for several hours. Unfortunately, I didn’t have that luxury. Sure I could have hired a carpenter, but I wanted to do the work myself.
Anyway, knowing we would still continue to pace ourselves, I figured setting the goal date to be in the new space for the Colorado QSO Party weekend would be safe.
Of course, as winter turned into Spring and Spring turned into Summer and watching Memorial Day come and go, then Field Day come and go and 4th of July come and go….WHOA!!!! I woke up one day and it was August and inside of 30 days. Would I make it? Could I make it? What if I didn’t make it?
Of course, nothing bad would happen if I didn’t make my goal. My New Year’s Resolution was to finish the basement in 2012, the Colorado QSO Party date was somewhat self-imposed or should I say self-inflicted. In any event, if I wasn’t in the new shack…I could certainly still operate in the contest from my old shack location. I mean it works…right? Also, I didn’t want to just move a chair, a desk and a radio into the new shack for 24 hours. It was either all-the-way or no way.
Thankfully, things really began to click into place in August. On August 1st (T-Minus 30 days) the sheetrock work was done, the texturing, sanding etc. was done, the paint on the walls and ceiling was dry, the floor was down, the cabinets were in place and the countertop was on the way. I merely had just a few hours of finish carpentry to complete before the dust creation process was 100% complete. Once I no longer need to cut trim in the basement area, I could safely begin bringing in my computers and radios into the new space.
So what’s left to do? Before I answer that question…let’s take a short walk down memory lane through pictures. Unfortunately I don’t have any photos of the plain concrete walls, so just use your imagination.
Framed walls before sheetrock – February 2012

Measure twice, cut once – February 2012

Everything I needed to know to do this I learned in Kindergarten. Just cut along the line. – February 2012

Getting there… – March 2012

Walls done – March 2012

It’ll need a ceiling right? – April 2012

You’ll have to trust me that this is a picture of the finished/textured wall. – May 2012
")
Warp Speed. From June 1 through end of July we managed to paint ceiling, walls, put down flooring and hang over 20 wall cabinets and drawer cabinets. – August 2012

Let me pause for a second as I’m getting dizzy. I worked mostly without any major plans. I had an idea in my head, but it wasn’t until we reached the cabinet stage that I actually attempted to create some form of plan or layout. I felt this was necessary so we could really get an idea of how the cabinets, countertop and space would all work. The image below was done before flooring was complete and before cabinets were installed. Unfortunately I couldn’t find any models of ham radios in the design software to place on the counter surface.

Now let’s look at the finished product. This is the brand new ham shack for KD0BIK.

In the above picture (from right to left) I have my Jetstream JTPS45 power supply which provides all of my 12v DC power. It connects into a West Mountain Radio RigRunner (mounted below desk). I also use the PWRGate which provides auto-switching from power supply to a 12v marine deep cycle battery.
Just above the Jetstream power supply I have an old style TV antenna rotator. This provides a little direction to my 20m hamstick dipole. Next is the Yaesu FT-950 HF radio. I use this radio primarily for SSB ops.
In the center below the two 21” LCD flat panel screens, I have the MFJ-4724 Desktop/Remote Antenna/Transceiver switch. This allows me to switch between either my 20m hamstick dipole or my Hustler 6BTV antenna to any of my HF rigs in the shack. No more having to move coax connections. YAY!!!!
Moving on around, next to the left 21” LCD I have the Yaesu FT-897 HF/VHF/UHF All mode transceiver. I use this rig primarily for all data modes. Sitting just below the 897 is the West Mountain Radio RIGBlaster Pro.
Just to the left is the MFJ Intellituner which I use with the FT-897 and sitting on top of the tuner is the Elecraft KX3. The KX3 is just posing for the picture. It’s main role is portable QRP and SOTA operations outside of the ham shack. Sitting just behind the KX3 (and might be difficult to see) is the IMD Meter by KK7UQ.
Finally, the radio to the far left is the Yaesu FT-857 which I keep mounted in a TAC-COMM TRC-1 metal enclosure and mainly mobile HF use. But at the moment it is connected to my V/UHF antenna and what I use for local V/UHF Ops and Packet. Just below the 857 is the Kantronics KPC-3+. Just above the 857 are two of the three HT’s I own. The Yaesu VX-8 is used on the trail and next to it is the only piece of ICOM equipment I own. It is the IC-92AD for D-STAR operations.
This has been an incredible project spanning many years. For much of the past six months I have worked for a few hours each weekend. Now it is time to sit back and enjoy the new ham shack.
Thank you for reading my blog and I hope it continues to inspire you.
Until next time…
73 de KD0BIK
Shack Update – Aren’t We There Yet?
I wish….
I just realized I haven’t published a blog update regarding my new basement ham shack, home office, podcast studio and man-cave in some time. Actually, I believe it was sometime in May just after I finished the texture phase.
Of course, I’ve been using my other forms of new media to keep everyone informed. I’ve talked about my progress on PARP. PARP is my weekly and monthly amateur radio podcast. PARP + is a weekly review of all the on-air (and some off-air gatherings) taking place in the amateur radio community. My regular version of PARP is monthly and includes a educational topic such as SOTA, JT-65, Preparedness, How to get your license etc. Please visit MyAmateurRadio.com to learn more about the practical amateur radio podcast.
According to the countdown clock located on KD0BIK.com, we are getting closer and closer to the big day. That is the Colorado QSO Party and the day I planned to be in the new ham shack. Will it happen????
The last time I blogged about my ham shack progress, I mentioned having just finished the texture phase. Boy what a mess that was. After texture came the painting phase for both the ceiling and the walls. The paint went on with ease and was completed in two weekends.
It was around the time I wrapped up the paint phase (mid June) when we started making decisions on flooring and cabinets. The cabinets were ordered via Home Depot and their Hampton Bay line of custom cabinetry. I wanted to make sure I ordered the cabinets earlier enough so they would arrive in Denver just after the flooring was finished.
The flooring we selected for the basement area is TrafficMaster Allure from Home Depot. It goes down in strips measuring 6 x 36 inches and is advertised as the easiest floor to install.
I need to stop for a minute just to say…I haven’t always worked in the Information Technology field. I’ve done a wide range of jobs and for a number of years I worked for the State of Texas Public School system and performed general maintenance. But even before that, I’ve always enjoyed building things and learning about construction. I spent four years in high school taking classes in wood shop, metal shop and even in the agricultural trade. Most of what I learned between my own high school education and working in the Texas school system is what I’ve used to construct my new ham shack area.
However, one area of education has been more important than any other. My Dad can make anything out of nothing. Fortunately, all through my life my Dad has shared his knowledge (some he learned from his Father) with me. Now I’m not a master craftsman…far from it, but what I’ve learned from my Dad is truly what has allowed me to do all this work. Even including installing a tile floor.
Oh…one more thing. The time I spent working at the school in Texas, was also 3-4 years I was able to work alongside my Dad. It’s hard to imagine just how much kids can damage a school in 9 months and we had 3 months during the summer to patch it all back together. That was a lot of fun and something I’ll always remember. Thank you Daddy!
My own tile floor went down just as advertised and really looks good. My wife and I spent the week of July 4th on a staycation (a stay at home vacation) and while we managed to get out of the house and up to the mountains (including one SOTA activation) I also managed to get all of the flooring installed.
The cabinets arrived almost on schedule. They are great quality (real wood) and the price was right. All cabinets were pre-assembled (no flat pack) and arrived on three pallets. The trucking company rolled them into my garage and I unpacked, inspected and moved each one through the house and down into the basement.
The picture below shows both the wall cabinets and the floor cabinets installed in their final location (along with flooring). Across the top of both sets of floor cabinets will be the countertop/desktop/worktop surface.

There are many reasons why this project has been years in the making. Remember I began framing this space in 2008, but didn’t work on it much from 2009 – 2011. With some excellent guidance, planning and encouragement from my wife, I kicked off 2012 with the New Year’s Resolution of completing this space. She has been instrumental in getting this space from the 2×4 phase to what you see above. Thank you honey!!
However, each step (painting, flooring, cabinet) including the countertop decision has been one that has taken time. In other words, we had to pick flooring to match cabinets and cabinets to match wall. The countertop needed to blend in with all and it just required a lot of shopping around. While we never contemplated going with granite, as we began shopping around and comparing different products such as laminate, solid surface, quartz and granite, we learned the price difference between quality solid surface and granite was close….actually very close.
The other consideration is resale value. While we have no plans to sell our house, the decisions we make regarding everything from the type of roof shingle, type of window replacement and the home office area are all with resale value in mind. This basement space would make someone a fantastic home office or even a hobby/craft room. Likewise, it will also make a fantastic ham shack.
Alright…time to wrap things up. Just yesterday (Monday, 6 August) we had the granite counter install company come and perform a laser measurement of the space. I’m told the lead time from measurement to install is approx. 10-14 days. As of today, Tuesday 7 August I am 24 days away from the planned opening date. So YES!! I do believe I’ll be in the new space on-time.
Meanwhile, I still have a few items of trim to install. I’m hoping to finish the trim work (requires sawing and that creates dust) in the next two weeks. Then if the countertop install is on schedule, I can (and will) begin moving into the new space. Painting of doors and trim (and wall touchups here and there) can all be done with radios and computers in place.
I’m really excited and yes I’m a little burned out on working on this project almost every weekend. But I’m in the home stretch now…see you at the finish line.
Until next time…
73 de KD0BIK
Texture–Another phase complete
I bet you’re thinking, “Jerry received his KX3 and the basement project has been placed on the back, back burner”. Yes, it’s been a while since I provided a progress update on the basement project. Yes, I did receive my KX3 as I’ve blogged about several times. But NO, the basement project was not placed on the back, back burner…it has been progressing along nicely. Today I have a major update to provide.
We’ve turned some major corners in the past few months with this project. While I know many of you could certainly have done everything I’ve completed over the past 3-4 months in perhaps just a few weekends, I’ve wanted to make sure I had time for other things. Plus I’ve never considered this to be a race. Very early on I established a goal for completion of Labor Day weekend to be fully moved into the new space. I’m very happy to report that we are still on-time and on budget.
On April 16th, I reported “The Shack has a Ceiling”. My wife and I started the process of mudding the joints and all the screw holes (along with a few “oops” areas). We taped and applied the first coat of joint compound (drywall mud), then sanded. We repeated that process, then sanded. Finally, last weekend I applied the third and final finish and wider coat of joint compound and we lightly sanded. We were ready for the next phase…texture!
Of all the tasks I’ve performed for this project (framing, electrical, plumbing, A/C Vent, drywall) applying texture is the only thing I’ve never done before. So I spent some spare time over the past week or two watching YouTube videos and reading as much as I could on the art of applying texture. Because I will have some other future drywall projects to complete, we opted to purchase a texture sprayer/hopper gun versus rent.
Home Depot sells the Wal-Board Texture Pro 200 hopper sprayer for $70 bucks. While this machine might not be everything a pro would need, I figured it would work fine for my use. Since I had used the pre-mixed joint compound for the taping and mudding phase, I decided to stick with that versus other formulas.
Since I had never applied texture I really had no clue just how much material (joint compound) we would use. I started out with two 5 pound buckets. In an empty 5 gallon bucket I thinned the pre-mixed joint compound into a consistency of thick paint. We were looking for a medium orange peel texture. After mixing for a few minutes with my drill and mixing attachment, I filled the hopper and applied texture to the side of a cardboard box. A little tweaking of air pressure and mixture consistency and I was ready to go.
After texturing two of the 16’ walls, I realized I probably needed another 5 gallon bucket of pre-mix. I kept mixing and spraying, mixing and spraying. My wife was starting to feel sorry for me and I think she also secretively wanted to try her hand at the texture gun. She began spraying while I continued to mix.
This teamwork actually worked out really well. I didn’t fill the hopper as full as I would have normally done for myself and when I wasn’t mixing compound, it allowed me to move and position the drop cloth and plastic around the room as she continued to spray. We managed to get all the walls textured in just about 3 hours.
To celebrate, we went to Home Depot yesterday and took advantage of their Behr paint Memorial Day Savings event. We saved $5 per gallon and $25 per 5-gallon. A nice savings and just when we needed it.
We will probably take this coming weekend off and resume work on the weekend of June 9-10. The next phase is the painting phase and I suppose if we get started on 9 June, we could easily be finished in a few weekends and have the painting phase finished by July. This leads us to the flooring phase.
At the time of this blog posting, we are not 100% clear on just what we will do with the floor. Tile of some type has always been the top choice. Carpet in a basement just doesn’t work and I want the ability to zoom across the room in my chair if need be. Decisions…Decisions…but they will be made and will be made in the very near future.
My apologies as the picture above just simply does not do the texture job any justice at all. I took this in a hurry this morning and didn’t take time to turn on all the portable lights. The ceiling recessed lighting is still covered. The two bumps are tape covering electrical outlet boxes. These will be just above the desk surface in the ham shack.
While I hate the see the long holiday weekend come to an end, there is a part of me that is looking forward to going back to work so that I can get some rest and recharge my batteries for the next phase…PAINT!!!
Until next time…
73 de KDØBIK


