Posts Tagged ‘amateurradio.com’
 Get your head in the cloud.
Even though my day job is completely centered around Information Technology I still miss changes and shifts in technology that happen practically under my nose. As much as I hear vendors speak about “The Cloud” I haven’t had much time to investigate and discover if this “new technology” is something I can put to use.
If you already know what “The Cloud” is then you can skip the following paragraph, otherwise please read on:
The easiest way to understand the cloud is to think of it as a utility, like electricity. When you plug a device into a wall outlet, electricity flows. You didn’t generate the electricity yourself. In fact, you probably have no idea where the electricity was generated. It’s just there when you want it. All you care about is that your device works. Cloud computing works on the same principle. Through an internet connection (the equivalent of an electrical outlet), you can access whatever applications, files, or data you have opted to store in the cloud–anytime, anywhere, from any device. How it gets to you and where it’s stored are not your concern (well, for most people they’re not).
There is no end to the stream of interesting projects that are being developed “in the cloud” and its hard to keep track of them all. Some projects have turned into things that we’re all familiar with; Flickr, Facebook & Twitter are a few examples. Some appear and vanish like the proverbial “Flash in the pan” and, since you generally lose access once they run out of steam, it can be disappointing if you have invested any time in those applications.
I’ve collected a few cloud based applications/services here that might be of interest to the radio amateur and/or experimenter. They look like they should stick around for a while and have already reached a fair level of maturity:
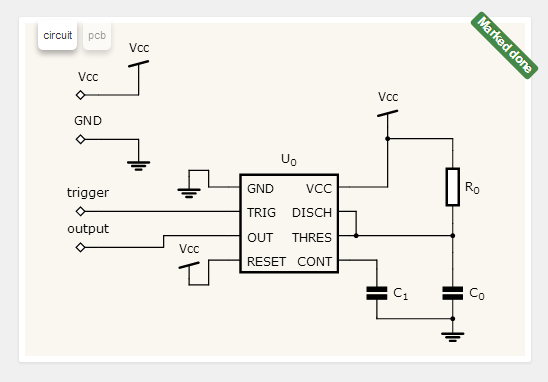
circuits.io: Described as a free circuit editor in your browser, it is actually a lot more. You can not only design practically any kind of circuit using just a web browser, you can turn that circuit into a printed circuit board and then BUY that PCB board online. Several different technologies had to come together to make this into an effective tool. This tool is fairly new but is becoming very popular. Hopefully it will stick around and continue to mature into something great.
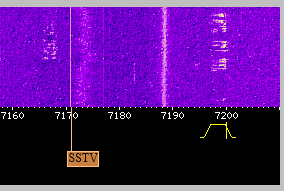
WebSDR: While arguably not a “cloud application” it does allow you listen to software defined radios, using a web browser, from anywhere you have internet access.
There are multiple sdr receivers located across the globe using a variety of receivers and antennas. Some are tuned to the HF bands while others cover VHF & UHF bands.
This is an invaluable free service provided by institutions and individuals at their own cost.
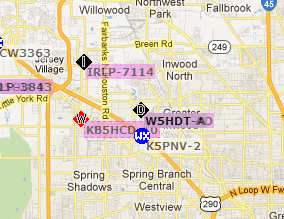
APRS.fi: The distributed network of Automatic Packet Reporting System stations, repeaters, clients and map servers could be considered to be “of the cloud” before the cloud even existed. With an APRS equipped radio you can log your position from a GPS, over the air & through another ARPS receiver. This is then sent out (usually) across the internet to other systems which in turn can map your location or update other APRS clients or radios. APRS has also been extended to include the ability to text message which is particularly useful in locations where cell phone SMS messages or email are not possible!

Echolink: Like APRS, Echolink links the Internet to amateur radio. However Echolink links the audio and PTT (push to talk) signals from a radio or software client to a radio in another physical location. If you’re stuck in a hotel room or another location without access to a radio you can still “get on the air” using an Echolink client on your Windows, Linux, iOS or Android computer & handheld device. Most Echolink connected stations are VHF/UHF but there are HF stations connected as well. Echolink is not designed to replace radio to radio communications but instead increases the connectivity of amateur radio operators and allows hams, who otherwise would not be able to operate, the pleasure of getting on the air.
As you can see, some of these “cloud apps” pre-date the idea of cloud computing by quite a while. Just another example of amateur radio folks being ahead of the curve without even realizing it.
Busy, Busy: ARES Incorporation and My Son’s Enrollment in an Electrician AAS Program
It’s been too long since I’ve posted; for those waiting for my next post on the ARRL Radiogram, please pardon the delay. The last couple of weeks have been unusually busy. More important matters have largely taken precedence over ham radio and blogging, but ham radio has by no means died at the QTH of NØIP and KAØCEM!
ARES® has been thriving here. On July 5, Yellow Medicine County ARES®, Inc. was incorporated. We filed our articles of incorporation with the MN Secretary of State and also obtained vanity call sign WØYMC (Yellow Medicine County) from the FCC! Two nights ago, the board of directors held their organizational meeting at which they adopted bylaws, elected officers, etc. Now we are ready to make application for 501(c)(3) status with the IRS. Hopefully I will get to that next week.
We had one emergency operation in July, though I sort of backed into it. After I received a phone call from a friend, my son and I assisted in searching for a missing girl. At first I wasn’t even thinking in terms of ARES. Intending to just help our friends, I told my son to throw on his ARES vest to be more visible, I grabbed mine, and we brought our HT’s so we could communicate. Upon arrival at the scene we found ourselves in the midst of many similarly-clad firefighters and EMS personnel as well as police officers and deputies. Long story short, by the time the search was concluded, many more firefighters would be involved as well as local K9, bloodhounds from Watertown, SD and the MN State Patrol Helicopter. Thanks be to God, the girl eventually turned up safe.
The weekly Yellow Medicine County ARES Training Net continues. In July I covered the ARRL radiogram, an introduction to the Incident Command System, and spent one session discussing lessons learned in the search for the missing girl. Thus concludes the latest ARES news from Yellow Medicine County.
And on the home front it appears that by elmering my son Antonio, KAØCEM, I have unwittingly steered him toward a career as an electrician! This past Wednesday he was admitted to the Electrician AAS program of MN West Community College, Canby, as a PSEO (Post-Secondary Enrollment Option) student in his last two years of highschool/homeschool. He surprised me a couple months ago by asking about this, and now he’s all registered for classes and already has a pile of books to study.
That’s all I have time for right now. After dashing this off it’s back to work for me. Hopefully I’ll get back to regular posting next week.

![]()
The ARRL Radiogram, Part 2
In this post I’ll describe how to compose a basic radiogram. I won’t wax on about everything involved here — if you want to learn more just click here. Here’s an example that I’d like to explain piece by piece. (Thank you to the Oregon ACES program for sharing a fillable PDF of the radiogram; I used it to create what you see here.)

The four main parts of the radiogram are the preamble (at the top), the address block (just below the preamble on the left), the text (the main body of the message), and the signature (just below the text). For now I’ll ignore the part at the bottom where it says “REC’D” and “SENT” as well as the box just below the preamble on the right where it says “THIS RADIO MESSAGE WAS RECEIVED AT,” since those are just for record-keeping.
Preamble:

Notice that a couple of the boxes are blank. I’ll still explain them, but because they’re optional and often not used I’ve left them blank. The preamble has eight boxes:
- NUMBER: This is whatever number the originating station chooses. (If you are the first station to send this radiogram, then you are considered the “originating station.”) Typically you start with “1″ on the first radiogram of the year and number each subsequent radiogram sequentially. Just make sure that it’s a number with no letters and that it doesn’t start with a zero.
- PRECEDENCE: Either R, W, P, or EMERGENCY. The first three letters stand for Routine, Welfare, and Priority, but “EMERGENCY” is always spelled out. Unless you’re dealing with a disaster, your radiogram is probably Routine, so put “R” in this box.
- HX: This is for one or more of seven optional handling instructions: HXA, HXB, HXC, etc. You don’t have to put anything in this box unless you have some special need, like to authorize a collect call for delivery, hold delivery until a certain date, etc. To learn more, click here.
- STATION OF ORIGIN: Your call sign, if you’re the first station to send the radiogram.
- CHECK: The number of words in the text of your message. If there is an ARL code used in your message, then put “ARL” in front of the check number. Later I’ll say more about ARL codes — and a dangerous trap that some operators fall into with this box when delivering a radiogram.
- PLACE OF ORIGIN: The location of the person who actually authored the text of the message. If you as the originating station are the one and only person composing it, then this would be your location. But if you’re not, then it may be some other location. Say for instance that your non-ham friend wants you to send a message of his own by radiogram. The place of origin would be your friend’s location, not yours.
- TIME FILED: This is optional (unless you have entered special handling instructions in “HX” that require it) and is often left blank for routine messages. If you do enter a time, enter the time you (the originating station) created the message. Use 24 hour format followed by an indicator of the time zone, e.g. 1730Z (UTC), 1730L (Local time).
- DATE: The three-letter abbreviation for the month followed by a number for the day. This is assumed to be UTC unless you have indicated a different time zone in “TIME FILED.”
Address block:

Enter the address of the person the radiogram is intended for. Don’t neglect the phone number (and remember to include the area code!) since usually radiograms are delivered by telephone once they make it to a ham who lives close enough to place a local call. I’ve put dashes in the phone number, which I should point out is technically incorrect but I’ll probably keep doing it.
Text and signature blocks:

Notice that there are five rows, each row containing five blanks? Each blank is for one word. The rows of five are to make it easier to count the words to compare with the “CHECK” box in the preamble. Instead of counting every word, you can just count by fives for every row that is full. This makes it easier for stations in the NTS to rapidly check for missing/extra words after they have copied a message. Here are a few notes on this part of the radiogram:
- Punctuation: Don’t use any punctuation marks. At the end of a sentence where a period would normally go, write “X” on a blank (it counts as a word and is pronounced “X-RAY” when read over the air). Don’t write “X” at the end of your last sentence, though. For a question mark, write “QUERY” on its own blank line (it also counts as a word).
- ARL Codes: ARL codes are a handy way to say a lot with only two or three words. For a listing of all the ARL codes, click here (it’s toward the end of the document). “ARL FIFTY” means, “Greetings by Amateur Radio,” and that’s what the recipient will hear when finally a ham calls him and reads the radiogram to him. Note that the number “FIFTY” is spelled out, and both “ARL” and “FIFTY” each count as a word. If you used, say, “ARL FIFTY ONE,” that would count as three words. Warning! Don’t confuse the “CHECK” in the preamble with the ARL code you are trying to send. In the example I’ve shown here, “ARL 15″ is in the “CHECK” box, but all that means is that 1) there is an ARL code in your message 2) there are 15 words total in your message. Frankly I wish we didn’t have to put that “ARL” in the check box because it’s confusing and can be disastrous. Just read the story in the Operating Manual about the time a poor ham delivered a radiogram and mistakenly interpreted “ARL 13″ in the “CHECK” box for “Medical emergency situation exists here” (the meaning of ARL THIRTEEN, if it were actually in the text of the message). After the family received this botched radiogram, they threatened to file a lawsuit!
- Wording: Be concise. The fewer words the better, as long as it still makes sense.
- Closing: Closing words like “sincerely,” “love,” etc. should be included in the text of the message, not the signature.
- Signature: The name of the person(s) writing the text. The signature goes just below the text as shown. At first this is a bit confusing when you’re staring at a blank radiogram form because it’s not obvious that the top border of the REC’D/SENT boxes doubles as the line for the signature. But that’s where it goes — above that top border, not below it. It has nothing to do with “REC’D/DATE/TIME” or “SENT/DATE/TIME,” which are for record keeping as the radiogram is sent and received. Note: the signature does not count toward the number in the “CHECK” box of the preamble.
I hope this is helpful! In my next post about the ARRL Radiogram I’ll discuss how to send it using a voice mode like SSB.

![]()
The ARRL Radiogram, Part 1
 Who knew the ARRL radiogram could be so easy to send and receive — and so enjoyable? All those old-time NTS operators, of course! The National Traffic System — the “Relay” in the American Radio Relay League — has been around since 1915, yet never have I had the courage to take part until now. I wish I’d done it sooner. My son, a ham for only a month, has already passed two radiograms of his own! How about you? Would you like to give it a try?
 The first step is to find a net that is part of the NTS. I found one by searching the ARRL database (click here) for a “Section Net” in Minnesota. Unfortunately the database is a bit cluttered, so it may require a bit of patience as you sift through the listings and tune around listening for a listed net. But that’s not a bad way to start, really. Patient listening will get you far in this hobby, especially when you’re trying to learn something new.
Once I found the MN Section Phone Net on 3860 kHz I listened to a few sessions before checking in. My biggest fear was that I might be asked to receive a radiogram without understanding the procedure. But I didn’t have anything to worry about — surprisingly, very little traffic is actually passed these days. The same is true of the SD NEO Net which immediately follows the MN Section net on that frequency.
We need more radiograms in the system. It doesn’t matter how trivial your message is, honestly. Know somebody who has a birthday coming up? Send him a radiogram! It is a novel way to send a greeting, and it helps keep the NTS running the way it’s supposed to. As the ARES EC for my county I have a vested interest in the proficiency of the NTS, which works closely with ARES during a disaster. But I digress.
 To learn how to send and receive a radiogram I turned to The ARRL Operating Manual For Radio Amateurs. The chapter on traffic handling is very well written; read through it a couple of times and you’ll be ready to handle radiograms by a voice-mode. CW is a little tougher because it involves unique prosigns and Q-signals — the book is indispensable as a starting-point, but I’m still not ready to check into a CW traffic net quite yet. I’m listening when I can, though, and learning.
Before passing a radiogram in the NTS, I practiced sending and receiving a test-radiogram with my son on 2 meter simplex. Then I practiced sending a test-radiogram to the Yellow Medicine County ARES Training Net on our local 2 meter repeater. We were ready to do it for real. On the next Training Net my son sent me a bona fide radiogram bound for his friend in Virginia. No turning back now — I couldn’t let my son down! The next chance I had to put it into the NTS was with the SD NEO Phone Net, so I tuned in, gulped, and took the plunge. Pretty soon the radiogram was on its way and I was grinning. This is easy!
In my next post I’ll describe how to compose a radiogram. Obviously I’m new at this, but that also means some of these things are fresh in my mind. I hope it will help one of you get on the air and send a radiogram!

![]()
Heartwarming: My Son Takes My Old Novice Callsign, KAØCEM

Novice Station KAØCEM, circa 1978.
Today my son, Antonio, was granted my old Novice call sign from 1978: KAØCEM. He has wanted this call sign ever since he began studying for his Technician license. What a moving thing this is to behold my son showing such honor to his father, if even in such a trivial matter as an amateur radio call sign. It gives me pause to contemplate my relationship with Antonio and the man he has become.
Back in 1996, when he was born, I could not foresee the year 2012. I’ll never forget that day when we came home from church to hear a message from Antonio Maset, the director of our adoption agency. Our hearts leaped to hear him say that a baby boy had been born the night before in Guatemala City. Mr. Maset said he would call back later that evening. We spent the afternoon with another adoptive family with a boy from Guatemala, and my wife and I looked at each other in awe when the mother told us we should have a name picked out when Mr. Maset called us back. Watching her boy and imagining a son of our own like him, our minds whirled as we tried to grasp the magnitude of what was happening.
When we went home and waited for the phone to ring, the minutes crawled by like hours. Finally, the phone rang and my wife and I each picked up. Antonio Maset was on the line with Helen de Rosal, the lady who ran the home where this little baby would spend his early days. We eagerly told them that we did indeed want to adopt this little baby, and we told them we wanted to name him after Mr. Maset. Thus was my son named Antonio before he left the hospital that day. Five months later, after our lawyer in Guatemala City finalized the adoption with the courts, I flew to Guatemala to bring Tonito (as we called him then) to the American Embassy for a visa. And a day later, I delivered him into my wife’s loving arms at the Minneapolis-St. Paul airport as my daughter and a host of smiling friends and relatives looked on.

Antonio’s last lab in book one of the Electronic Learning Lab: a frequency meter using 555 & 4046 chips.
Now Antonio is sixteen, and he has chosen my old Novice call sign as his own. As heartwarming as it is, this symbolic gesture reminds me of far more important things about my son. Most importantly he has given himself to Jesus Christ; as a Christian he is as much my brother in the church as he is my son. He has grown up to be a respectful, hard-working young man who disdains teen culture and loves ham radio because he gets to talk with adults who treat him as an adult. He adores his sister, respects his mother, and honors me not only as his father but as his homeschool-teacher. He keeps up with his chores, and he willingly tilled and planted the garden this year. He loves playing classical guitar, riding and training horses, and reloading various kinds of ammunition.
And now, he’s a ham radio operator — with my old Novice call sign. He wants to master CW, but until then he is active on 2 meter FM and 10 meter SSB. He has registered as an ARES operator, and last night he even passed his first radiogram on the Yellow Medicine County ARES Training Net (a radiogram that I need to pass along on the MN Section Net today!). Not bad for being a ham for only one month!
I pray that God will guide Antonio as he continues to grow in wisdom and stature. Son, may you always keep amateur radio and your other pursuits in their proper place, and strive above all else to bring glory to God as you seek to know him and love him — not only to live well, but to die well.

![]()
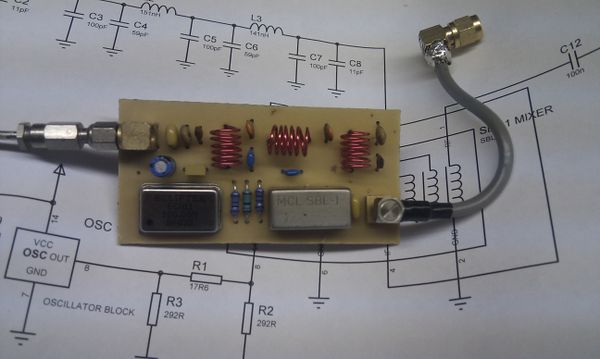
The $20 Software Defined Radio
Despite my interest in boat-anchors I do find myself peeking ‘over the wall’ from time to time and taking a look at new and emerging technologies. After several demonstrations from friends I had become convinced of the incredible potential of software defined radios and even found thinking about owning one … one day.

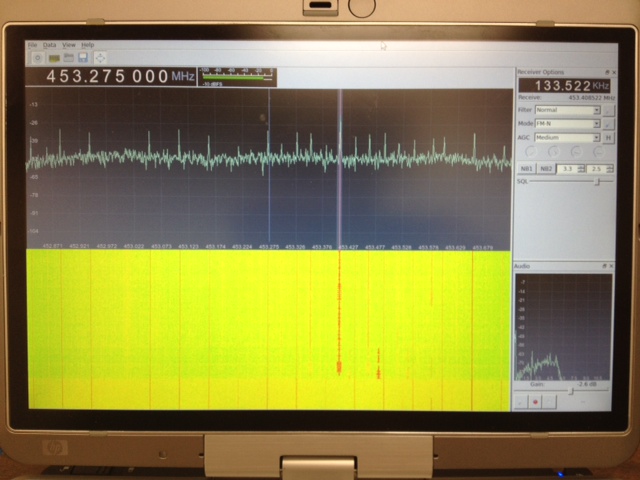
Software (Linux) : After poor results with the software running on MS Windows I moved across to Linux and got it working well there. I can’t point you to a single howto for this because I used several different guides and tried a few things before it started working. The most helpful, and probably all you really need, are the build-gnuradio script which gets hardware support and gnu-radio running and the “Getting Started With RTL-SDR” page by Tom Nardi which covers installing Gqrx. All the software used is in development and requires familiarity with the command line to install and use at the moment.
Update : Thanks to a link from Neil W2NDG to an EBay sale I’ve been able to track down a pre-assembled HF up-converter on this page : New HF Converter Kit for the SDR Fun Cube Dongle The price seems to be 45 euros, or about $55 US.
The KARS 2012 Summer Field Day Video
It took a little while but I finally got the video for the Katy Amateur Radio Society summer field day together. I didn’t shoot as much video or as many photographs this year as I actually spent time a fair amount of time operating for a change!
Hopefully it will still be an entertaining, if short, reminder of those two days in June.
Katy Amateur Radio Society – Summer Field Day 2012 from Owen Morgan on Vimeo.


