Posts Tagged ‘amateurradio.com’
 Making use of Elecraft Mini-module Kits
Connecting the bits and bobs
I have enjoyed building Elecraft Mini-Module kits. Now to put them to use...
 |
| Elecraft Mini-Module Kits |
What to do?
I built the kits as part of my learning adventure and to improve my soldering skills. It's also helped me learn to follow instructions better (my wife says I need to work on learning to follow instructions). But ultimately these modules are intended to be useful, and in my case they work nicely to when operating my old Ten-Tec Century/21.
My Ten Tec Century/21 is a 1970s CW-only, low(ish) power rig originally intended for Novice license holders of the time. It has no RF output meter or SWR meter. It has poor filtering/selectivity compared to modern radios and its analog tuning dial is a bit vague so you generally only know your frequency within 5 kHz.
The mini-module kits prove useful. I employ the W1 Wattmeter to determine my power output and SWR; the CP1 directional coupler is used to send a 20db attenuated signal to a frequency counter to determine operating frequency, and the AF1 Audio Filter makes operating near adjacent CW signals more pleasant by providing a narrow audio-band-pass filter. The result signal can be transmitted through a LDG tuner into the BL2 switchable balun connected to my attic Doublet.
Bring out your cables
All these independent modules need to be connected, so tying the bits and bobs together requires a few coax jumpers to route the RF around:
- UHF to BNC from the radio to the W1 Power meter
- BNC to BNC From the W1 Power meter to the CP1 coupler
- BNC to UHF From the CP1 coupler J1 input to switched T1 output to frequency counter
- BNC to UHF From the CP1 coupler J2 output to the tuner
And other cables:
- Serial cable from the W1 Power meter to the computer
- 12v power cables for the W1 and AF1 (unless I want to use 9V batteries)
- Audio cable from the TenTec C21 to the AF1
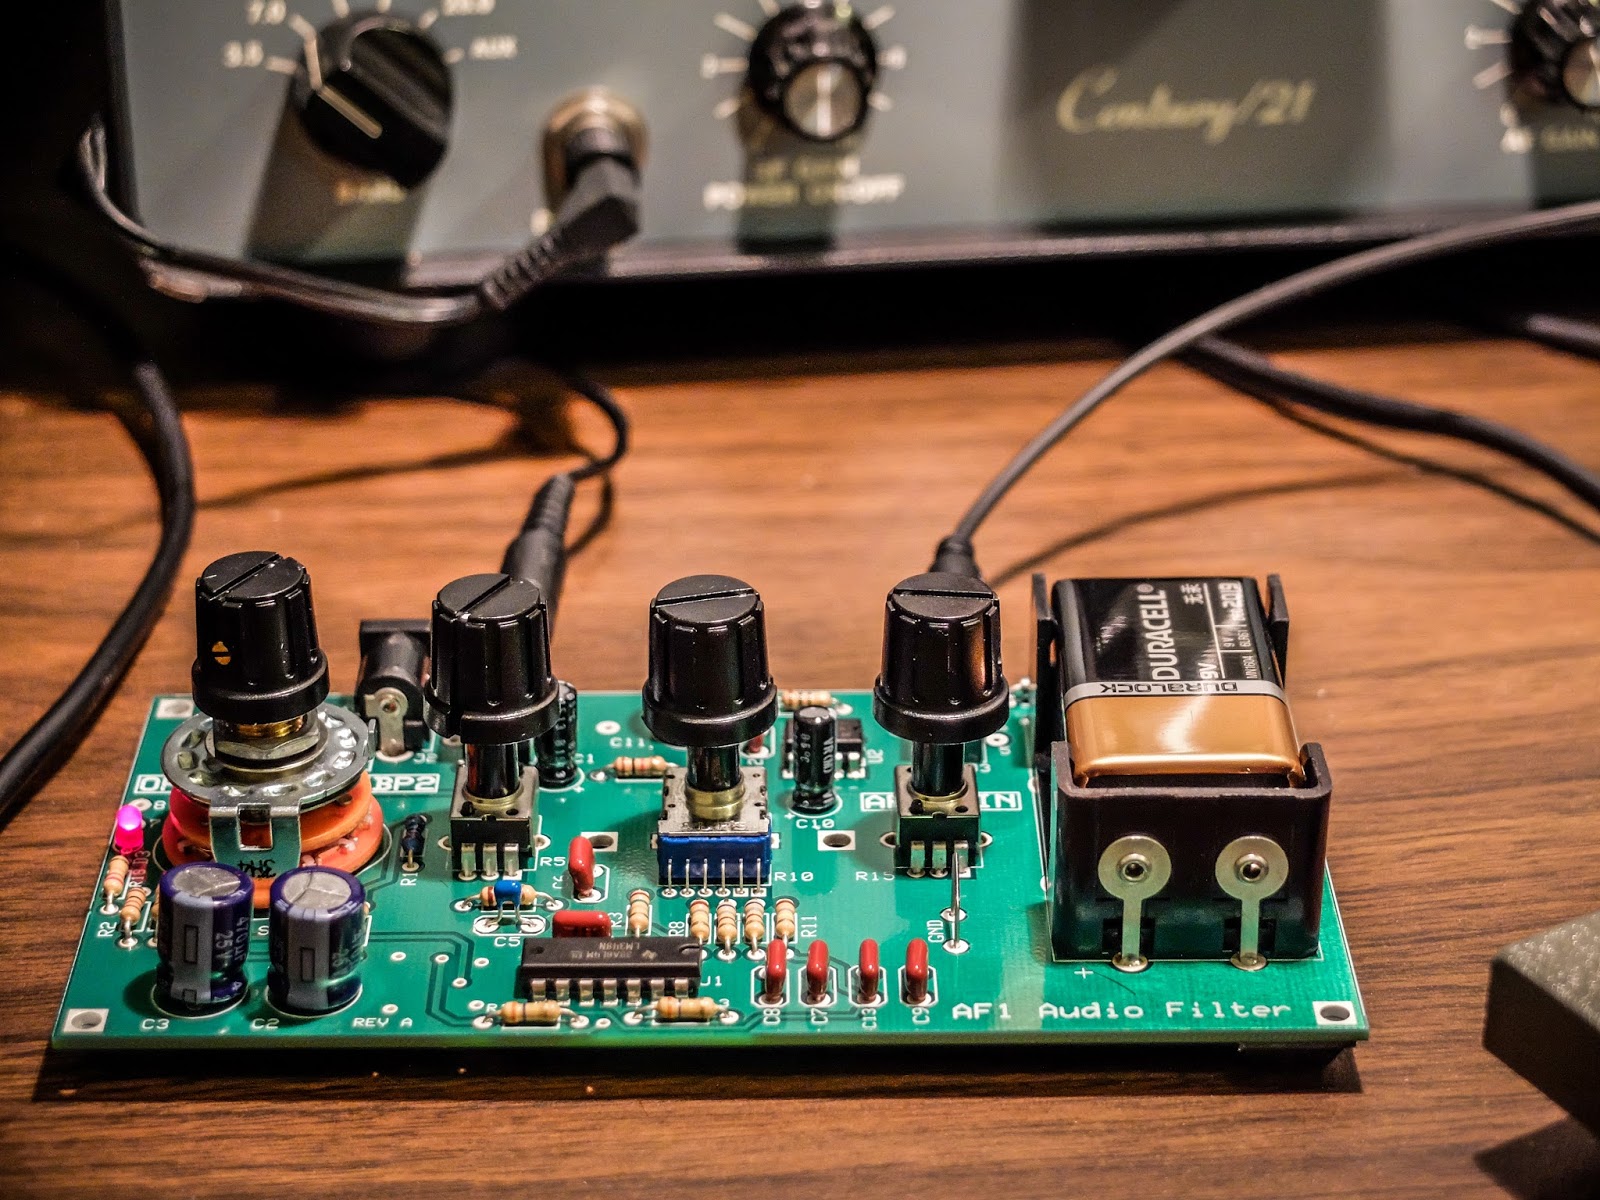 |
| AF1 Audio Filter making crowded band operations pleasurable |
 |
| CP1 Directional Coupler sending off 20dB attenuated signal to the frequency counter |
 |
| Frequency Counter fed by the CP1 directional coupler. |
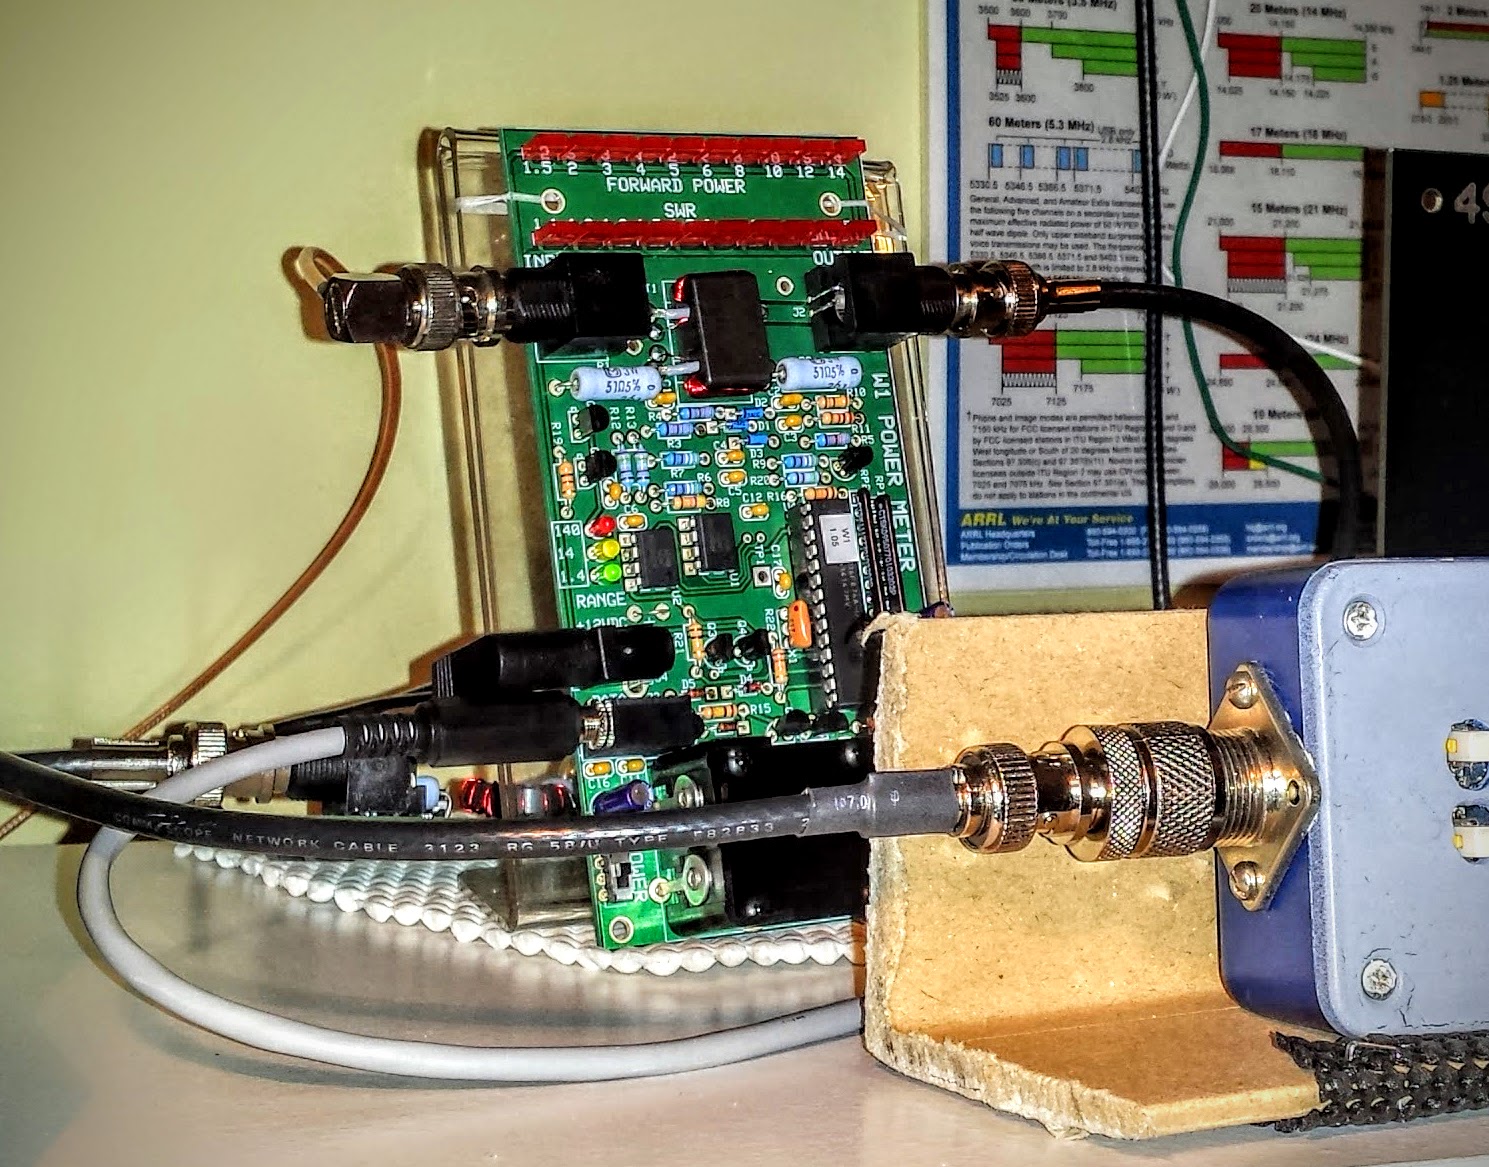 |
| W1 Power Meter sending its measurement off to the computer |
W1 Power Meter Output to Computer
The W1 has a serial output to a PC for use with the Elecraft W1 software. The software can both configure the meter and display more detail than can be determined from the LEDs. Source code is supplied and the command set is documented so it would be easy to write your own software for this.
The W1 power meter LEDs give you relatively discrete output information for the lower two ranges (0.1w to 1.4w) and (1.5w to 14w). But in the high range (over 14w) the LEDs are only displaying 10 watt intervals. For instance in the high range, when the second LED is lit you don't know if your operating just 20 watts or 29 watts. It won't trip the next LED until it crosses the 10 watt boundary in the high range so it can be useful to look at the measurement on the computer if you are operating QRO. I'm not complaining. I understand that the meter is primarily intended as a QRP meter and for QRP power (less than 15 watts) it offers plenty of information.
Here I brought the TenTec Century/21 up to nearly full input drive (55-60 watts) to see what it could output. The rig probably had a few more watts left in there but I didn't want to push it because I haven't gotten around to replacing some of the out of spec components in the internal power supply. I normally use this radio under 10 watts (I look for about 30 watts input on the drive meter) but I was curious to see what the old girl could do since I had the meter hooked up to the computer display.
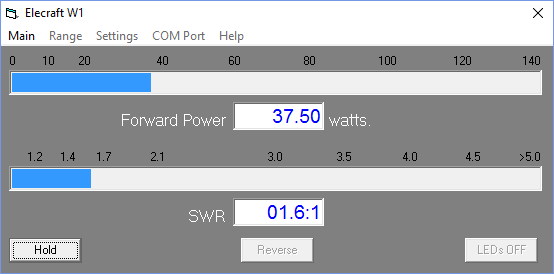 |
| Measuring maximum RF output from the Ten Tec Century/21 |
Nits and Quibbles
My antenna's native SWR at 15m (~21.08MHz) is around 2.5 so it requires tuning (impedance matching). After my LDG auto tuner spends a ridiculous amount of time trying to find a match it settles at 1.7 SWR according to the W1 Wattmeter, while the indication on the Autotuner is that it believes the SWR is 1.5 or better, while the radio on the other side of the W1 meter sees a SWR over 2.5. I only see this behavior on 15m so I think there is some strange impedance reaction occurring in the W1 wattmeter that is changing the reactance on the jumper to the radio. I've tried a few different jumpers, swapping jumpers, etc. But it always presents an abnormally high SWR to the radio at 15m. Now when I transmit into a dummy load I don't see this behavior, so it is some combination of SWR / reactance present at W1 that causes a impedance mismatch downstream toward the radio. I have more investigating to do but for now I am choosing to not use the W1 Wattmeter in-line when operating on 15m.
The CP1 directional coupler is not entirely transparent and raises the SWR by a bit as signal passes through it. You would expect there to be losses according to the -20 db taps (one forward and one reverse). This should work out to about 0.08% loss but I wouldn't expect it to raise the SWR. It adds about 0.1 to your SWR and occurs even if the forward and reverse couplers are switched "off" and shunt their respective loads to the on-board 50 ohm resistors. I'm unsure what accounts for that slight SWR bump but be aware that CP1 contributes some very small losses.
Summary
So the Elecraft Mini-modules are fun to build; and with enough jumper cables, can be combined for experiments and general augmentation of other equipment in your shack. So go out there, build some kits and experiment. It's a rewarding experience.
I'm trying to decide what I'm going to build next.
That's all for now...
So lower your power and raise your expectations
73/72
Richard, N4PBQ
Smartphones
I was prompted to write this because of the latest poll on eHam. It's about smart phones and Amateur Radio apps. Of course, it devolved from being anything useful into a bunch of curmudgeons blasting the topic to smithereens.
"What do you need a smart phone for anyway? I detest them, they are the mark of the Beast - the Devil's plaything, they are everything that is wrong with society! I use a real radio that has knobs ...... remember what those are?" I am paraphrasing, of course. ;-)
And so on, and so on, and so on. Sigh - heavy sigh.
It's a tool, guys ...... just another tool in the Ham radio arsenal, get it?
I have a pre-owned (sound so much better than "used") Samsung Galaxy S3, which I recently picked up on eBay. It's my first personal 4G cell phone. (I know, forever behind the times.) Even though it's an older model, it's in excellent shape and I'm familiar with the S3, as my work-issued cell phone used to be an S3. For work, they recently upgraded me to an iPhone 5s, which I don't like (or use) - but this post is not about that.
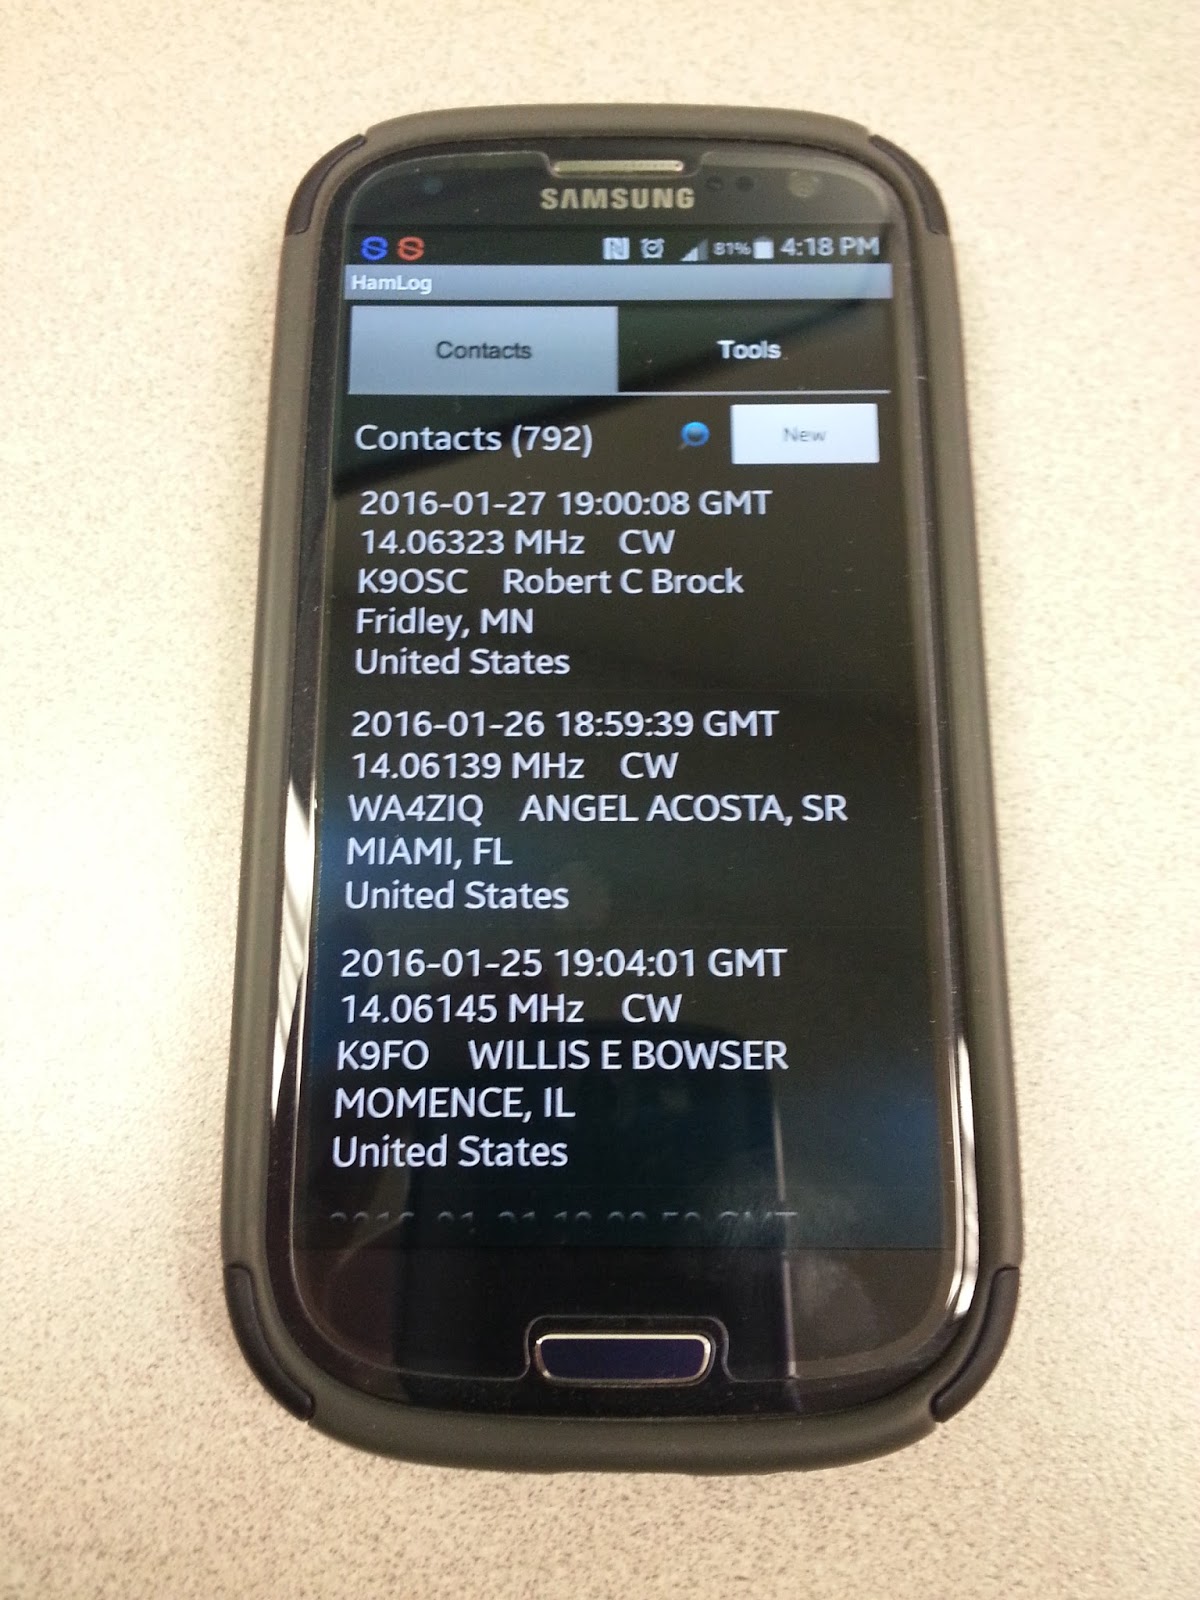
My Galaxy S3 is a great companion for portable QRP ops. It's works much better than the Motorola Droid 2 that I previously used. It has more system memory, so it doesn't lock up or lag on me, like the Droid 2 used to. I have the following Amateur Radio apps on it:
HamLog
SOTAwatch
Morse Trainer by Wolphi
QRZDroid
DX Cluster

HamLog is great! It's easy to use and has a lot of features. If I'm not in a pileup situation (ragchew mode, or even causal sprint operation), it's easy enough for me to type in my contacts. In a hectic pileup situation (think activating NPOTA or the Skeeter Hunt), where things are happening fast and furious, I get flustered a bit. I can start out logging on the cell phone, but inevitably, I end up getting fumble-fingered and have to resort to old school - paper and pencil. If I'm near a wi-fi source (I have a very limited monthly data allowance, so my data connection is always off), it will even look up the names and QTHs of the operators that I am currently working. I can easily export the log to an ADIF file, so that I can add my portable ops contacts to my main log on Log4OM.
SOTAwatch - turn it on and it shows you the current activations. Call signs, peak, frequency and mode. It has other features which I haven't even explored yet.
Morse Trainer - This is one of the best Morse Code trainers out there IMHO. It will allow Morse to be sent as fast as 60 WPM. I keep mine set to a speed of about 40 WPM and have it send regular words. I try to listen to some code practice several times a week in my never ending goal to become an even more competent CW op. Boy, 25 WPM sure sounds easy-peasy after listening to 40 WPM for a while!
QRZDroid - QRZ.com in an app. Easy call sign look up.
DX Cluster - Very helpful in tracking NPOTA stations. The only drawback with DX Cluster is that you can filter it for either all HF bands or mono-bands. It would be nice if I could filter say, 20 and 17 Meters in one shot. But, hey, if wishes were nickels, I'd be a rich man. Wish I was smart enough to write apps like these, then maybe I would be a rich man!
The bottom line is that a smart phone can be a useful tool to compliment and enhance your overall Amateur Radio experience. It's not a replacement or any other kind of bogeyman. It is what you make of it.
72 de Larry W2LJ
QRP - When you care to send the very least!
"What do you need a smart phone for anyway? I detest them, they are the mark of the Beast - the Devil's plaything, they are everything that is wrong with society! I use a real radio that has knobs ...... remember what those are?" I am paraphrasing, of course. ;-)
And so on, and so on, and so on. Sigh - heavy sigh.
It's a tool, guys ...... just another tool in the Ham radio arsenal, get it?
I have a pre-owned (sound so much better than "used") Samsung Galaxy S3, which I recently picked up on eBay. It's my first personal 4G cell phone. (I know, forever behind the times.) Even though it's an older model, it's in excellent shape and I'm familiar with the S3, as my work-issued cell phone used to be an S3. For work, they recently upgraded me to an iPhone 5s, which I don't like (or use) - but this post is not about that.
My Galaxy S3 is a great companion for portable QRP ops. It's works much better than the Motorola Droid 2 that I previously used. It has more system memory, so it doesn't lock up or lag on me, like the Droid 2 used to. I have the following Amateur Radio apps on it:
HamLog
SOTAwatch
Morse Trainer by Wolphi
QRZDroid
DX Cluster
HamLog is great! It's easy to use and has a lot of features. If I'm not in a pileup situation (ragchew mode, or even causal sprint operation), it's easy enough for me to type in my contacts. In a hectic pileup situation (think activating NPOTA or the Skeeter Hunt), where things are happening fast and furious, I get flustered a bit. I can start out logging on the cell phone, but inevitably, I end up getting fumble-fingered and have to resort to old school - paper and pencil. If I'm near a wi-fi source (I have a very limited monthly data allowance, so my data connection is always off), it will even look up the names and QTHs of the operators that I am currently working. I can easily export the log to an ADIF file, so that I can add my portable ops contacts to my main log on Log4OM.
SOTAwatch - turn it on and it shows you the current activations. Call signs, peak, frequency and mode. It has other features which I haven't even explored yet.
Morse Trainer - This is one of the best Morse Code trainers out there IMHO. It will allow Morse to be sent as fast as 60 WPM. I keep mine set to a speed of about 40 WPM and have it send regular words. I try to listen to some code practice several times a week in my never ending goal to become an even more competent CW op. Boy, 25 WPM sure sounds easy-peasy after listening to 40 WPM for a while!
QRZDroid - QRZ.com in an app. Easy call sign look up.
DX Cluster - Very helpful in tracking NPOTA stations. The only drawback with DX Cluster is that you can filter it for either all HF bands or mono-bands. It would be nice if I could filter say, 20 and 17 Meters in one shot. But, hey, if wishes were nickels, I'd be a rich man. Wish I was smart enough to write apps like these, then maybe I would be a rich man!
The bottom line is that a smart phone can be a useful tool to compliment and enhance your overall Amateur Radio experience. It's not a replacement or any other kind of bogeyman. It is what you make of it.
72 de Larry W2LJ
QRP - When you care to send the very least!
Smartphones
I was prompted to write this because of the latest poll on eHam. It's about smart phones and Amateur Radio apps. Of course, it devolved from being anything useful into a bunch of curmudgeons blasting the topic to smithereens.
"What do you need a smart phone for anyway? I detest them, they are the mark of the Beast - the Devil's plaything, they are everything that is wrong with society! I use a real radio that has knobs ...... remember what those are?" I am paraphrasing, of course. ;-)
And so on, and so on, and so on. Sigh - heavy sigh.
It's a tool, guys ...... just another tool in the Ham radio arsenal, get it?
I have a pre-owned (sound so much better than "used") Samsung Galaxy S3, which I recently picked up on eBay. It's my first personal 4G cell phone. (I know, forever behind the times.) Even though it's an older model, it's in excellent shape and I'm familiar with the S3, as my work-issued cell phone used to be an S3. For work, they recently upgraded me to an iPhone 5s, which I don't like (or use) - but this post is not about that.
My Galaxy S3 is a great companion for portable QRP ops. It's works much better than the Motorola Droid 2 that I previously used. It has more system memory, so it doesn't lock up or lag on me, like the Droid 2 used to. I have the following Amateur Radio apps on it:
HamLog
SOTAwatch
Morse Trainer by Wolphi
QRZDroid
DX Cluster
HamLog is great! It's easy to use and has a lot of features. If I'm not in a pileup situation (ragchew mode, or even causal sprint operation), it's easy enough for me to type in my contacts. In a hectic pileup situation (think activating NPOTA or the Skeeter Hunt), where things are happening fast and furious, I get flustered a bit. I can start out logging on the cell phone, but inevitably, I end up getting fumble-fingered and have to resort to old school - paper and pencil. If I'm near a wi-fi source (I have a very limited monthly data allowance, so my data connection is always off), it will even look up the names and QTHs of the operators that I am currently working. I can easily export the log to an ADIF file, so that I can add my portable ops contacts to my main log on Log4OM.
SOTAwatch - turn it on and it shows you the current activations. Call signs, peak, frequency and mode. It has other features which I haven't even explored yet.
Morse Trainer - This is one of the best Morse Code trainers out there IMHO. It will allow Morse to be sent as fast as 60 WPM. I keep mine set to a speed of about 40 WPM and have it send regular words. I try to listen to some code practice several times a week in my never ending goal to become an even more competent CW op. Boy, 25 WPM sure sounds easy-peasy after listening to 40 WPM for a while!
QRZDroid - QRZ.com in an app. Easy call sign look up.
DX Cluster - Very helpful in tracking NPOTA stations. The only drawback with DX Cluster is that you can filter it for either all HF bands or mono-bands. It would be nice if I could filter say, 20 and 17 Meters in one shot. But, hey, if wishes were nickels, I'd be a rich man. Wish I was smart enough to write apps like these, then maybe I would be a rich man!
The bottom line is that a smart phone can be a useful tool to compliment and enhance your overall Amateur Radio experience. It's not a replacement or any other kind of bogeyman. It is what you make of it.
72 de Larry W2LJ
QRP - When you care to send the very least!
You can’t work ’em if you can’t hear ’em.
The snow plows came through to clear our street. Even so, they never really plow the entire street. They clean it up for sure, so that you can travel safely down the road, but there's always that snow plow residue on the sides of the street. So, until the snow melts substantially, I can't park on the street, as I usually do, there's just not enough room to park and still have space for other cars to get by. That means I have park in the driveway. Since I generally get home last, I have to get up and move my Jeep when my wife Marianne has to leave for work at 5:00 AM (I've mentioned - she's a nurse).
So this morning, after moving my car for her, I made some coffee and headed down into the shack. I had about a half hour before I had to shower, shave and get dressed for work. I figured that maybe, just maybe, I'd hear K5P, as this is their last day on the island, I believe. And sure enough, there they were on 80 Meters, calling CQ! And from the rate they were answering stations, you could tell they were listening for ATNOs - stations they had never worked before (which would have been me!).
They were decently loud - about 559 with QSB on 3.530 MHz with QSB. Even so, this was the best I've heard them throughout the entire DXpedition. I put the KX3 into "Dual Watch" mode, so I could figure out where they were listening, and then I fired up the KXPA100 to 90 Watts and jumped into the fray.
Then some idiot proceeded to come onto their QRG (the frequency they were transmitting on) and began to send an non-ending string of S9 dits, totally obliterating them.
"You can't work 'em if you can't hear 'em."
Sigh.
72 de Larry W2LJ
QRP - When you care to send the very least!
I’ve Got the Power
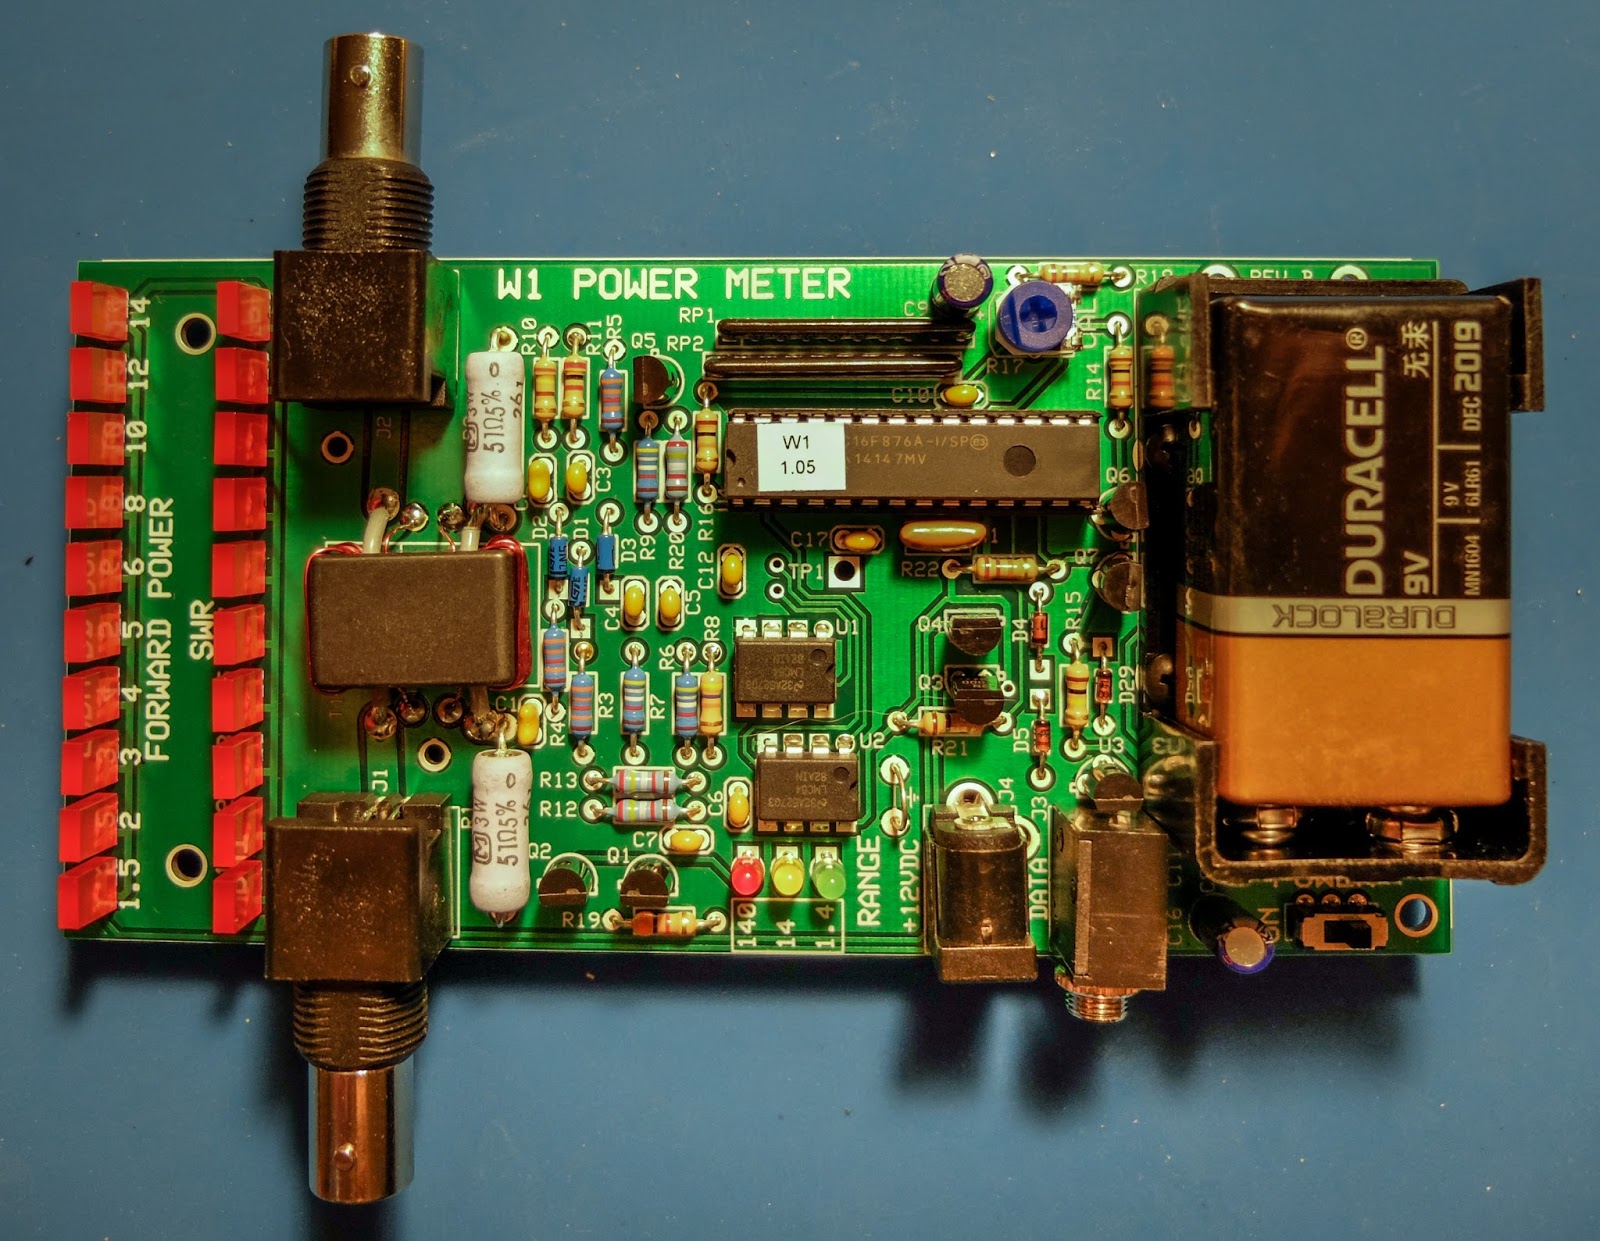
Elecraft W1 Power Meter
The Elecraft W1 is another fine mini-module kit from Elecraft. It is an auto-ranging power meter measuring as little as 150mw up to 140w. The 150 milliwatt to 1.4 watt range is an especially nice feature for QRP'ers.
 |
| Elecraft W1 Power Meter |
Building
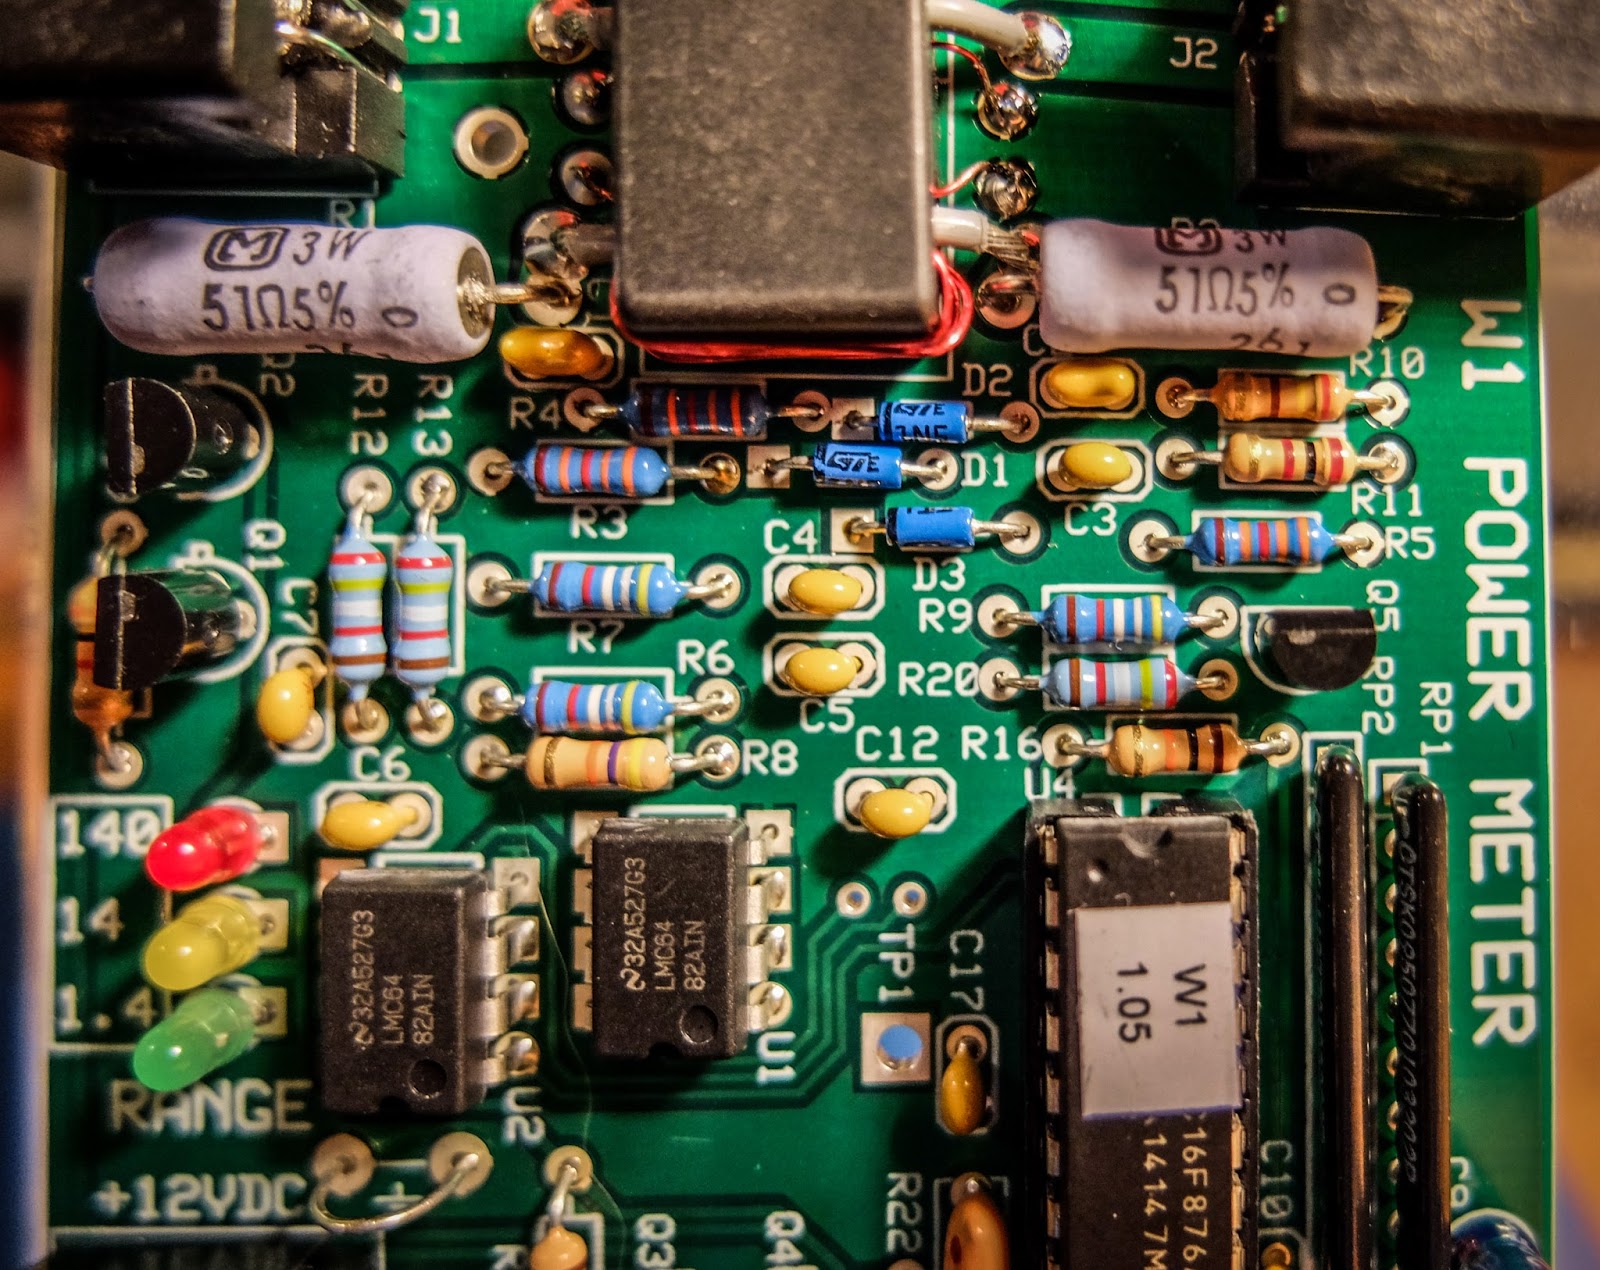
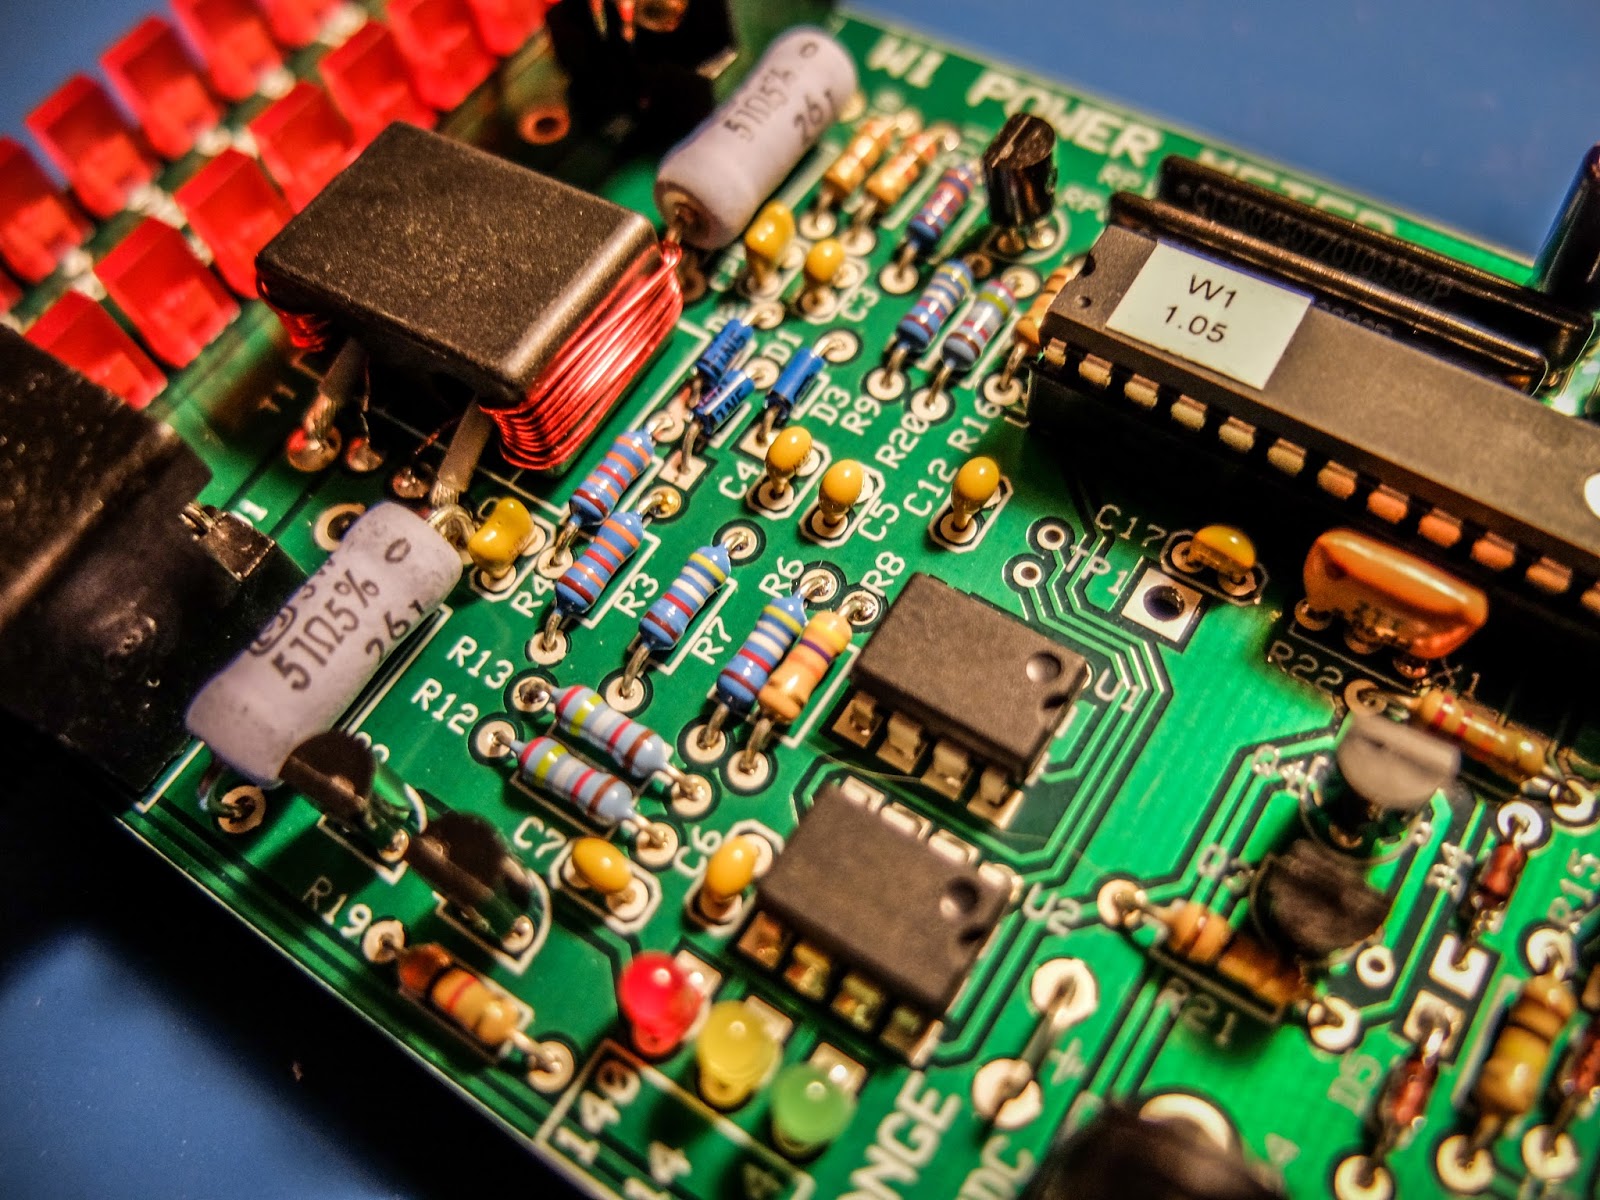
I am new to building kits. My first kit was from 4-State QRP (Regen Receiver). This is my 4th Elecraft kit. The instructions are very detailed and easy to follow and I especially like that they give you the resistor color and capacitor identification right there in the instructions without having to refer to a data sheet somewhere else in the documentation.
All the parts come in a single bag so there is a bit of sorting that you need to do when you receive it. I use a big egg carton to sort and inventory the parts so that I can find them more easily.
This kit was a bit more involved than the other kits I've built from Elecraft. It has a binocular toroid which is fiddly to wind, 3 ICs and a couple of resistor packs. Lots of soldering. The most tedious parts to solder are the tiny transistors. Those solder pads are really close together for someone new to soldering like me, but I took my time and everything turned out ok. I worked on this kit a little at a time over 3 nights. If you can follow instructions and have a steady hand you should be fine.
The kit has some ESD sensitive parts so you'll want to be able to properly ground yourself and your equipment. Make sure your soldering iron is ESD safe and that you are grounded.
Lastly, final calibration is performed using just a multi-meter.
Build options
The meter can be built in a number of different configurations depending on how you plan to use it. The battery holder and BNC connectors can be installed on the top or bottom of the board and the BNC connectors can even be oriented vertically on the back side of the board. If you plan to use it in an enclosure give some thought to the location of the battery holder and BNC connectors before you get to that part of the build.
I plan to use some stand-offs to mount it to the front of an acrylic photo frame that I already had.
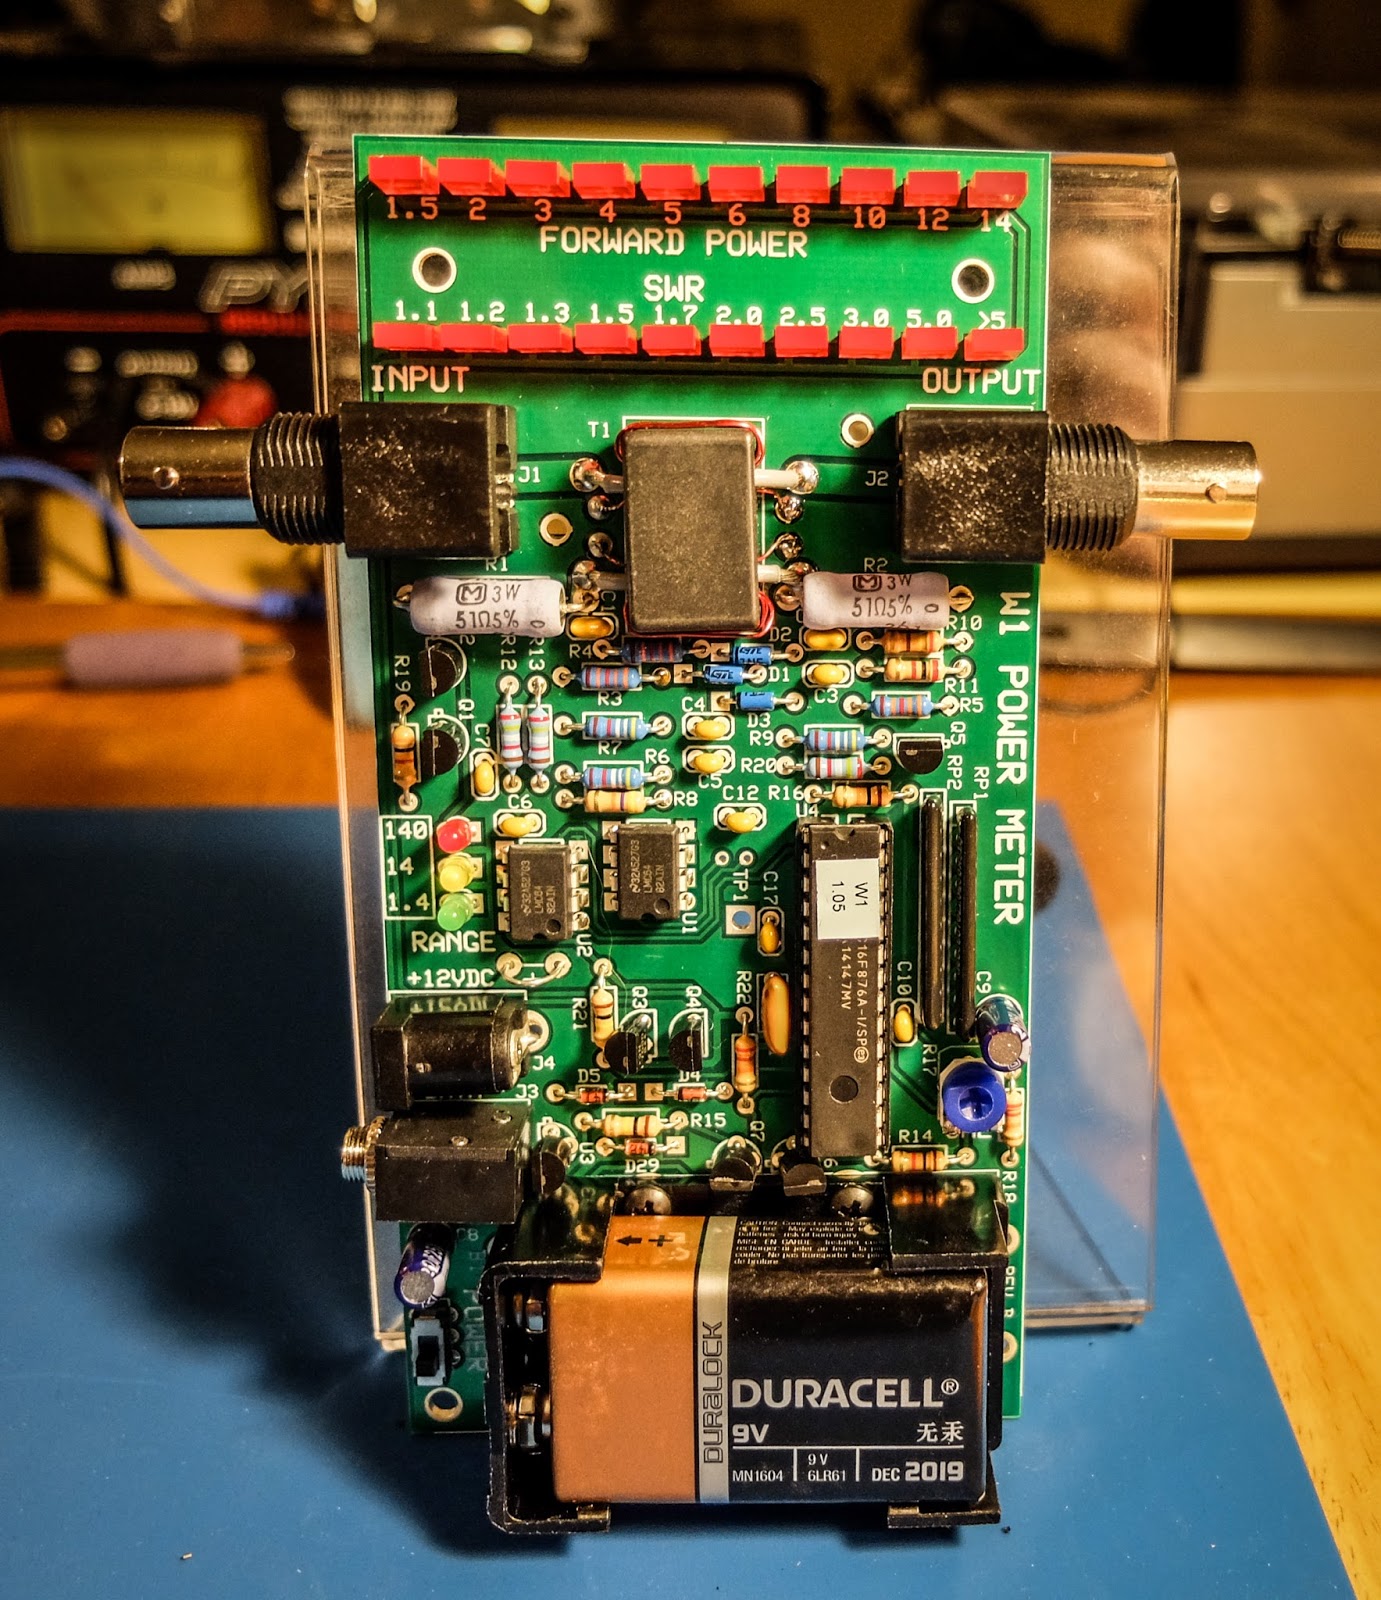 |
| An acrylic-angled photo frame can make a homebrew stand |
Operation
The meter can operate from a 9V battery or from an external power supply via the barrel connector on the side. There is a small power switch at the bottom left of the board.
The top row of LEDs indicate power for a given range. The 3 LEDs mid way down the board to the left indicate the current power range. The range can be automatic or set via a command through the serial interface.
The ranges are:
- 150 milliwatts to 1.4 watts -- Green LED
- 1.5 watts to 14 watts -- Yellow LED
- 15 watts to 140 watts -- Red LED
Computer interface
There is a 1/8" stereo jack below the power connector that provides a serial interface to a computer. There is a command set for interacting with the meter as well as a sample application available on Elecraft's site that allows a number of settings to be modified such as peak hold and saved to the meter.Elecraft sells a $15 serial interface cable kit. What they don't tell you is that it has a DB-9 connector rather than a USB connector. I don't even have a computer with a DB-9 serial port so buyer beware. You may want to skip their kit and build your own. I happened to already have a DB-9 to USB converter but I'd preferred their kit to provide a USB connector.
Demonstration
Photos
 |
| 3 ICs to solder and toroid winding... lots of fun |
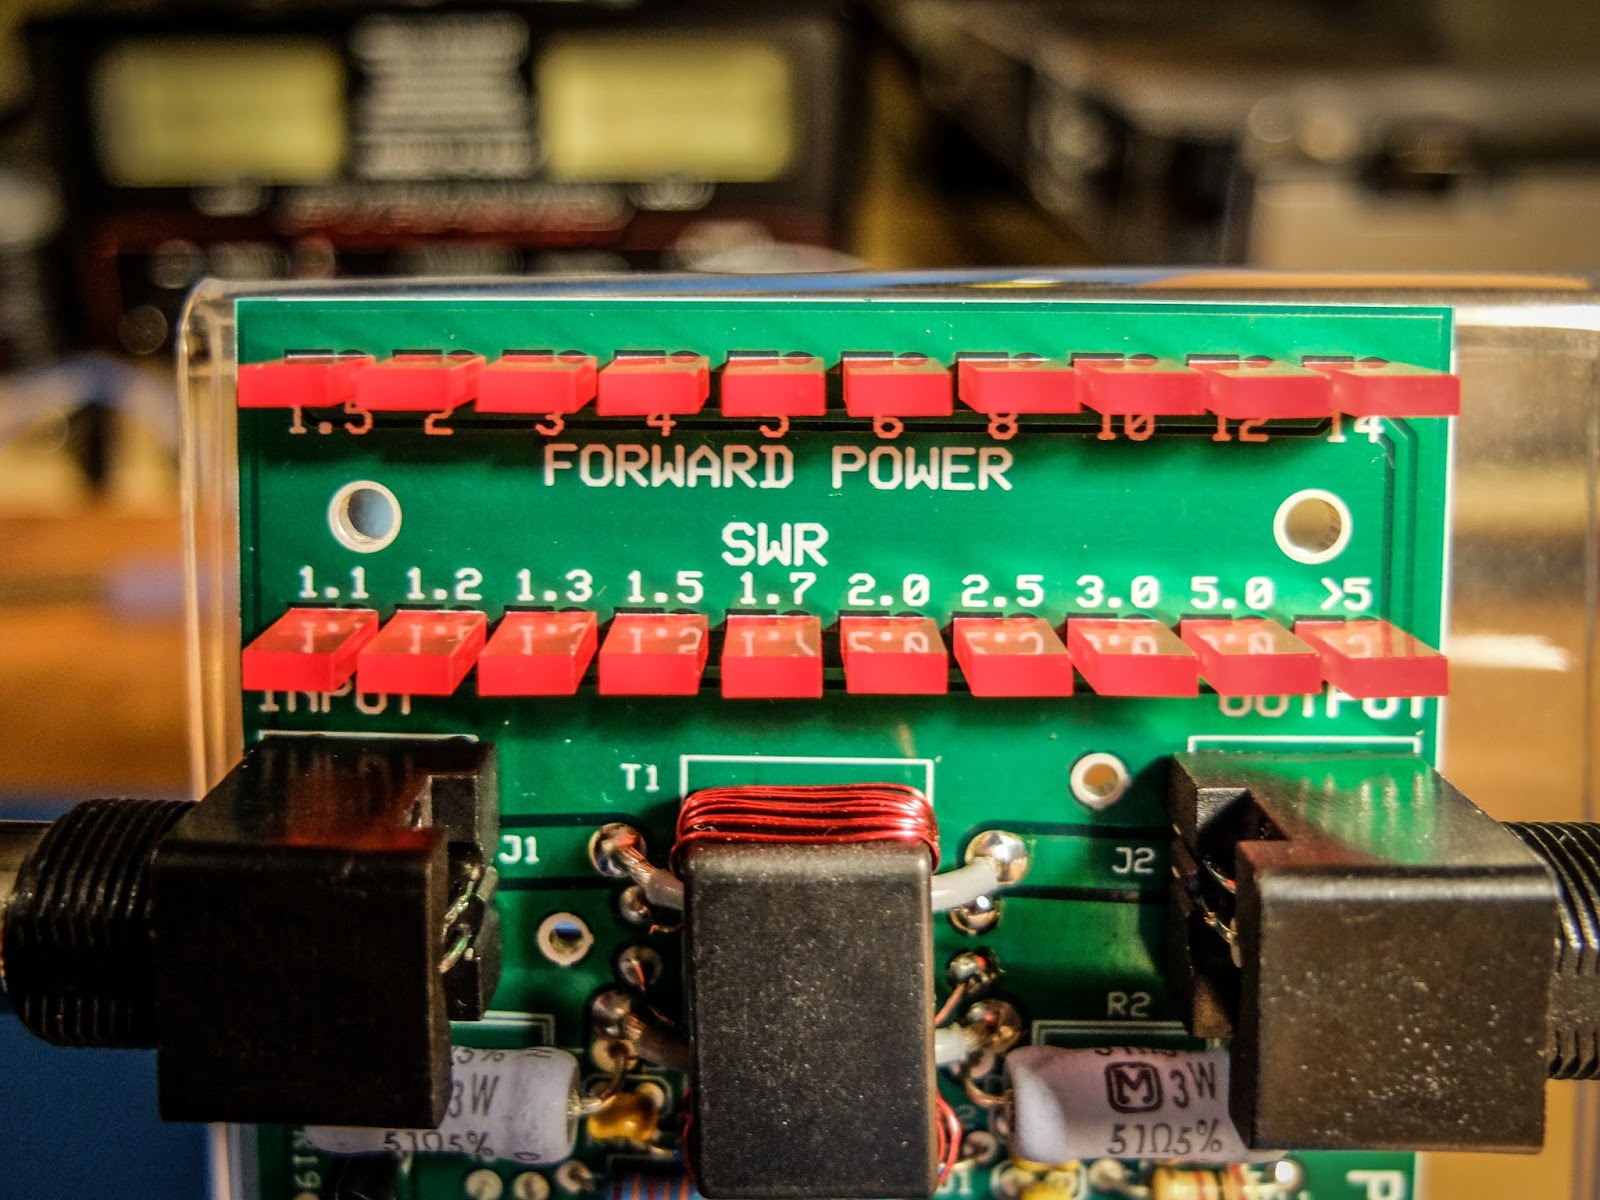 |
| LEDs indicate power in each range and SWR |
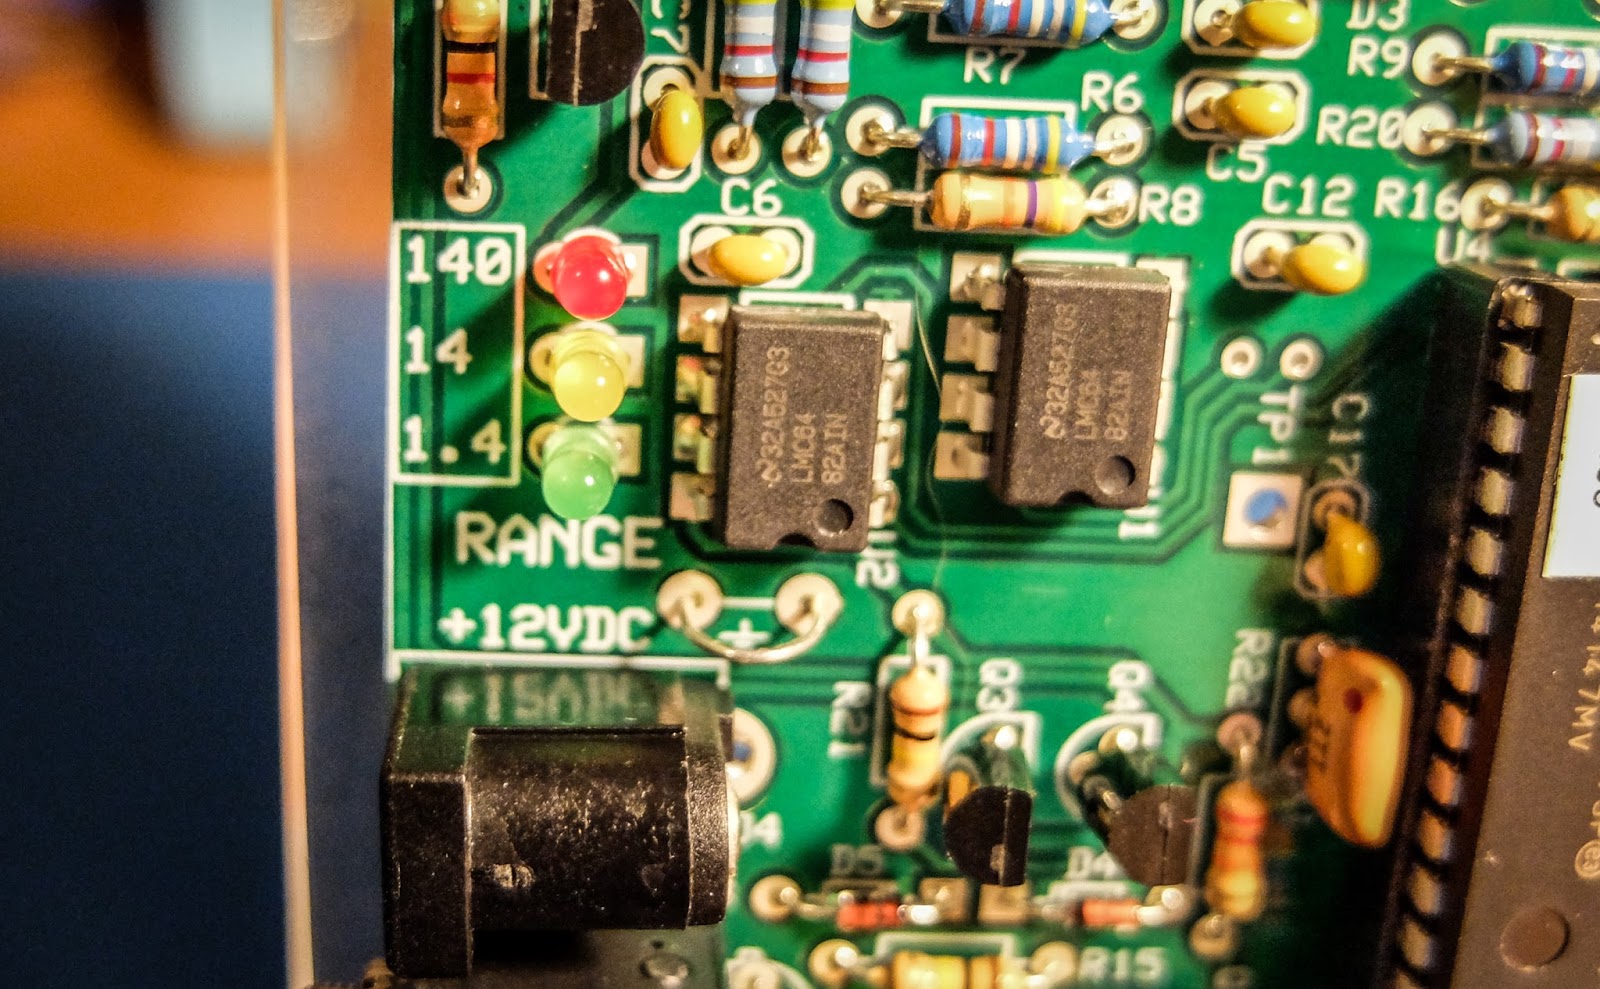 |
| LEDs indicate the power range being displayed |
 |
| Elecraft W1 Power Meter |
That's all for now
So lower your power and raise your expectations
73/72
Richard, N4PBQ
Some friendly NPOTA (and portable ops, in general) advice
If you've never done any type of portable operating and you're intrigued by NPOTA, and are thinking of activating a park or entity, there are several things that you need to do. To a lot of QRPers, this will all be "Elementary, my dear Watson", as so may of us are used to taking our radios to all kinds of off-the-beaten-path locations. But if you've never left the friendly confines of your Home shack before, here are some things to consider:
1) Scope out the entity or park before "Game Day". Know where you're going to operate from. Is there an out of the way place where you can set up, or will you be right in the thick of things? Are there any prohibitions/releases/permissions needed? You want to know about these things and get them out of the way and taken care of before Activation Day. There's nothing as disheartening as showing up and having a Park Ranger come up to you and say, "You can't do this, because (insert any number of reasons) .........". And, while we're on the subject of Park Rangers ......... I know this is so basic as to almost be insulting, but I'm going to mention it anyway. No matter what else happens during your activation, PLEASE ..... at all times be cooperative, courteous and respectful to NPS employees. They're just there doing their job. It's important that we present Amateur Radio operators and Amateur Radio operations through the best lens possible. Don't ruin things for your future brother and sister Hams by being rude, pushy, or by having an attitude.
2) Know your equipment, know your antennas. Know what works, what doesn't. Take what you need (with backups), but leave the fluff at home. If you've never done a portable operations gig outside of Field Day, then you need some practice. Portable operations are not quite the same as Field Day. Close, but not quite the same. First off, your activation more than likely won't be for 24 hours, so you're going to have to consider power. Power is the most important thing. 4, 5 or 6 hours at the 100 Watt level? You're going to need to bring heavy, fully charged deep cycle batteries with you. 4, 5 or 6 hours at QRP levels? Life gets much easier. Smaller, lighter SLAs or better yet, feather-weight lithium ion batteries will serve you well.
Second, you may very well be "it". Solo ... a party of one. So that means all the work will be performed by you. Make sure your setup will be manageable by you, alone without any outside help. Don't be overly ambitious. There's nothing wrong with just tossing a wire into a tree and going "au natural". If you can manage elaborate that's all well and good, but this is supposed to be enjoyable for you, too. The KISS* principle is a good one to remember and it applies to NPOTA and portable ops in general, very, very well.
Antennas. Unfortunately, there is no "one size fits all" solution, but the idea is to make a lot of contacts. You don't want to spend all your precious time setting up aerials to get on the air, so go with antennas that are relatively easy to set up quickly. Operating stationary mobile from the car? Hamsticks, Buddisticks, Buddipoles, screwdriver antennas are all good choices. Operating away from the car? End fed wires, Buddipoles, Buddisticks, dipole antennas, and the Alex Loop are all good choices, but again, your environment (presence of trees or not?) and/or park rules will be a big factor in deciding what you can or cannot use.
Logging. Logging is one of the most important aspects of NPOTA, and you really can't be casual about it. So far, in the early moments of NPOTA, it appears as though this program is quite the huge hit. It's not unusual to tune across the HF bands and hear pileups taking place. All these NPOTA chasers want credit for their time and effort. It's your duty as an Activator, to do your best to record the QSOs as reasonably accurately as you can. Bring an accurate watch with you, preferably one that can be set up to display UTC time. For the actual task of logging, whether you bring along your laptop, or log on your cellphone (Hamlog is excellent for this!), or even log using plain ol' paper and pencil, you need to perform this task efficiently and well. Keep in mind that you will need to upload your logs to the ARRL's Logbook of the World. This is how Activators and Chasers get credit. If you're not already on LotW, then you need to send in for a password and set up an account. If you're already an LotW user, you will need to download and install the latest version of Trusted QSL. This will allow you to set up locations for your account other than "Home" using the NPOTA entity designators as location names. THIS IS IMPORTANT! If you do not upload your log using the NPOTA entity designator as your location, neither you or your chasers will get credit for all your effort. Believe me, you do not want hundreds of e-mails from angry NPOTA chasers asking you why they didn't get credit for working you. Not that that would ever, ever happen! ;-)
If your NPOTA activation will be your first solo portable experience, go to a local park away from home and try your setup there. Some people would recommend setting up in the backyard, but it's way too convenient to just walk back into the house if you've forgotten something. When you're away from home, even if it's a short distance, and you discover you have forgotten something vital, you are way more than likely to never, ever forget it again. Don't feel bad about making a checklist for yourself. Checklists are very, very good things.
3) Know yourself. Know your limits. Everyone would like to go hiking and activate that trail, or activate that park in the middle of the beauty and solitude of Nature .....but if you can't walk to the corner mailbox without getting winded - you're not going to activate a SOTA peak or a mountain trail. If you need to, find a place with a parking lot (gives you the option to operate from the car if you're not the outdoors type or if the weather is bad), picnic tables (if you're only somewhat the outdoors type) and "facilities" so your activation can be an enjoyable, exhilarating experience that you will want to repeat, and not look back upon with dread. You're most likely to enjoy your outing if you're comfortable, so dress appropriately, bring along water (and snacks if you need to), bring along some type of folding chair if you think it will be required.
4) Bring your cell phone and one of whatever VHF. UHF, VHF/UHF handheld(s) you may own. God forbid you sprain an ankle and need help, it just a call way, via telephone call or a repeater contact. The cell phone has an added benefit. If you are lucky enough to have cell service at your chosen location, you can log onto DX Summit or DX Heat and you can self spot your activation. You can quite literally go from calling CQ to pile up conditions within seconds. If you do self spot, please make sure to put "NPOTA" and your entity designator in the comments portion of the spot.
I really hope the above doesn't scare you off or deter you. It wasn't meant to, it was meant to bring some common sense ideas to be considered by new, or less experienced portable operators. Once you've left the shack and have gotten into the Great Outdoors, with your radio providing you with fun and companionship, I guarantee that you will be smitten and will want to go out and do it again, and again, and again, and again.
One last caveat. I am by no means an expert on portable ops. I'm not a SOTA Mountain Goat, nor a W1PID nor a WG0AT nor a N7UN, nor a K0JQZ for that matter. I'm just offering basic advice based upon my own limited experience. The comment box is always open, so please feel free to add to what I have written here; or correct me on anything I may have gotten wrong. We all learn when we share.
I've posted this video before, but to see how simple, easy and fun and successful this can be, here's the YouTube video that Sean Kutzko KX9X posted about his activation of Pigeon Key in Florida.
72 de Larry W2LJ
QRP - When you care to send the very least!
*KISS = Keep It Simple, Stupid!


