 |
 Ham College episode 4 Live Stream
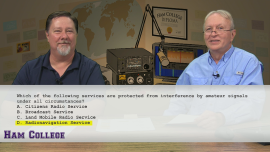
Episode 4 of Ham College is this Thursday, April 23rd at 7PM CDT, 000 UTC at live.amateurlogic.tv
George Thomas, W5JDX, is co-host of AmateurLogic.TV, an original amateur radio video program hosted by George Thomas (W5JDX), Tommy Martin (N5ZNO), Peter Berrett (VK3PB), and Emile Diodene (KE5QKR). Contact him at [email protected].
Next field test – optical?
After my very disappointing results on VLF earth-mode yesterday – I must get to the bottom of why results were quite so bad – I think my next test will be at the other end of the spectrum. We have a windmill very close so I may try bouncing optical signals off this to test my optical gear is working still. It is a long time since I have done any optical experiments.This will not be too far initially, more a test of the gear before venturing any distance.
Roger Lapthorn, G3XBM, is a regular contributor to AmateurRadio.com and writes from Cambridge, England.
VLF field test – a total failure!
Well, I did my first VLF earth-mode field test today since my brain bleed in Sept 2013. Sadly, it was a total failure. I am at a loss to explain the results.
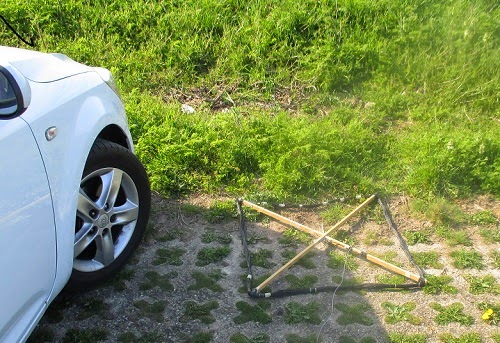 |
| Tuned VLF loop |
I put the 5W, 8.976kHz, beacon on into the same earth electrodes used successfully on 472kHz (best DX on TX over 1000km) and went about 1.6km to a car park where I always had strong signals using a tuned loop on RX and earth-electrodes on TX from the old QTH in the same village. Nothing at all copied today – absolutely nothing. I waited in case I was in a pause between QRSS3 callsign transmissions, but no absolutely nothing at all. Not even the tiniest hint of a signal.
So I parked in the road about 0.3km from this QTH and again nothing at all. At this point we drove home.
Sure enough, everything was still working at the TX end. I am using one remote ground and the mains ground as the shack end as for 472kHz. I did check this was grounded to real ground.
So, whatever utilities assistance I was getting before at the old QTH is not the same at this newer QTH. All very very odd. I was expecting to see something. In the past I received transmissions from the old QTH at the new QTH (about 0.3km away) using just an E-field probe on the car. From the old QTH I spanned 6km!
In summary, this VLF test was a total failure. I am at loss to explain things. Not only that, but the work has left me very exhausted. My brain is still foggy, but the results today were not due to any mistakes with the HW gear or PC Spectran settings.
I am not having much success today.
Roger Lapthorn, G3XBM, is a regular contributor to AmateurRadio.com and writes from Cambridge, England.
Weekly Propagation Summary – 2015 Apr 20 16:10 UTC
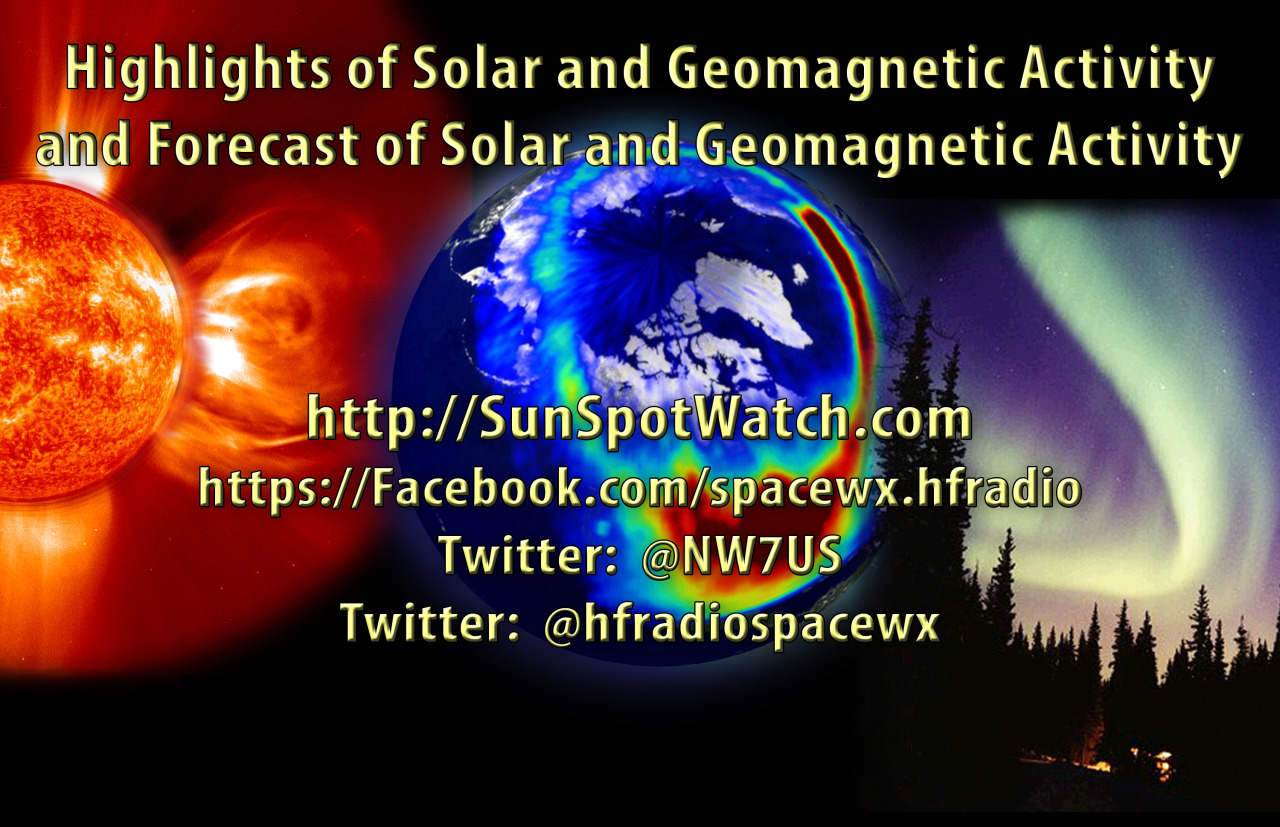
Here is this week’s space weather and geophysical report, issued 2015 Apr 20 0248 UTC.
Highlights of Solar and Geomagnetic Activity
13 – 19 April 2015
Solar activity was at very low to low levels. Numerous weak to
moderate level C-class flares were observed from Regions 2320 (S12,
L=211, class/area Dac/180 on 07 Apr), 2321 (N13, L=095, class/area
Ekc/620 on 13 Apr) and 2324 (N18, L=062, class/area Dko/410 on 15
Apr). The most significant event of the period occurred from Region
2321 on 18 April when the region produced a C5/1f flare at 18/1419
UTC. Associated with this event was a 7 degree long filament
eruption, centered near N05W16. The filament eruption resulted in an
asymmetric, faint full-halo CME, first visible in SOHO/LASCO C2
imagery at 18/1524 UTC.
No proton events were observed at geosynchronous orbit.
The greater than 2 MeV electron flux at geosynchronous orbit was at
normal levels on 13-15 April and high levels on 16-19 April.
Geomagnetic field activity began the period on 13-14 April at quiet
to active levels under the influence of a weak transient. By midday
on 15 April, field activity increased to active to minor storm
(G1-minor) levels as a co-rotating interaction region (CIR), in
advance of a negative polarity coronal hole high speed stream (CH
HSS), influenced the magnetic field of Earth. Geomagnetic activity
increased to major storm (G2-moderate) levels late on 16 April due
to CH HSS effects and continued at active to minor storm levels
through midday on 17 April. Field activity relaxed to quiet to
unsettled levels through the remainder of the summary period as CH
HSS effects waned.
During the period, ACE solar wind parameters measured a high wind
speed of 784 km/s on 17/0408 UTC with a low speed of 286 km/s on
14/0004 UTC. Total field (Bt) ranged from about 1-17 nT while the Bz
component varied between +13 to -12 nT. The phi angle was generally
in a negative (towards) orientation with intermittent periods of
rotation to a positive (away) sector.
Forecast of Solar and Geomagnetic Activity
20 April – 16 May 2015
Solar activity is expected to be very low to low with a slight
chance for moderate (R1-R2/minor-moderate) levels through 24 April
due to the flare potential from Region 2321. Very low to low levels
are expected from 25 April through 06 May. From 06-16 May, activity
levels are expected to increase to a chance for
(R1-R2/minor-moderate) levels upon the return of old Region 2321
(N11, L=092).
No proton events are expected at geosynchronous orbit, barring any
significant flare activity.
The greater than 2 MeV electron flux at geosynchronous orbit is
expected to be at moderate to high levels from 20 April-06 May,
normal to moderate levels from 07-12 May and moderate to high levels
from 13-16 May.
Geomagnetic field activity is expected to be at G1 (minor)
geomagnetic storm levels on 21 and 22 April due to CME effects.
Field activity is expected to be at G1 (minor) geomagnetic storm
levels on 14 May with unsettled to active conditions expected on 20,
25, 29-30 April and 01, 13 and 15 May, all due to CH HSS effects.
Quiet to unsettled field activity is expected for the remainder of
the outlook period.
Don’t forget to visit our live space weather and radio propagation web site, at: http://SunSpotWatch.com/
Live Aurora mapping is at http://aurora.sunspotwatch.com/
If you are on Twitter, please follow these two users:
+ https://Twitter.com/NW7US
+ https://Twitter.com/hfradiospacewx
Get the space weather and radio propagation self-study course, today. Visit http://nw7us.us/swc for the latest sale and for more information!
We’re on Facebook: http://NW7US.us/swhfr
Visit, subscribe: NW7US Radio Communications and Propagation YouTube Channel
More Magic
 |
| LU6QI |
For the third day in a row, someone has sprinkled 6m magic-dust over the Pacific Northwest with more long-haul propagation into southern South America. The openings have been characterized by their very small footprints and today, unlike the previous two days, the footprint locked-in on my own QTH for over an hour.
For the most part, signals were in the 559 range but at times would build up to true 599 levels, reminiscent of the previous cycle's F2 north-south openings in the afternoon.
During the entire opening, strong sporadic -e signals from California, Arizona and Nevada were present so I suspect that the propagation mode was Es to TEP and from there to southern SA who knows! I doubt there was any F2 involved (unless it was ver SA) as the solar flux just doesn't seem to be high enough to support that mode. In all likelihood, the present coronal hole stream that is impacting the ionosphere has been the trigger for these unheralded openings.
 |
| courtesy: https://maps.google.ca/ |
During the opening, the following stations were worked, mostly on CW but some on SSB as their signals were very loud at times:
CX90IARU, LW6DG, LU6QI, CE2AWW, CX3AL, LU5FF, CX1DDO, LU4FPZ, CX6DRA and CE3SX.
As mentioned in my last blog ... who knows what this cycle will do next as the surprises just keep coming!
Is there enough dust left for a fourth day in a row?
Steve McDonald, VE7SL, is a regular contributor to AmateurRadio.com and writes from British Columbia, Canada. Contact him at [email protected].
LHS Episode #145: Screaming Peanuts
 Hello, friends! We're back with another fine episode of Linux in the Ham Shack. In this episode, we tackle topics like digital voice, the release of the 4.0 Linux kernel, installing or running Linux from a thumb drive, and a few rants from the peanut gallery. Please enjoy, and come back in a couple weeks for the next one!
73 de The LHS Guys
Russ Woodman, K5TUX, co-hosts the Linux in the Ham Shack podcast which is available for download in both MP3 and OGG audio format. Contact him at [email protected].
Rookie Roundup
Club member Dave KD2FSI, who qualifies as a Rookie by time, volunteered to set up the station. I say Dave qualifies as a Rookie by time, because by the rules of the contest, he does - he was licensed less than three years ago. However, he is certainly not a Rookie by experience. He has already upgraded to General and is a very busy Ham, diving headfirst into many different facets of the hobby, portable operations being one of his favorite. I wish I could take credit for steering him in that direction, but Dave discovered that joy on his own, without my help.

We had agreed to meet at Putnam Park in town at Noon, in order to set up for the 2:00 PM start. By the time I got there, Dave already had things quite well in hand.
Marv K2VHW and Drew W2OU served with distinction in the coaching perspective. Marv is quite the instructor. He has a gift and a natural talent for teaching and was able to make our Rookies feel like Old Pros in no time.
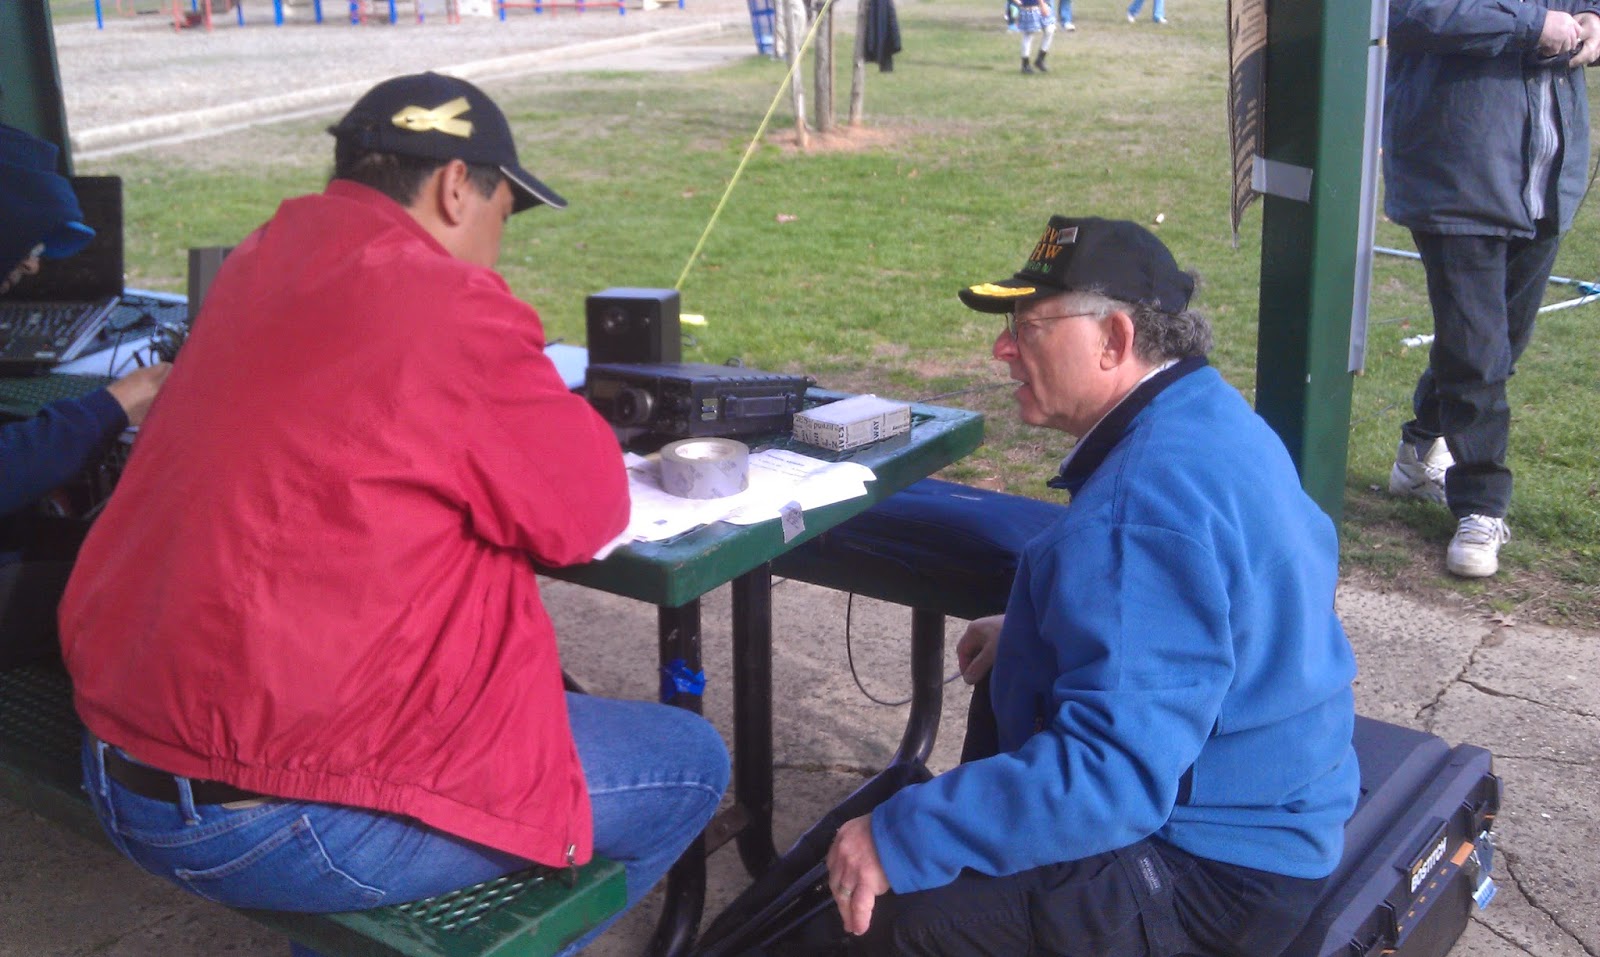
Here's a picture of Marv explaining to Mario the ins and outs of making a SSB Contest QSO. Mario made his very first HF QSO today, and the process was amazing to watch. The first few QSOs were halting and tentative, but due to Marv's excellent guidance, Mario was having a blast within short order.

Within a short amount of time, our Rookies were able to handle QSO and logging chores while we stood in the background as control operators for NJ2SP.
The opportunity seemed golden. HF operating under portable ops conditions. With QRPTTF next weekend, how could I not bring the QRP gear along? It's always good to perform a test run, no?
I bungeed my 31' Jackite pole to a nearby post and set up the EARCHI antenna as a sloper.In between my stints as an HF coach, I went to town working stations on 20, 17, 15 and 10 Meters. A lot of the contacts were MM contest QSOs, but there was one ragchew in there, also. I worked
9A7R
ZW8T
OX3XR
CO8EH
WD4MSM - ragchew
KP2F
TM9B
EG8TRV - Special Event Station
HA8VK
Not bad for the time I had, in between helping with QSO procedures, serving as a helping set of ears, and talking with some of our other newly licensed Techs about equipment, making recommendations, etc.
The Rookies had a blast as well. 10 Meters was open to Texas and the West Coast and our newbies were amazed that "talking to a guy in Idaho" was as easy as talking to a guy on the local 2 Meter repeater - and that the guy in Idaho sounded better than the guy on the 2 Meter repeater!
In all it was a fun day. I'm not sure who had more fun - our new Techs in getting their feet wet in HF, or us veterans watching their fun and excitement. It was definitely rewarding, and I hope we pushed some people a little more deeper into this fine hobby.
72 de Larry W2LJ
QRP - When you care to send the very least!
Larry Makoski, W2LJ, is a regular contributor to AmateurRadio.com and writes from New Jersey, USA. Contact him at [email protected].
 Ham Radio Deluxe |
 W5SWL Electronics |
 Ham Radio Prep |
 KB3IFH QSL Cards  Hip Ham Shirts  HamRadioAuctions HamRadioAuctions Reliance Antennas Reliance Antennas Enigma Shop Enigma Shop |  morseDX  Ni4L Antennas  R&L Electronics R&L Electronics antennas.us antennas.us QRV QRV |
- Matt W1MST, Managing Editor
