 |
 ‘Ham Talk LIVE!’ weekly call-in show debuts Thursday, February 18
 Neil Rapp, WB9VPG, is taking to the Internet airwaves Thursday, February 18th at 9:00 pm Eastern (02:00 UTC) with a brand new live call-in podcast. Ham Talk LIVE! will feature general interest ham radio topics and special guests with a wide range of ham radio expertise.
Unlike traditional ham radio podcasts, Rapp says he hopes to create something a little different. “I really look forward to just doing some open line shows,” he says. “I want it to be a conversation and just talk about happenings more than just disseminating information. We already have people doing a great job with that, and I enjoy watching and listening to them.”
Thursday night’s episode will discuss DXing and contesting and will feature well-known DXer Dr. Scott Wright, KØMD. Next week he’ll host popular Amateur Radio Newsline anchor Don Wilbanks, AE5DW.

To tune into the show, you can visit HamTalkLive.com. To participate, listeners can either call Skype username ‘hamtalklive’ or dial (812) 638-4261. “I don’t have a call screener. Once I answer they will be on immediately so I won’t answer until I’m ready for the caller,” Rapp says.
The show will last 30 minutes each week. If listeners miss the live show, a downloadable podcast will be available on iTunes, Spreaker, and possibly other outlets soon after each broadcast.
If the format works out well, he may extend the show longer than the allotted thirty minutes. “If people listen, I’ll definitely extend the time,” he says.
Rapp is a high school chemistry teacher and sponsors the ham radio club at his school. He was first licensed in 1976 at the age of five. He is the recipient of the 2014 Indiana Radio Club Council Amateur of the Year award, the 2003 Indiana Radio Club Council Technical Excellence Award, and the 2004 ARRL Professional Educator of the Year award.
Matt Thomas, W1MST, is the managing editor of AmateurRadio.com. Contact him at [email protected].
LHS Episode #162: Mumbo Gumbo
 Hello there and welcome to the latest installment of Linux in the Ham Shack. For your listening pleasure this fortnight, we have information on politics in the ARRL, opportunities for kids to participate in ham radio and FEMA, adventures in WSPR, a lost Atari 2600 ham radio app, a quick review of SolusOS and much more. Please enjoy.
73 de The LHS Crew
Russ Woodman, K5TUX, co-hosts the Linux in the Ham Shack podcast which is available for download in both MP3 and OGG audio format. Contact him at [email protected].
Learning CW – The Beginning
I have decided to learn CW. Why? Because I want to, not because I have to. Yes I am one of those no-code hams!
Most of this blog post is aimed at newer hams. If someone is thinking about trying to learn CW, I hope this post might help motivate them to go for it and give it a try.
Since I became a more active ham a couple years ago, from a non-active ham, I have thought it would be nice to have a very small portable battery powered radio, and easy & quick to deploy antenna and make some QSO’s when and where I can.
The next question, once I decided to learn CW, was how to learn CW? I know in the past, people used to use cassette tapes, learning at 5 wpm (words per minute). I looked online and found that the “tapes” can still be purchased, but now they are on CD instead of tapes. From the reviews that I have read, the content has not been updated but simply copied on to CD format. So it’s the same lessons that existed in the 60’s, 70’s, 80, etc, just in a little newer delivery format. My goal isn’t 5 wpm. It’s higher. More like the 20 wpm range someday. That then leads to some “newer” methods of learning. The “Koch” method is very popular. It starts with two characters, sent at 20 wpm but with more space between the characters, making the effective overall speed slower but still with faster character speed. The key is learning characters at a faster speed, introducing another letter when you learn the first two. You keep adding letters until you eventually have them all learned. There are many web sites and programs that use this and other methods. There are also a lot of phone apps that people use to learn. A friend of mine learned CW using these apps, and I sat with him on Field Day in 2013 as he worked without a microphone, only CW. He didn’t even bring his microphone to Field Day! He now works CW almost exclusively.

After further research I came across The CW Operators Club web page, http://www.cwops.org. I found that they have a CW Academy with 3 different levels. Level I is for beginners with no CW experience and Levels II & III are more advanced working on increasing speed and other things. I decided to enroll in their Level I beginner class. I signed up on their web site and weeks later, I was confined for the Level I class that started in January ’16, a few weeks ago. I am now 5 weeks through an 8 week class. The class meets twice a week, using Skype. There are five students in my class, which is lead by an experienced instructor. Homework consists of using a web based CW training program, for receiving practice. Assuming you have a key/paddle or something to send with, there are sending exercises as well. The curriculum introduces the letters, much like the Koch method, at a 20 wpm pace, but in a different order than the standard Koch trainers. The first session consisted of four letters, and words using those four letters. If you would like more information their web site is: http://www.cwops.org
Is it working? So far it is working. Five weeks into the class, I now know the whole alphabet, the numbers 0-9 and a few punctuation characters. I say “know” them, but I am not very good at receiving yet. I miss a lot of characters when I try to listen so a real QSO on the air. Like learning anything like another language, it’s going to take some practice to get better at listening in real time. I have recorded a couple QSO’s from a websdr.org station and when I repeat it multiple times, I can figure it all out. Considering 5 weeks ago I didn’t know a single letter, I am making progress.
I’ll continue attending class, and practicing. I’ll post again later when I make some more progress and someday pretty soon, I’ll get in the air and attempt a real QSO!
Until then – – . . . . . . – –
PS “- – . . . . . . – -” is morse code for “73” in case you wondered!
Wayne Patton, K5UNX, is a regular contributor to AmateurRadio.com and writes from Arkansas, USA. Contact him at [email protected].
Trans-Canada On 630m
| courtesy: http://www.bing.com/mapspreview |
Both Mitch and myself had been alerted to the excellent propagation earlier in the week, when VE3OT's CW beacon had reached S9 levels here for several hours on two consecutive nights ... but any late-night QSO attempts would have to wait until the weekend, when having to get up in the middle of the night would not conflict with Mitch's workweek schedule.
Our first attempt, late on Friday night and 3A.M. for Mitch, found that conditions had deteriorated from midweek's enhanced propagation and the low signal levels, combined with some unseasonal lightning noise, resulted in rescheduling for another shot on Saturday.
Late Saturday night found the band much quieter and propagation much improved, but not as good as it had been earlier in the week ... somehow Murphy always seems to have a hand in pre-planned events, and it's never a helpful one. Mitch's beacon signal was readable here but had a deep ten-minute fade cycle with a short-lived peak before fading out to nothing.
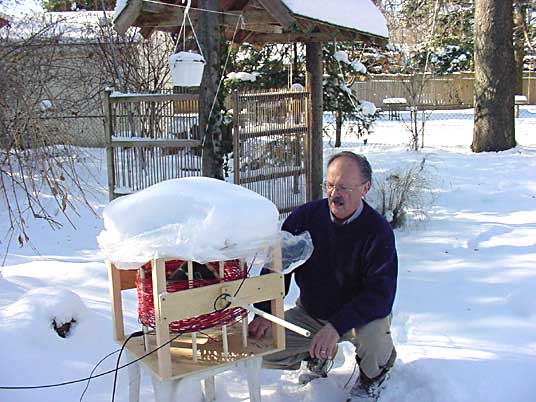 |
| VE3OT at his loop's loading coil |
 |
| LF / MF station at VE3OT |
For those of you that worked VE3OT during the recent 630m crossband event, Mitch has put together a very special QSL card!
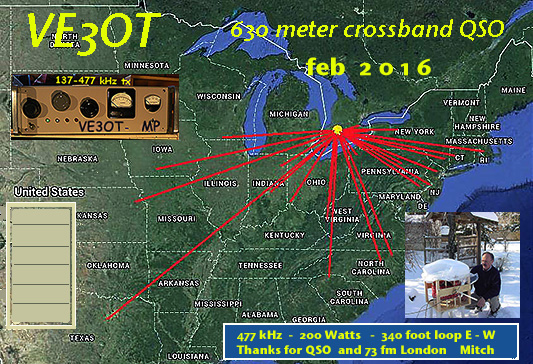
As the solar cycle winds down, the 'good' nights will happen more often, as will the truly 'great' nights. Hopefully there will be more Canadians on the band to take advantage of what lies ahead.
Hopefully the U.S.A. will soon have the band as well, which will really spark nightly activity. What is really needed right now is more Canadian activity, especially in the western provinces, where nightly CW contacts could be readily made. Time to reach for the solder iron! There are several VE7's, and one VE3, waiting and wanting to work you!
Steve McDonald, VE7SL, is a regular contributor to AmateurRadio.com and writes from British Columbia, Canada. Contact him at [email protected].
‘QRP School’ shows how to have big fun with a small signal
 Every amateur radio operator is attracted to different aspects of our diverse hobby. For Cliff Batson, N4CCB, of Nashville, Tennessee, it’s QRP — making radio contacts with 5-watts or less.
“I’m not an expert, but I have quite a bit of passion and enthusiasm for QRP. There’s just something magical about being able to make contacts using less power than a nightlight,” says Batson.
Batson started a video blog called QRP School late last summer and recently added his twentieth episode. He’s already covered topics like using a deploy-anywhere vertical HF antenna (below), solar power operations, building a computer-to-CW interface, bringing your gear along on vacation, and many more. He says that he hopes to add even more QRP-related videos soon.
“Ham radio is a big hobby, and there’s room for all of us to enjoy whatever we enjoy, while letting others do their own thing,” he says.
If you enjoy QRP or want to learn more, you can visit his site at QRPSchool.com and subscribe to his YouTube channel.
Matt Thomas, W1MST, is the managing editor of AmateurRadio.com. Contact him at [email protected].
Weekly Propagation Summary – 2016 Feb 15 16:10 UTC
Here is this week’s space weather and geophysical report, issued 2016 Feb 15 0238 UTC.
Highlights of Solar and Geomagnetic Activity 08 – 14 February 2016
Solar activity was low from 08-11 Feb. The largest C-class event during that period was a C8/1f observed at 11/2103 UTC from Region 2497 (N13, L=087, class/area Eac/250 on 12 Feb) with associated Type II (est. speed 483 km/s) and Type IV radio sweeps. A CME was visible following this event and is anticipated to arrive at Earth early on 15 Feb. Solar activity was moderate from 12-14 Feb with Region 2497 producing an M1 flare each day. No other Earth-directed CMEs were observed.
No proton events were observed at geosynchronous orbit.
The greater than 2 MeV electron flux at geosynchronous orbit was at normal to moderate levels during the period.
Geomagnetic field activity began the week at minor storm levels due to effects from a co-rotating interaction region (CIR) ahead of a CH HSS. Predominately quiet to unsettled levels were observed for the remainder of the period with isolated active periods on 09, 11 and 12 Feb associated with extended periods of negative Bz.
Forecast of Solar and Geomagnetic Activity 15 February – 12 March 2016
Solar activity is expected to be at very low to low levels with a chance for M-class flares from 15-17 Feb. Activity is expected to decrease to very low levels with only a chance for C-class flares from 18-29 Feb as Region 2497 moves beyond the west limb. Low levels are anticipated once again on 01-12 Mar as well as a chance for M-class flares with the return of Region 2497.
A slight chance for a proton event exists at geosynchronous orbit from 15-17 Feb due to the flare potential and position of Region 2497.
The greater than 2 MeV electron flux at geosynchronous orbit is expected to be at normal to moderate levels for the majority of the period. High levels are likely on 18-20 Feb following effects from a CME and a subsequent CH HSS.
Geomagnetic field activity is expected to reach minor storm levels on 15 Feb due to effects from the 11 Feb CME. Quiet to active conditions are expected on 16 Feb as CME effects subside. Minor storm conditions are likely again on 17 Feb as a recurrent negative polarity CH HSS becomes geoeffective. Quiet to unsettled conditions are expected with isolated active periods possible on 18-20 Feb as CH HSS effects continue. Mostly quiet conditions are expected on 21-29 Feb. Quiet to unsettled conditions are expected from 01-03 Mar due to effects from a positive polarity CH HSS. Mostly quiet conditions are expected for the remainder of the period with unsettled to active periods possible on 06-07 Mar and 11 Mar as two sequential small recurrent coronal holes affect the field.
Don’t forget to visit our live space weather and radio propagation web site, at: http://SunSpotWatch.com/
Live Aurora mapping is at http://aurora.sunspotwatch.com/
If you are on Twitter, please follow these two users: + https://Twitter.com/NW7US + https://Twitter.com/hfradiospacewx
Get the space weather and radio propagation self-study course, today. Visit http://nw7us.us/swc for the latest sale and for more information!
Check out the stunning view of our Sun in action, as seen during the last five years with the Solar Dynamics Observatory (SDO): https://www.youtube.com/watch?v=zXN-MdoGM9g
We’re on Facebook: http://NW7US.us/swhfr
Visit, subscribe: NW7US Radio Communications and Propagation YouTube Channel
AmateurLogic 87: FLDigi Mac
AmateurLogic.TV Episode 87 is now available for download.
Tommy explores FLDigi with his Icom IC-7100 and Mac computer. Peter’s Introduction to Satellite TV Pt 2. Emile visits Hammond Hamfest and Crossband repeats. Plus lot of fun and a few headaches.
1:08:20
George Thomas, W5JDX, is co-host of AmateurLogic.TV, an original amateur radio video program hosted by George Thomas (W5JDX), Tommy Martin (N5ZNO), Peter Berrett (VK3PB), and Emile Diodene (KE5QKR). Contact him at [email protected].
 Ham Radio Deluxe |
 W5SWL Electronics |
 Ham Radio Prep |
 KB3IFH QSL Cards  Hip Ham Shirts  HamRadioAuctions HamRadioAuctions Reliance Antennas Reliance Antennas Enigma Shop Enigma Shop |  morseDX  Ni4L Antennas  R&L Electronics R&L Electronics antennas.us antennas.us QRV QRV |
- Matt W1MST, Managing Editor
