 |
 Jumping Out of A Perfectly Good Airplane For Ham Radio
Jumping out of a fully working airplane from 13,000 feet is not exactly my cup of tea. When I stand to high on a ladder I get a little woozy. But this guy jumped from an airplane and using 70cm Amateur Radio Television, shared ti with other Hams. Mark, AF6IM, strapped on a parachute, and a 427 MHz ATV transmitter hooked to a helmet cam and jumped from an airplane to land safely while he transmitted, using a Drake mini-modulator with foldable dualband J-pole, that he released after his chute opened and he floated down to the ground.
As you can see from the video below and the info Mark gave about the jump, the Drake can act as a transmitter when an antenna is hooked to it, but the signal was weaker then expected and only worked when he got to about 2000 feet. He said he may try a linear or use a 5 watt Videolynx ATV transmitter next time he does it.
Mark was transmitting on 421.25MHz or cable tv channel 57, and the recieving station was using a 3-element 70cm UHF antenna connected to a Sansui TV set with built-in VHS deck set to catv channel 57. Improvements are being looked at from what was learned from this jump, and another may be in the future.
If you want to find out more, you can visit the Parachute Mobile website.
Rich Gattie, KB2MOB, is a regular contributor to AmateurRadio.com and writes from New York, USA. Contact him at [email protected].
VK on a whip antenna
The amazing power of the WSPR mode to enable weak signals to be received over long distances was demonstrated conclusively when my 2 watt signals, transmitted into a 1.3m long telescopic whip antenna from inside the G4ILO shack,were received in Australia and the USA, not once but several times with SNR reports of up to -19dB.
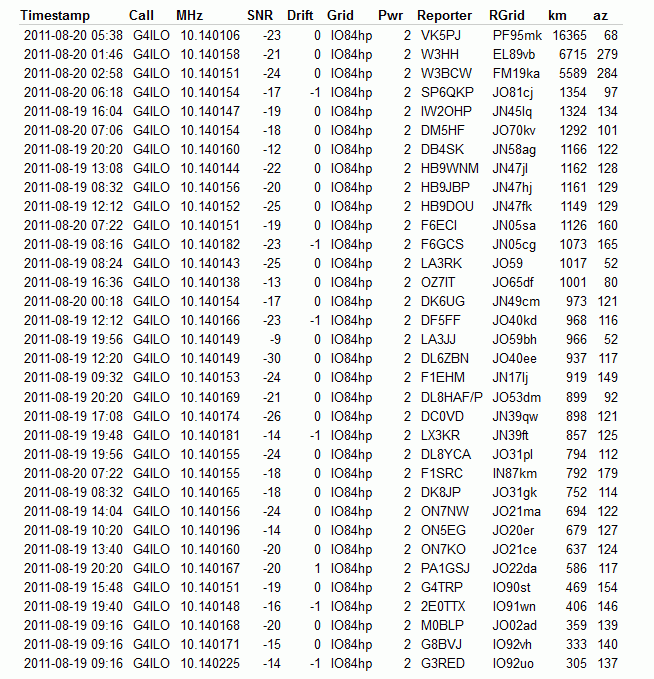
These spots were not achieved using a hand held radio as they occurred early in the morning when I was asleep. But they were made using a home made portable 30m whip antenna that I designed to be used with the VCXO-AXE portable WSPR transmitter I recently built. Here is a picture of the antenna taken during the tests.

The antenna consists of an L-match mounted in a small plastic project box, with BNC sockets for the transmitter and the whip antenna.
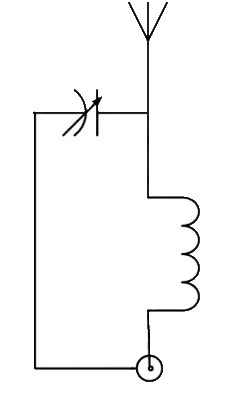
The constructional details can be gleaned from this internal view here. Click the image to see a much larger version.
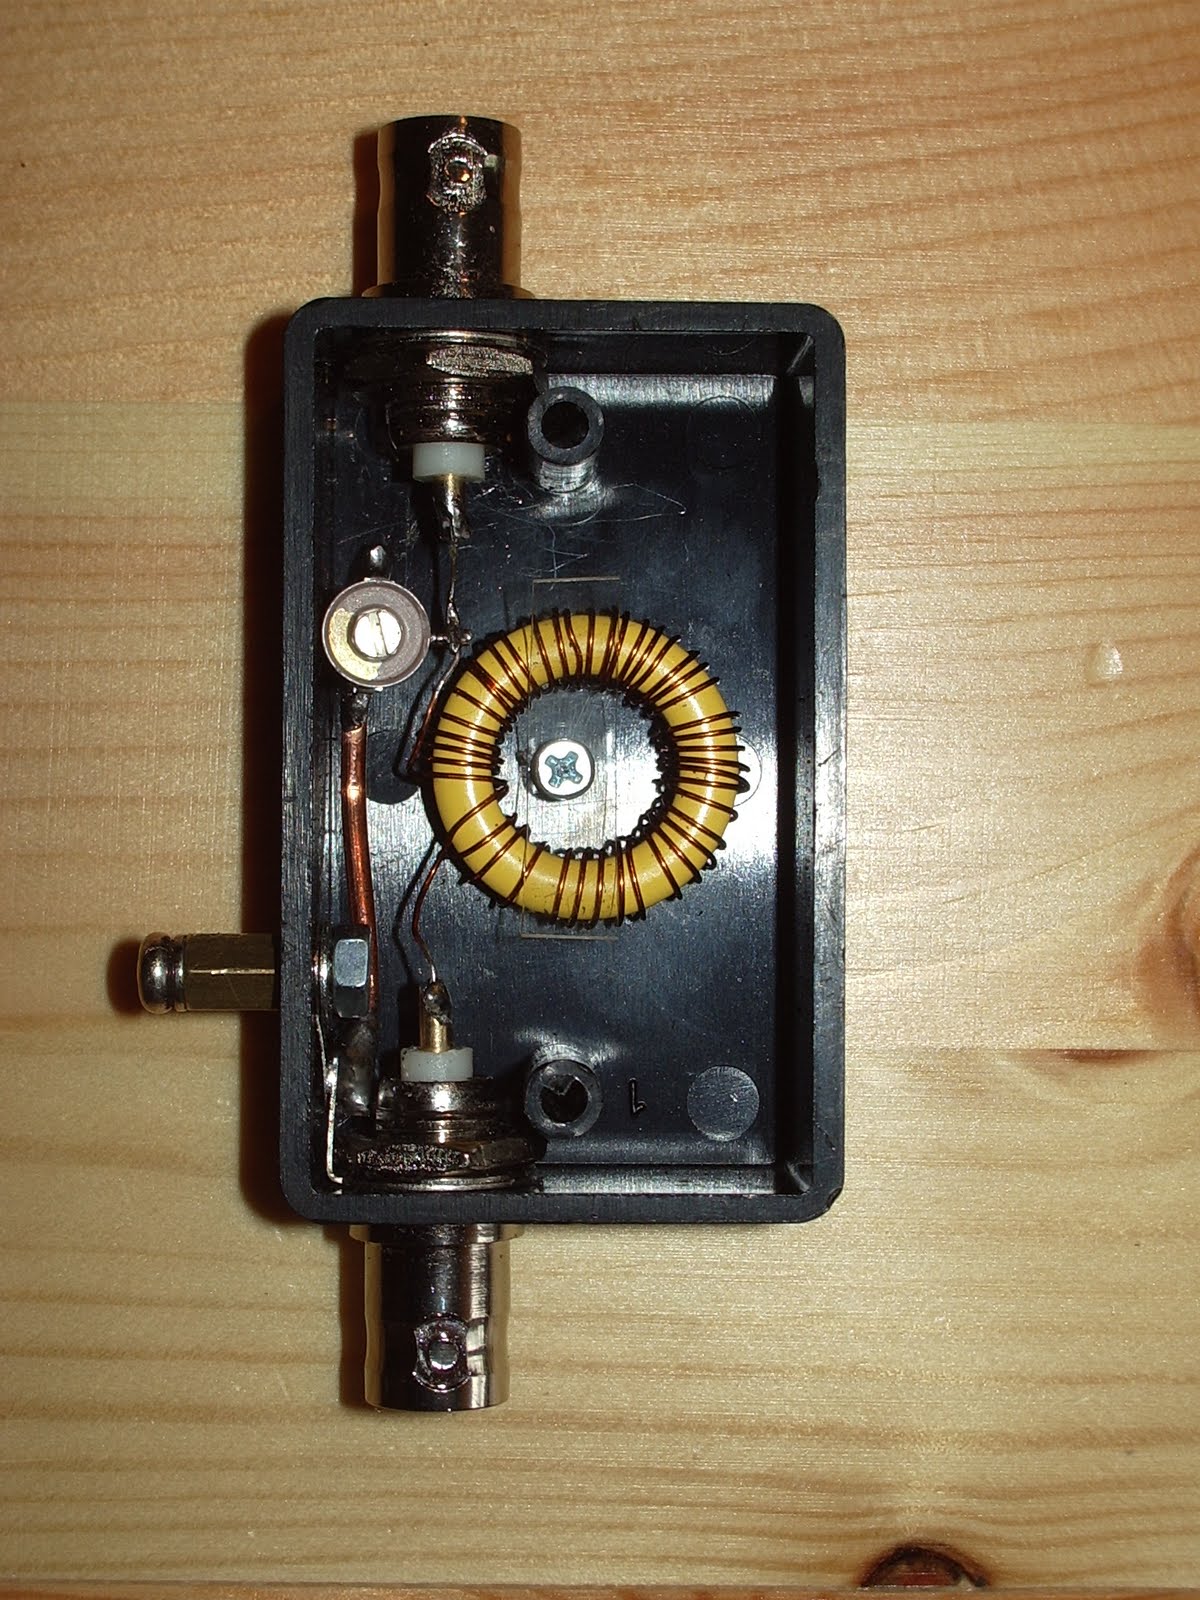
The loading coil consists of about 46 turns of 28SWG wire on a T80-6 toroid. The matching capacitor is a 4 – 40pF trimmer. The number of turns was determined empirically (i.e. using trial and error) so don’t ask me for details of how to make one for other bands. There may be formulas for calculating things like that but I don’t know them.
It would have been difficult to make this antenna without an antenna analyzer like my RigExpert AA-200 which displays the SWR across a range of frequencies graphically. With my first attempt at the inductor it was possible to obtain an SWR null at 10.140MHz but it was rather a broad dip and the minimum was around 3:1. However at lower frequencies I saw that I was able to obtain a much deeper, sharper null. This made it clear that what I needed to do was remove some turns until the deep, sharp null was at the frequency I wanted. A deep null indicates higher Q and therefore better efficiency.
You can see the SWR curve of the final version below.

Note, however, that this was taken inside the shack in the test position where reflections spoiled the SWR and broadened the dip. When measured out of doors the SWR curve dipped deeper and was narrower as long as I stood clear of the antenna. (It was interesting to note how the SWR was affected even if I was a metre away from the telescopic whip. This suggests efficiency would be adversely affected when used in true hand held fashion.)
A good ground or quarter wave counterpoise wire is needed with this antenna. The resonant frequency is affected by the ground system used as well as the length of the whip and the position of the trimmer. If you don’t want to take an antenna analyzer to the field to check and tune the antenna before operation you should use the same counterpoise. So it would be advisable to pair the counterpoise with the antenna.
Further tests would be useful to determine the extent to which a good match is reproducible in different locations using the same whip length and counterpoise without retuning.
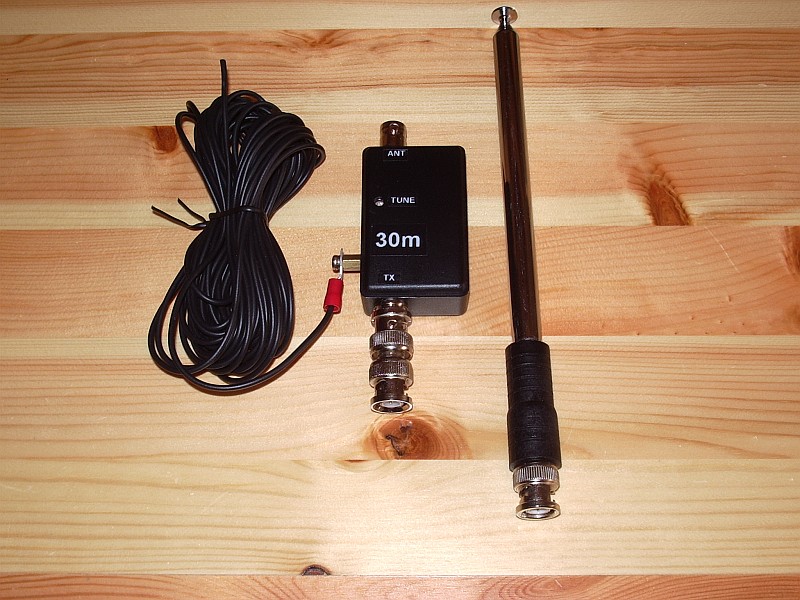
In case retuning is needed I added an access hole for the tuning trimmer. The resonant frequency can also be changed (increased) by shortening the telescopic whip a section or two.
This has been an interesting project. As a result of it I now have a completely portable, pocketable, battery powered system capable of sending a radio signal half way round the world, and I have developed a useful monoband 30m antenna.
Julian Moss, G4ILO, is a regular contributor to AmateurRadio.com and writes from Cumbria, England. Contact him at [email protected].
My Code Runneth Over
The code-writing squirrels at Radio Artisan Labs have produced another update to the Arduino Keyer code. This update provides a plethora of functions for the PS2 keyboard feature, increases the number of memories to 12, and the number of supported transmitters to six. I’ve never encountered the Ultimatic mode in the wild, but it’s now available as are Iambic A, Iambic B, bug, and straight key modes. Ham Radio Deluxe can now talk to the keyer, which can be used to provide a rather nice graphical user interface to most keyer settings and functions. A host of other logging and contest programs should interface with it as well as some kinks in the serial USB interfacing were worked out. And as if that wasn’t enough, the code now sports a GNU license like all good free software should.
The next features to be developed are an LCD display with eight soft keys and CW receive capability. The squirrels want to write some code that will automatically make QSOs while they’re on a DXpedition vacation in Aruba, wanting more time on the beach and less in the shack.


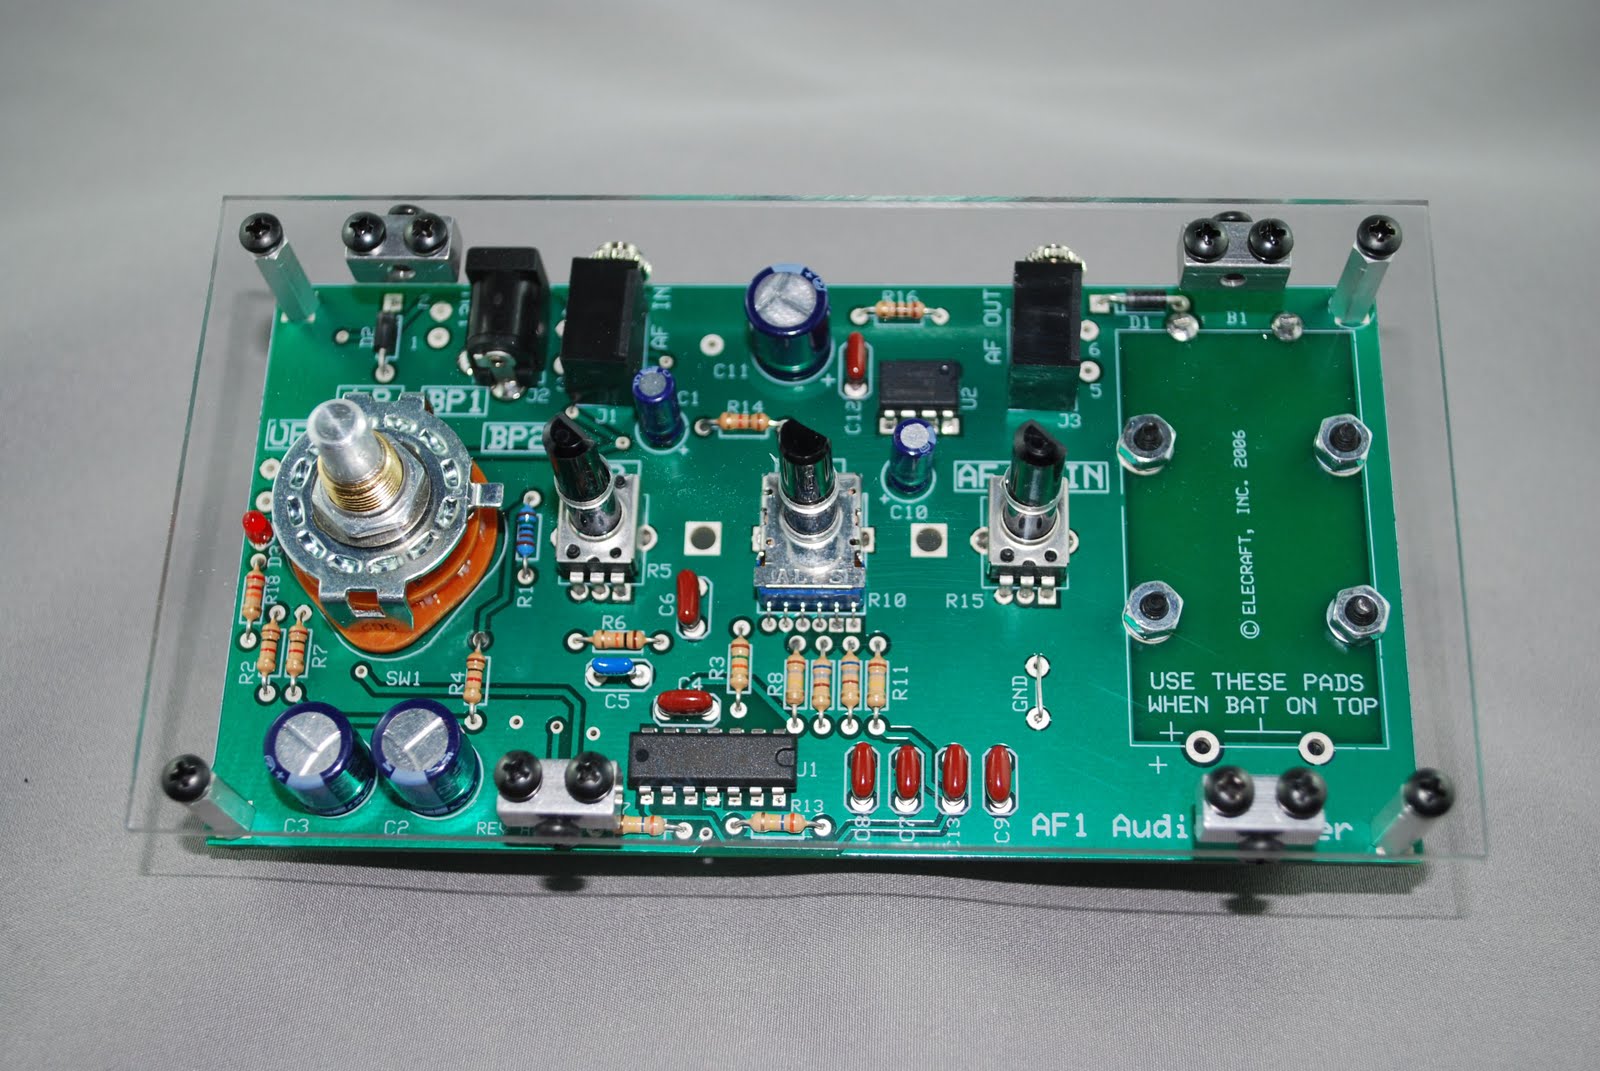
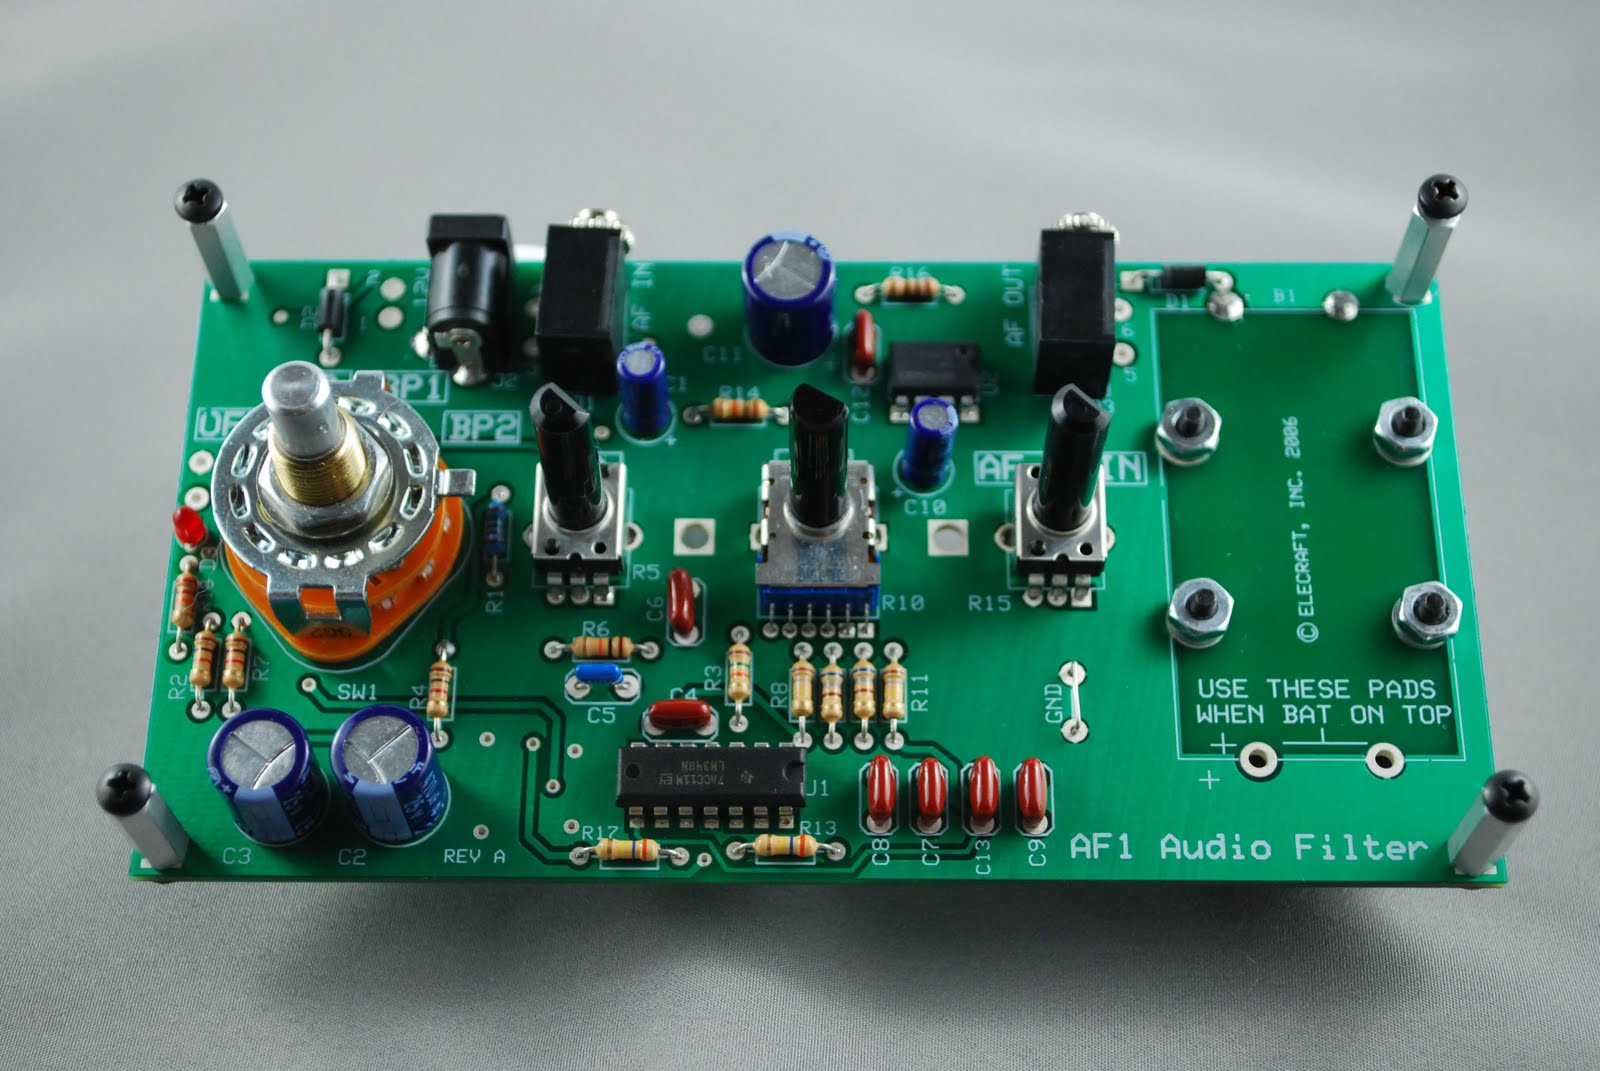
Eleccrafts AF1 enclosure.
 |
| Front mounted |
 |
| Stand offs mounted |
many out door situations. It was a must to get this unit in a case. This brings me to Dave W8FGU he offers a very good solution to my AF1 case situation. Dave
 |
| Tab on rotary switch bent |
 |
| Bottom of enclosure |
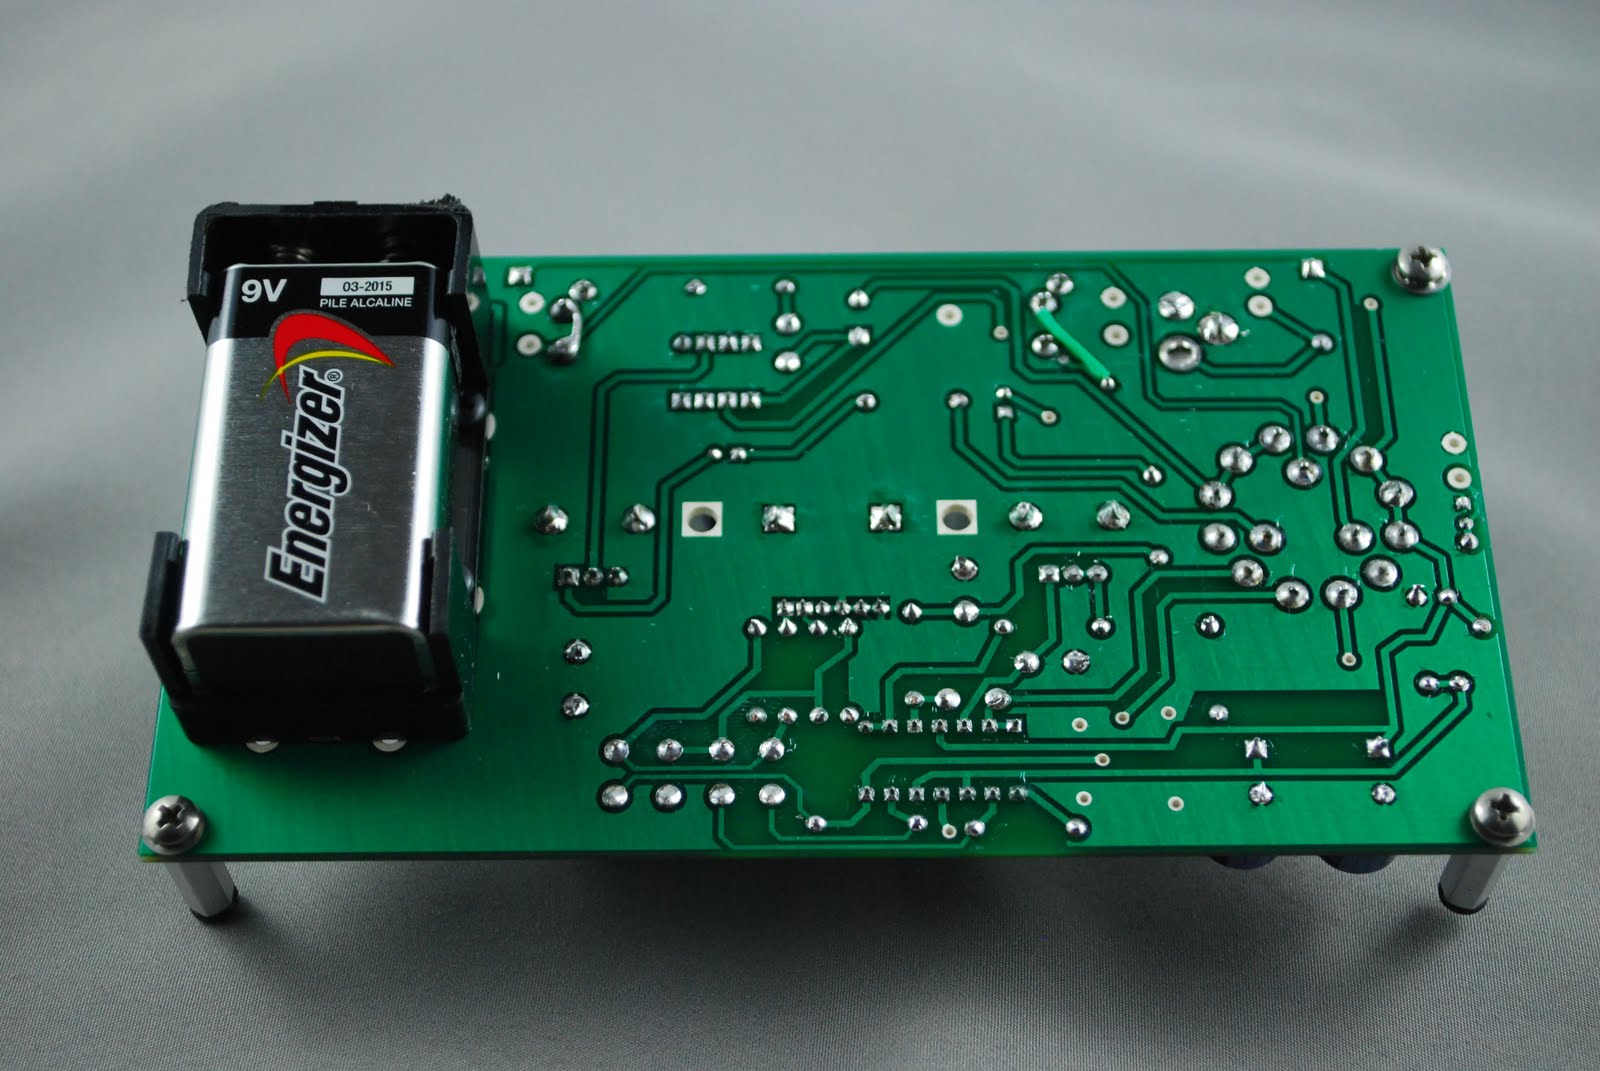 |
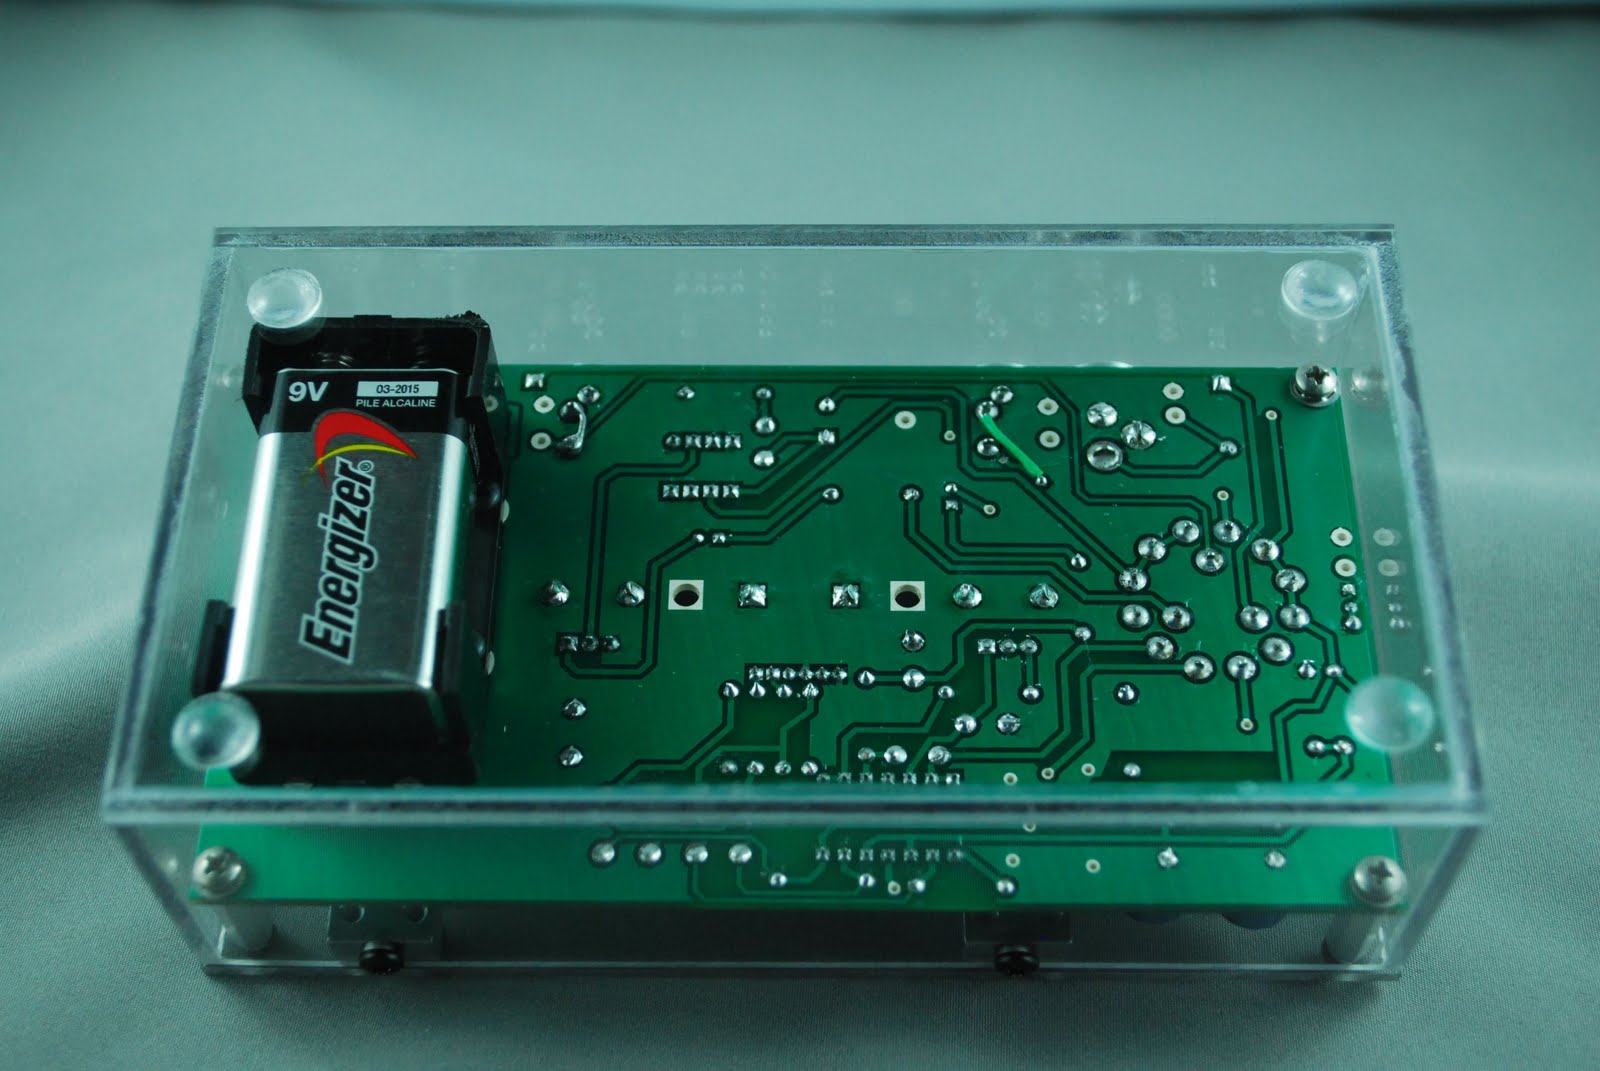
| Battery mounted on bottom |
AF1 for it to fit properly into the Lexan case. The 9 volt battery had to be mounted on the underside of the circuit board. That went very smoothly as Elecraft has provided for this and it is well laid out on the PCB.
The only other modification was the AF1's rotary switch had a tab which had to be bent down in a horizontal fashion.The case is very well made and along with the strength of the Lexan materiel makes the case well worth it. All edgings and corners were flush fitting, all the screw holes lined up with professionalism and attention to detail.
 |
| Finished product |
Mike Weir, VE9KK, is a regular contributor to AmateurRadio.com and writes from New Brunswick, Canada. Contact him at [email protected].
DVAP Tests–Range
As I recently blogged, I purchased the DV Access Point Dongle a few weeks ago. It really came down to trying to do something to enhance my interest in D-STAR or sell my ICOM IC-92AD. I was first introduced to D-STAR back in early 2008 and purchased the IC-92AD in the fall of 2008. I spent the first several months having QSO’s on the local repeaters with the growing number of D-STAR users in the Rocky Mountain region. But I’ll admit I did get a little bored with just speaking with the same group of guys. I mean no disrespect, but I never really got into the local VHF/UHF repeater scene. I think I would have more interest in local repeater operation if I had a longer commute. But with less than 5 minutes in the car, there’s just no time to try.
Anyway, a few months ago I grabbed the D-STAR radio and re-educated myself on how to use it and connected to the local Denver repeater and connected to the REF005 London repeater. I really enjoyed just listening with that reflector dialed up in the background. Not wanting to tie up the local repeater just for my enjoyment, I began looking into the DV Dongle and the DV Access Point Dongle. I was first leaning towards the DV Dongle as I figured I would do more listening that actual talking and it could just play in the background. I could use my IC-92AD when I wanted to QSO. But as I began comparing the two dongles (no dongle is created equal) I began leaning more towards the DV Access Point Dongle with the ability to still use my radio.
It didn’t take long before I had a short list of ideas on how the DVAP would come in handy around the house and in the office. In the office I work in a lab which is a RF black hole. Nothing comes in and nothing gets out. I could take the DVAP and my IC-92AD to the office and either just listen or perhaps even strike up some QSO’s during lunch.
If you’re not familiar with the DV Access Point D-STAR Dongle, it is a simple looking little device that connects to your PC via USB and allows you from your D-STAR radio to connect into the D-STAR network via the Internet. The DVAP has a small antenna and transmits at a mere 10mw. But the nagging question was just how far will 10mw travel?
I had read many blog postings from other hams who were enjoying the world of D-STAR from their DV Access Point. They were finding out they could successfully operate from other rooms, the back deck, the back yard and even to the henhouse as in the case of my friend, Tim Kirby G4VXE in the United Kingdom.
Now before I go any further, allow me to type out some fine print. The DV Access Point Dongle is truly designed to provide a licensed ham the ability to connect to the D-STAR network from inside and around their home or location. It is not intended to be used as a neighborhood D-STAR repeater and send RF signals across the neighborhood or across town.
Having said all of the above, I still wanted to know the range. My ham shack is in my basement. With the DVAP setup and using the little stubby stock antenna, I tested by walking all around my basement, then going upstairs to the ground level, then upstairs to the second floor and then finally on my back deck and courtyard. No issues.
Like many, the experimentation aspect of the hobby is something I enjoy. I don’t have a lot of time to build radios and living in such an antenna restricted neighborhood, I don’t have a lot of need to build and experiment with antenna design. So my eagerness to know just how far I could move away from my QTH really excited me. I know I’m a nerd…but if you’re reading this so are you. ![]()
So I decided to connect the DV Access Point Dongle up to my Diamond X-30A external VHF/UHF antenna. This antenna is attached to the side of my house where a Directv satellite dish once was mounted. The antenna works great for working the front range repeaters (including the D-STAR repeaters) and I’ve also managed to hear ARISSat-1 via this stationary antenna. As a point of reference, the antenna is approx. 16 feet off the ground and it does not stick up above the roofline. It is totally hidden from view of neighbors and as such it not as efficient as it could/should be.
With no other modifications to the DVAP, I connected it to the external antenna and hopped in the car to go to the grocery store. From my QTH to the grocery store parking lot (based on Google Earth measurements) as the crow flies or the RF travels, it is .75 miles, 1.20 kilometers, 3,941 feet, 1201 meters…I think you get the idea. I honestly figured I wouldn’t make it out of my neighborhood. As I reached the end of my street I was able to do a successful echo test. I continued up the road and to the exit of my neighborhood. Another echo test proved successful. I then proceeded down the street towards the grocery store and with IC-92AD in hand and in the car I did another successful echo test. I reached the grocery store parking lot, stepped outside and conducted the final echo test….yep successful. I was .75 miles from my QTH and had solid copy on the echo test to the DVAP dongle.
Again…let me add the fine print. The DV Access Point Dongle is intended to provide the licensed amateur radio operator access to the D-STAR network in and around their house/yard. It is not intended to provide connectivity at 3/4 of a mile away.
I was short on time this particular day and plan to conduct further testing to determine the limit. The neighborhood I live in is relatively old with tall, mature trees. Another test in the dead of winter might also prove to provide additional range since less foliage on trees will get in the way. A final testing to just fulfill my interests will be as far as I take the range experiment. I’m not interested in trying to amplify the 10mw signal as I believe that is taking the DVAP in a direction not intended by its developer. However, the next time I go to the community pool which is located just about 100 yards from my QTH, I believe the IC-92AD might just come along.
Look for an updated blog post on the additional range testing to see if I can go a full mile. I’ve read reports from hams in the NY area who have been successful at one mile in all directions (N, E, S, W). I may just wait until winter to try this as I stated above. Finally, I do want to do a little testing to see just how this setup could perform in a portable setup using an AT&T 3G data card. I’ve certainly read blog posts from other hams stating they have had no issues with a configuration like this. Again, it’s more to fulfill my experimental interests.
Until next time…
73 de KD0BIK
Jerry Taylor, KD0BIK, is a regular contributor to AmateurRadio.com and writes from Colorado, USA. He is the host of the Practical Amateur Radio Podcast. Contact him at [email protected].
Motorola Millstone
This weekend I had planned to write about my Android smartphone, a Motorola Milestone 2, which I bought in early July soon after I came out of hospital. It was a fantastic phone with a big, clear screen and a really usable slide-out keyboard. It became my main method of electronic communication. The Android user interface is great – far, far superior to Windows Mobile. It is well integrated with Gmail as you would expect and it has an excellent web browser that can display almost any website, unlike the IE browser in Windows Mobile which is just a piece of s***. I was also intending to write about an Android APRS application called U2APRS. Unfortunately, last night my Milestone turned into a brick.
The one thing I hadn’t got round to doing was install a good app to read the various blogs that I follow. Blogger Dashboard is one of the few sites that doesn’t work well in the Android browser. I decided to install Feedly, found that I liked it, and spent some time going through all the blogs marking all the posts as read. Having done that I was trying to figure out how to get back to the list of blogs now that there were no new posts when the screen froze and refused to respond to touch input.
Thinking that this was just a software crash, I pulled the battery. But when the phone started up again the screen still refused to respond to finger movements. And now I couldn’t get past the lock. This situation persisted after several attempts.
Time to go online. A Google search revealed that problems with the Motorola Milestone 2 touch screen were not uncommon and that the only diagnostic to try was to perform a factory reset to make sure that the trouble was not due to a software glitch. This would, of course, remove all my apps and settings. But there was no alternative. Except that the instructions for performing a hard reset – press and hold the Camera button while powering up the phone – didn’t work. Every time, the phone booted into its normal screen, which was still locked.
After wasting quite a lot of time making several attempts at this I found another forum post that suggested holding the X key on the keyboard whilst powering on the phone. This got me a step nearer to where I was trying to be – a screen with a warning triangle and an Android icon on it – but the instructions to bring up the menu – press and hold the Volume Up button and then the Camera button – did nothing. Again, a lot of time was wasted trying this several times, including different permutations of pressing and holding, and trying both of the Volume buttons since I couldn’t be sure which was Up and which was Down, to no avail. Deep frustration was setting in.
Olga found a forum post which suggested that pressing the keyboard Search button from the Android warning screen would bring up the reset menu. That didn’t work either. Then she found another one that said to use the the @ key. At last, the menu! I was finally able to format the system and wipe all my apps and data. When the phone rebooted it entered the initial configuration sequence, asking what language I wanted it to use. Which I was unable to select because the touch screen still didn’t work.
So my Milestone is currently as much use as a lump of rock. I’m missing it already. It will probably take several days to send it for repair and have it returned, which I can’t even start to do until Monday. But I’d rather do without a phone than go back to Windows Mobile, which may be a very good platform for running apps but is absolutely loathsome as a telephone and is totally useless for Gmail.
Deep frustration. Not to mention irritation over the valuable time I’ll have to spend reinstalling and reconfiguring everything once it’s back. And to add to my annoyance I’ve lost U2APRS because the developer JA7UDE’s web site has been offline for the last couple of weeks for reasons unknown and there is no longer any way to obtain it.
I’m not a happy bunny.
Julian Moss, G4ILO, is a regular contributor to AmateurRadio.com and writes from Cumbria, England. Contact him at [email protected].
Elecraft K3 Assembled in 7 Minutes [VIDEO]
So after oversleeping this morning, I managed to find a nice video that I can share with all of you. It’s nothing groundbreaking. It’s just a time lapse video of a gentleman putting together an Elecraft K3 from unboxing to finish. Pretty interesting to see the process. I have yet to build from a kit, but this is pretty cool. So watch it and enjoy. In the mean time, I’m going to go have a snooze or something. But here ya go.
Rich Gattie, KB2MOB, is a regular contributor to AmateurRadio.com and writes from New York, USA. Contact him at [email protected].
 Ham Radio Deluxe |
 W5SWL Electronics |
 Ham Radio Prep |
 KB3IFH QSL Cards  Hip Ham Shirts  HamRadioAuctions HamRadioAuctions Reliance Antennas Reliance Antennas Enigma Shop Enigma Shop |  morseDX  Ni4L Antennas  R&L Electronics R&L Electronics antennas.us antennas.us QRV QRV |
- Matt W1MST, Managing Editor
