 |
 WB9LPU’s Marconi Centenary Key

A Marconi style straight key homebrewed by Rich, WB9LPU (copyright Richard Meiss, used with permission)
After my last post on my visit to Signal Hill I have been contacted Richard Meiss, WB9LPU, who constructed a straight key in the tradition of the keys made by the Marconi company, to celebrate the centenary in 2001 of Marconi’s reception of the first transatlantic signal. Rich has a written an account of the construction of the key, which is mounted on a piece of Newfoundland soapstone and it can be accessed below by clicking on ‘WB9LPU Marconi Style Key’; it is well worth reading.
Rich manufactures many keys, paddles and bugs and his craftsmanship is outstanding. There will be more posted on Rich’s work on the blog in the near future, but to whet your appetite here is a video of one of his homebrew bugs.
Please note Rich’s materials (photograph and PDF document) are included here with permission and do not fall under the Creative Commons license that I use on this blog.

![]()
Alan Steele, VA3STL, is a regular contributor to AmateurRadio.com and writes from Ottawa, Ontario. Contact him at [email protected].
New wallpaper just arrived
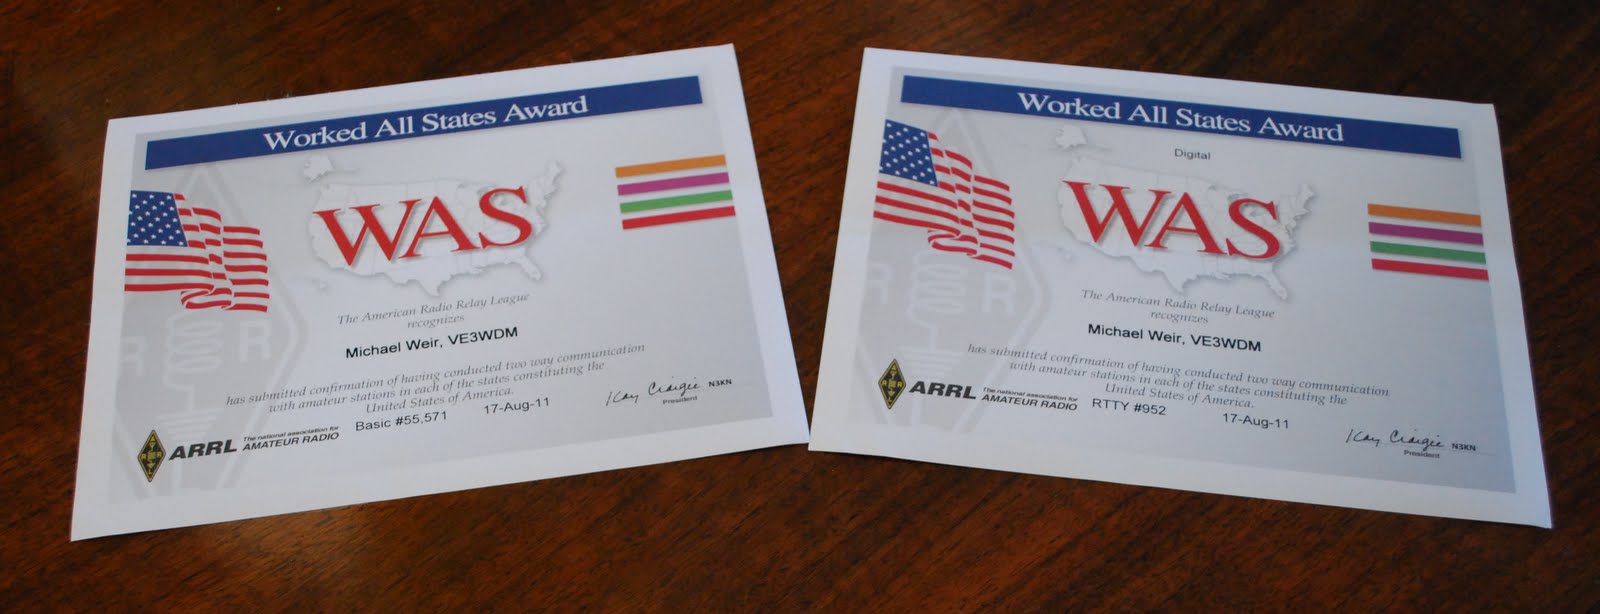
Mike Weir, VE9KK, is a regular contributor to AmateurRadio.com and writes from New Brunswick, Canada. Contact him at [email protected].
Visit to Signal Hill

Welcome to Signal Hill
Back in June I attended a conference at Memorial University at St John’s Newfoundland. The morning of my last day in the city a colleague and myself went to visit the historic site of Signal Hill, where Marconi received the first transatlantic radio signal after they were transmitted from Poldhu Cornwall, England, in December 1901.
The day we visited the Hill was thick with fog, which had enveloped St John’s for the five days I had been there. Still it was good to visit such an important site for radio even if you could not even see the sea which was at the foot of the hill. The Cabot Tower at the top of the hill is not the actual building where Marconi received the signals, that was then adjacent Fever Hospital which was destroyed by fire in 1920, however the Cabot Tower is the focus of the commemoration of the event and it has an exhibit, a shop and a radio station, VO1AA, run by the Society of Newfoundland Radio Amateurs. The shop is at the entrance level and then there is a floor for the exhibit, you can also gain access to the roof – which probably has fine views in good weather but the fog was thick the day we visited. Unfortunately, there was nobody manning the station so I did not get chance to operate from there. Still, there was plenty on display although the modern equipment looked like it was locked away. The photographs below show some of what was on display.
The name ‘Signal Hill’ does not come from Marconi’s work, but due to the fact it was a viewing post for incoming ships. Once the merchant line was identified a flag associated with that company was raised so the stevedores and other dockworkers for the respective company could get ready for the ship’s arrival in the port of St John’s. There is a photograph of rolled up and neatly stored set of flags, which I presume were the company identifier flags, in the gallery below.
In the shop I bought a copy of “Marconi’s Miracle” by D. R Tarrant. This is a short (101 pages) but concise account of the reception of the first transatlantic signals, including the build up and subsequent controversy of Marconi’s work. The controversy being that Marconi was effectively and quickly forced to cease his work in Newfoundland as the Anglo-American Telegraph Company enforced their exclusive rights to telegraphy systems in Newfoundland. They obviously felt concerned the new wireless system would take business from their cable system.
Just further down the Hill from Cabot Tower is a visitors centre that has more information about not only Marconi but the military significance of the Hill and the trading in the region. That is worth a visit too.
So, if you find yourself in or near St John’s I strongly recommend you visit Cabot Tower and if you are an amateur radio operator it is a ‘do not miss’ just for its important significance.

![]()
Alan Steele, VA3STL, is a regular contributor to AmateurRadio.com and writes from Ottawa, Ontario. Contact him at [email protected].
Baofeng UV-3R Review
Following the success of the Wouxun radios, we have a new Chinese handheld transceiver that has many hams excited – the Baofeng UV-3R. The UV-3R is a dual band (UHF/VHF) 2W “micro” transceiver manufactured by Vero Global Telecom and sold by Baofeng. While the Baofeng brand is the most popular, the radio is also sold as the Comtex UV-3R, the Magiksu UV-3R, and the Zastone ZT-UV3R. (Baofeng also sells the UV-100 and UV-200 models that share common internals with the UV-3R, but have some cosmetic differences. Also, on ebay.com you can find speaker mics for these models that are unavailable for the UV-3R.) One reason the UV-3R is so popular is its relatively low price – less than $50 via ebay and slightly more from the US suppliers. At this price and small form factor, it makes a great back-up radio to keep in a truck glove box or a laptop bag.
Cosmetically, the UV-3R is very similar to the Yaesu VX-3R.
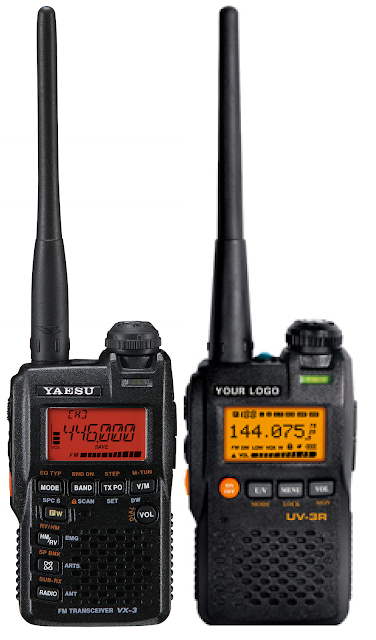
The dimensions are the same, but the UV-3R is missing a few buttons on the front panel and the functions of the duplicate buttons are not the same as the VX-3R. The UV-3R, in the fine tradition of Chinese radios, adds an LED flashlight. The radio also is available in red, yellow, blue, and camouflage in addition to the standard black. When holding both the Yaesu and Baofeng in my hand, it is easy to see and feel the superior quality of the Japanese radio.

A quick review of the technical specifications reveals that this radio is dramatically different from the VX-3R. The UV-3R is a 2M/440 MHz transceiver and FM broadcast receiver. An abbreviated list of its features/functions/specs is below. (A full list can be found here.) The radio is built by levering the power of the RDA1846 by RDA Microelectronics. This single transceiver chip provides most of the radio functionality – essentially making it a SDR.
Functions and Features
– 50 CTCSS, 104 CDCSS
– Time-out Timer (Off/30/60/90/120/150/180 secs)
– Shift Frequency
– VOX (Off/1-9 Levels)
– Call Tone (1750 KHz)
– Squelch Set (1-9 Levels)
– Electronic Volume Adjusting (8 Levels)
– Keypad Lock
– Backlight (On/Off/Key)
– Tail Tone Elimination
– Battery Save
– Restore to Factory Default
– PC Programming
– FM Radio Channel Storage
Technical Specification – General
Frequency Range | 136-174/400-470 MHz
Channel Capacity | 99
Channel Spacing | 5/6.25/12.5/25 KHz
Operated Voltage | 3.8V
Standard Battery | 1500 mAh
Battery Life | 10 hours
Dimensions | 1.9″ x 3.2″ X .9″ (Approximate)
Weight | 140g
Technical Specification – Transmitter
RF Power Output | 2W
Early adopters were “treated” to a version that appeared to be rushed to market – the units only had twelve menu options, the s-meter was worthless, and it came in a rather plain box. The subsequent version added six more menu options, improved the signal meter, and now comes in a more polished box.
The menu options are:
| Menu # | Name | Description | Options |
| 1 | RXCODE | Receive Tone | Off, CTCSS, DCS |
| 2 | TXCODE | Transmit Tone | Off, CTCSS, DCS |
| 3 | SQL | Squelch | 0-9 |
| 4 | LIGHT | LCD Illumination | Off, On, Key |
| 5 | K TONE | Keypad Beep | Off, On |
| 6 | VOX | VOX/Handsfree | Off, 1-9 |
| 7 | POWER | RF Output Power | High, Low |
| 8 | DW | Dual Watch/UHF & VHF | Off, On |
| 9 | STEP | Freq Size Step | 12.5/25KHz |
| 10 | OFFSET | Repeater Offset | 0-37.995, 0-69.995M |
| 11 | SHIFT | Repeater Shift | 0,+,- |
| 12 | STE | Squelch Tone Elimination | Off, On |
| 13 | W/N | Wide/Narrow Receive | Wide/Narrow |
| 14 | SAVE | Battery Save | Off, On |
| 15 | TOT | Timeout Timer | Off, 30, 60, etc. |
| 16 | SCANM | Scan Memory | TO Time based – time out/ CO Carrier (present) based – carrier out |
| 17 | RELAYM | Relay Message | |
| 18 | BCLO | Busy Channel Lock | Off/On (No Tx when receiving) |
In addition to the cost and size, hams give the UV-3R favorable reports for both transmitted and received audio. On July 20, 2011, the UV-3R became Type 90 accepted by the FCC. The FCC documents can be found here.
The UV-3R is easy to use in spite of a somewhat confusing manual. ZL2GVA mitigated that short-coming by releasing an easy to use cheat-sheet. While most folks find it easy to program the memories from the radio itself, the UV-3R can be programmed from a computer using a USB cable and software from Baofeng. In addition to the factory software, the UV-3R is also supported by the CHIRP cross radio programming application. (CHRIP may not program all features for all radios; it is intended to allow hams to transfer memories from one device to another with little effort.)
In addition to the USB programming cable, the radio has several accessories. It comes with the manual, charger, a charger adaptor (if needed), a charging stand, wrist strap, an UHF antenna, a VHF antenna, an ear bud/mic combo, and a belt clip. The shorter antenna (with a red ring) is for UHF. The longer antenna is for VHF. The UV-3R requires an antenna with a SMA-M connector. The antennas perform well, but many folks have wished for a dual band antenna. The Nagoya NA-701 and Nagoya NA-666 both seem to be popular choices. The antenna connector is fairly close to the LED, so some trimming may have to be done to get a good fit.
Car chargers, cases, and the USB programming cable are available as options or sometimes included as a bundle with the radio. The battery is a common NP-60 (FUJI compatible), so picking up an extra one is easy to do. Also, with a slight modification to account for the belt clip mount, the AA battery pack (FBA-37) for the Yaesu VX-3R can be used to run the UV-3R. For me, the car charger and the AA battery pack are the must have accessories for the UV-3R in its role as a backup radio.
The radio is not without some minor problems and quirks. For example, one oddity is that it uses the less common negative tip for the power plug. As for the problems, hams have reported issues with fit and finish – specifically plugs/sockets that result in loose connections. If pushing the plug with all your might doesn’t work, then try backing it out a little. Also, hams have found spurious emissions on harmonic frequencies. There was a lot of debate about the severity of this issue on the UV-3R Yahoo group – bench vs. real world, letter vs. spirit of the FCC regulations, Type 90 Acceptance impact, etc. Whatever the severity of the emissions, it did not prevent the UV-3R from meeting the requirements of the FCC. Another common complaint was with the loud receive volume. Even at the lowest setting, the radio is quite loud. For that reason, I don’t like using it where it will bother others.
One of the advantages of an inexpensive radio is that you don’t risk much when trying to modify it. Disassembly mostly involves removing screws, but you will have to unsolder the antenna connector. Two mods seem to be the most common as they address some of the issues mentioned above. The first adds a capacitor to reduce spurious emissions on the harmonics. The second also involves adding a capacitor to reduce the loud receive volume issue. More frivolous mods include turning the LCD blue – but then you can have a blue radio with a blue screen.
For me, this little radio has provided a great learning experience as well as a good value for my money. It may not be the best radio ever, but the price, size, and overall good performance make it a good choice for backup radio or even one for a new ham to get on the air. It also has been interesting to see:
- the debates that sprung up around the severity of the spurious emissions,
- the wisdom (or not) of using a dual band antenna,
- the variety of applications from simple transceiver to APRS and tracking satellites
Credit goes to a lot of the guys on the UV-3R Yahoo group – I don’t have the knowledge, tools, or time to do a lot of the research/testing/playing that they have done. I highly recommend the Yahoo group – although it has now reached a point where a lot of the same questions are being asked.
Editor’s note: I personally follow Brick’s blog and find it very worthwhile. While not all content is Amateur Radio related, I encourage you to check it out. -Matt W1MST
Brick O’Lore wrote this guest post and blogs regularly about a variety of topics at http://www.brickolore.com. Contact him at [email protected].
Amateur TV Gone Digital [VIDEO]
After only 78 views on the website yesterday, I figured I should step up my game. One aspect of Ham Radio that I started to look at was Digital Amateur TV. The analog version, while still around, I’m sure is fun, but digital seems more my speed, being a Ham and a Geek. So here are a few things to kind of wet the appetite for Amateur Television. One is a simple link to a website in the Netherlands, with all kinds of information on digital amateur television. It’s in English, so don’t worry about busting out your Dutch to English dictionaries or Google Translate. There is also a nice site from a group in Ohio with some great info. I saw the link for this a while ago in QST, I think.
The other is just the guys from Ham Nation talking about Amateur Television. Now I haven’t seen this episode yet, but it’s one that I really should sit down and watch. So, here ya go.
73.
Rich also writes a Tech blog and posts stories every Tuesday and Thursday on Q103, The Rock of Albany’s website, as well as Amateur Radio stories every Monday thru Friday on AmiZed Studios and hosts a podcast called The Kim & Rich Show with his fiance’ Kim Dunne.
Rich Gattie, KB2MOB, is a regular contributor to AmateurRadio.com and writes from New York, USA. Contact him at [email protected].
Nifty Accessories Winners!
Congratulations to:
Jim, AF5S
Frank, NF8M
Francisc, YO4PX
Larry, KI6ZQY
Jim, KK4DJX
They’re the five winners of our Nifty Accessories giveaway!
Thanks to everyone for participating and stay tuned for our next contest.
Matt Thomas, W1MST, is the managing editor of AmateurRadio.com. Contact him at [email protected].
D-STAR for iOS Devices
I know what you’re thinking and no, unfortunately no one has created an app to access the D-STAR digital amateur radio network from an iOS (iPhone, iPad) device. At least not yet. But there is an app to help you know who’s online and what repeaters are near your location. The app is called DSTAR and is available via the iTunes App Store. Now please sit down and brace yourself for the cost. Yes, the D-STAR app for iOS devices is $9.99 USD.
Yes, I know what you are also thinking. I would have to agree. The app is a bit pricey. While I certainly don’t expect someone talented enough to develop an app and make it available for free. There is a certain spirit of amateur radio which I do agree with. This spirit is of sharing and helping. After all the Echolink app for iOS devices is absolutely free. I even blogged about this app here. But I digress, after all this blog post is not about the absolutely free Echolink app, but about the D-STAR app.
Before I get started, please allow me to add a brief disclaimer. The review I’m providing was not solicited by the developer/manufacturer of the product. I purchased the product the exact same way anyone else would and whether or not the developer/manufacturer of the product reads this blog posting is none of my concern. I do not rate products by assigning it a value of x number of stars and I typically do not suggest whether you should consider buying or avoiding. I provide as detailed of a description as possible and let you decide if is something you can’t live without.
 I guess I’m a sucker for amateur radio related apps. I practically live by my iPhone and iPad and every few weeks I do a search for amateur radio and ham radio in the iTunes app store. I typically download and test just about everything free and if something catches my eye that is not free, if I think I can use it, I’ll buy it. This is how I came to own the D-STAR app.
The D-STAR app opens to the menu screen and you’ll see seven different menu options. These options are Last Heard, Last Heard Map, Repeaters Near Me Map, Repeaters Near Me List, All Stations List, Settings and Disclaimer. By the way, the app is the same regardless if you are using it on the iPhone or iPad.

Let’s explore the Settings option first. The screen is fairly self-explanatory. My Call is your callsign and My Repeater is the local repeater you typically connect to. For some reason the app doesn’t appear to retain the My Repeater information. Auto-load on start is on and Minutes of data I also left at the default setting.
Since the local repeaters in my area are all located in the Rocky Mountain foothills (about 40 miles or so from Denver) I had to adjust the “Near me radius” out some from the default setting. I opted to set it at 100 miles just in my testing. Finally I turned on the “convert Km to Miles” as being an American…that just works better for me. Again, other than My Repeater, the app remembers the rest of the settings each time I launch it.

The next few screens I’ll show you are all fairly self-explanatory as well. The Last Heard is simply a list of the stations “last heard” on the D-STAR network. This is the same data which populates on the d-starusers.org website, which has always been a good resource to check which users are active etc.
One note about the Disclaimer screen (which I’m not going to show). The developer of the app reminds us “the information we see on the Last Heard page is made possible by the system admins who have installed the DStarMonitor program on their gateway computer systems.” I guess some system admins may not have installed this software and therefore the ability for you to see active users or even yourself may not work. I guess it is safe to say if you see this data on the d-starusers.org site, then all should work on this app as well.

The Last Heard map provides a visual representation of users based on location. If you touch a pin, it’ll provide you the callsign and the location of the station.

The Repeaters Near Me List (not shown) looks much like the Last Heard list. It just lists out the D-STAR repeaters near you based on the settings you established in the settings screen (near me radius). The Repeaters Near Me Map (shown left) might be more helpful to review first. You’ll see your location based on the green pin and the repeaters near you in red. Clicking a pin provides the repeater name and frequencies. You can then switch to the list view for even more information and repeater capabilities.
By the way, both the Last Heard List (of stations) and Repeaters Near Me list can be easily exported from the iOS device and sent via email. Also, you can drill down into a individual station and even touch a callsign for QRZ.com details about the individual station. This just simply opens a browser screen and you see the QRZ profile data just the same as you would from a regular PC.
I believe I will find more use for this app when operating mobile or traveling. When operating from home, it’s just too easy to get this same data from a regular PC when I’m in the shack.
In closing, the price of this app is going to seriously turn a lot of hams away. Yes, I realize most everything having to do with D-STAR already has more cost associated to it than non D-Star equipment. It is perhaps unfair for me to suggest what this app might be worth. After all, I did pay full price for it. But perhaps the developer would actually sell more copies of the app for a less expensive price and actually turn a larger profit. But this is simply just my opinion.
I’ve owned the app for about two months and the developer has pushed out one upgrade which contained some bug fixes and the enhancement to export the list data via email. I’m hopeful this means the app is still being developed and while I’ve found no bugs in functionality, future updates might contain additional functionality.
Until next time….Thank you for reading.
73 de KD0BIK/AE
Jerry Taylor, KD0BIK, is a regular contributor to AmateurRadio.com and writes from Colorado, USA. He is the host of the Practical Amateur Radio Podcast. Contact him at [email protected].
 Ham Radio Deluxe |
 W5SWL Electronics |
 Ham Radio Prep |
 KB3IFH QSL Cards  Hip Ham Shirts  HamRadioAuctions HamRadioAuctions Reliance Antennas Reliance Antennas Enigma Shop Enigma Shop |  morseDX  Ni4L Antennas  R&L Electronics R&L Electronics antennas.us antennas.us QRV QRV |
- Matt W1MST, Managing Editor
