A rig for £30 – the Baofeng UV-3R 144/433MHz dualbander

I’d had the chance to play with one of the Baofeng UV-3Rs a few weeks ago and quite liked it. Like most people, I’d seen them advertised in the UK amateur radio press at around £50. On e-bay you can get them for £20 plus £10 postage. I thought I’d plump for one of those and see what happened.

The radio arrived in about 8 days from ‘RadioBanker’ in Hong Kong, beaufifully packaged and with some nice stamps! It was neatly boxed and pleasingly presented. The box includes the transceiver, the battery, VHF antenna and UHF antennas , power charger and leads as well as an earpiece and microphone. Assembly was straightforward and just required the battery to be clipped into the body of the transceiver and the cover slid down and clipped in place. I’d opted for the jaunty blue model!

The rig fits neatly into the hand. Sorry about the grubby fingers – I’d been digging the garden!


Because I had put the battery into the transceiver, I did not need to use the ‘shell’ supplied for charging the battery and just plugged the lead from charger into the DC socket on the side of the rig and set it to charge overnight. The charger supplied was a wall-wart designed for UK 3-pin plugs, unlike some suppliers who, I understand ship a US type charger and adapter.

I’ve found that battery life was good. Not quite ‘charge and forget’ like some of the larger handhelds and bigger battery capacity, but certainly good for several  days operation during walks and monitoring whilst I was in the house – the battery life of 10 hours quoted by the manufacturer seems realistic.

The build quality of the rig is good. Clearly it’s not as good as rigs from the mainstream manufacturers (which are, after all, several times the price) and perhaps not quite as good as the Wouxun models. But it is entirely satisfactory. The ‘L/R’ button on the side of the rig as well as the p.t.t. button were absolutely fine but were of the type that made you wonder how they would last over time. The rig fitted nicely in my hand and also in my coat pocket, so ideal for taking out on a walk.

The manual? I should probably start by saying that if you are the sort of person that likes things to be ‘just so’ and for the manual to guide you effortlessly through the operation of the rig, then this is not the rig for you. The manual is one of the poorest that I have read. To me at least, it isn’t logically organised.
The ‘Getting Started’ section covers switching the rig on, adjusting the volume and that’s it. Then it’s onto the ‘Advanced operation’ section which is just a description, sometimes clearer than others, of the different menu items. One of the more mysterious items reads (sic), “ELAYM (Repeater Sound Response). The UV-3R comes with the Repeater Sound Response feature. When the feature is activated, the handheld transceiver will hear the sound from the repeater, that means the handheld transceiver is working via the repeater’. What?! Certainly the intent wasn’t clear to me. This is probably the most mysterious and cryptic description in the manual, but it is by no means unique. Incidentally, the ELAYM feature appears to be intended to suppress K tones from a repeater.

It all gets better from there. If you are happy to accept the manual as it is and work with the information provided you should soon get to grips with the radio. For example, though the manual says how to store frequencies in the memories, it doesn’t tell you how to recall them, but with some (not too much) experimentation, I discovered how to do this.

Programming the rig with repeater and simplex frequencies is reasonably straightforward once you master the menu system.  I found programming my most used frequencies into memory was the easiest way to use the rig, because the rig didn’t automatically sense repeater channels and apply repeater shift as some do. Not wanting to be fiddling around with changing the radio’s menu items with cold hands on a walk, then setting up the memories seemed to be the most convenient solution. Programming software and a USB lead 
is available, though I’ve not taken the plunge yet (it would double the cost of the rig!)

Having set up the rig with the local repeaters and a few simplex channels I made some experiments from within our house. The antenna on the UV-3R is quite small and I found that I couldn’t hear the 144MHz repeaters GB3WH and GB3RD (both about 15 miles distant) as well as on a ‘full size’ handheld such as my Icom E-92, but I could still get into them if I chose my spot. Likewise on 433MHz, GB3TD at Swindon could be heard weakly and accessed from the first floor of our house. So, if you are planning to use one of these handhelds inside your house to access repeaters or work local stations, you’ll probably need to be within 5 to 10 miles of them.

However, I was more interested in how the rig would perform when I was out for a walk in the Oxfordshire countryside. I ventured to our allotment which just happens to be on the ridge of the hills with a clear take off from west, through north to the north east. The 430MHz repeater GB3UK on Cleeve Hill in the Cotswolds is about 40 miles distant and I tried a call through it using the UV-3R. To my slight surprise, the repeater heard me easily and I put a call through it. Richard, G4ERP was operating mobile on horseback and responded to my call, as did Mike, G3TSO. Both Richard and Mike were able to confirm that the audio from the rig was good, although the deviation was just slightly low but in general the quality of my transmission was excellent. I could easily access the GB3DI repeater at Harwell and worked John G6LNU at Wantage. Rob G4XUT heard me on GB3TD and we QSYed to simplex and made a nice contact with me on the footbridge over the A420 to the south of our village and Rob at home – a distance of around 20 miles. Not bad for 2W and a small antenna! Experiments showed that the speaker/mike gave a better audio level than the internal microphone.

One issue discovered at this stage was the fact that even at bare minimum, the volume is quite loud. Sufficiently loud that if the rig is in your pocket and someone pops up on a repeater, their voice may be loud enough to surprise your walking companions or passers-by! Various modifications for this have been mooted from modifying the board to sticking some tape over the speaker. The supplied earpiece/microphone proves quite beneficial from this point of view too – the lowest volume setting seemed quite bearable through the earphone.

The UV-3R also features the capability to listen to F.M. broadcast radio, which the manual stated covered 87 to 108MHz. Somewhat intriguingly, when I first switched to F.M., it displayed a frequency of 65MHz! The tuning range appeared to be 65 to 108MHz for wideband F.M.. The tuning step is 100khz – so I was unable to tune to 70.450MHz (UK 70MHz F.M. calling frequency). However,  I did verify that I could receive my own transmission on 70MHz! Given that the receiver is set up for wideband F.M. and amateur transmissions are narrowband F.M., this will be of limited use, but it may prove a useful facility. Also, in Es season, it may provide the ability to listen to Eastern European broadcast F.M. – though presumably the small antenna may prove something of a handicap. The F.M. feature does what it is supposed to do, receive F.M. radio stations. Sensitivity seemed reasonable and I was easily able to receive our favourite local radio station from Oxford, Jack FM. I enjoyed that when a station popped up on the repeater that I was monitoring = even if I was listening to F.M., the rig would switch over to V.H.F./U.H.F..

A more serious, well documented issue with the UV-3R is that the second harmonic of the V.H.F. transmitter is not well suppressed and is only around 30dB down. Since I was planning to use the rig on 70cms, I didn’t really care. However, Steve G1KQH kindly provided a link to a site where a mod to improve the VHF performance is available. 

I enjoy having the UV-3R around. It is perfectly sized to fit in a pocket to take with you when you are out for a walkto the shops or on a hill. Good things about the rig are value for money, wideband receive coverage and excellent 433MHz performance. On the downside, the manual was very poor, especially for a beginner and the second harmonic of the V.H.F. transmitter gives cause for concern. Neutral points, but ones to be aware of, include relatively low power and small antenna will restrict the range and performance of the rig, balanced by reasonable battery life and easy portability.

For £30, I think this represents exceptional value – I’m delighted. And you can also get the rig in red, yellow, camouflage as well as regular black!

Tim Kirby, G4VXE, is a regular contributor to AmateurRadio.com and writes from Oxfordshire, England. Contact him at [email protected].

Day one (for me) of the ARRL CW DX contest

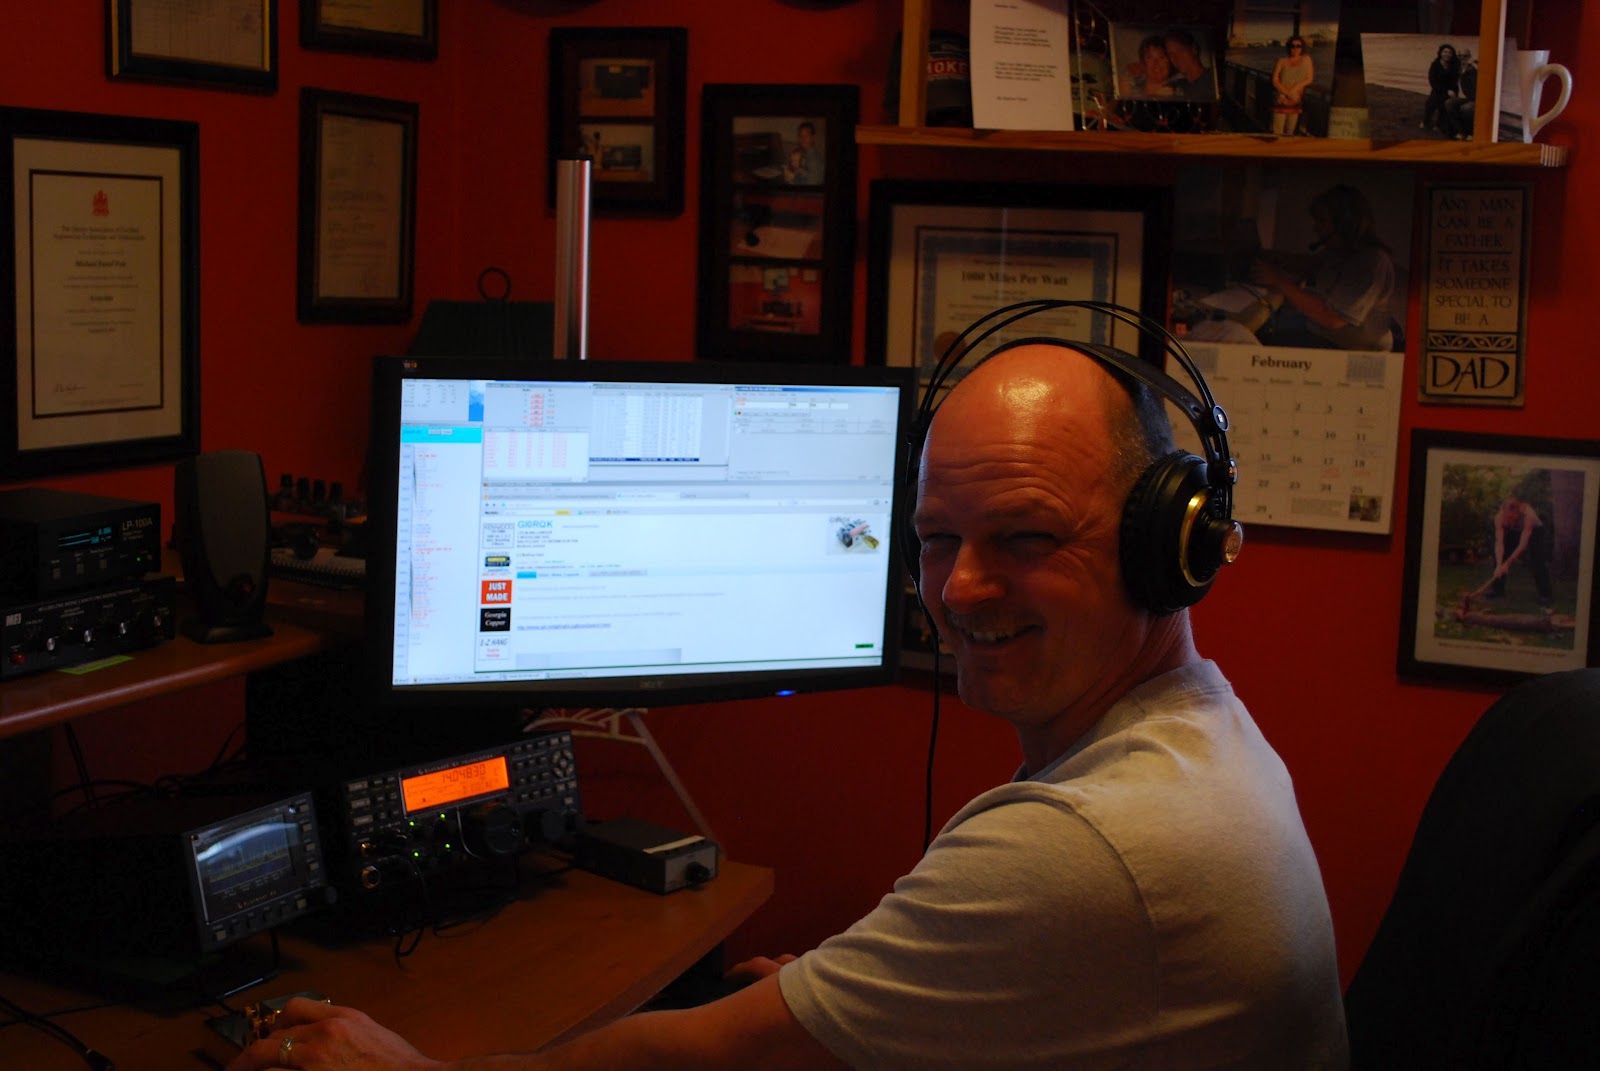
Relaxing and contesting
Well as you know I was not on the air on Friday as the speed and pileups were just out of this world. So I managed to get things done around the house and hit the air on Saturday at 9am local time. At that time I found 10m to be dead but 15 was great! I was able to make 10 contacts on 15 meters with 500mW's...it's funny I am contacting folks who give me their power as 1KW and I am getting to them with 500mW's. Any way the conditions were great but I did take a break at around 1800 UTC as things were slowing down on 15m at that time and not yet picking up on 20m's. At around 1930 UTC I was back at it again but this time on 20m's for some reason I did try 500mW's but it was just not doing it so I slowly made my way to5 watts. That seemed to be the magic power for 20m. The bands were alive and healthy out this way and I had a blast!! I have been on a total of  7.43 hours and made 252 contacts (all DX contacts that is) that breaks a record here of almost 34 contacts per hour. I have not started to log contacts for the ARRL DXCC diamond jubilee so this was the contest for me to get that rolling. Up to this point I have 50 contacts toward the certificate.  Sunday is another day and I plan to get up early to pounce on some 10m contacts and 50 more DXCC's......dreams are free as they say..........

Mike Weir, VE9KK, is a regular contributor to AmateurRadio.com and writes from New Brunswick, Canada. Contact him at [email protected].

New offering from Four State QRP Group

The following was announced today on the various QRP e-mail reflectors:

The Four State QRP Group is pleased to announce a new kit, the Stand Alone VXO (SAVXO) designed by Jim Kortge, K8IQY. The very complete manual, specifications, and ordering information can be found here http://www.wa0itp.com/savxo.html PayPal is accepted. It is shipped with 40M components but can easily be used on any HF band.

This is a Super VXO design which has it’s origins in the Super VXO of the SS-40 receiver. It is crystal controlled yet combines frequency agility with smooth stable tuning, and NO perceptible drift – even from a cold start. It is ideal for driving your NS-40 or other crystal controlled transmitter or receiver, and is also a great starting point for a transmitter strip of your own design. As kitted the SAVXO will put out over 250mW by itself, plenty of power to operate QRPp if desired.

All proceeds go to fund OzarkCon. As always thank you for supporting the Four State QRP Group. http://www.4sqrp.com/

I ordered mine!  And once OzarkCon 2012 is over, I’ll be ordering a Magic Box kit, too.

72 de Larry W2LJ
QRP – When you care to send the very least!


Larry Makoski, W2LJ, is a regular contributor to AmateurRadio.com and writes from New Jersey, USA. Contact him at [email protected].

I need to follow my own advice

I went downstairs and flipped the K2 on and tuned around 40 Meters – WOW !!!!!!

After a long and full day of work, my brain is simply not ready to wrap around 40 WPM code.  I worked HG3R who was cruising at about 35 WPM and called it a night. Tomorrow, after a good night’s sleep and after the opening hours pandemonium is over, I will be ready to jump into the fray.  Also, during the daylight hours, stations will be spread out more as other bands open.  Seems like right now, everyone is crammed into 40 and 80 Meters.

I’ve been at this Morse game for over 30 years now; and I really admire these guys who can while away at 40 – 50 WPM.  I would love to be able to attain that kind of speed; but right now, it sounds more like a buzz saw than Morse Code.  God bless them, you have to admire and respect that kind of ability.

72 de Larry W2LJ
QRP – When you care to send the very least!


Larry Makoski, W2LJ, is a regular contributor to AmateurRadio.com and writes from New Jersey, USA. Contact him at [email protected].

Opening thoughts about ARRL CW contest

Before you knew it 00:00 came and the ARRL international CW contest was a go. During my first 1/2 hour 20m was open but only to non DX to me. So it was off to 40m's and it was alive and hopping! Here at VE3WDM the contest power is 5 watts or less. The band was crowed and the pileups long I did give a few DX stations a call but the KW powered stations going back to the DX really gave me no chance. I did hang in for the whole 1/2 hour but it was just not happening to night. I shut the rig down for the evening just to crazy out there, once the contest adrenaline cools I will get back on. I am looking at Saturday to give 10m, 15m and 20m a go for some DX soup.
Until then....contest on!!

Mike Weir, VE9KK, is a regular contributor to AmateurRadio.com and writes from New Brunswick, Canada. Contact him at [email protected].

DIY Magnetic Loop Antenna – Part 1

Do you live in a neighborhood with a restrictive antenna policy and despair of having a useful HF antenna?

Can you solder or know someone who can?

A magnetic loop antenna may be the answer and they are not as difficult to build as you might think. Like getting on the air for the first time or taking your license exam there is a certain amount of uncertainty when you first approach magnetic loop antennas, there are a few new ideas to grasp. However, thanks to other hams like Steve AA5TB there are tried and tested designs, calculators & building methods that are known to work and that you can follow.

At the heart of every radio and MLA (Magnetic Loop Antenna) is the resonant circuit. The combination of an inductor (a wire has inductance, but a coil of wire has more) and a capacitor (two conductors separated by an insulator) in a circuit will resonate or ‘ring’ at a certain frequency. Sound vibrations at a certain frequency can cause a piano string to vibrate in sympathy and a vibration of the correct radio frequency will cause a resonant circuit to electrically vibrate in sympathy.
Since there is no such thing as a free lunch, the sacrifice you make with a MLA is that it needs to be re-tuned whenever you change frequency on your transceiver. The frequency range over which it is resonant is very small, typically only a few hundred kilohertz at the most.

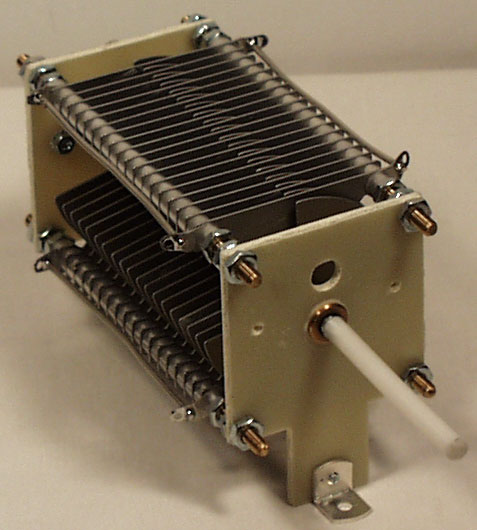
The materials you can get your hands on is going to decide the capabilities of your MLA. Ideally you’ll have a loop made from a conductor with very low resistance (usually copper) and a capacitor that can handle high voltages. A variable capacitor is required if you want to use your antenna on multiple frequencies but you can use or make a fixed capacitor if you operate on one frequency, for Eg PSK31.

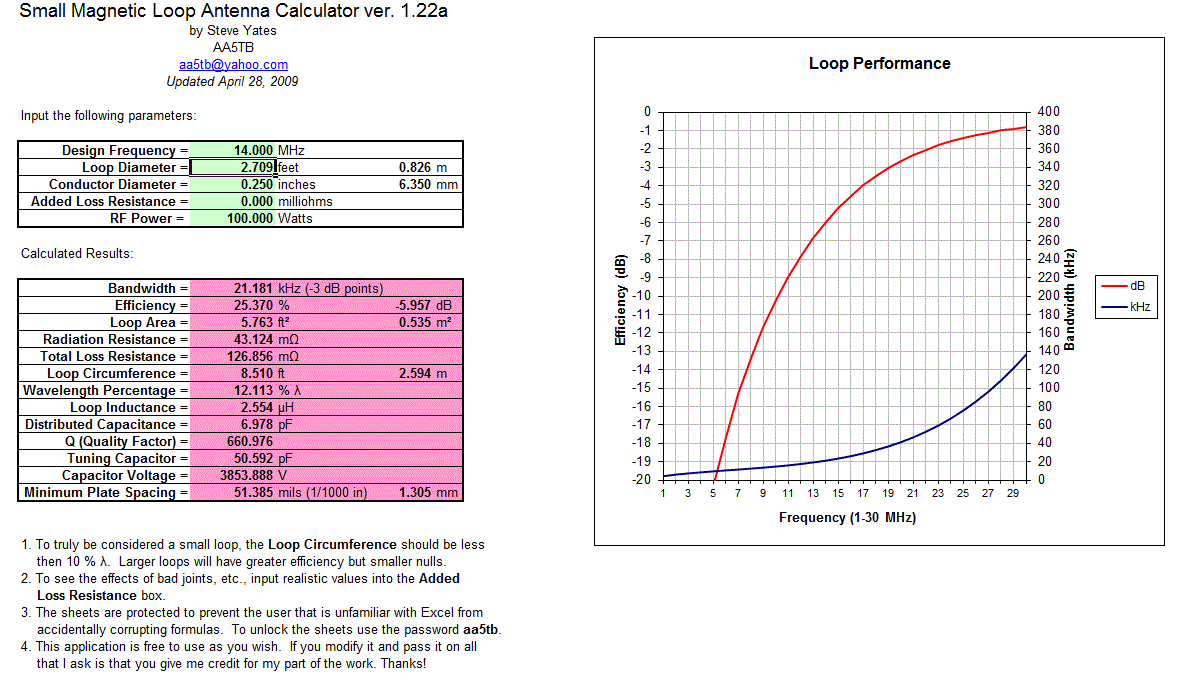
A MLA calculator like the Excel spreadsheet from Steve AA5TB or this web page from 66pacific.com will help you to decide what size components you’ll need to make your antenna.

The four pieces of information required are:

  1. What frequency or frequencies do you wish to transmit on?
  2. How large do you want the loop to be (It should have a circumference less than 10% of the design frequency wavelength, both calculators help you figure this out)
  3. The diameter of your conductor (Three quarter inch (0.75 inch) copper pipe is a good start)
  4. How much power you want to use (The voltage across the capacitor is proportional to the input power to the MLA)
A MLA of a certain circumference will be more or less efficient based on the frequency you transmit at. It is worth changing the loop size in the calculator to get the best efficiency possible in your favorite band. 
For example, my 30-10 Meter loop is 8.5 ft in circumference and 23% efficient at 10.1Mhz but 91% efficient at 28Mhz. This represents a difference of about 6dB or 1 S-Unit.
The diameter of the conductor determines its resistance and this becomes important due to the large current flowing through the loop. Large diameter copper pipe is better since the radio frequency current flows primarily on the outside of the conductor rather than the core. Typical 3/4 inch plumbing pipe is a good balance between low resistance and weight, Heliax coax is good for portable antennas where the loop has to be rolled up into a compact space.
Probably the most problematic part of the MLA is the tuning capacitor. While everything else can be found in your junk box or on a shelf at the local hardware store the capacitor takes a little more digging. Ideally it should be variable from a minimum to a fairly high capacitance (0-300 pF would be good) it should also be able to withstand high voltages. If you are planning to run 100W then you could expect at least 4000 volts across the capacitor. This is not as bad as it sounds as it takes 3300 volts to jump just 1mm or .04 of an inch.
Ideally you could purchase a vacuum variable capacitor, the Rolls Royce of high voltage variable capacitors. You would expect to pay anywhere from $100 up when buying a 10 – 500 pF unit on Ebay and a LOT more if you buy new. If that is the way you want to go then great, you’re all set. If not then read on …
There are several alternatives to the vacuum variable capacitor that will work almost as well. The primary concern now becomes resistance and plate separation. For QRP power levels you can use the tuning capacitors from old vacuum tube radios, the type that have a set of fixed metal plates and a set of moving plates that mesh into them.
For higher power there are two other types of capacitor that are suitable. 
One is the split-stator capacitor, so called because each terminal of the capacitor is connected to a stator that is electrically isolated from the other and the frame. The rotors and shaft form the rest of the circuit so there is very low resistive loss and no sliding contacts.
The other type is called a butterfly capacitor due to the shape of the rotor plates. In this type the stator plates are placed opposite each other with the butterfly rotor in between. When each of the butterfly “wings” are fully meshed between the stator plates the capacitor is providing maximum capacitance, when rotated 90 degrees the wings are completely un-meshed and the capacitor is providing minimum capacitance. Because of the construction of butterfly capacitor there is a higher minimum capacitance that should be noted when planning the frequencies your loop will cover.
If all else fails then you can construct your own variable capacitor. The idea is to have two conductors separated by an insulator, the larger the area of the conductors and the better the insulator the higher the capacitance. Sliding metal plates, trombones of copper tube and even Coke cans have been used as variable capacitors.
A fixed capacitor can be created out of coaxial cable if you intend to operate on one frequency and a table of approximate capacitances for different types of coax is included here, click to enlarge the table below.
You can cut a length of coax a bit longer than the length suggested by the table above and trim it to frequency once it is attached to the loop. Make sure there are no stray pieces of braid between the shield and the center conductor as the voltage rating is determined by the spacing of the two closest conductors.
Part two of this post will continue with calculating the antenna dimensions and performance.
One important thing to remember … If you don’t have access to the best materials then use what you have and improvise. If you don’t have copper pipe then use coax or heavy wire. If you don’t have a high end variable capacitor then use what you can find and keep the power levels QRP. The only antenna that is a complete failure is the antenna you never get around to building.

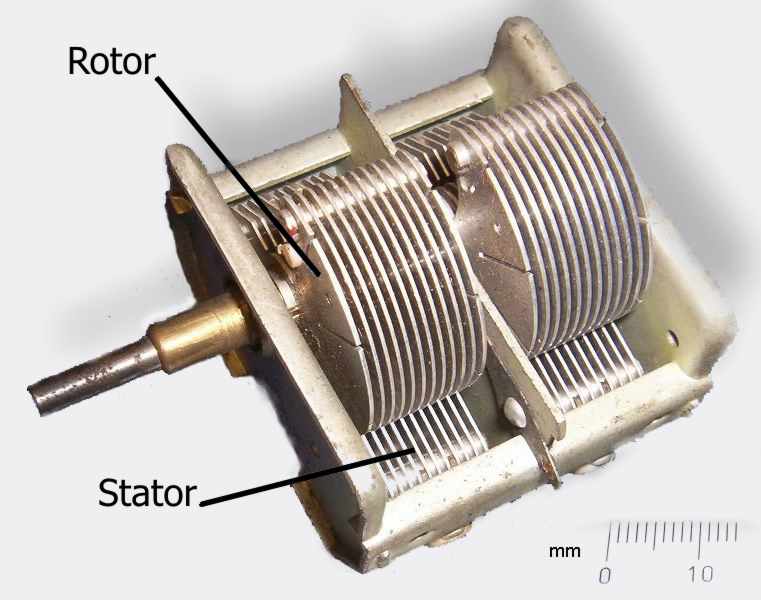
Owen Morgan, KF5CZO, is a regular contributor to AmateurRadio.com and writes from Texas, USA. Contact him at [email protected].

LHS Show Notes #075

Introduction:

  • We’re a little light on content, but we’ll make up for it with enthusiasm!

Announcements:

Topics:

  • Linux Mint 12 Review
    • Richard has been using Ubuntu for some time, but he’s been unhappy with the latest version. He’s rediscovered Linux Mint! Version 12 is out, with Gnome 3, Gnome 2, MATE, and Cinnamon, and he gives a brief review.
    • His primary needs: browser, email, Audacity, XChat, and a few others.
    • Using the Gnome 3 desktop, as a desktop fills with icons, a new desktop is automatically created.
    • By moving the mouse to a hot corner, you’ll see a high-level view of all your open applications.
    • Russ has been using Linux Mint Debian Edition, so he’s missing out on the Gnome 3 goodies, at least for now.
    • Our hosts then drift into a discussion of various desktop managers and visual effects.
  • WINE: Wine Is Not an Emulator
    • WINE is a collection of libraries for Linux that support Windows library calls from a Windows application.
    • EchoLink, for example, is a Windows application works quite well under WINE on Linux.
    • If you can’t find a native Linux application that does what you want, you may find that WINE will allow you to run the Windows program.
    • There are a couple of different versions of WINE, all based on the core version of WINE.
    • Cedega: a version of WINE that supports a variety of Windows games.
    • CrossOver: a version of WINE that originally focused on supporting business applications such as Internet Explorer and MS Office, but has also expanded to include some games and running Windows applications on a Mac.
    • Richard browses the list of ham radio applications in the WINE application database.
    • Russ talks about installation and configuration:
      • Red Hat/Fedora: yum install wine
      • Debian-based: apt-get install wine
      • Some repositories may not have the most recent version of WINE (1.4 at the time of recording).
      • Under System Tools (in Linux Mint, or Debian) there is a WINE Configuration tool.
      • To install a Windows program under WINE, download the Windows installer application. At the command line, type “wine [name of installer executable]“, and the setup program should proceed just as with Windows. A program icon should appear under the WINE program folder, and the program will, hopefully, run just like in Windows.
      • Some Windows programs will run just fine under WINE; others won’t. Give your favorite a try and see!
    • One of the most-wanted ham radio applications, Ham Radio Deluxe v. 5.0, does not run at all under WINE. If you can find a copy of HRD v. 4, it should work under WINE. Remember, too, the native Linux application fldigi does much of what HRD would do.
    • Russ has also tried the N1MM Logger under WINE, and it worked fine.
    • The Winetricks tool might help get a Windows application running under WINE.
    • The WineHQ forum is a good resource for help.

Feedback:

  • We had a donation from William A. Thank you!
  • Leif, KC8RWR, continues a comment dialog about the origin of CUPS in Episode 67.
  • G8FXM, mentioned LHS in his blog. Thanks, David.
  • The Hoosier Hills Ham Club linked to the LHS site and we linked back. Thanks to W.W., KB9TMP.

Contact Info:

Music:

  • To be added.

Russ Woodman, K5TUX, co-hosts the Linux in the Ham Shack podcast which is available for download in both MP3 and OGG audio format. Contact him at [email protected].

Subscribe FREE to AmateurRadio.com's
Amateur Radio Newsletter

 
We never share your e-mail address.


Do you like to write?
Interesting project to share?
Helpful tips and ideas for other hams?

Submit an article and we will review it for publication on AmateurRadio.com!

Have a ham radio product or service?
Consider advertising on our site.

Are you a reporter covering ham radio?
Find ham radio experts for your story.

How to Set Up a Ham Radio Blog
Get started in less than 15 minutes!


  • Matt W1MST, Managing Editor