 |
 Cloud RF
Cloud RF is something that I stumbled over and to be honest I’m not sure where so if I’m telling you something you already know then I’m sorry, its a function of me not concentrating.
Anyway the blurb from the Google marketplace / Google play site indicates that the app is for all sorts of RF planning and I quote ‘DAB, DVB, GSM 2G/3G/4G/LTE, Marine VHF, PMR, TETRA, PTT, WiFi, WiMax
Groups: Emergency services (Ambulance, Coastguard, Fire, Forestry, Police), Amateur/Ham enthusiasts, Armed Forces/Military, Construction industry, Event organisers, Government, Maritime/Private Security, WISPs.’

For me its a way of simply checking the coverage I’m expecting. there are 2 applications for your Android phone and a web based offering to boot. The programme is squarely aimed at the corporate market and the trial offshoot for hams is either a 12km limited plot for free or for a fiver you get 100km of signal plotting. I guess you could reduce power to minimal levels and attempt to extrapolate but it doesn’t seem worth it if you’re into planning for a RAYNET or emergency communications type situation.
Still for the casual user there is at least something to wet your appetite and the operation couldn’t be simpler on your phone. Use the GPS or map to locate where you are / want to be. Entering in the frequency and power as well as height above ground for the rudimentary settings and press the button to calculate your plot. Other aspects can be changed such as type of ground and the usual modelling parameters that you’d expect from a simplified model that bears a similarity to Radio Mobile that Julian, G4ILO posted a while ago. I’m only guessing but I’d image its a similar if not the same engine that delivers the plots (Irregular Terrain Model).
Have a play with the trial version and see if that takes you fancy and if you dip into the paid for version then let me know what you think.
Alex Hill, G7KSE, is a regular contributor to AmateurRadio.com and writes from Cumbria, UK. Contact him at [email protected].
The ups and downs of amateur radio!
There are some days when things don’t go quite right. In fact, nothing goes quite right.
Yesterday morning, I thought I’d have a look on 28MHz JT65. I plugged the interface lead into the sound card on the computer but there was no receive noise. Fiddled and faffed and discovered that there was a problem on the socket with the computer.
Managed to get around that by using an external USB sound card which came with the ZLP interface. That worked great with WSJT, but with the W6CQZ JT65-HF program which I use on HF there wasn’t enough gain using the basic interface that I have from the FT1000MP. In the shower, I realised the simple way around that was to run all the digimodes from the FT847 which had previously just been used on VHF/UHF. Got that going and in fact, the receive on 28MHz seemed to be better than from the old setup. I had some contacts to test it and all seemed ok.
Later in the day I was playing around on FSK441 on 144MHz and I noticed the output was down! I had a sinking feeling that I had done something horrible to the PA whilst on HF JT65A. Fortunately, it proved to be the patch lead between the FT847 and the amplifier. I removed the patch lead and everything seemed ok. Need to grab some more connectors from Maplin tomorrow and make another up.
Then I got panicky about a noise that the FT847 made when going back to receive on JT65. That proved to be something to do with the JT65-HF program – WSJT was fine. I think it was just a slightly different click of the relays on HF. But I’m not quite convinced!
Playing around on JT65 on LF I realised that the filters in the FT847 weren’t anything like as good as the FT1000MP. I decided to connect the MP back up. On LF, the lack of gain really wasn’t an issue compared to my findings on 28MHz earlier. So that’s good, I can still use the MP for JT65 on 7 and 3.5MHz.
About then, I saw a tweet from Paul, M3JFM to say he’d just worked ZD7XF on 10m. Now, I’m pretty sure that I haven’t worked St Helena from the UK, so I thought I’d better do something about that.
I found Nigel, ZD7XF on 7MHz easily, but what a pileup! I decided to admit defeat somewhat grudgingly and went to bed.
The cats asked to get up at 0530z so I had a quick check on the bands after testing them out. ZD7XF was audible on 3505. I tried a couple of quick calls, but it was clear I wasn’t getting anywhere. Back to bed!
By 0800z ZD7XF was on 21MHz. The Butternut isn’t great on the band, but it works – just. After just a few calls, Nigel was in the log! Already, today seemed more positive. After breakfast, I thought I had a few minutes before I needed to start my jobs! I checked 28MHz and he was there – not strong, but workable. It took a few goes, but I made it. Thank you, Nigel!
It all worked out in the end. Need to get that patch lead sorted and take a look at the socket on the laptop…..
And a quick ‘get well soon’ to Paul, M3JFM who inspired the ZD7XF chase!
Tim Kirby, G4VXE, is a regular contributor to AmateurRadio.com and writes from Oxfordshire, England. Contact him at [email protected].
No time for radio this weekend……..
 |
| There were train tracks here at one time. |
 |
| 2 clicks into our walk |
 |
| A shot of the Grand River |
Mike Weir, VE9KK, is a regular contributor to AmateurRadio.com and writes from New Brunswick, Canada. Contact him at [email protected].
Are You a Real Ham?
One night I am tuning around on 75 meters and I hear a piece of a ragchew QSO.
“Roger, Roger OM. I am a Real Ham too.” After a minute, I wondered, what other kinds of hams could there be? Unreal hams, imaginary hams, weird hams or phantom hams? I didn’t know.
Puzzled, I grabbed my FCC license and scrutinized it carefully. I was stunned. Right there in the middle of the license, under Special Conditions/Endorsements it says, “None”. Is that a mistake or a typo perhaps? Maybe I am a Non-Ham? I broke out into a cold sweat.
In a panic, I called my old buddy Ralph. Ralph knows everything about ham radio. He has been a ham so long that he says Marconi was his Elmer. Ralph calmed me down and assured me that I was a real ham. Ralph said that all hams are real hams if the FCC says so. Even though some claim only they are the real deal, anybody with a valid license is a real ham. What a relief!
With my fear arrested and my curiosity aroused, I wanted to learn more about the Real Ham phenomenon. Who are they? Are Real Hams like real men, who don’t eat quiche and don’t like change? Well, maybe they eat quiche in secret but they still don’t like change.
Since change is an essential facet of technology and amateur radio is a technology based hobby, then Real Hams should embrace change. Right? Apparently not; instead Real Hams complain about those that did not have to pass a code test, incentive licensing and the ARRL. I don’t get it.
What about the code thing? I’ve heard Real Hams say we should bring back the code requirement. I kept asking myself, what purpose it would serve other than to erect an artificial barrier to entry into our hobby. CW is a challenging and fun operating mode. It is a skill one could acquire if they wanted but is it any longer a core competency for a license?
My old buddy Ralph looks back on his CW days as a golden era. His radio lineage goes way back to the days of spark. Back in that day, that is all there was but even Ralph says the radio art has moved on.
“You mean it has progressed?” I asked.
“Sure”, says Ralph. “Listen kid (everyone’s a kid to Ralph), I got my first car in ‘08(that would be 1908). Back then you had to be a pretty good mechanic to just drive to town. You had to know about radiators, magnetos and manual shifting and you couldn’t call triple A either. Now you just jump in the car and turn the key.”
“We don’t have to rely on CW, like we did back then. With all the digital operating modes, VHF repeaters and the like we have lots of other choices. I haven’t tried it myself yet but I hear that you can even send e-mail by amateur radio.”
I began to feel better after my conversations with Ralph. Maybe I was a real ham after all. I’ll have to try CW after I finish my moon bounce project.
Ron, AE5NO
Ron Litt, K5HM, is a special contributor to AmateurRadio.com and writes from Texas, USA. Contact him at [email protected].
First HF Opera QSO

Yes. Opera now has a QSO mode. I had to update KComm to allow the Opera contact to be logged, so I thought I’d add ROS for good measure. You never know. 🙂
eQSL still won’t accept the mode “Opera” as it hasn’t yet been added to the ADIF specification. It remains to be seen whether the mode catches on. It’s an obvious rival to JT65A but the JT mode has a lot more users. Opera is not time-synchronous and allows a bit more free-text flexibility.
By the way, have any of you Blogger users noticed that you can’t insert GIF images into blog posts any more? When I try, I just get an empty box. I have to save all my images as JPG which is not a very efficient format for screenshots.
Julian Moss, G4ILO, is a regular contributor to AmateurRadio.com and writes from Cumbria, England. Contact him at [email protected].
Trip #4 to Lido Key, IOTA NA-034
In just over a week, I’ll be heading down to Florida to visit family, and, as I’ve done on previous trips, I plan to be operating from Lido Key, IOTA # NA-034 from March 21 to 23. My current plans are to be on the air during my local afternoon between around 1700 – 2200 GMT, on 14.260 or 21.260 (the standard IOTA frequencies), phone only. This is very much a “holiday style” operation, so those operating times may vary, and depending on band conditions, I might set up elsewhere.
For this trip, I’ll be taking my Buddipole and using it on top of the same 8-foot mast that I used last summer in Costa Rica. When I was in Costa Rica, I was able to bungee cord the mast to the railing of the balcony, but since I’m not sure that I’ll be able to do the same with the picnic tables at the park where I’m planning to operate, I figured out how to guy the mast using some lightweight tent stakes, some line, and some small carabiners that I picked up at a local outdoor store. The folks who sell the Buddipole do make a guying kit, but I thought it would be nice to see if I could make something myself.

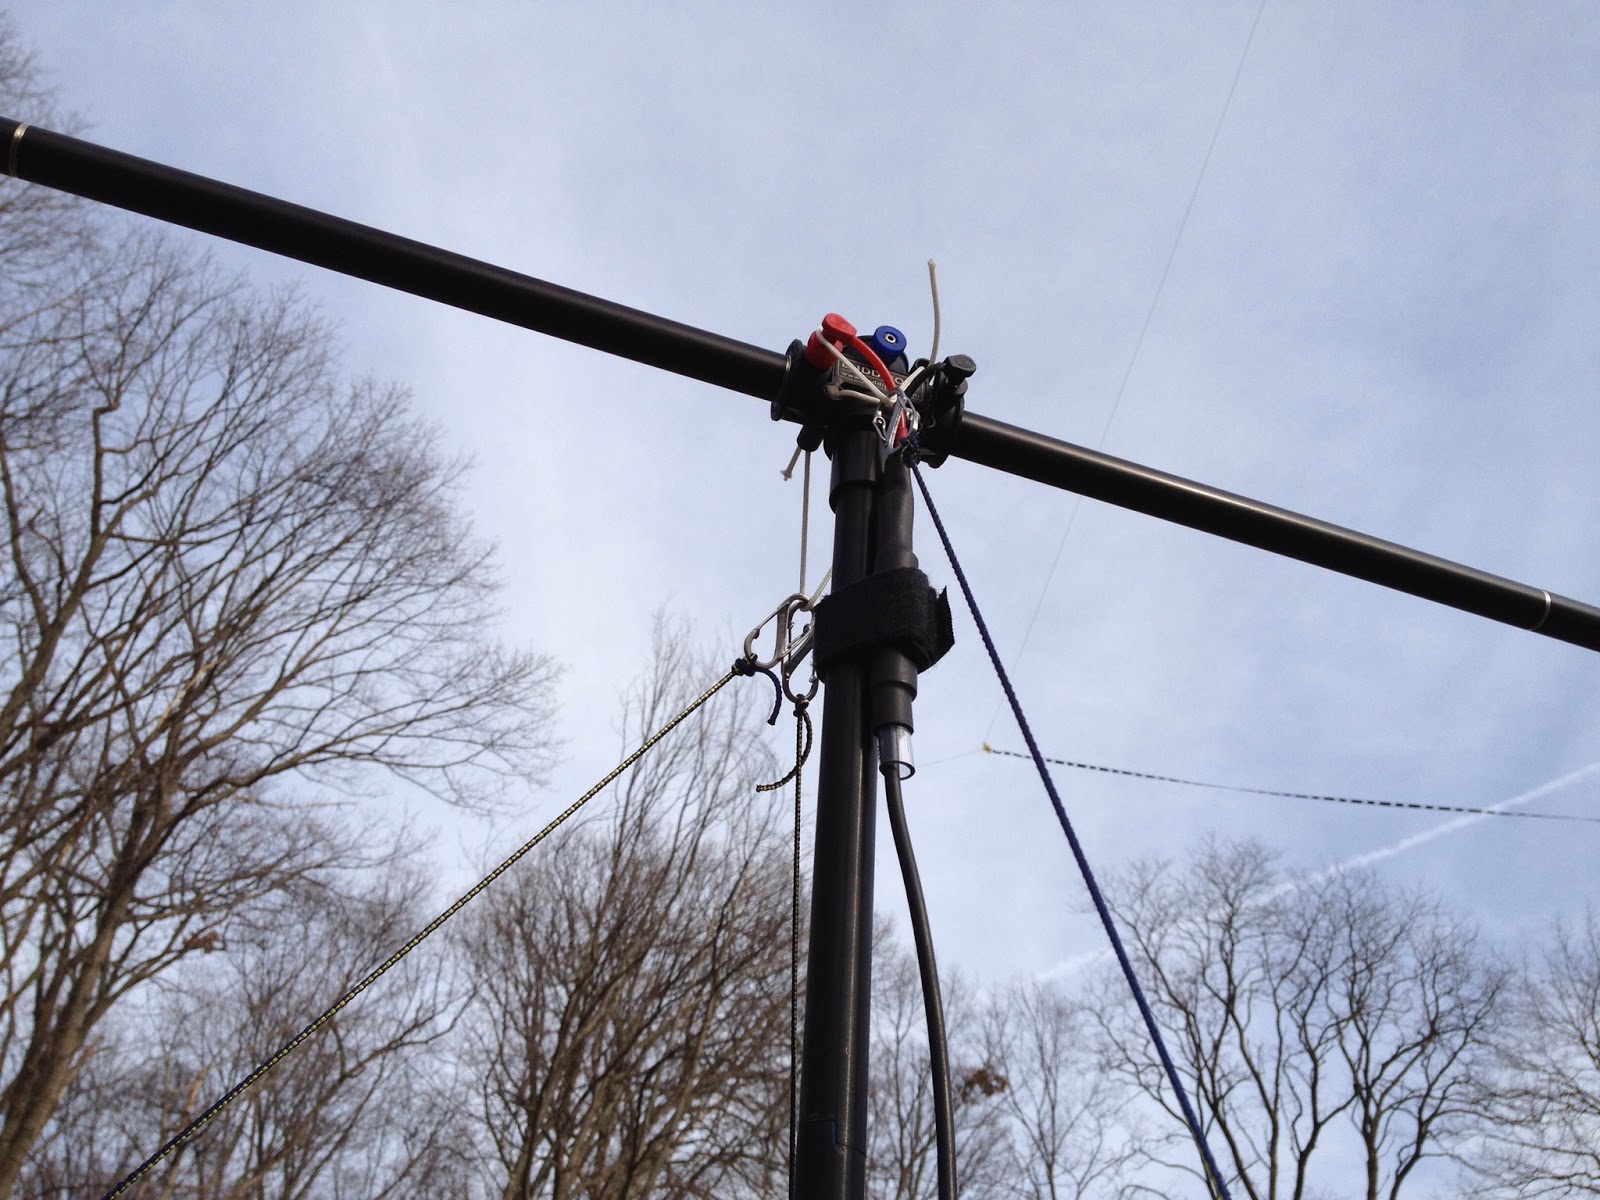
Because I learned the hard way that it’s pretty easy to break a whip if the antenna isn’t supported properly, I first made sure that I could connect the Versatee to the mast (without the arms or whips), attach the lines to that, then stand it up and tension the guys so that the mast seemed stable. I realized that I needed to keep the guy lines probably a bit closer than I would have liked to the mast or I wouldn’t be able to reach the hitch knots to adjust them. While I could have used adjustable knots to connect to the carabiners, in use those would be at the top of the mast and would be unreachable. As it turned out, it worked out pretty well the way I set it up. I had to first roughly estimate the 120 degree separation between the stakes around the mast, and I got lucky on my first try.
 After seeing that this seemed to be pretty stable once I put some tension on the guy lines, I took it down and screwed in the antenna arms, coils, and whips, though I left the whips fully collapsed. I raised it back up, tightened up the guys (actually I just had to tighten one guy because of the way I’d lowered things), and it still seemed pretty stable, so I lowered everything once again, extended the whips (I’d already connected the wander leads to the proper location on the coils) and raised everything up. (If you’re viewing this on my blog page, you can click on the pictures to see a bit more detail, which is particularly helpful for the one showing the antenna fully deployed).
I connected the feedline to my radio (I’d brought my Icom 706MkIIG and a small power supply outside) and the built-in SWR meter in the’706 showed good SWR over the phone portion of 15 meters. I tuned around to see if I could find a station to work and I came across was Pedro, EC8AUZ. We had a nice little chat and he told me that my setup was working well, which was all that I could ask for.
At only 8 feet above ground, I know that the pattern for the antenna is going to be distorted. As I was set up with the broad side of the antenna roughly aligned Northeast/Southwest, it was good to know that I could make a 3500 mile contact due east with that setup.
I still have a few things to do before leaving, but it looks like I should be all set as far as the antenna goes. I hope to work some of you while I’m in Florida. If you’re in the Sarasota area, drop me and email and maybe we can get together for a bit while I’m there.
PC power supplies for Amateur Radio equipment?
 I’ve noticed a few spirited discussions regarding modifying computer power supplies for use with Amateur Radio equipment. On the surface it seems as though they supply the perfect solution: Inexpensive, high current, regulated 12V DC supplies for a fraction of the cost of specialized amateur equipment. Is it really is as straight forward as lopping off a molex connector and replacing it with an Anderson Powerpole?
By design PC power supplies are designed to output a fairly well regulated 3.3V & 5V to the PC motherboard and 12V to the motherboard, fans and hard-drive motors. Modern units are typically rated anywhere from 75W to 1200W which should be a measurement of the output power available from all the 3.3, 5 and 12 volts. Since this isn’t a lab grade power supply you can expect marketing hyperbole has perhaps inflated the power output figures.
Back when my job was to build PCs I had an issue with a server not being able to start its complete complement of disk drives. When I opened the case I found a 300W desktop supply board had been used in place of the 800W board … sometimes you don’t even get what you pay for!
Before you convert your first PC power supply there are two issues that may, or may not, cause a problem depending on your unit.
The first is load regulation or the ability of the power supply to maintain its rated voltage under load. If the output voltage drops too far your rig will shutdown, distort or fail to provide its rated output power.
The second issue is due to the high frequency switching circuits used in switch mode supplies. Depending on the individual power supply there can be adequate to no filtering to prevent radio frequency interference being broadcast to your receiver. Toroids on the input and output lines can help to reduce interference.
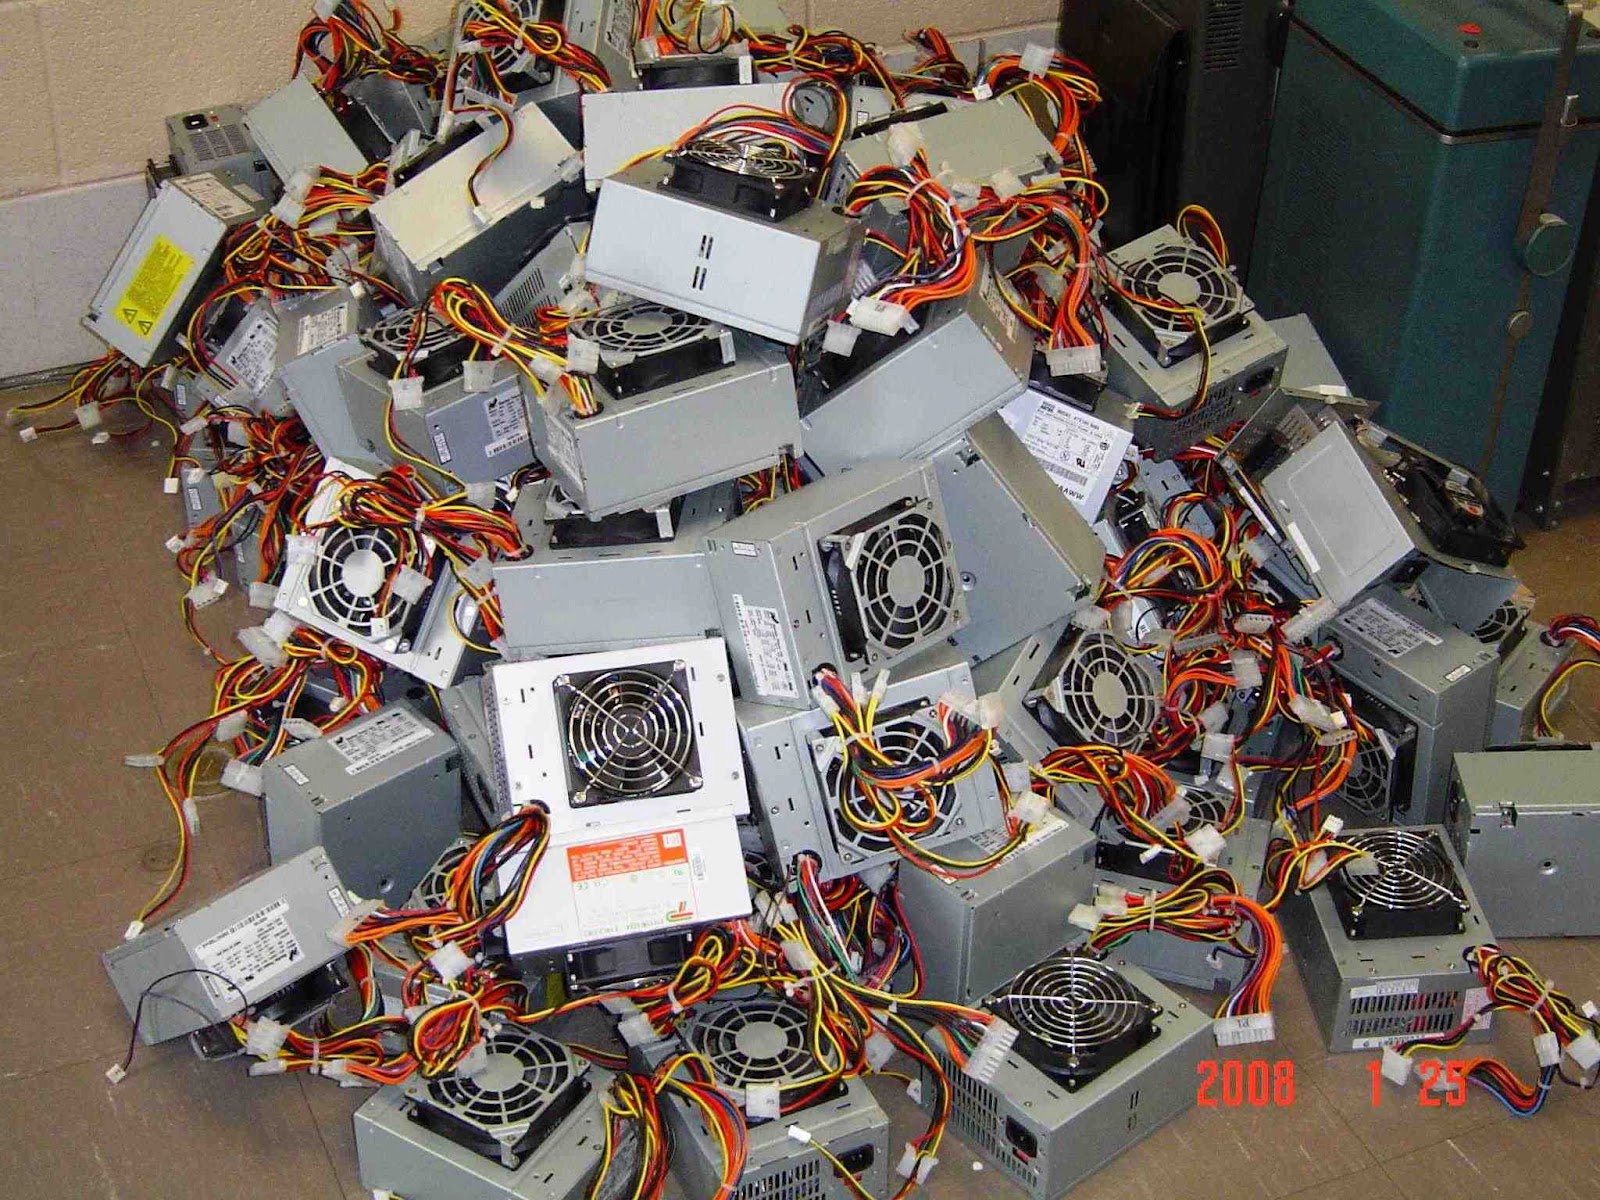 Because of construction differences between models and even between batch numbers for the same model you can never be certain how the power supply you purchase, or recycle, will perform. For the most part people’s experiences have been positive but I have heard of power supplies that were unusable because of RF interference or such poor load regulation that the 12V rail dropped to 11V under load.
Without a motherboard presenting a load and supplying the power-on signal there are a few changes that need to be made to the power supply. Modern power supplies will not enable the 12V output unless the power-on wire is grounded and a load should be placed on the 5V line to help with regulation. Additionally there is usually an adjustment that can be used to raise the voltage above 12V
The following links detail the steps required to convert a PC supply for use with amateur radio equipment. Whether this represents a good investment of your time will depend on your desire to do-it-yourself and the quality of the power supply you begin with. I’ve heard strong opinions either way but I’ll just say that, if luck favors you, you’ll save some money and learn a few new skills in this exercise.
Computer Power Supply Converted for Ham Use
CONVERTING COMPUTER POWER SUPPLIES (Advanced with theory)
Converting Computer Power Supplies to stabilized 13.8 V DC 20 A
Owen Morgan, KF5CZO, is a regular contributor to AmateurRadio.com and writes from Texas, USA. Contact him at [email protected].
 Ham Radio Deluxe |
 W5SWL Electronics |
 Ham Radio Prep |
 KB3IFH QSL Cards  Hip Ham Shirts  HamRadioAuctions HamRadioAuctions Reliance Antennas Reliance Antennas Enigma Shop Enigma Shop |  morseDX  Ni4L Antennas  R&L Electronics R&L Electronics antennas.us antennas.us QRV QRV |
- Matt W1MST, Managing Editor
