 |
 ICQ Podcast S05 E09 – Cam Hams DXperdition (22 April 2012)
Series Five Episode Nine of the ICQ Podcast has been released. News Stories include :-
- Radio Scouting IRLP Calling Channel
- WUST Award
- RSGB Training and Education Committee
- New frequencies for Polish Radio Amateurs
- ESPN Worldwide Amateur Radio Club
- Ham radio operator needed in Canberra
- GB2CRF - Falklands 30th Anniversary
- The 145.500 MHz FM Calling channel
- 50 to 52 MHz available in Portugal from April 26
- Amateurs must protect new radars in 23 cm band
- Spectacular explosion on the Sun
- England completed by G4MD and G4OIG
Your feedback and Martin M1MRB is joined by Hams from the Cambridgeshire Amateur Radio Group to discuss their upcoming Dxperdition.
Colin Butler, M6BOY, is the host of the ICQ Podcast, a weekly radio show about Amateur Radio. Contact him at [email protected].
Battery Evolution
As mentioned in one of my last posts, the lithium ion battery that I had acquired from eBay arrived. There was a “return receipt, signature confirmation” slip in the mail box and I went and picked it up from the Post Office this morning.
Batteries sure are getting lighter and smaller!
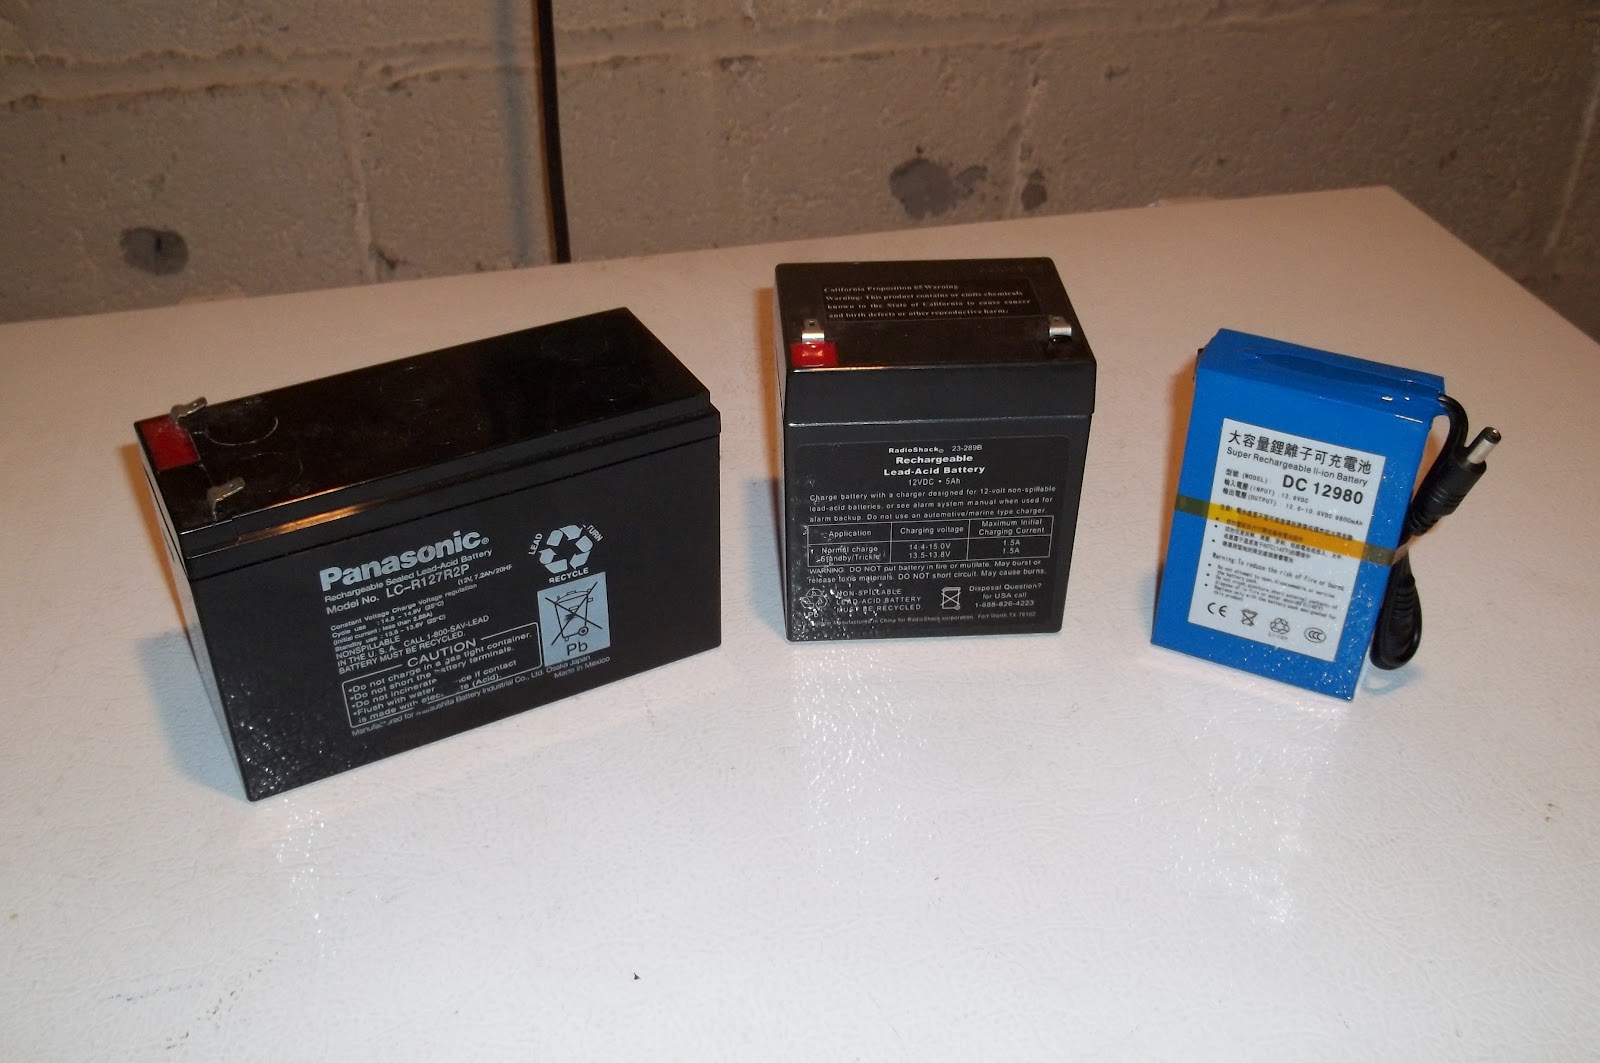
The battery to the left is the very first sealed lead acid battery that I’ve ever used for portable field operations. I’ve had this guy for about eight years now. It’s a 7.2Ah battery, probably about 5 pounds (a tad more than 2 kilos)- about the weight of a bag of sugar (roughly). It came out of an emergency EXIT light that was in the building that I used to work at. I saved it from the dumpster and there was (and still is) absolutely nothing wrong with it. Only drawback for field operations is the weight.
The middle battery is the one I’ve been using for about the last three years. It’s rated at 5Ah and is roughly half the weight of the big battery (approx. 2.5 pounds or about 1 kilo).
“Little Boy Blue” to the extreme right is the lithium ion battery. 9.8Ah and I would say, the same size as a pack of cigarettes. It weighs less than a pound (less than 1/2 a kilo). It came with a wall wart (not pictured) for charging, it has both male and female 3.5mm connectors for output; and it has a little switch on the left hand side with a tiny red LED indicator to let you know you have turned the battery “on”.
More capacity in a smaller, lighter package. How cool is that?
72 de Larry W2LJ
QRP – When you care to send the very least!
Larry Makoski, W2LJ, is a regular contributor to AmateurRadio.com and writes from New Jersey, USA. Contact him at [email protected].
Third-party Kenwood accessories
Ebay is a good place to buy accessories like speaker/mics and headsets for your radios. A few years ago I used it to buy a speaker/mic for my Kenwood TH-F7E. After I sold that radio I used the speaker/mic with my TH-D72. When I tried it with my old TH-205E however I found that PTT didn’t work. I soon established that the reason was the genuine Kenwood accessories used a monophonic 2.5mm plug with only two contacts, tip and sleeve, for mic audio and PTT. The third-party accessories from eBay used a stereo 2.5mm plug with tip, ring and sleeve, but there was no connection to the ring. It looked as if the plug in the radio was trying to make contact in the area of the ring. This obviously was OK for newer Kenwood radios but with the 205E there was no ground connection for the PTT.
 |
| Ring and sleeve of the 2.5mm plug should be connected |
My first thought was to open up the speaker mic, find the wire connected to the ring and connect it to ground. However I soon found that the cable of my speaker/mic had no wire connected to the ring at all. My only option was to try to bridge the two contacts together using solder. This I did, and the speaker/mic then worked with the TH-205E.
The Wouxun KG-699E and the Baofeng UV-3R+ also claim to use accessories with a Kenwood-compatible plug but just like the 205E I found that PTT did not work. I have just performed the same modification to the plugs on a “Kenwood-compatible” headset/boom mic and also one of the earpiece/mics that came with the Baofeng and Wouxun so that they would all work with all four radios. It is easy to do, but you need to take care as it’s easy to melt the plastic parts of the plug and you could easily ruin it if too much heat is used.
Using a sharp craft knife cut away a small section of the black plastic insulation between the ring and the sleeve of the 2.5mm plug to reveal an inner metal sleeve. Open this up a bit more using the edge of a jeweller’s file. Then make a solder bridge between the ring and sleeve. You need to apply heat using the edge of the soldering iron bit to the inner sleeve in order that the solder will bridge the gap. Apply the soldering iron for as short a time as possible to avoid melting the plastic insulation and destroying the plug. I used Blu-Tac to hold the plug in a steady position whilst soldering.
After you have bridged the contacts use a jeweller’s file to remove any excess solder from the plug. You should also smooth the plastic insulation between the plug contacts which may have melted and bulged a bit. The plug should be completely smooth between the contacts, the solder bridge and the insulation. It should plug easily into the socket on the radio. If it needs a firm push then try a bit more filing until it goes in easily. You don’t want the plug to get stuck in the radio nor for it to damage the socket contacts if force is needed to insert or remove it.
I accept no responsibility for damaged plugs or radios as a result of trying this modification. However I have done three of them now with success each time so it is possible with care. Now my “Kenwood-compatible” accessories will work with old and new Kenwoods as well as the Baofeng and the Wouxun.
Julian Moss, G4ILO, is a regular contributor to AmateurRadio.com and writes from Cumbria, England. Contact him at [email protected].
Lyrids meteor shower
This weekend is the peak of the Lyrids meteor shower. I had a quick listen on both 50 and 144MHz this morning before breakfast. On 50MHz, I heard my radio neighbour Neil, G4BRK calling CQ JT6M on 50.230. Listened for a few moments and was interested to hear SM4KYN with a few bursts. Not bad as I was just using the vertical antenna. On 144MHz, I looked on 144.370 FSK441 and heard a really excellent burst from EB3DYS. I did call EB3DYS for a couple of periods but heard nothing more after that.
Tim Kirby, G4VXE, is a regular contributor to AmateurRadio.com and writes from Oxfordshire, England. Contact him at [email protected].
D-STAR: New DCS reflectors and DV-RPTR boards
When I was playing around with D-STAR last weekend, I thought the REF001C and REF005A reflectors seemed a bit quiet. I wondered whether people had got fed up and moved on. I didn’t worry too much as I had some nice QSOs.
During the week, I noticed a tweet from the Bromley Repeater Group saying that they had connected up MB6SS, one of their nodes so that they could access the new DCS reflectors. I’d seen a comment about DCS reflectors when I had installed the new version of Win-DV, but hadn’t had a chance to investigate.
A quick Google provided some useful information and I found the following from Kurt DJ0ABR, ‘The main difference (and the advantage) of DCS compared to old reflectors is, that is does not more use the Header-Voice separation. The separate transmission of headers and voice packets makes sense on RF due to the limited bandwidth. But it causes many routing problems in old reflectors. DCS uses a new format and transmits (over the internet) the routing information with every single voice packet. This makes routing much more reliable. Protocol wise there is no header packet, instead each AMBE packet includes a header which adds a lot of resilience and allows you to pick up a QSO mid over. Operation wise: The main differences are that DCS reflectors use channels A to Z and they have names, DCS001 A is world wide, and is permanently linked to the A channels on all other DCS reflectors. A nice touch. The new client code is implemented already in Jonathans gateways, in the Control Center and in a couple of Icom clients. DCS was invented and developed in February by DG1HT, Torsten. I am helping him in debugging and testing. DCS001 runs at a gigabit intenet node in a high school and is currently designed for up to 700 simultaneous QSOs.’
Very interesting. So I did a little research and found that DCS005B was the main UK reflector, though I can see that they are some regional reflectors, for example DCS005W for Wales and the West and DCS005L for the London area. In practice, the new reflectors work well and seem to provide better audio quality than the old-style ‘REF’ reflectors. It’s also nice that you can pick up a QSO half way through an over rather than having to wait for the start of the next transmission.
Activity on the new reflectors can be seen at http://xreflector.net/neu3/ Also, have a look at the DV-RPTR boards which should provide a cheap route for more people to get involved with D-STAR with their existing equipment. This all seems like a positive step in the evolution of D-STAR and pleasing that it is progressing in a more open direction.
Tim Kirby, G4VXE, is a regular contributor to AmateurRadio.com and writes from Oxfordshire, England. Contact him at [email protected].
DXLab’s software
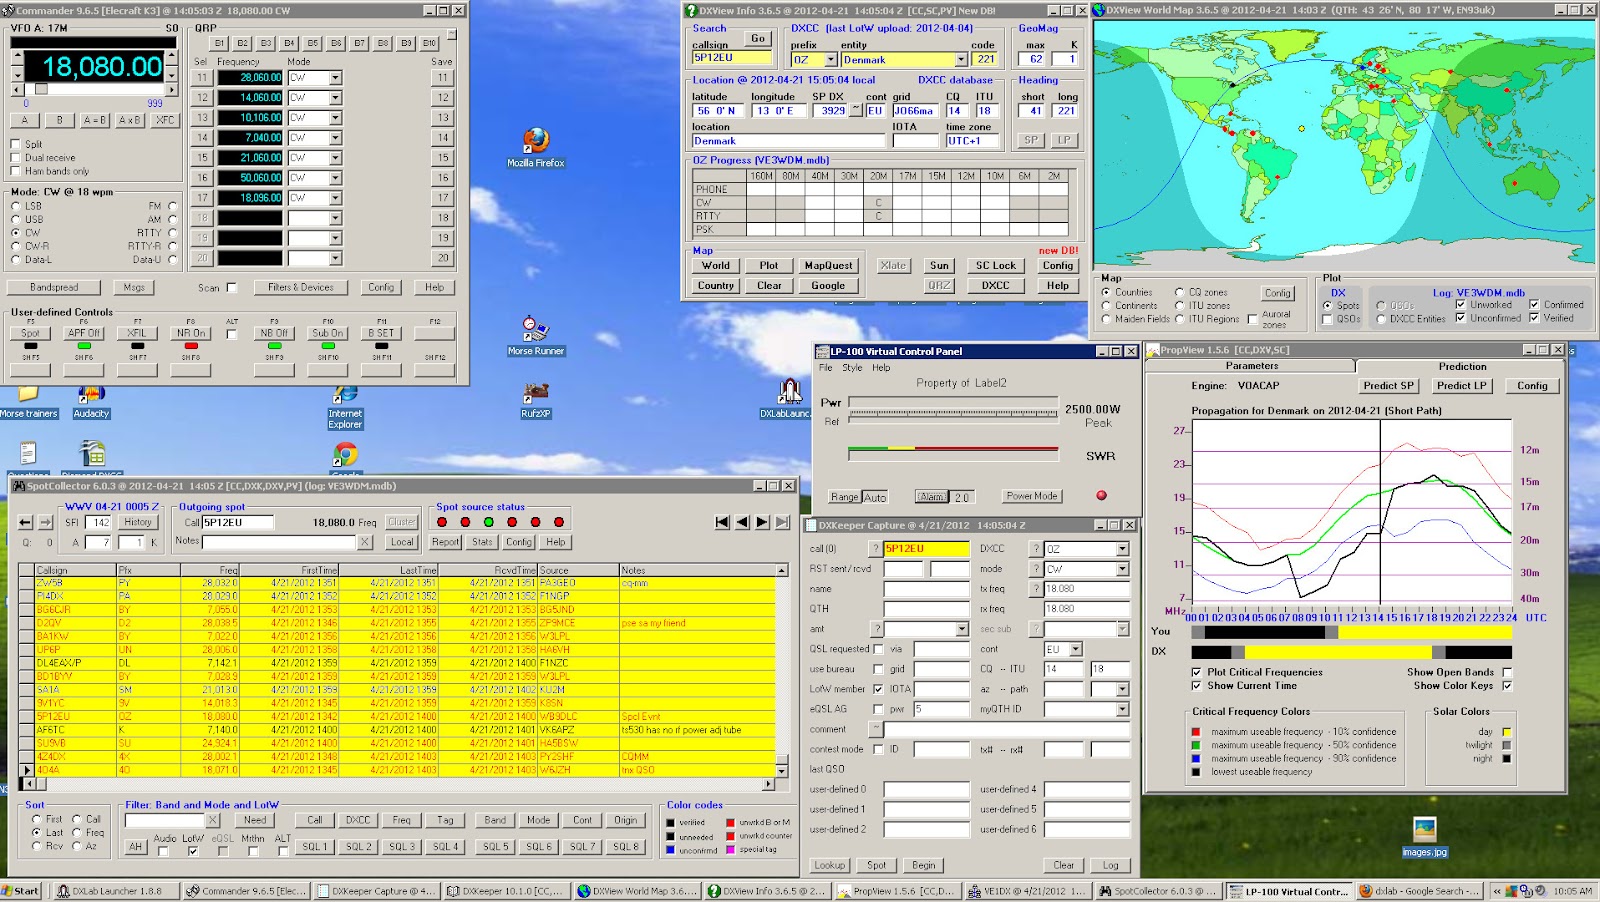 |
| My DXLab's desktop |
- You can pick and choose what applications you want to install.
- Once an application is installed you are able to customize it to your needs.
- Great support, the short time I was running DXlabs they released fixes and upgrades.
- Running all 8 applications did not seem to take up much of the PC's processor.
- Each Application has over the top documentation in great detail.
- It will start up 3rd party applications to run with DXLab. For me so far I have my LP-100A virtual meter starting up within DXLab.
- Make sure you read the documentation to fully understand what each app can do.
- The first application you want to download is called Launcher. This app when up and running at the push of a button install each app you want to try. It also (when configured to) will check for updates of all the programs each time it opens. It will also with one click start-up and shut down all DXLab app's. I made the mistake of not using this program and I manually unzipped, created a folder and installed each application. The Launcher makes installation a painless experience.
- Join the DXLab yahoo group for outstanding support. I posted a questions and it was answered in 20 minutes.
Mike Weir, VE9KK, is a regular contributor to AmateurRadio.com and writes from New Brunswick, Canada. Contact him at [email protected].
KX3–The first 24 hours
As previously mentioned, my KX3 shipped from the Elecraft factory on Tuesday afternoon and was delivered to me in Denver, Colorado via USPS Priority Mail Service. I’ve gotta say for the price, USPS Priority service is the best way to go in most cases. Of course this blog post is not about shipping services and I’ll move on.
Over the past couple of weeks I’ve seen some awesome Youtube videos from hams who have received their new KX3. I see no reason to re-invent the wheel, just search Youtube for Elecraft KX3 and you’ll find these.

My Elecraft KX3 is serial number 57. Perhaps s/n 59 would have been cool, but I’m happy nonetheless. I spent a little bit of time with my KX3 the first evening. I took the time to attach Anderson Powerpoles onto the supplied power cable. I adjusted the tilt legs on the back. Which by the way, in recent days I’ve noticed a lot of discussion on the Yahoo KX3 reflector dedicated to the discussion of the tilt legs. I’ve seen no issues with any binding of the thumb screws. You just need to gently loosen the thumbscrew, lower the tilt leg into position and then re-tighten the thumbscrew. Repeat for the other side. It really is that simple.
I grabbed a short coax jumper and connected the KX3 to my Hustler 6BTV. I clicked the band switch until the KX3 was in the 40m band and turned the VFO. While doing so I read through the manual and tried out many of the features of this remarkable radio.
For the most part, my KX3 will be used for SOTA or Summits On The Air and will replace my Yaesu FT-817. At this time, I’m not planning to purchase the Elecraft amplifier which would most certainly turn this little radio into a nice shack rig. I already own a Yaesu FT-950 which I use primarily for SSB and run digital modes from my Yaesu FT-897. I’m happy with what both of these transceivers do for me in the ham shack.
In all honesty, I was also pleased with my Yaesu FT-817 for field use. I purchased it new about 4 years ago and it’s been a trusty companion for both SOTA activations as well as general portable use. So why purchase the Elecraft KX3?
Like many of you, I began hearing about the KX3 around Dayton 2011. I watched the videos and did some research into Elecraft. Everything I read, heard and watched pointed to the KX3 being a fantastic radio. Then in the fall of 2011, I was bitten by the SOTA bug. Chasing quickly turned into activating and now I’m lucky to have the opportunity to assist one of the coolest SOTA activators I know. Of course, I’m talking about Steve Galchutt wG0AT. Steve appointed me as the Central Colorado regional manager. My role is to promote the Summits On the Air program as well as amateur radio. To date, I’ve conducted three face to face SOTA presentations to local amateur radio clubs in the greater Denver area. I’ve conducted one via Skype to a club in Washington state and I have many more lined up. This opportunity has truly allowed me to broaden my Elmer opportunities beyond my blogging and podcasting efforts. Thank you Steve.
So as I learned more, I realized the KX3 would become a much better SOTA performer for me than the 817. Allow me to point out a few of the differences.
Weight – Advantage KX3
My Yaesu FT-817 weighs in at a little over 2.5 pounds. This includes the internal FNB-85 9.6v battery pack.
The KX3 with 8 AA batteries weighs in slightly less than 2 pounds. While I don’t plan to operate the KX3 solely on internal power, I may not install internal batteries. Note: I didn’t purchase the optional KXBC3 charger.
Size – Advantage KX3
The size differences between the 817 and KX3 are minimal. The 817 measures in at 7 3/4 x 5 1/2 x 1 1/2 inches. The KX3 is much more compact with measurements of 8 x 3 1/2 x 2 3/4. Unfortunately, the comparisons I did a few weeks ago with my 2×4 prototype don’t match real KX3 comparisons. I can still use the Lowepro Apex bag but will not pack the battery pack in side.
Durability and Ruggedness – Advantage 817
I’ll admit this was one category I thought long and hard about. The Yaesu FT-817 is a rugged little radio just like it’s big brother the FT-897. I handle all my gear with care, but accidents do happen and certainly portable operations increase this chance greatly.
Now please don’t confuse this with poor construction or design. The KX3 design just has a larger control panel footprint. This is great and what leads to my next category. However, a little more surface area to get damaged from an accidental drop or other mishap. I’ll just be extra careful.
LCD Display and Control Panel– Advantage KX3
I’m 45, will turn 46 in October. I’ve been using reading glasses for the past 4-5 years. Each year my prescription is bumped up a little. I’m to the point where I can’t read anything without either holding it at arms length away from me or making sure I have my reading glasses with me.
The LCD display on the 817 is a tiny 1.5 x 1.0 (rough measurement) screen. However, the LCD on the KX3 is 4.75 x 1.25. I can read the frequency or any of the other items without my reading glasses.
Portability and SOTA Readiness – Advantage KX3
While the Yaesu FT-817 is an all mode transceiver including HF, VHF and UHF operations as compared to the KX3 which today is HF/50MHz only (internal 2m module coming soon). The lack of 2m or 70cm operations does not impact me and the way I will use the rig. I carry the Yaesu VX8 for APRS tracking and will use that radio for any V/UHF operations.
Speaker Audio Output – Advantage 817
Elecraft has stated from the beginning that headphones or external speakers would be a must for a noisy environment. The speaker in the KX3 is tiny and I honestly don’t see how this could have been avoided. However, I view this as a non-issue. I use a lightweight pair of over-the-ear ear buds for SOTA activations. This is important as in windy conditions or even noisy band conditions, a headset or ear buds will help.
Other Features and Functionality – Advantage KX3
I’ve truly enjoyed operating QRP and have honestly gained much more respect for QRP operations in general since being active in SOTA. Working DX from on top of Mt. Herman (W0/FR-063) opened my eyes to what a little bit of power and a properly tuned antenna can accomplish.
While the KX3 does offer extra transmit power from the 817, I will keep it set at 5 watts and only increase to 10 or 12w when needed. In addition, while I’ve never packed my LDG Z-100 Auto tuner on a SOTA trip, I did order the internal ATU in the KX3. However, I firmly believe a successful SOTA activation starts with a properly tuned antenna and will continue to stick to that process.
The VFO knob is most certainly a major difference between the KX3 and 817. You can really crank up or down the bands with much greater precision and speed on the KX3. In addition, the KX3 allows for direct frequency entry. This makes easy work of tuning up and down the bands.
Of course, another feature set that completely blows the 817 out of the water is the ability for the KX3 to decode PSK/RTTY and CW signals. I’ve played around with this and the PSK decode is spot on. The only problem is watching the text. The text is displayed in an 1.5 x .5 inch area of the LCD screen. It goes by pretty quick. I’m experimenting (with much success) using the PSKer iOS app. I plan to blog soon about this testing.
In closing, and in all fairness to the Yaesu FT-817, the 817 is a great little SOTA rig. There are many SOTA activators and other portable enthusiasts who will continue to benefit from the performance the 817 can deliver. Just how much improved performance I’ll gain from the KX3 on a typical SOTA activation has yet to be seen. I plan to correct this and schedule a SOTA activation in the near future.
Until next time…
73 de KD0BIK
Jerry Taylor, KD0BIK, is a regular contributor to AmateurRadio.com and writes from Colorado, USA. He is the host of the Practical Amateur Radio Podcast. Contact him at [email protected].
 Ham Radio Deluxe |
 W5SWL Electronics |
 Ham Radio Prep |
 KB3IFH QSL Cards  Hip Ham Shirts  HamRadioAuctions HamRadioAuctions Reliance Antennas Reliance Antennas Enigma Shop Enigma Shop |  morseDX  Ni4L Antennas  R&L Electronics R&L Electronics antennas.us antennas.us QRV QRV |
- Matt W1MST, Managing Editor
