Archive for the ‘antennas’ Category
 What a day!
‘Twas one of those days at work where I felt like I was beaten with a pool cue, run over by a bus and then dragged in by the cat.
A case for a KX3
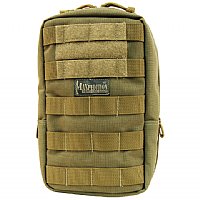
Following a tip on the Elecraft reflector from Wayne N6KR I ordered a Think Tank Strobe Stuff Belt Pouch to use as a case for the KX3. As Wayne suggested, this could be the ultimate compact KX3 carrying case.
 |
| The ultimate KX3 carrying case? |
The KX3 fits easily into the main compartment (after removing the KXPD3) while the secondary compartment has room for several accessories including the removed KXPD.)
Wayne managed to squeeze the KX3, the MH3 mic, a backup mini-mic, the KXPD3 paddle, ear buds, a spare set of 8 AA cells or a 4-cell, 14-V Li-Ion pack, two 25ft. lengths of Wireman #26 “silky” for antenna and ground wire, two 1in. stainless-steel hex nuts (for tossing wire into a tree) a 20-m two-piece telescoping whip (in case there isn’t a tree) a BNC elbow and a BNC-to-binding post adapter (to attach the two wires) into the case. I’m not quite sure how he managed it, but there’s no doubt that with a bit of practice you could get a fully functional portable station in there. CW diehards could dispense with the MH3 mic which takes up the most space next to the KX3 itself. If you use the AlexLoop WalkHam then you could omit the wire and a few other bits and pieces. The belt pouch looks smart alongside the AlexLoop carrying case.
Search for the Think Tank Strobe Stuff Belt Pouch by name and Google will find you the best local supplier.
Good night on the bands
Got QSOs on four different bands tonight – they all seemed to be in decent shape.
CN8KD in Morocco on 20 Meters
UA3TCJ in European Russia on 17 Meters
UT6UD in the Ukraine on 30 Meters
EW7LO in Belarus on 40 Meters
No rag chews tonight – just quickie kind of DX contacts. The QSOs on 17 and 20 Meters were completed through the Butternut HF9V and the QSOs on 30 and 40 Meters were made through the 88′ EDZ antenna. As per the little NA5N propagation box, conditions on all the bands I used were pretty good.
Just for the heck of it, I hooked both antennas up to my coax switch and then to the KX3. You could actually hear the signals being attenuated by the switch. The difference between direct hookup to the rig and going through this crummy switch was like night and day. I’ll have to try and see if I can find a good quality coax switch at the hamfest this weekend to replace this piece of junk.
It would be nice to be able to switch real quickly. Take the QSO with CN8KD for example. When I first heard him, I was on the wire. I called and called and called with no result. I switched over to the vertical and bingo – first try resulted in a QSO. Maybe it was coincidence, but in my mind, in this case the vertical made all the difference in the world. The wire is a much better performer on 80 and 40 Meters. It sure would be nice to be able to switch at the flick of a button.
72 de Larry W2LJ
QRP – When you care to send the very least!
Gremlins Lurk in the Junk Heap
Three weeks ago my EchoLink station went deaf. Thanks to the West Central MN Amateur Radio Club’s antenna analyzer, I figured out right away that the problem was in the feedline/antenna system. Ever since then I have been either too busy or too nervous to go on the roof, so it has remained a mystery . . . until this afternoon.

Antonio Mitchell checking SWR on the Edison Fong J-Pole
Antonio, my son, went up on the roof with the antenna analyzer while I watched from the ground. He did a great job taking all the tape and coax seal off the PL-259, disconnecting the coax from the antenna, and hooking up the antenna analyzer to the antenna with a patch cord. “One point two!” he called down to me. There you have it — it was the coax! I realized what I’d done. Here I had some brand-new coax in my field-kit, but I ended up grabbing a different coil of junk coax and got bitten by a Gremlin. I found the new, already-terminated coil of coax and Antonio swapped it for the bad length, carefully wrapping the PL-259 with coax seal and rescue-tape. In short order we had the station back on the air.
All that, and Antonio doesn’t even get to use it yet. Hopefully soon! Antonio has been studying hard for his Technician exam this week. He is eager to take the test.
Thanks, Antonio, for getting the EchoLink back up and running for all of us.

![]()
Handiham World for 16 May 2012
Welcome to Handiham World.
You can do it!
Today, just as we did last week, we are going to begin with Troubleshooting 101 as part of our initiative to help new ham radio operators (and even some of us older ones) learn how to do some basic troubleshooting for ourselves. Yes, it can be tempting to ask someone else to do things for us. This can become a bad habit when it keeps us from learning new things, especially things that we could – with a bit of practice – learn to do for ourselves. Knowing these basic things can serve us well in the future when no help is available.
Troubleshooting 101

Let’s get to today’s troubleshooting question:
I sometimes use my handheld radio in the car. I can hear the repeater just fine, but I have had complaints that other stations can’t hear me. What’s going on here? Is there something wrong with my HT?
Yes, I’m afraid there is a problem with your radio. The problem is that it has a terrible antenna. Before you complain that the radio has always worked quite well when you used it around the house, let me explain.
Handheld radios are meant to be portable so that they are easy to carry around. Haven’t you noticed that people prefer smaller, lighter electronic devices? So what was once referred to as “a brick” – the venerable 2 meter HT – has evolved to a multiband miniaturized wonder that fits in the palm of your hand. The antenna on the old brink was just about the same length as the one on your new radio, though. These flexible “rubber duck” antennas are the ones that come as standard equipment with a new handheld radio. They have always been terrible antennas, but they are designed to be flexible so that they can bend without breaking and generally survive being dumped into a backpack, stuffed into a pocket, or crammed into a purse. A quarter-wave antenna for the 2 meter band should be around 19 inches long (48 cm), but the radio would hardly be portable with that big antenna, would it? The rubber duck antenna is inductively loaded so that it can be physically shorter but still act like an electrical quarter wave.
This seems like a great solution because now you have the equivalent of 19 inches of antenna in a tiny, convenient flexible stick. Ha, ha, that is a good one. Most of these rubber antennas are more like a “dummy load on a stick”. They are inefficient and lossy. A rubber antenna that came with the HT is probably okay if you are in a good location and not far from the repeater and are not moving around. The rubber antenna can receive okay but is not going to win any awards, but transmitting efficiently is just plain not a happening thing. When you move the antenna around, every slight cancellation of signal from multipath reception becomes a near-dropout. It is even worse inside a car, where the body of the car can block part of the signal and you are nearly always moving. No wonder your friends are complaining about your signal – because it is terrible!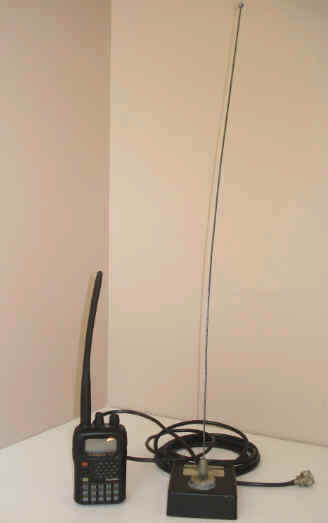
I placed my tiny Yaesu VX5R HT with the somewhat bent from years of carrying it in my pocket next to an old Larson 1/4 wavelength magnet mount antenna. The ACTUAL quarter wave mag mount towers over the HT with its wimpy rubber antenna. If only there were a way to use a quarter-wave magnet mount antenna, or even a 5/8 wavelength mag mount antenna, with my HT it would sure solve my transmitting problem and make the HT more useful as a temporary mobile radio.
Of course there is a way; you just need to get the right adapter to mate the mag mount antenna’s connector to your HT and you are in business, right?
Well, no – it’s not quite that easy. For one thing, you might not have a mag mount antenna. And you may not be familiar with these kinds of temporary antennas, especially if you are not a driver yourself and you ride with a spouse or a friend. Here are some things to consider:
- If you are going to move the antenna around a lot, such as using it on a friend’s car then removing it after you get where you are going, there are tiny, highly-portable miniature mag mount antennas with small diameter coax (RG-174U) with a connector to fit directly onto your HT. Actually, I prefer these antennas over other mag mounts because the light, flexible coax will not put extra stress on your radio’s SMA connector. MFJ makes the MFJ-1722 dual-band mag mount antenna and it is only around $15 – an accessory to your HT that is well worth the money.
- If you already have a more conventional larger mag mount with RG-58 coax, I recommend an adapter with a short piece of RG-174U coax so that the flexibility of the cable allows for comfortably moving the HT about as you use it. Stiff coax will put excessive pressure on the HT’s antenna connector and may eventually break it.
- If you are using an HT with an SMA connector, you may want to consider a special connector adaptor that seats against the body of the radio, taking pressure off the antenna connector.
- Pay attention to the routing of the feedline out the door. It may run through the gap between the door and the car’s frame, but choose a spot where the rubber gasket around the door frame will close gently against the wire.
- Avoid sharp bends when running coax.
- For longer term installations, test the water seal around the coax entry point with a garden hose.
- Place the antenna on the roof of the vehicle or on the deck of the trunk lid if the cable is to be run through the back seat and out into the trunk.
- Be sure the magnet has a serious grip on the metal car body!
- Avoid long, flapping runs of wire across the roof or trunk.
- If you have an antenna that screws onto a magnetic base, be sure it is screwed on tightly before traveling!
- Consider a small, easy to remove antenna that is placed just outside and above a back door. You can easily grab it off the roof and shove it on the back seat floor under a mat when you want to conceal the fact that you have a radio in the car or if you need the extra clearance to get into the garage. While you’re at it, unhook the HT and put it in the glove box or take it with you.
- If you are serious about using an HT in the car, you might also pop for the optional car charger. All the HT manufacturers offer them, and they can be in the glove box with an extra rubber duck antenna when not in use. You will likely need high power while operating mobile, and that can run your battery down quickly.
Once you start using a “real” antenna mounted outside the vehicle, you will wonder how you ever got by with an HT and the rubber antenna.
Email me at [email protected] with your questions & comments.
Patrick Tice, WA0TDA
Handiham Manager
Wow!
I saw this on eBay today:
Someone in Spain is auctioning off NorCal Doublets. This particular one has 12 bids on it with about 2 1/2 days to go. High bid is $31.00 US.
Holy Shamoley! I have to start getting busy building NorCal Doublets and posting them to eBay !! I have built several of these from ribbon cable as well as light gauge speaker wire. They do work decently well, and they are cheap to make. For what I paid in materials, $31.00 would be a serious return on investment.
The handing out of Skeeter numbers is going well. If you hit the extreme right tab above, entitled “NJQRP Skeeter Hunt“, you’ll get the rules and you’ll be able to see the roster as it currently stands. I am going to update it as often as I can. As of this very second, 39 Skeeter numbers have been handed out.
Ward Silver of the ARRL has been notified, so The Hunt will appear in the August “Contest Corral”. I will send an e-mail to CQ this weekend, also.
Ahhh! My birthday present arrived in the mail today – the DCP paddles from American Morse. Tiny little package for a tiny little key. I hope to start the build this weekend and will post some photos.
The kids (including yours truly) want to see “The Avengers Assemble” this weekend. Hope I can get tickets – all local shows around here for tonight are already sold out.
72 de Larry W2LJ
QRP – When you care to send the very least!
B&Q Beam
I’ve committed to ‘presenting’ the B&Q beam to the club in a couple of weeks so I better get on making it. The idea is one that has been done a few hundred if not thousand times over. Give some new / inexperienced hams the opportunity to build a perfectly adequate 3 element beam for 2m from parts found at a local hardware shop. In the UK B&Q is just about everywhere and it supplies just about everything, apart from the thing you want, generally.
Seriously the design is taken from any of your favourite calculators. I have found that they vary slightly against the original maths but I know my Sotabeam works very well so that’s a good starting point for dimensions.
Costs to date are in the region of a few quid but by far the most expensive parts are the nylon bolts used to hold the elements. I’ve bought a bunch so I’ll have a few attempts at drilling straight through the nylon without heating it up too much.


