Author Archive
 CW Part 3
I thought I would post another in my series about learning CW. You can go back and find my previous two posts if you would like to catch up.

I wrote in July this year that I had made a single CW contact this year, which was a big mess. Since then I have have completed the CW Ops Academy Level 2 course. I have to say that this course helped me a great deal. For those not familiar with CW Ops Academy, more information can be found on their web site. Their courses are highly regarded and are very good. The goal for our class was to be pretty solid at about 15 wpm receiving and sending. I didn’t quite hit that goal, but I did improve a great deal comparing my ability before and after the course. I probably was not as prepared for the class as some of my classmates were. Also starting a new job, my practice time was interrupted a bit as well.
Since then, I have logged about 40 CW contacts. I am not able to spend a lot of time operating and squeeze time in here and there. Most have been quick, QSO party type contacts. A few have been short contacts trading signal reports, name etc. I have yet to get brave enough to try a slow rag chew, but will someday soon.
The highlight of my short CW operating career was making a CW contact with VP6R on 15 meters. This was the Pitcairn Island DXpedition. I tried making a contact via SSB phone and grew frustrated as I was unable to succeed with my small station of 100 watts and a wire antenna. I decided to try CW and found them operating on 15 meters one afternoon and start listening. I understood the exchange, figured out the split operation, and waited for a lull in the pileup. When VP6R called CQ, I transmitted my callsign and heard them respond with my call and we completed the exchange! It showed up in Clublog a day or so later. I experienced the ability of CW getting through where I could not with SSB phone.
If you are thinking about learning CW or just beginning, I want to say it’s possible and you should be able to learn it. I seem to be learning a bit slower than some people, but I am making steady progress. I am using several tools in addition to the CW Ops Academy materials. My favorite resources, but not a complete list be far, have been:
- CW Ops Academy Classes (I & II). I am not ready for Level III yet. The courses are free and well worth the time and effort.
- K7QO Code course. I have copied all the files to my phone and can play them in my car when I don’t have passengers.
- https://lcwo.net/ Free online lessons and exercises.
There are many other resources for learning CW. There are a lot of phone applications for both Android and iPhone, many other websites and programs you can download and install on your local computer. Those listed above were just three that I use the most.
Good luck learning CW & 73!
CW Part 2
In 2016, I posted that I was learning CW by taking the CW Ops level 1 course. I did complete the class, made two on air QSO’s then life got in the way of the ham radio hobby and until recently, I left CW alone. In January this year, I decided to get started again and set a goal to make 100 CW QSO’s by the end of the year.
I started reviewing the CW Ops materials I had from 2016. I also copied the all the K7QO code course mp3 files to my phone so I could listen to that while in the car. In addition to those two things, I am also trying to listen to live QSO’s on the radio. Most of them go too fast for me to not miss a bunch of characters. Some QSO’s are difficult due to timing or no spacing. I heard a CQ call that sounded like “CQCQdeCallSignk”. There were no spaces in between the characters or words. One long string of dits and dahs.
So far, I am making progress. I relearned the alphabet, numbers and a few punctuation marks, and am trying to gain faster recognition so I can understand more.
I did make my first CW QSO of the year last week. It was a bit of a mess but we managed to actually exchange enough info to make an official QSO! That lead to an exchange of emails and this fellow ham and I made another scheduled QSO and he’s going to help me make more so I can practice CW! Gotta love the ham radio community!
If anyone is thinking of trying to learn CW, do it! If I can do it, then I think most people could do it as well. It’s going to take some effort and time but what doesn’t? 73.
K5A Special Event Station

On Saturday, August 11, 2018, the Bella Vista Radio Club will be operating a special event station at the Shiloh Museum of Ozark History in Springdale Arkansas. This is to celebrate the 50th year anniversary of the museum. We will be operating on the museum grounds from the General Store. Listen for us on the air starting Aug 11, at 1300Z. Operations will conclude at 2300Z. Two stations, one SSB and the other CW, will be operating on or near 14.250, 14.035, 7.250 and 7.035.
I will be participating part of the day, likely on the SSB station. I may spend some time trying to listen to CW to see if I can decode it yet! Gotta work on that!
For more information see the following links:
ARRL Link
Bella Vista Radio Club Link
Looking forward to having a QSO with you on Saturday!
DMR Hotspot
There is a lot of blogs, forums and place to get information about various aspects of our hobby. Ham Radio, as you all know, is a diverse hobby with a lot of different ways to enjoy it. This post is going to be about my learning and stepping in DMR. As with most of my posts, this is aimed at someone just looking at and thinking about diving into DMR. If you are a seasoned DMR operator, then you likely know all this already.
A friend of mine brought an inexpensive TYT MD-380 DMR radio to a club meeting and told us about DMR. He uses it a lot when he travels around a two state are for his job and loves it. After that, I decided to order the same radio and see what DMR was all about. This friend sent me his code plug and when I looked at it I was lost. He had all the repeaters for two states, lots of talk groups and lots of operator call signs. It was a lot to digest for someone who didn’t know how to program a DMR radio.
I decided to take a step back and learn some more about how DMR works and how to do the programming. I wanted to start simple and begin my code plug from scratch. The closest DMR repeater to my house is about 20 miles away and with all the hills around Arkansas, I cannot hear it with the HT antenna. I figured putting together my own hotspot would be the ticket as I have three Raspberry Pi’s sitting around doing nothing but collecting dust, so acting on some advice from more experienced hams, I ordered a DVMega board to go with one of the Pi’s.
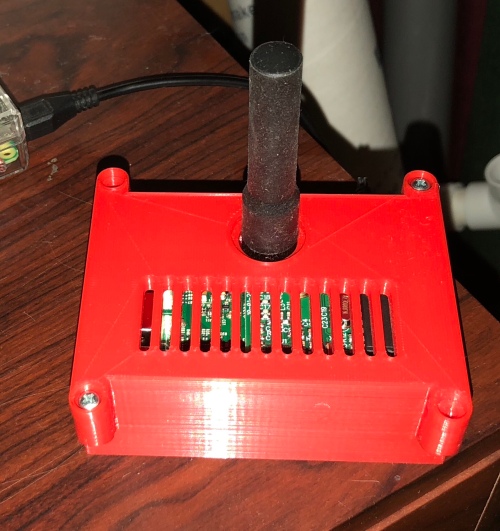
I asked a friend with a 3D printer to print this case for the Pi and DVMega from Thingiverse.

The completed Pi, DVMega combination put together and ready to go. Yes there are two screws missing. I don’t know that I need them so I left them out.
For storage for the Pi, I used a Sandisk class 10 32GB micro SD card that I already had. It is important to use a decent storage card so the performance isn’t worse than it needs to be. One of these cards is less than $15, so it is not very expensive compared to the cost of the entire hotspot project.
One could download Raspian and install all the software separately but there is an image already created that is very popular called Pi-Star. It is essentially Raspian with MMDVMHost, DStarRepeater and other software included. It is an easy way to get everything you need for DMR, DStar, P25 and more digital voice modes.
Pi-Star can be downloaded from here. Once the image was downloaded, I used the Linux dd command to write the image to the card.
After inserting the card into the Pi and booting it up, there are two very important steps. The first is to expand the image to use the entire card. When first written, a small portion of the space is used and a command needs to be run to expand the file system to use the rest of the space. That command is pistar-expand. The second important thing to do is to make sure the image is updated. The Pi-Star creators provide two commands for doing that. pistar-update / pistar-upgrade which are similar to the Raspian apt-get-update and apt-get upgrade commands but do so for the operating system and the software included in pi-star.
To setup the Pi-Star software, I followed along with this page:
https://www.toshen.com/ke0fhs/pi-star.htm
There is a lot of information on this site in addition to this page related to DMR. It was worth browsing around and finding information that I didn’t know.
After configuring the hotspot, I was able to verify that it connected to the BrandMeister Network.
The next step was to program the TYT MD-380. I had to choose a simplex 70cm frequency. After consulting the band plans and looking at the Arkansas repeater council page, I was able to choose one to use.
I won’t go into a lot of detail on programming the radio as there are a lot of YouTube videos and web pages describing that process.
I listen to the Hamradio 360 Workbench podcast and they use a talk group that I programmed into a channel and was able to hear some of that traffic. I also made a call and confirmed that I was able to transmit on the talk group as well as receive.
My next step is to find other talk groups that I might want to listen to, and determine how I will use DMR going forward. I am planning on taking the hotspot on business trips and possibly use it in the car for DMR mobile. I’ll figure that out as I go along.
Overall the process was not difficult, but took some time researching how DMR worked so I could understand the programming better. I used many web resources along with several YouTube videos. I still have a few more bookmarked to watch but I am getting a handle on it.
Comments and questions are welcome.
Portable Station Build – Part 3
I am sitting here watching the NFL playoffs and remembered that I never posted my final post about my portable station build. I completed the build last year. I say completed, but of course that does not rule out future modifications. I am a ham after all right?
The major change from the last post to this one is the addition of a front panel on the lower portion that allowed me to add connectors for power and antennas easily in the front of the box.
There are two antenna connectors on the left for the FT-857D, one for HF and the other for VHF/UHF. The HF jumper actually is connected to the antenna tuner and there is another jumper goes to the radio. There is also a VHF/UHF connection on the right for the FT-8800R. The power connector I salvaged from a computer power supply and made a power cable that plugs into the Powerwerx power supply.

The last picture is the setup in action at Field Day. I was running PSK31 with my club on 20m and had a good time. You can see that the radio on the left is running and there is no power connector in the front. In this picture, I have a 35 amp/hour battery under the table feeding power into the RigRunner mounted in the back of the rack. I was able to run low power digital modes all day and into the night. I still had power left over when I went home.

I have been happy with the rack that I built. Lately I have thought about splitting the radios apart into their own rack as I have found that I don’t use both at once usually. There are also events where I need just the FT-8800R and don’t need the HF gear. Having the FT-857D along for the ride does give me a spare radio if something were to malfunction with the FT-8800 during an event I suppose. So for now, this is the result.
K5UNX

CW Filter for my FT-857D
Last year I decided that I wanted to learn and use CW. To that end, I enrolled and completed the CW Academy Level 1 class with the CW Ops group (http://www.cwops.org/cwacademy.html). I have 2 CW QSO’s under my belt and I need to get on the air and make some more. Ion preparation for that, I decided to get the 500Hz CW Filter to add to my FT-857D. The radio has two slots for optional filters. Looking online, it seems the filters for the FT-857D are getting harder to find. I found one on INRAD’s web site and ordered one. It came a few days later and sat on my desk for a couple days. being Saturday and getting some things done, I decided to install it. I found it’s really very easy to install this filter.
To start with, there are 7 screws that hold on the top cover of the radio. 2 on each side and 3 on the top. The labels are simply my way of remember where things go in the back of the radio while it’s in my portable rack.

After removing the cover the locations for the filters are in the back left corner, as shown in the lower left portion of the photo below.

An up close look.

The filter is pretty easy to orient. There are 3 pins on one and and 4 on the other so it’s hard to get it backwards. There was also a reminder from INRAD that the circuit board went down and the label faces up. Here is after the installation which is simply pressed in.

After the installation, I wanted to make sure it was recognized by the radio so I powered it in and looked at the filter menu option and the 500Hz filter showed up as option B.

Now all I have to do is get on the air! When I do that, I will try to remember to make a video demonstrating how the filter affects reception of CW signals.
If you have a FT-857(D) and would like a CW filter for it, you might put this project on your list. I can imagine a day when these filters are really hard to find!
73!
K5UNX

CQRLog CAT control for FT-857D
My last post, I talked about getting Linux setup for my new ham laptop. This is a short post to cover another small step in that process.
Tonight I was working on getting Rig Control working for my FT-857D and CQRLog on Linux. A lot of times, when I read posts like this, or watch youtube videos, people ignore the hardware side and just focus on the software side of things. I am going to try and cover both.
The hardware setup is simple. I am using the programing cable (CT-62B cable) that came with my RT Systems software to connect the CAT port of the FT-857D to a USB port on the laptop. Windows will see this cable a COM port, in my case, COM3 when I booted to Windows.
I found I had to install a couple things in Linux in order to get this working properly. When I intalled CQRLog, hamlib was installed along with it. I also had to install a package called libftdi1. When I look at the output of “dmesg” I see that the CT-62B cable shows up as ttyUSB0 which is the name of the serial port in Linux that I am going to use to communicate with the radio.
In CQRLog I set the following:
- RIG Model = 122 FT-857
- Device = /dev/ttyUSB0
- Serial Speed = 4800 (This is what the radio is set to)
- Check the box for “Run rigctld when program starts”
Everything else on the TRX control setup in CQRLog is set as default and not changed from the installed values.
One last Linux setting, in the /etc/group file, I had to add my user name to the “dialout” group. This can be done with the command usermod from a terminal. In openSUSE which is what I am running, I ran the command “usermod -G dialout k5unx”. I then logged out and back in and started up CRLog. When I opened the TRX control window the frequency matched what was one the radio and when I spun the radio dial, CQRLog changed with it.
More to come as I get up and running with Linux on my ham radio laptop.


