Author Archive
 New and Improved 9:1 Un Un
My latest antenna uses a 9:1 Un Un. That’s a funny word isn’t it. It means Unbalanced to Unbalanced. It matches an unbalanced coax feed to an unbalanced antenna. The bonus here is that I can operate on 7 different bands using the same 35 foot wire antenna!
I had to change antennas every time I changed bands the old way. I guess this means I’ll have 7 single band antennas for sale soon!

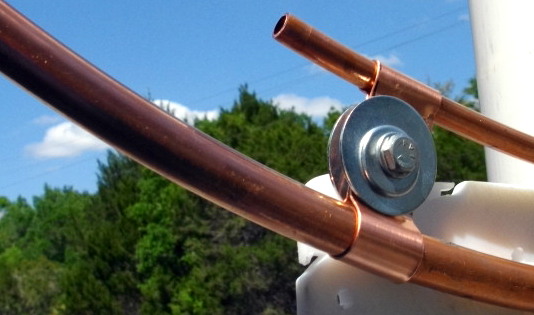
Un Un Mounted on my porch rail
Note the bungee cord in the back. It allows for strain relief when this antenna is mounted over a tree limb.

Torroid on the left and PL 259 on the bottom.

Reinforcing block at the wire end of the Un Un. Note the hot glue holding the block.

Strain Relief for the wire lug.
I’ll use this antenna in the park, portable. Strain relief keeps the wire lug from separating from the antenna wire.
http://www.earchi.org/92011endfedfiles/Endfed6_40.pdf
I got the diagram and physical layout here. I added the bungee for strain relief and the reinforced ends. The Reinforced ends allow me to mount this antenna horizonatally, from my condo porch to the nearby Live Oak Tree.
Jim Cluett, W1PID mentioned this un un kit in a recent post. Thanks Jim. Thank you to the ‘Emergency Amateur Club in Honolulu for the PDF for this project.
73 de AA1IK
Ernest Gregoire
Pizza Box Computer Screen Sunshade
Its always difficult to see a computer screen in bright daylight. Here in Florida, there are numerous pavilions with roofs over them and that helps a lot. Something extra is usually needed on a bright sunny day. I had a pizza today and while I was waiting for it to come out of the oven at the Pizza shop, I asked the cook if I could buy a couple of extra boxes. I told her what they were for and she gladly gave them to me. The $4 tip didn’t hurt that situation I’m sure!

I’ll make the next one look prettier.
I’m sure that I’m not the first one to come up with this idea. But here is my version of the Pizza Box Sunshade.

The interior of the box is pretty dark. Note the clear packing tape holding the sunshade together.

I did this job by myself, so I didn’t have anyone to hold the box in place while I applied the tape.
Using ordinary paper staples was a mistake, they leave sharp places to stab your fingers with.

Cheap and workable, the Sunshade should last a while. I’ll collect pizza boxes to keep me supplied.

It took 3 Pizza boxes to make up this sunshade, and it was worth every bite of Pizza!
I took this photo with a flash to show the interior of the sunshade.
73 de AA1IK
Ernest Gregoire
A Great Day for QRP

Right on the Gulf of Mexico, not 50 feet from the water, This is my favorite venue for QRP.
The crosses are a memorial to people that drowned in a freak storm that blew in from the Gulf Of Mexico, unannounced and unanticipated. This is a beautiful spot for ham radio operation, (bug spray required)!

MFJ push up pole is neatly deployed from the 2 inch towing receiver on the back of my truck. This is the first time I tried it out. There is a 30 meter EFHW, End Fed Half Wave antenna attached to the top with a rope and pulley.
Dave, K4DFG and I operated QRP from this park today. He worked 20 meters. I worked 30 meters. Both of us use the PAR EFHW, antennas. They are very easy to put up and take down.

Kx3 for a radio, and a computer for logging and transmitting CW,
I worked a guy in OK who was also QRP and very glad to be working QRP and is back on the air after a long lay off. We hit it pretty good here today, they just finished mowing the grass as I set up.

Dave used his FT817 and worked a couple of guys in Texas.
No goats here, sorry! No long hike, just a drive up and plop!

Hiking with all this stuff is unthinkable. But for a drive up and plop style of operating. I take extra parts, batteries , just in case!

Fiberglass electric fence post keeps the terminal end of the EFHW off the ground.
The coax is the ‘other half’ of the antenna. I try to make sure its close to a 1/4 wave long on whatever band I happen to be on.
This seemed unnecessary today on 30 meters, the coax was a bit short of that figure but it worked well anyway.
We had a great time, made a few contacts and enjoyed the beautiful venue.
Air boats haunt this very shallow cove so its a good idea to have noise cancelling headphones but even then, they are pretty loud. Only one went by today.
72 de AA1IK
Ernest Gregoire
Power Pole Connectors Added to Radio Shack 3 Amp Power Supply

POWER POLE ADDITION TO 3 AMP POWER SUPPLY
I wanted a 3 amp power supply for my Kx3. The 12 volt ‘laptop’ power supply did not quite have the ‘chutzpah’ to charge the internal batteries, all the way!
I bought it from local ham that no longer used it and wanted to make it compatible with all my other gear. I use Power Pole connectors on all my radio gear including accessories. Manufacturers are ‘Getting the picture’ by using Power Pole connectors which are superior to all other types, (in my opinion) but they are catching on slowly. My first thought was to simply place one power pole connector on the face of this Radio Shack 3 Amp power supply. (See the rectangle on the face plate)

Second Option Layout
It was a mistake to use a ‘permanent marker’ to layout the face plate cut out, but fortunately, it went away with the cut out! This, proving once again, that not all my original ideas are good ones!

Cut Out Portion of the Face Plate is Shown Here.
The internal components were removed to facilitate soldering.
There is not a ‘whole lot’ of room inside this power supply, but more than in some I’ve seen. None the less, I opted to remove the internal components to allow a good solder job from the Power Poles to the original binding posts. I covered the splices with heat shrink tubing.

I used a Dremel Tool to remove the lower right corner of the Power Pole face plate and a hacksaw on the cut out.
This was necessary in order to keep the cigarette lighter socket where it is. A good filing job was necessary to smooth out the hacksaw and Dremel tool marks. I used a cloth to shield the circuit board and transformer from flying metal chips, then vacuumed out the inside very, very well. The last thing I need in a power supply is a ‘rogue’ chip of metal bouncing around inside it. I also cleaned out the interior of the cabinet with Q-tips and rubbing alcohol to make sure I got them all. The voltage was off a bit, but that was easily adjusted by turning a small pot on the circuit board. It reads a prefect 13.8 VDC now.

This cigarette lighter plug fitted with Power Pole connector is such an example of the versatility that these sockets bring.
This particular plug works in your car as well, opening a myriad of possibilities for charging and lighting. This socket is very useful for accessories of all kinds.

My pocket flashlight is powered by 4.2 V batteries that can be charged via the cigarette lighter socket.
Cell phones usually have such an adapter too, as do Kindles, or MP3 players.

So here you have it, a 3 amp power supply modified with Power Pole connectors.
This little power supply now sits on a coffee table powering my Kx3, among other things. Please feel free to contact me for information about doing modifications like this one. Please note, this is a ‘regulated’ power supply, and not a ‘switching’ power supply. Radio Shack no longer makes this model. At least I could not find one like it in a Radio Shack Store search online. You might find one like I did, by looking for a used one.
73 de AA1IK
Ernest Gregoire
Links http://www.powerwerx.com/
http://www.dremel.com/en-us/Tools/Pages/ToolDetail.aspx?pid=4000
Six Meter Summer

My Buddipole Antenna, Configured as a 2 Element Yagi for 6 Meters
The ribbons are to keep me from poking my eyes out on the end of the whips.
Here, I’m trying the antenna out in my driveway before I take it to the beach.

Kx3 QRP Radio
Six Meter Summer!
 This pavilion is my favorite operating spot at Hagen’s Cove.
It overlooks Dead Man’s Bay, on the Gulf of Mexico in Perry Florida.
I’m going to spend the summer playing around with my Kx3 on 6 meters. The antenna here is a Buddipole, configured as a 2 element Yagi. Its easy to assemble in the field, so I’ll take it to the beach (Hagen’s Cove) and try to make some contacts with it. I’ve been a ham for 22 years but have never done much with 6 meters. This will be a 6 meter summer for me. Join me, I’d love to have a ham radio buddy to share the adventure with.
de AA1IK, 73
Multi-Band 4 Foot Magnetic Loop with Gamma Match

4 Foot Diameter Magnetic Loop In Operation
As my mag loop projects progress, I’m learning a lot about building them and using them. This antenna works on 17, 20, and 30 meters, with the best bandwidth on 20 meters. The bandwidth on 17 and 30 is quite small but usable. There is a 20 KHz bandwidth on 20 meters. I used a vacuum capacitor to build this particular loop for 100 watt operation. The air capacitors are good for QRP but will arc over using much power over QRP levels.

4 Foot Magnetic Loop Antenna with Gamma Match
This photo was taken before I trimmed the Gamma Match.
I didn’t know how long the Gamma Match should be, so I made it long enough to allow for trimming after the match to 50 Ohms was made.
This is the first mag loop that I made with a Gamma match. I like this match better than the usual Faraday feed loop that is featured in my previous mag loop antennas. Matching is easy and building the Gamma match is not difficult. I’m planning to build other smaller loops that will also feature the Gamma match. The smaller loops will target 10, 12, and 15 meters. Loop size determines which band its best suited too. Although it is possible to get more bands on one loop, the bandwidth is small and the tuning ‘dip’ is very sharp. I found it better to limit the number of bands in favor of wider bandwidth and antenna efficiency.
Please look up my previous posts for more details on parts and plans.

Here is a good close up of the clamp.
(Before Trimming)
Gamma Match After Trimming. This enables a 50 Ohm Match for all three bands.

Gamma Match on the left, PL 259 in the center and, Tuning Aid Stick (PVC) pipe , on the right.
The vacuum capacitor is ‘tuned’ by twisting the PVC pipe that is attacked to it with a cotter pin.
Tuning the cap to the ‘loudest noise’ on the air will put you in the ball park for operating.
You can also use an antenna analyzer if you want to know the exact SWR, and RR of the antenna.
Tuning with a radio attached is fast and easy.

Making the clamp for the Gamma Match

Soldering The Back Plate and PL 259

Removing The Oxidation Before Soldering
The main loop is 5/8 inch, soft copper tubing.

Close Up of PL 259 to Gamma Match Joint
The center of the PL 259 had a #10 solid copper wire inserted and soldered in place.
The Gamma match is 3/8 inch soft copper tubing.
This part of the job was done with a soldering iron, the rest was done with a plumbers torch.

Handy ‘third hand’. A clamp to hold the Gamma match in place while I soldered it.
My town was going to hire a ‘Mad Scientist’ but it couldn’t afford one, so they settled for a ham radio operator instead. Me!
73 de AA1IK
Ernest Gregoire
5 Foot Diameter Magnetic Loop Antenna

A bonus picture here. The one on the left is a 3 foot in diameter loop.
Note: The little box at the bottom of the small one contains an air variable capacitor for tuning.
Compare it to the 5 foot in diameter loop on the right. ‘

5 Foot Mag Loop
I made a QRP CW contact with this mag loop from right where it stands in my drive way.
 Small Loop Feeds the Big One

Home Made Capacitor Clamps.
Home made cap clamps. The clamps are soldered to keep the contact resistance low.
This is very important with High Q antennas.

5 to 150 Pfd capacitor
Russian capacitor. It is available at E-Bay for about $150

Easy to Make PVC Pipe Stand
Where would hams be without PVC pipe!
This stand is made from 2 1/2 inch sewer pipe.
This is a fun antenna to build and use. I made my first contact with W9GY this afternoon on 20 meters. I used 5 watts, he used 10. RST out was 459, RST in was 579. The antenna was in my drive way in front of the garage that you see here. And Jeff was in Indiana. What a hoot! Making contacts on a home made antenna is great fun. The parts are readily available and with a little planning and shop time you can have a Magnetic Loop antenna to play with.
This is my second Mag Loop. The first one is 3 feet in diameter and covers from 20 through 15 meters. I’m planning another for 17 meters through 10 meters. Mag Loop calculator is available at http://aa5tb.com/index.html
Yahoo has Mag Loop groups that are very helpful to get you started. http://groups.yahoo.com/group/MagLoop/
and http://groups.yahoo.com/group/MagneticLoopAntenna/
Copper foil or strapping is available at http://stormgrounding.electrical-insulators-and-copper-ground-bars.com/copper-foil-2.html
If you’d like more information about Mag Loops, please feel free to contact me. [email protected]
73 De AA1IK
Ernest Gregoire


