Posts Tagged ‘Portable’
 Tripod for a WalkHam
Having got an AlexLoop WalkHam antenna I needed some way of holding it up whilst it was in use. After considering ideas like a guyed mast made from plastic pipe I decided the best solution would be a photographic tripod, if only I could devise a way of mounting the antenna on it.
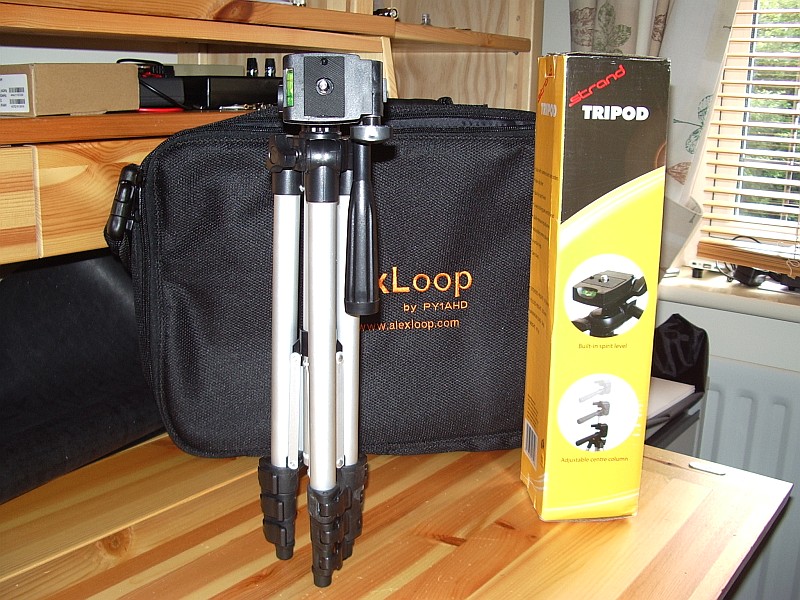
After scouring eBay for a suitable tripod I came across this one from British firm Strand Europe. Unfortunately this won’t be much help if you’re not in Britain as the seller will only post to the United Kingdom.
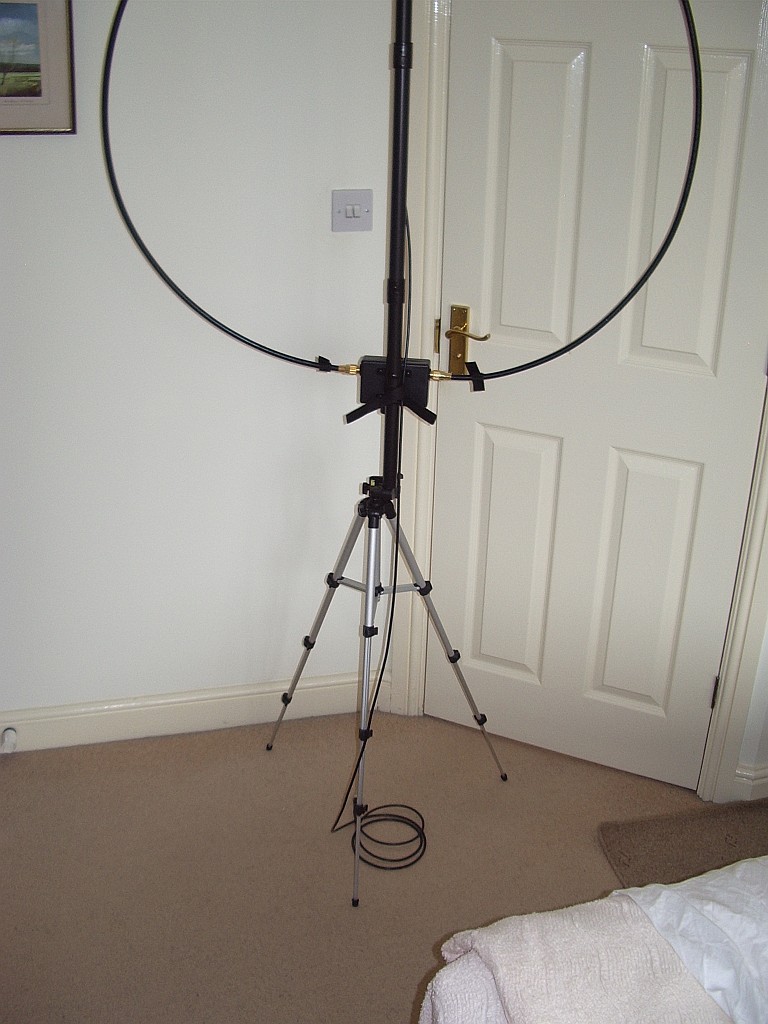
The tripod is short enough when collapsed to fit inside the WalkHam carrying case – the stumbling block for most of the ones I looked at which were just a bit too long. What’s more, the panning handle can be secured in the vertical position and fits inside the WalkHam’s mounting pole like it was made for it! So no modifications are needed and you can still use the tripod for photography if you want.
The same day that the tripod arrived I received an email from Alex giving details of his own tripod recommendation. He wrote:
“The perfect tripod is the VIVITAR VIV-VPT-1250. It is a 50” unit and the lightest and most inexpensive VIVITAR unit that can be found for less than U$ 10.00. The secret is take off the camera head with a Phillips screwdriver and leave the aluminum tube on the top. It must be marked with a pencil at 4 inches (12 cms): that is the maximum extension that can be used to introduce something to avoid any pressure on the antenna elements. Without the camera head the tripod can be collapsed and carried inside the antenna bag.”
I couldn’t find the Vivitar for as little as $10 in the UK so I’m content with my purchase. My only reservation is that the tripod is much lighter than the antenna (a good point for the person carrying it of course) and might be inclined to blow over if used in much of a breeze. I’ll find out when I manage to try it! I can’t say whether Alex’s recommended model would be any better in that respect.
K8GU/5 Field Day 1B1Op Battery

I found myself in Santa Fe, NM, for Field Day this year to attend a conference. As I have shared before, I have mixed feelings about Field Day, but this was a genuinely good time. I first checked ARRL’s Field Day finder map and the local club’s web site for activity. Zilch. So, I remembered staying at the Fort Marcy Hotel Suites on several previous visits to Santa Fe. These condos are up on a hill overlooking town. Across the street is Hillside Park, with a couple of scraggly trees that might be suitable for antennas.
Instead of bringing the “usual” portable station, I brought a Small Wonder Labs SW-40, a K1EL K12 memory keyer (assembled especially for this trip), Palm Mini paddles, a 40-meter dipole, and a AA battery pack. The whole station took up less space in my luggage than my notebook computer and set up in 15 minutes. I got the dipole center about 4-5 meters off the ground and the ends sloped down to about 2-3 meters high…just enough to allow cars and small trucks to pass under them in the parking lot. Apologies for the photographs…they were taken with my cell phone (which is a regular old “dumb” phone).

The SW-40 did not appear to be transmitting correctly when I first hooked everything up. So, I pulled the cover off (packing a Leatherman tool is another good reason to check a bag) and wiggled some wires around until it fired up. Not an auspicious sign.
But, I did manage to operate for about an hour and make 12 or 15 QSOs. They’re logged in a notebook, but I haven’t looked at it since making the contacts. Virtually every QSO was a struggle. Low power (1.5 watts), wrong band (20 meters would have been better), a low antenna, and the fact that I hadn’t used the SW-40 for any QSOs in over 10 years, conspired to make thing difficult. Most operators pulled me right out once I was in the clear and zero beat (which I think was a serious challenge with the slightly drifty and definitely touchy SW-40).
My final QSO was with my old radio club from my college days, W8FT. The operator was my good friend Bill, AD8P, who worked hard to pull me out once he got my call right. After I packed up, I noticed that I had a missed call on my phone…sure enough it was from Bill. So, I gave him a call and we talked for a couple of minutes. “When he answered the phone, he said, `New Mexico?!?! I told Kelsey (N8ET) that’s what I had copied.’” We had a nice chat as I hiked back down the hillside into town and he pulled into his driveway after his FD shift.

I don’t think I’ve ever been so delighted with a Field Day effort of so few QSOs (except maybe my first Field Day, which was much more work for about twice the number of QSOs). Including the walk from my hotel to the park, setup, tear-down, and operating, I think the whole exercise took about 3 hours, and was tremendously FUN.
A case for a KX3
Following a tip on the Elecraft reflector from Wayne N6KR I ordered a Think Tank Strobe Stuff Belt Pouch to use as a case for the KX3. As Wayne suggested, this could be the ultimate compact KX3 carrying case.
 |
| The ultimate KX3 carrying case? |
The KX3 fits easily into the main compartment (after removing the KXPD3) while the secondary compartment has room for several accessories including the removed KXPD.)
Wayne managed to squeeze the KX3, the MH3 mic, a backup mini-mic, the KXPD3 paddle, ear buds, a spare set of 8 AA cells or a 4-cell, 14-V Li-Ion pack, two 25ft. lengths of Wireman #26 “silky” for antenna and ground wire, two 1in. stainless-steel hex nuts (for tossing wire into a tree) a 20-m two-piece telescoping whip (in case there isn’t a tree) a BNC elbow and a BNC-to-binding post adapter (to attach the two wires) into the case. I’m not quite sure how he managed it, but there’s no doubt that with a bit of practice you could get a fully functional portable station in there. CW diehards could dispense with the MH3 mic which takes up the most space next to the KX3 itself. If you use the AlexLoop WalkHam then you could omit the wire and a few other bits and pieces. The belt pouch looks smart alongside the AlexLoop carrying case.
Search for the Think Tank Strobe Stuff Belt Pouch by name and Google will find you the best local supplier.
The unfortunate & epic saga of the perfect military radio
 |
| The long awaited but ultimately unwanted GMR radio |
As my day job starts to include more long term projects & project management I was particularly intrigued by an article in arstechnica.com. The article is, “How to blow $6 billion on a tech project“, although the title may be more inflammatory than technically accurate.
The article covers the 15 year development of an advanced & unified military radio communications system that suffered from multiple issues including scope-creep & a rapidly changing underlying technology.
If you are involved with a group that is working to develop a product or service you’ll really get something from this article. If you interested in radio systems, military or otherwise, you’ll find this interesting as well.
Its hard to image the frustration people suffer when contributing to a project that is mismanaged unless you have been there yourself. I hate to think of the wasted effort that resulted when people found out How to blow $6 billion on a tech project
QRP TTF 2012
Great weather here in Orlando for a good afternoon of QRP Portable. The QRP To The Field contest is always a good time to get out and give out a few more points to the serious contesters. I enjoy the concentrated QRP contacts and hearing my virtual friends once again. Every QRP event has a few regulars that are almost always heard. This year the bands were only so-so in Florida with lots of QSB on 20m which was by far the best for the day. It was solid at times and then signals would suddenly drop to the noise level which made RST reporting fun!

Mt. Cedar Tree: Just above sea level
Because of band conditions, I spent most of the 4 hours on 2om, but I did check 15 and 10m on an hourly basis. To do that, I pulled out my Ten Tec Argonaut 509 and used a Buddistick with the base up about 12 ft. I called CQ about 50 times on 15 m but heard almost nothing on 10m all day. On 15m I heard a couple Eu (IV4 and DK) stations but was not getting a response to my calls and only heard 1 or 2 US stations so I assume the band conditions here weren’t quite right for those two bands.
Managed 18 QSO’s in 4 hrs of switching between my Wilderness Sierra to an EFHW, Delta Loop for 20m, and the Buddistick / Argonaut combo for 15 and 10m. 40 m was full of Florida QSO Party stations and a couple of nearby (within 4 miles) stations were pounding my receiver and causing the AGC to go nuts when I tuned across them so I only managed a single contact on 40 before retreating back to 20m.
I’ll be looking to give out more points in upcoming contests. So call CQ and I’ll be out there lookin’ fer ya!
72,
Kelly K4UPG

Buddistick on the way up
OAx/K8GU
Loyal readers know that from time to time, I am fortunate to travel to interesting and exotic locales for work—they usually come in pairs, so Greenland and Peru are it for a while. Although the motivation is usually field work, occasionally a conference pops up. The International Symposium on Equatorial Aeronomy occurs every three to four years and can be counted on for an exotic locale. Sarah had such a good time when we attended the 12th ISEA in Crete in 2008 that she insisted on attending the 13th in Peru with me this year. Of course, Evan complicated that a bit, and so we evaluated the pros and cons of leaving him with grandparents or bringing grandparents along, eventually finding a willing pair of grandparents to come along. If you’re interested in a general travelogue (and following posts) and some photographs, you might check out my father’s blogs. This short post is mostly focused on radio aspects of the adventure.
In retrospect, it may not have been such a good idea to bring ham gear to this meeting. Between being the most seasoned traveler in my family and the only one with a functional command of the Spanish language, plus Evan, plus hours of meetings and collaborations each day, there was little time/energy to actually operate. Getting to Peru was uneventful—we took an American Airlines codeshare flight on LAN Airlines via Miama to Lima and got there early in the morning. Unlike their neighbors to the south, Peruvian Customs is by far the most curious I’ve encountered while carrying radio gear—just a minor headache but Sarah was a bit concerned when they took me away for additional questioning. I carry modest gear—a Yaesu FT-840, Astron SS-30 (this should be replaced with something smaller, but it’s what I have), WKUSB, Palm Mini-Paddle, the K8GU portable antenna system, and various cables to connect it all up. After clearing Customs, we boarded a bus to Paracas, where the meeting would be held…

Paracas, which is about four hours’ drive south of Lima, was the site of a major earthquake several years prior and is still in recovery. The hotel that hosted the conference and a few nearby hotels had all been rebuilt from the ground up since the earthquake. The city is on a small bay that is protected from the Pacific. It’s very beautiful—desert sands that go right down to the bay. After a few days at the meeting, I managed to get the antenna set up.

One of the things that surprised me was an excellent JA opening on 20 meters just after sunrise before I went to breakfast and then the meeting. I am pretty sure it was a direct-path opening because the signals did not sound like long path and the long path crosses the southern auroral oval, whereas the direct path does not. (Auroral absorption, by the way, is one reason that the long path can be more effective than the short path.) Any time I called CQ as OA5/K8GU, I was greeted with a roaring pileup. Not bad for an antenna propped up on my veranda. Verticals on the beach rule, and this one wasn’t even really on the beach.
At the request of a friend, I made a special effort to operate on 12-meter CW in the afternoon. The portable antenna would not tune up on 12 meters with the wire radials I had laid out. In a moment of desperation, I assembled some extra pieces of my portable antenna to produce a tuned radial that I clip-leaded to the ground lug as depicted in the photo above. It worked right away and I was quite popular there as well.
A comment about computers—my standard work-issued computer is a MacBook Pro, which although perfect for my work, is essentially useless for amateur radio. I know this will generate a torrent of discussion, but if you are accustomed to real contest/DXpedition logging software available for DOS and Windows, you know that the stuff for the Mac doesn’t cut the mustard. I have logged DX operations on paper (CE/K8GU), or in the case of the OX/K8GU operation, brought along a second computer. However, in a long-delayed flash of insight, I bought and installed VMware Fusion on the Mac in February. It runs Windows XP and TR4W with the WKUSB just brilliantly and with no special configuration. Aside from having to press Fn+F1 to CQ, this was an epic win. KB9UWU tells me that there’s an option in VMware to eliminate this nuisance as well.

After the meeting in Paracas, we returned to Lima, where we celebrated the 50th anniversary of the Jicamarca Radio Observatory. The cornerstone of the Jicamarca facility is a 49.92-MHz radar that feeds an 18,720-element phased array, pictured above. Jicamarca is one of the most powerful radio transmitters in the world, capable of 4.5 MW output, and is used for a variety of atmospheric, ionospheric, and space science experiments. Like Arecibo, it was originally designed to perform incoherent scatter measurements of the ionospheric electron density profile.

Lots of fire in that wire! Have you ever seen a coaxial cable that’s rated for over a megawatt at 50 MHz? This is the feedpoint of the phased array. There are a few tuned stubs in there, too.

Here’s one of the four 1.5-MW transmitter cavities. A maximum of three are used together. When configured for three transmitters, the driver stage puts out 7 kW! Needless to say, everything is custom made on site. The transmitting tetrodes (8973s, if I recall correctly) are refurbished by the manufacturer as needed.
After Jicamarca, we went to Cusco, which is south and east of Paracas, and much more lush than the deserts around Lima and Paracas.

We spent a lot of time being tourists in Cusco and vicinity and I had some difficulty with my computer so I only made a handful of OA7/K8GU QSOs from Cusco on 17 meters. It is quite remarkable how much better the bands were from the coast. As someone who has operated from W3, W8, W9 and W0, I can attest to that difference as well. I missed my morning JA run…
A final thought—we drove through a lot of towns and communities in OA4, OA5, and OA7, on this trip. Nearly every town, no matter how small, had at least one building with an HF fan dipole on the roof. HF is alive and well in a mountainous country like Peru!
QSL information: If you worked OA5/K8GU or OA7/K8GU, the best way to get a confirmation is through ARRL’s Logbook of the World. I have been responding to direct cards (to my FCC address) with a one-day turn-around lately.
A Portable Vertical Antenna
With the loss of my preferred frequent flyer status, airlines tightening their checked luggage allowances, and the addition of another traveler to the family, I’ve been contemplating a new portable antenna that is easier to pack than my usual DK9SQ mast and dipoles. I don’t do high-priced reduced-size antennas if at all possible since portable installations usually have other efficiency-reducing problems. Multi-element antennas take up additional space and have feeding and installation complications that are unnecessary for the casual DX operator. So, that leaves us to choose between a vertical and a dipole.
A few words about efficiency: Dipoles have a distinct efficiency advantage over verticals in almost every practical installation for 40 meters and up, except when the vertical is physically placed in or over salt water. Radiation efficiency tends to be dominated by near-field conditions, pattern is dominated by stuff that’s farther away. This is why vertical dipoles work so well for long-haul DX when placed within a few wavelengths of salt water. They don’t need the near-field efficiency enhancement as much as base-fed verticals, but they still leverage salt water for developing their far-field radiation pattern, especially at low angles required for long-haul communication.
I’m a casual DX operator, not a DXpeditioner, so I never operate on 160 or 80 meters. That is, considering the discussion above, why I have been using dipoles with the DK9SQ. But, verticals have a distinct advantage over dipoles in the sense that they are self-supporting. I decided to build a vertical because: 1) my next DX trip would include time near a beach and 2) I wanted to be able to bring my own support as I had with the DK9SQ.
My remaining requirements were now simple:
- A vertical antenna that requires no additional supports. Guying is OK.
- The antenna must be full-size (quarter wavelength) on 40 meters and above.
- Experience has shown that multi-band operation is desirable, but instant band switching is not necessary.
- The longest piece must fit inside my suitcase (20 in / 50.8 cm maximum length).
- Field assembly and repair with only a Leatherman tool.
- Minimum cost, minimum weight, minimum volume, minimum installation time.
And this is what I came up with:

There are 21 aluminum sections, most with a “swaged” (actually, a poor-man’s swage to be described in a moment) end and a slit end. They are shown here bundled perfectly inside a section of cardboard shipping tube. An 18 x 2.5 x 0.125-inch aluminum plate serves as the base. I used DX Engineering resin support blocks to insulate vertical from the base. A point could be fashioned on the bottom of the base and a foot plate attached to push into soft soil, but that has not been done.


Most sections fit together using overlapping joiner pieces that I previously referred to as “poor-man’s swaging.” I’m not sure that it’s actually a savings over paying a local shop to swage the ends for you when time is considered in addition to material, but I cut telescoping pieces six inches long and fastened them three inches deep in one end of a 17-inch section of tubing with two offset and orthogonally-placed aluminum pop rivets for a total length of 20 inches. This geometry not only fits in my suitcase, but results in a very small amount of wasted material as well.

The other end of each piece is slit about 2 inches and they mate with an all-stainless steel hose clamp. The first 10 feet of the antenna are 0.75-inch 6063-T832 tubing followed by telescoping sizes down to 0.375-inch at the very top. The transition pieces are a full 20 inches long and are slit on both ends. The full-size antenna will stand in a light breeze, but guying is a good idea. Guy rings are fashioned out of flat washers drilled in three places.
Tune-up is easy…the more radials you use, the less critical their length. After about 8 or 10, you’re in the clear here. I never attached enough to prevent them from affecting the tuning. If you only plan to have a couple of radials, go ahead and cut them to 1/4 wavelength (even though ground proximity will detune them). Then, set the length of the antenna using the required number of 17-inch sections (the 234/f formula is surprisingly close) with the last section being a variable length for fine tuning.
I’ve intentionally left out most of the details of the antenna itself because I don’t expect anyone duplicate it exactly. But, here are a few notes for anyone considering building one themselves:
- There are lots of parts vendors out there. McMaster-Carr and DX Engineering will get you there in one order from each. There is a surprising amount of overlap in their inventories. Get the hose clamps from McMaster…even if you get stainless-stainless (stainless band, stainless screw), they are about 1/3 of the DXE price. On the other hand, the resin support blocks are cheaper from DXE.
- I carry a compact antenna analyzer (Autek Research VA-1) with me. Field tune-up is a snap and it runs on a single transistor battery. It’s about 1/4 the size and weight of an MFJ-259 and good enough for amateur work. Oh, and I bought mine used for a fraction of the MFJ.
- A tubing cutter is fine if you only have a half-dozen or so cuts. But, if you have a chop saw or need an excuse to buy a chop saw, it will make cutting the tubing far easier. My hands were raw for a few days after cutting the tubing by hand. I’m sure the antenna performs better on account of it, though.
- Find a friend with a metal-cutting bandsaw to slit the ends of your tubes. I went through a half pack (McMaster mega-size pack) of cut-off wheels for my rotary tool doing my slits.
- McMaster only sells the aluminum plate in 36-inch pieces. If you don’t have the aforementioned chop saw, an angle grinder with a cut-off disk does a surprisingly good job.
- I pack a combination-screwdriver that has hex drivers that fit the hose clamps and #6 nuts. Even though the antenna can be erected with only a Leatherman tool doesn’t mean it has to be.
- The small parts box shown in the top picture holds all of the parts for the antenna—it was 2 USD at Home Depot.
- The final and most critical component is a clip-lead that can be used to attach various nearby metal structures to your ground plane. I have used it to make a temporary radial out of excess tubing sections on 12 meters as well.
That’s it. The antenna goes up in a few minutes, especially if not used at full length. I used it successfully last week as OA5/K8GU, which will be detailed in a future post.


