Posts Tagged ‘Manhattan’
 Manhattan Style
After blogging for over four years now, I've covered a lot of topics that have piqued my interest in the ham radio world. I'm going to (once in awhile) select some previous blogs for reposting since they are every bit as valid as they were a few years ago and many new readers will have never found them without going way back! This one is from June, 2014.
****************************
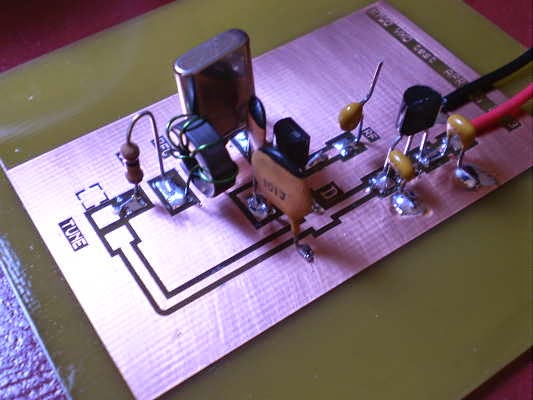
I haven't yet decided to rebuild the little 630m CW transmitter using Manhattan style or the newer Muppet style being promoted by Chuck, K7QO.
The Muppet style seems to be PCB without holes, with parts being mounted on the copper pads directly. Like Manhattan or Ugly construction, changing components is very convenient. I pretty much split final construction methods between Manhattan style or dedicated PCB.
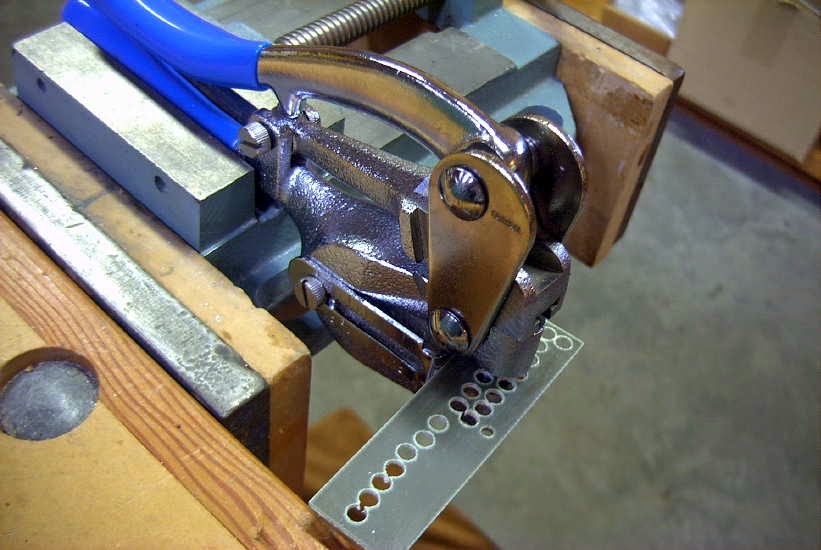
I recently ran low on the pads used for Manhattan and made another pile of various sizes. For those interested in using this style, it's pretty quick and easy to manufacture a good stock of your own pads using a simple hand punch.

These punches are widely available on e-Bay or possibly at your local hardware outlet or craft store. They come with various sized dies but I have only found myself using two sizes, 5/32 and 3/16. The punches have a small point at the center which I filed off so not to create a dimple in the punched pad.
.jpg)

It's also advisable to scuff sand the bottom of the PCB strip as well as to shine up the copper side with some light steel wool before punching any pads. They will eventually be glued to the circuit's PCB copper surface using a small dab of CA ("super glue") glue and the slight scuffing beforehand will ensure that the pads stay put. My usual technique is to place a tiny dab of glue with a toothpick at the spot where the pad will go. I then pick up the pad using an X-acto knife, spearing the pad's copper side and then pressing it down on the glue spot. CA cures quickly once it is oxygen-starved so pressing down on the pad for a few seconds is usually all that is needed. Any time I have run into trouble it was because I used too much glue....just a small dab is needed.
There are many good tutorials on Manhattan-style construction to be found on the internet as well as some super examples of what can be accomplished using this method as a "final" version technique.
For me, one of Manhattan's strongest selling points is that even though final part values may have been fleshed out during a rough build, parts can still easily be changed, added or even removed without a lot of fuss....unlike a PCB....but Muppet does look interesting!
I haven't yet decided to rebuild the little 630m CW transmitter using Manhattan style or the newer Muppet style being promoted by Chuck, K7QO.
 |
| K7QO Muppet Style |
I recently ran low on the pads used for Manhattan and made another pile of various sizes. For those interested in using this style, it's pretty quick and easy to manufacture a good stock of your own pads using a simple hand punch.
These punches are widely available on e-Bay or possibly at your local hardware outlet or craft store. They come with various sized dies but I have only found myself using two sizes, 5/32 and 3/16. The punches have a small point at the center which I filed off so not to create a dimple in the punched pad.
It's also advisable to scuff sand the bottom of the PCB strip as well as to shine up the copper side with some light steel wool before punching any pads. They will eventually be glued to the circuit's PCB copper surface using a small dab of CA ("super glue") glue and the slight scuffing beforehand will ensure that the pads stay put. My usual technique is to place a tiny dab of glue with a toothpick at the spot where the pad will go. I then pick up the pad using an X-acto knife, spearing the pad's copper side and then pressing it down on the glue spot. CA cures quickly once it is oxygen-starved so pressing down on the pad for a few seconds is usually all that is needed. Any time I have run into trouble it was because I used too much glue....just a small dab is needed.
 |
| VE7SL Lowfer Tx |
For me, one of Manhattan's strongest selling points is that even though final part values may have been fleshed out during a rough build, parts can still easily be changed, added or even removed without a lot of fuss....unlike a PCB....but Muppet does look interesting!
More Manhattan Building Tips
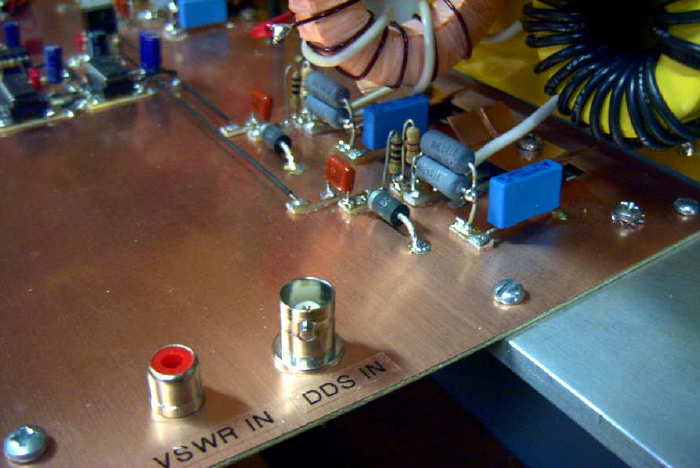 |
| 2200m kW Transmitter |
One of my early blogs described how I make the pads needed for Manhattan style. It can pretty much be used for any modern project and has been used here for countless circuits ... from a 1W LF tranmsitter to my 2200m/630m kilowatt.
 |
| 1W LF Transmitter |
I found these hints from Bob about pads and soldering components particularly helpful for anyone making a start in Manhattan style building:
Round pads require only placing in proper X and Y coordinates. A rectangular or square pad also requires proper rotation. A rectangular pad placed cockeyed doesn't look good.
I've had good luck with pads made from .032 double sided board. Solder surface tension prevents shorts with this pad thickness. My experiments making pads from thinner .010 thick flexible board often resulted in shorts.
A clean surface is needed for good pad adhesion to the board. I polish the pad board on both sides to a shine and then punch out the pads.
Pads can take up a lot of solder so I prefer to use 1/8th inch (.125) diameter pads.
Some of my Manhattan projects have failed because pads have loosened from the board. Cheap, discount super glue was my mistake. I now use Loctite Super Glue Gel. Of the hundreds of pads I've applied, I've never had one loosen.
If a punch is used to make pads each pad will have a rounded side and concave side. My pads are applied rounded side up. Using tweezers, I pick up a pad, place a small dab of glue on the punch mark and drop the pad in place. Light tweezer pressure is used to set the pad. Too much pressure squeezes out the glue leaving a weak joint. I Use enough glue so it squeezes out around the bottom edge of the pad.
Disaster occurs if glue gets on the tweezers. Pads stick to tweezers and won't stick to the board. If this happens, I stop and wipe off the tweezers with a cloth. I also use an Exacto knife to remove any hardened glue on the tweezer tips.
I try not to put too many leads to a pad. For example, its common for a transistor base lead to connect to two resistors and two capacitors. If this happens I extend the transistor base lead across two adjacent pads ans share the connections between the two pads.
I take time to shape my component leads. I make certain I don't have to flex a lead, like a spring, to solder it in place. Improper technique means the next component soldered to the pad may spring loose the earlier lead.
I put a bend in the component lead so the lead sets level on the pad. But the bend doesn't need to be long. A bend a 1/16th inch long, or half the diameter of the pad works well. This also means multiple leads can attach to a pad, each pointing toward the pad center.
My Hakko 936 soldering station is rated for 50 watts. I use a wide tip to get that power to the pads. I'm surprised how much power is required to do Manhattan construction. This is especially true when soldering component ground leads to the project board.
It is very easy to come away with cold solder joints. After all the leads are attached to a pad I Heat all the solder on the pad to liquid state. My ground connections take 1-2 seconds and pad connections take about 1 second. I've had no damage to components due to the heat I apply.
I prefer to use .032 leaded solder for my pad connections. But I use .062 solder for ground connections or to fill in a heavily populated pad.
I offer these ideas for what they are worth to you.
bob-N7SUR
Bob also mentioned that he prefers to tape down a full size plan of his component layout as an aid in placing his pads ... a light punch mark through the paper layout, marking the pad's location. I haven't gone this far with any of mine, preferring to place pads as I build, giving flexibility to component placement.
There are lots of good online references for Manhattan-style building but be warned ... some of them, particularly the pages of Dave, AA7EE, will have you making plans and reaching for the soldering iron before you know what's happened!


