Posts Tagged ‘Ham Gear’
 Review – BTech DMR-6X2
by John ‘Miklor’ K3NXU
![]()
![]()
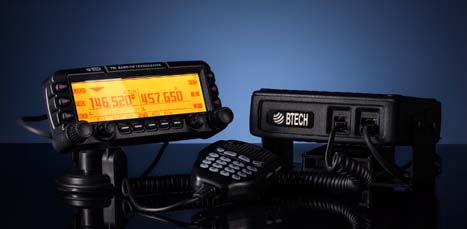
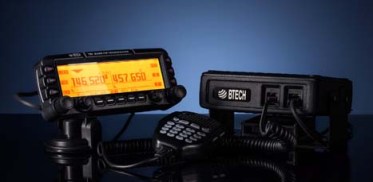
Several Dual Band DMR handhelds have been introduced into the market in the past few months. Having owned most of them, I would have to place this one toward the very top of the list. The DMR-6X2 is both VHF and UHF, Tier II DMR digital as well as FM analog with most features geared strictly toward ham radio use.
Important Note: The BTech DMR-6X2 is Not made by Baofeng. (see note below). That being said, let’s see what’s…
In the Box
Included with the radio are the:
– Two (2) Li-Ion Batteries (2100 and 3100 mAh)
– Two (2) Belt clips
– Hand Strap
– 37 page User Guide – English
– Charger base & AC adapter
– Antenna – 6.25″ (16cm)
– Programming Cable
– Earphone / Microphone
General Description
– DMR / FM
– VHF / UHF Dual Band
– Size: 5.1 x 2.4 x 1.5″ (129 x 61 x 39mm)
– Weight: 9.9oz (282g) w/ant & 2100 mAh battery
– Weight: 10.8oz (306g) w/ant & 3100 mAh battery
– 136-174 400-480 MHz
– CTCSS/DCS DTMF/2TONE/5TONE
– Digital Simplex Repeater
– <1.0w / 6.0w transmit
– 4000 channel
– 250 Zones (up to 250 channels per zone)
– 10,000 contacts
– 150,000 DMR Database Contacts
– Part 90 compliant – 2AGND-DMR6X2
– N0GSG Contact Manager Compatible
Basic Description (additional features)
The heart of the 6X2 is the proven Anytone D868. Under contract with Anytone, BTech had several addition features exclusively added to the 6X2.
Some of the additional features exclusive to the 6X2 include:
– Multiple Scan Groups
– Priority Scan
– Change TG via Keypad (Adhoc) with Unlimited Hold Timer
– Display Color Options
– Digital Simplex Repeater
– Analog Squelch Level Adjustment
– Start Up Code Plug Compatibility
– Display Hold
– Multiple Scan Groups in Same Channel
The 6X2 allows multiple scan lists to be entered per channel. You are no longer limited to one scan group entry per channel. The scan groups can include and mix of DMR or analog channels.
– Priority Scan
When developing a scan list, up to 2 channels can be assigned as priority. This allows the priority channels to be interwoven in the scan list. As an example:
– Channel 1
– Priority Channel 1
– Channel 2
– Priority Channel 1
– Channel 3
– Priority Channel 1
– Change Group via Keypad (“Unlimited” hold timer)
This is specially nice when using a hot spot. By setting a key function to “Dial” or “Long Press 0”, and the Group Call Hold time to “Unlimited”, you can enter a Talk Group using the number pad and it will remain permanently or until the channel is changed. No longer is the hold time set in seconds or minutes.
– Display Color Options
There are two display color options available. They are White on Black background, and Black on a Powder Blue background. (shown below). They are selectable by either software or keypad menu.
– Analog Squelch Level Adjust
The analog squelch level can now be adjusted using one of the programmable keys.
– Start up Code Plug
To assist with start up, the software was written to initially accept an Anytone D868 code plug. I’ve had a 868 since they first came out, and this was a huge time saver. Everything transferred and I was ready to play radio in minutes.
Note: Due to the extra features in the code plug, a 6X2 CP cannot be transferred back to a D868.
– Digital Simplex Repeater
Not to be confused with a standard repeater, this feature allows the DMR-6X2 to function as a Store and Forward Simplex Repeater. The 6X2 records a transmission and stores it in memory. Immediately after the incoming signal is dropped, the transmitter keys and re-transmits the recorded audio. The re-transmission can be either on the same or different frequency (not necessarily on the same band).
This feature allows the 6X2 to be used as a relay point during events such as marathons, races, etc. where a central relay method is needed and there is no local repeater.
– Display Hold
When a signal is received, the data image (name, call, location, etc) remains on the screen until the next signal is received rather than drop back to a standby screen. There is a Call End indicator at the bottom, but the data remains.

The Technical Side of the 6X2
The Transmitter
The frequency range of the DMR-6X2 is both VHF 136-174 and UHF 400-480 MHz. Along with DMR, the radio also supports analog FM (Wideband and Narrowband)
The power levels hold pretty close to the specifications. There are four power levels with a high of 5.0W and a Turbo mode of 6.5W. I personally run mine in 5W mode. Turbo isn’t going to Make or Break the signal, but it helps the battery.
What I do like is the low power mode is less than 1W. I run a hotspot here and if the power was only 0.3W I would be happy.
My audio reports have been excellent both through a DMR hotspot and the local repeaters. There is a five level microphone gain parameter that allows you to select the microphone gain level that best suited for your voice. I use level 3 (mid-level) for a full smooth audio response. I tried level 5 and found the audio was way too hot.
Power levels are listed below and were taken using a calibrated Bird Termaline wattmeter.

Enclosure
The DMR-6X2 case has a good solid feel and weight, and fits the hand well. It weighs in at 9.9oz (282g) with the standard battery attached and 10.8oz (306g) with the high capacity battery. Battery removal requires a simple push of the release slide located at the top of the battery. No battery sliding or pushing is required.
I found the keypad buttons a bit larger than most with a lighted keypad layout of three across and four down. This puts the zero (0) at the bottom of the keypad where I believe it belongs. The PTT button requires only a light pressure that doesn’t tire the finger to press.

Antenna
The included dual band antenna is 6.25″ which is a fairly common size for a handheld. I found that there was a slight improvement of about 2db by using an NA-771. The 771 is 10″ longer, so a difference would be expected, but I’ll probably stay with the stock antenna.
![]()

Receiver and Audio
The receiver sensitivity is very good on both digital and analog. I found the receive audio is amazing with wide and smooth frequency range.
The volume control range is adjustable with the software. Level 1 sets the full range of the volume control to a soft level, even at full volume. Level 8 sets the volume range to very loud at the top end. My preference is level 3 to 5 which is plenty loud, even for mobile operation.
Display
The radio has a two multi-color display options. The high contrast White on Black, and the softer is a Powder Blue with multi-color icons. The color is selectable via software or as a keypad menu option. The screen size is 1.1″ x 1.4″ with excellent resolution .
There are multiple sites where the current DMR User Database can be downloaded. There are various formats available allowing you to view name, call, location, user ID, license class, etc.

.
Software
Along with entering data in the conventional manner, the software allows you to import and export data to ‘csv’ files. Loading in a contact (TG) list, channel list, database, etc. is relatively simple.
I found being able to export to a ‘csv’ file has several advantages. I like having my channel list in sequence. With most software, you can only add new channels to the bottom of the list. Now I can sequence the list so it’s easy to view then load it back into the code plug.
Adding a new repeater can be done in minutes. I just cut and paste a copy of an existing repeater, change the frequencies, and load it back.
Note: The BTECH 6X2 can import a code plug (.rdt) from an Anytone D868UV directly. This is a great way to get your 6X2 on the air. Once loaded, however, due to the expanded parameters, the D868 is not capable of reading a 6X2 code plug.
CSV transfer Caution
Adding large amounts of data, updating and re-sequencing via CSV files is a major plus, but should always be done with Caution. For instance, Talk Group data must always be loaded before or at the same time as the Channel data. If not, improper data attachment may not occur.
Always backup your current code plug before modification.
Firmware
As additional features and future enhancements are developed, the radio can be updated to latest model. A firmware upgrades can be done with a Windows computer in about 5 minutes.
Note: The DMR-6X2 firmware is specific to this radio. It cannot be uploaded to a different model in hopes of adding new features.
Programming Cable
The DMR-6X2 comes with the necessary programming cable. The UART chip inside the radio, so the cable itself is straight through. There is no circuitry inside the cable itself. The driver will load automatically when the cable is attached.
For reference, although the cable appears to be the same as some that have the chip in the cable, those cables are not compatible.


The charger base requires a standard 12vdc wall wart (included). The LED on the front of the charger base is Red when charging, and Green when either fully charged or no radio in the cradle. The battery easily charges to full capacity with an overnight charge.
Battery and Charger
There are two batteries included with the 6X2, a 2100mAh and a high capacity 3100mAh. With battery save on, I can get 2 to 3 days out of the 3100mAh battery before needing a charge.
There are also USB charging cables available with output of 12V. These can also be used in place of the included Wall Wart.

Conclusion
If you think the BTECH DMR-6X2 very closely resembles a D868UV, you are correct, but as shown above, it is definitely not simply a rebadged Anytone. There are features and enhancements that set these two radios apart. I think BTECH was wise to wait for the bugs to be ironed out before introducing the 6X2 to the market.
If you’re waiting for this radio to drop in price, don’t hold your breath. Its features and performance make it well worth the price.
The obvious pros are the following:
– True Tier II DMR
– Same Band and Cross Band digital simplex repeater
– Dual Band VHF/UHF operation
– Multiple Scan Groups per Channel
– Priority Scan
– On the Fly Talk Group Entry
– Built-in Voice Recorder
– 2TONE and 5TONE decoding
– 150K user database capacity
– FCC Part 90 certified for commercial use
– N0GSG Contact Manager Compatible
There are plenty of options geared more for hams than commercial use. It performs well and makes a nice addition to the ham shack.
Available from:  and Amazon
![]()
For Clarification
BTech (BaofengTech) is not a division of Baofeng. They are an ODM that partners with OEM manufacturers to spec and build to their own requirements, whether from scratch (UV-5X3) or from an existing product. This 6X2 is an Anytone at heart with additional unique features found only in that model.
Here’s a comparison chart showing the major differences.
Click to enlarge.

Review – BTech AMP-25 series for Analog & DMR
The AMP-25 series VHF / UHF Amplifiers

The recently announced BTech Digital and Analog amplifier series puts a whole new spin on mobile operation. It performs more like a mobile than it does a power amp. The D series are true TDMA Tier2 DMR amplifiers.
Note: This review was done using an Anytone D868UV on both DMR and analog.
In the Box
Included with the 40W Mobile Amp are:
– Mounting Bracket
– 3′ Interface Control Cable (Kenwood K1 connectors)
– 3′ RF connect cable (SMA-M to SMA-F)
– Microphone and Hanger
– All necessary mounting hardware
– User Guide
General Description
– UHF or VHF Power Amplifier
– 2-6W > 20-40W Output
Modes of operation include:
| V25 U25 | V25D U25D |
| Analog (FM) C4FM (Fusion) P25 (Phase 1) NXDN IDAS dPMR MPT1327 | > DMR Tier II (TDMA) > P25 (Phase 2) Analog (FM) C4FM (Fusion) P25 (Phase 1) NXDN IDAS dPMR MPT1327 |
A Different type of Mobile Amplifier
I found these to be much more than a typical power amplifier. Although they can function as a simple ‘In and Out’ power amp, this is about as close to a full mobile as you can get. Although the driving  force was my DMR handheld sitting in my cup holder, the transmit audio was that of the included hand microphone and the receiver audio out was coming through the built in speaker driven by a four watt audio amplifier.
Transmit Power
I tested the power on two different models. The VHF V25 (non TDMA) and the U25D for UHF DMR. The power was tested using the analog side of both into a calibrated Bird Termaline wattmeter. The maximum current drain from my 13.6V 30A power supply was just under 6A. This is low enough for the amp to be powered by the 10A accessory jack in your vehicle.

Enclosure
The basic frame measures 4.6″W x 1.3″H x 5.5″D (excluding the SO-239) and weighs in at 26oz. I was curious to see the internal layout of the amp and to no surprise, there was a 5/8″ finned heat sink spanning the entire length and width of the case along with air vent along the back of the enclosure.
Operating Modes
These are single band amplifiers.
V25(D) = VHF 136-174MHz
U25(D) = UHF 400-480MHz.
Note: The V25D and U25D were designed to include DMR Tier II (TDMA) and P25 Phase 2 along with all other modes. Their operation varies slightly.
V25 / U25
To operate VHF through the UHF (U25) amplifier, or UHF through the VHF (V25) amplifier, simply power off the amplifier. This will allow you to run straight through directly to the antenna without power amplification on that band.
V25D / U25D
These amplifiers will only operate within their specified VHF or UHF range. This is due to the circuit switching design of DMR Tier II and P25 Phase 2.
Hook Up
The simplest configuration is using the included RF cable to attach the radio to the amp. You could add a Spkr/Micr to the handheld, but you would still be bypassing some of the best features.
I use the two included cables. The 3′ RF cable to attach the radio to the amp, and the control cable. This allows me to use the full size hand microphone as well as connecting the four watt audio amp powering the speaker. The power included power cable is compatible with handhelds using the standard two pin Kenwood style connector, such as an MD380, D868, GD77, UV5R, F8HP, UV82, etc.

I use an Anytone D868 on DMR as well as analog with the hookup diagrammed below. Depending on your radios antenna jack, you may need to pickup an SMA-M to SMA-M adapter.
Convenience
All channel selection and volume adjustments are done using the handheld. No duplicate programming or code plugs are necessary. Whatever is in my handheld is what I operate in the mobile
Operating my handheld in the low power position, I still get 22W out on UHF and my handheld’s battery life remains excellent, but high power gives me a solid 39W.
Conclusion
I was glad to see someone finally develop what is a full featured mobile amplifier capable of DMR as well as all other modes including C4FM and D-Star that is small enough to mount in the car, boat, and on top of your computer. This amplifier is Part 90 certified and definitely worth considering.
Available from Amazon: V25 V25D U25 U25D
and ![]()
VHF /UHF
Digital / Analog
Mobile Power Amplifiers
![]()
![]()
Review – BTech APRS-K2 Cable (TRRS/APRS)
by John ‘Miklor’

APRS-K2
It’s long overdue, but there’s finally a TRRS/APRS cable available for radios using a standard Kenwood style K2 connector.
I’ve been wanting to get involved with APRS for a while now, and this made it extremely easy.
APRS-K2 interface cable
The APRS-K2 cable allows you to interface your handheld transceiver with your existing mobile device, including. iPhone, iPad, and Android.
One end of the cable uses the Kenwood style K2 connector, while the opposite end is  terminated with a TRRS connector. Also included with the APRS-K2 is a Reverse Adapter to insure compatibility with all devices. This adapter allows cable to connect to earlier 3.5MM TRRS standards, such as Nokia.
App Driven
The APRS-K2 cable uses a virtual TNC found in several apps, such as APRSDroid, APRS.fi, and Pocket Packet. Plug in the cable, turn on the VOX, and you’re pretty much set to go.
Product Description
BTECH APRS-K2 TRRS / APRS Cable A simple way to start using APRS by using devices you already own. The BTECH APRS-K2 Cable will quickly connect your radio to APRS by using virtual TNC (app driven) on your tablet or device. The APRS-K2 cable is built with a custom circuit board that will automatically adjust the audio for clear packet transmissions with minimal adjustment; along with protecting your devices from strong over modulated signals.
Along with allowing APRS functionality the APRS-K2 cable can provide a simple interface gateway to allow several features to your radio!
Easily record radio conversations:
By connecting the APRS-K2 cable between your radio and any recording (line-in) device.
Use the APRS-K2 cable as a Mic In Connector:
Set up VOX on your radio to accept any form of incoming audio – such as a Push-to-talk application on a Phone – or a Line-out application from your computer.
Use the APRS-K2 cable to push transmissions over a speaker system:
Easily play audio over a intercom or speaker system from your handheld.
With a backup radio and your own ingenuity, the APRS-K2 cable can serve as an interface for a variety of applications for any amateur. Compatible with Kenwood K2 Accessory Slot Radios (such as BaoFeng, BTECH, Wouxun, TYT) Compatible with all phones, tablets, and computers with 3.5MM Audio In/Out Ports
Includes:
APRS-K2 Cable
Reverse Connector Adapter
Quick Start Guide
Conclusion:
The cable comes with a simple one page instruction sheet which should have you up and running in about 10 minutes after the appropriate app is loaded.
– Plug in the cable
– Set your handhelds volume control
– Turn on the VOX
– Set your handheld to 144.390 (US)
– Activate the app
That’s all it takes. If you’ve been considering building an APRS cable, you might find this an easy Plus and Play alternative.
The APRS-K2 can be ordered from Amazon, or if outside the US, you can go to their website and contact them directly. Baofeng Tech
Too many toys, too little time.
John ‘Miklor’ K3NXU
http://www.miklor.com

Review – BTech UV-5X3 TriBand Handheld
 UV-5X3
Although the case design is familiar, the radio inside is not. BTech has recently introduced the new UV-5X3 to the US Ham Radio market. This radio is a true triband transceiver with internal filters specifically configured for triband operation.The firmware in this radio has been reworked to include several new features not found in similar appearing radios.
.
In the Box
Included with the radio are the:
– 1500mAh Li-Ion Battery **
– 85 page User Guide – English
– Charger base & AC adapter
– Hand strap
– Belt clip
– PTT Earpiece / Microphone
– Antenna (1) – VHF / UHF 6 3/4″ (17cm) A-V85
– Antenna (2) – 220 MHz 6 1/4″ (15.5cm)
.
** This is the identical battery that is commonly mislabeled as 1800mAh on some handhelds.
The UV-5X3 was specifically designed as a Tri-Band transceiver. The internal filtering allows not only the traditional VHF and UHF frequencies, but also includes the 222-225 MHz Ham band for the US.
 Case Design
The UV-5X3 has the traditional case design, which allows me to use my high capacity BL-5L 3800mAh battery with no alteration to the base. Accessories such as my mobile battery eliminator, Spkr/Micr, etc. are fully compatible.
.
Transmitter
The frequency range is VHF 130-176 / 222-225 / UHF 400-480 MHz, supporting both Wide and Narrowband with 2.5kHz steps.The radio’s filtering scheme allows for full power on all bands. My OTA audio reports have been clean with clear with mellow audio. Power levels are respectable using a Bird VHF/UHF Termaline.
|
DTMF / IRLP Access
Something new also appearing on this model is a DTMF gain adjustment, allowing me to adjust the DTMF audio to the transmitter to a comfortable level for both repeater control and IRLP access.
If you are in a area that requires tone burst for repeater or network access, the 1000Hz, 1450Hz, 1750Hz, and 2000Hz burst are accessible by pressing the PTT along with one of the four pre-assigned keypad keys.
The receiver sensitivity is excellent, and the audio quality is clear, loud, and undistorted. Along with the 3 TX/RX bands, the receiver also includes the traditional commercial FM radio band. (65MHz-108MHz)
.
Tone Scanning – The receiver also has the ability to identify the tone of a repeater being transmitted by a received signal.
This feature gives me the ability to add / delete channels from the scanning list using the keypad. No longer a software only function. The more I can do from the keypad, the better I like it.
A Long Press of the [*SCN] button will start the scanning process.Channel Mode – When scanning with the Display Sync set to ON, the upper and lower display will scan together. This is explained below under Display Synchronization.Frequency Mode – When entering Scan, the image below will appear on the screen. Enter the first 3 digits set the range start, the second 3 digits sets the stop.
Example: Entering 146 : 146
Start the scan range at 146.000
Ends the scan range at 146.999
 Antenna
I found two antennas included with the radio. One was the standard upgraded A-V85 antenna, and a slightly shorter one for the 220MHz band.
Antenna (1) – VHF / UHF 6 3/4″ (17cm) A-V85
Antenna (2) – 220 MHz 6 1/4″ (15.5cm)
The separate antenna specifically tuned for 220 MHz is a great addition. The SWR shows 1.3 which is excellent. No compromise. I labeled my 220 antenna, as they are very close in appearance.
Display
The radio has a tri-color display, allowing the color options of the blue, orange and purple. The LCD can be formatted in either of three formats. Choices are Frequency, Channel number, or up to 6 Alpha Characters.Display Synchronization
The UV-5X3 supports display syncing, which gives ability to track both the upper and lower LCD. I keep mine set to display the channel name in display A, and the frequency in display B. When you change the channel, both the upper and lower displays move together.
 .
.Programming
Manual programming is pretty straight forward once you enter a few channels. A programming guide can be found at Manual Programming with a Menu Definition summary available at Menu Definitions.
The software support for the UV-5X3 can be found in the Latest Daily Build of CHIRP. There are a few new options that will be added to the 5X3 in the near future. One is the ability to Stun, Kill, Revive. This gives you the ability to disable your radio remotely.
The new chipset (RDA1846S and RDA5802N) provides reduced AGC switching noise and a low-IF digital audio processor for improved sound quality.
The programming cable requires a traditional two pin Baofeng / Kenwood style. There are several cable available. The generic cables may require special drivers, due to the use of cloned chips. For Plug and Play, a cable using an FTDI chip is recommended.
 Conclusion
The UV-5X3 firmware has obviously been reworked to include:
– Tri-Band Support: VHF/1.25M/UHF
– D-ANI (Display incoming DTMF Tones)
– Synchronized Displays
– DTMF audio gain level adjustment
– Add / Remove Channels from Scanning list via keypad (LCD Dot Indication)
– On the Fly scanning by Frequency Range
– 4 Tone Burst options
– Remote Stun, Kill, Revive

Review – BTech UV-50X3 (Tri-Band)
by John ‘Miklor’
Included with the radio are: 50X3 Weight: Main Chassis 2.1kg (4.6 lbs) Specifications The 50X3 is FCC Part 90 certified for commercial use in the US. Control Head The suction mount is about the best I’ve ever used. It requires a smooth metal or glass surface, but the silicon rubber cup will not let loose. My control head has been mounted atop my computer for over a month, and it is going nowhere. The button functions are displayed on the LCD screen for easy function identification. The PTT button on the upper right is for Momentary or Toggle PTT. One press turns the TX on, next press turns it off. Setting to Toggle is convenient if running a net or using a mobile headset.  Cooling The 220 ham band transmit range is limited to 222-225MHz. The receiver is capable of being programmed above and below those frequencies, but may be outside of the performance range due to the ham band specific filtering.
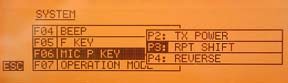
Microphone The radio comes with a full function keypad style microphone. On the right side are two slide switches that control the Lock and Lamp feature, and on top of the microphone are two frequency Up and Down buttons. Along with a 16 button DTMF style keypad are 4 programmable function keys. Choices are Squelch Off, TX Power, Rptr Shift, Reverse, and Tone Call. There are two microphone input jacks. One on the control head, the other on the main unit. There is also a built in microphone element inside the control head. Although the audio quality is excellent, the sensitivity is that of a standard microphone. The OTA reports were excellent with plenty of audio, so there’s no reason to shout. A nice feature in the audio section is an adjustable microphone gain control. There are 5 settings available. Min, Low, Normal, High, and Max. Normal is great for speaking in a normal volume an inch from the microphone. Running a net with VOX and a headset, you can bring it up a bit. Driving in an off road vehicle, you just might need to set it back.
Receiver Along with the standard VHF / 220 / UHF frequencies, the receiver covers: 0.5-1.7 MHz (AM Radio) The control head has built in speakers, as well as one in the main module. An external speaker jack in the rear also allows for a larger speaker if desired. The jack provides for either mono or stereo output. (each receiver can have it’s own speaker). I found a menu setting to adjust the tone of the speaker as well. Although there is more than ample audio output, when the volume control is all the way down, the radio is silent, as it should be. Cross Band Repeat The radio takes full advantage of the independent receiver by including a Cross Band Repeat function. I entered the VHF and UHF frequencies, power level and tones, selected the Cross Band mode, and was ready to go. The audio levels are preset and the audio quality reports were excellent. Cross band repeating using a 220MHz frequency was not possible. This is more than likely a precaution due to the minimal frequency separation. Display The control head has a large 5″ LCD with your choice of background colors. Options include White-Blue, Sky-Blue, Marine-Blue, Green, Yellow-Green, Orange, Amber, and White. The brightness and contrast are also menu selectable.
Unless you are only entering a few channels, I would recommend the optional PC05 programming cable. The UV-50X3 uses the CHIRP programming software. Scanning in the VFO mode allowed me to scan either the VHF, 220MHz, or UHF band. In the Channel mode, the scan would select any channel in the list regardless of band. Power Cable There are radios that draw less power whose power cables use thinner wire, lower value fuses, and can be plugged into accessory plugs. Do NOT use these cables, even though they may be plug compatible. The 50X3 draws twice the current, and will blow the fuses and possibly overheat the wire. The cable on the 50X3 appears to match that of the hi-power Yaesu, Icom, Kenwood series. ONLY use the proper cable for the radio. Base Station Operation For mobile drive testing, I teamed this radio with a Nagoya Tri-Band TB320A and SB-35 NMO mag mount and the results were excellent. Conclusion Some of the added advantages to the US market are the FCC Part 90 certification, local US support, and exclusive program support using CHIRP software. The radio can also be shipped worldwide by contacting BTech directly. This is definitely one of the nicest mobile transceivers I’ve used; and yes, I’ve owned the “big 3”.
More Information: Miklor.com |
 Four years after its initial design, the VGC 6600PRO has evolved into the BTech UV-50X3, a full featured Tri-Band mobile that delivers a full 50W on VHF and UHF, with addition of a 220 MHz module that delivers 5W output. The 220 MHz module was specifically designed and filtered for 222-225MHz US ham band operation. I mention this as there are currently radios being advertised as Tri-Band operating in the range of 240-260MHz that are not adaptable to frequencies below 240MHz due to their internal filtering.


Inverted High Frequency Loss with LMR-450G
By John ‘Miklor’ K3NXU
PERFORMANCE TESTS – LMR-450G
The recently announced LMR-450G cable has aroused much curiosity since its characteristics have not been collectively available by any one source. By multiple inquiries to several manufactures (only three at this time) and numerous lab tests, we hope to put many of the existing questions to rest.
DESCRIPTION
The physical make up of this cable varies slightly from most conventional RF cables. The center conductor is a semi-stranded copper alloy surrounded by Telfon, which will absorb and distribute cable ‘hot spots’ caused by excessive standing wave. The double silver braid and foil outer coating which provides a 98.6% shield is what the inverted high frequency loss characteristics are attributed. The loss is substantially less as the frequency increases, making this cable especially attractive for UHF, cellular, PCS and microwave applications.

Measuring cable loss under lab conditions
LOSS PER 100′
30 MHz 2.4 db
50 MHz 2.1 db
150 MHz 1.6 db
450 MHz 1.1 db
800 MHz .51 db
1200 MHz .37 db
1950 MHz .31 db
The cable’s most unique property is attributed to the outer jacket material Neo-glow, an RF sensitive composite plastic which will visibly indicate RF ‘hot spots’ in the cable. Adjusting the cable length to the antenna system for the ‘perfect’ impedance match is crucial at high frequency, thus the importance of a low SWR for peak performance.

From 100 Watts and up this cable will brighten up your world.
PROPER INSTALLATION
The low level emission of light from LMR-450G cable can be enhanced by wearing lightly tinted sunglasses with UV protection, which enhances the light radiation from the cable. Select an approximate length of cable needed for the installation which must be multiples of a 1/4 wavelength for the desired frequency. The exact length can be determined by using the formula 467 / Freq (MHz) plus approximately 18 inches.
The initial tests should be run with a 50 ohm dummy load at one end of the cable. With a minimum of 7 watts from the transmitter, you will see a faint glow from the cable indicating the ‘hot spots’ to be eliminated. These are the points along the cable where the RF is at its maximum. It is at these points where the RF connectors should be mounted. Trimming the excess cable may be required at both ends of the cable to produce the most effective match. Use caution not to trim too much cable as the loss characteristics improve with longer cable lengths.
SUMMARY
This could be the beginning of the long awaited high frequency “SUPER” cables. Only available in limited quantities at this time; contact your local cable supplier for more details.

Inverted High Frequency Loss with LMR-450G
By John ‘Miklor’ K3NXU
PERFORMANCE TESTS – LMR-450G
The recently announced LMR-450G cable has aroused much curiosity since its characteristics have not been collectively available by any one source. By multiple inquiries to several manufactures (only three at this time) and numerous lab tests, we hope to put many of the existing questions to rest.
DESCRIPTION
The physical make up of this cable varies slightly from most conventional RF cables. The center conductor is a semi-stranded copper alloy surrounded by Telfon, which will absorb and distribute cable ‘hot spots’ caused by excessive standing wave. The double silver braid and foil outer coating which provides a 98.6% shield is what the inverted high frequency loss characteristics are attributed. The loss is substantially less as the frequency increases, making this cable especially attractive for UHF, cellular, PCS and microwave applications.
Measuring cable loss under lab conditions
LOSS PER 100′
30 MHz 2.4 db
50 MHz 2.1 db
150 MHz 1.6 db
450 MHz 1.1 db
800 MHz .51 db
1200 MHz .37 db
1950 MHz .31 db
The cable’s most unique property is attributed to the outer jacket material Neo-glow, an RF sensitive composite plastic which will visibly indicate RF ‘hot spots’ in the cable. Adjusting the cable length to the antenna system for the ‘perfect’ impedance match is crucial at high frequency, thus the importance of a low SWR for peak performance.
From 100 Watts and up this cable will brighten up your world.
PROPER INSTALLATION
The low level emission of light from LMR-450G cable can be enhanced by wearing lightly tinted sunglasses with UV protection, which enhances the light radiation from the cable. Select an approximate length of cable needed for the installation which must be multiples of a 1/4 wavelength for the desired frequency. The exact length can be determined by using the formula 467 / Freq (MHz) plus approximately 18 inches.
The initial tests should be run with a 50 ohm dummy load at one end of the cable. With a minimum of 7 watts from the transmitter, you will see a faint glow from the cable indicating the ‘hot spots’ to be eliminated. These are the points along the cable where the RF is at its maximum. It is at these points where the RF connectors should be mounted. Trimming the excess cable may be required at both ends of the cable to produce the most effective match. Use caution not to trim too much cable as the loss characteristics improve with longer cable lengths.
SUMMARY
This could be the beginning of the long awaited high frequency “SUPER” cables. Only available in limited quantities at this time; contact your local cable supplier for more details.


