 |
 SOTA Rig Reconfiguration
Activating SOTA's, if you do it regularly, is an iterative process. Of course the primary focus is to get to the top of whatever summit you might be tackling on a given day, but another part of the game is how you get there. Of course the right clothing to be comfortable in whatever conditions you face, the right pack to carry your gear and of course the right radio. But then, some of the fun begins. Not only the right radio, but how will I configure the radio to maximize my signal, be as light as possible and how to I package of this so I don't have radio gear all over the ground or digging in my pack to find the battery, paddle, etc.. I have activated 150+ summits and this is a continuous process.
Since I've retired, I've now have the opportunity to have continuous thoughts about things like this without the interference of work or schedule related thoughts, it's great. Consequently, I've had some time to give my rig configuration some thought. What I have done is not totally unique as I have gotten ideas from others and mixed them into my own concoction. I have the 3 Band MTR, with 17m, 20m and 30m. I chose these particular bands so that I would have flexibility on contest weekends. So below is my latest, not my last configuration.
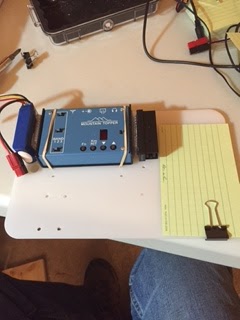
As you can see I am using a backpacking cutting board as the foundation of the setup. I used a product called Scotch Extreme fastener to attache the LIPO battery and the Pico Paddle, it's sort of like Velcro but it snaps into place and is 10x stronger than velcro. I simply drilled holes (this board has seen several iterations as you can see the many holes), and used rubber bands to hold the radio in place. I may decide to use the fastener instead. The "Rite in the Rain" card is for logging. A nice neat package to pull out of the pack, hook up the antenna, plug in the power and off I go.
There are however a couple of further improvements.
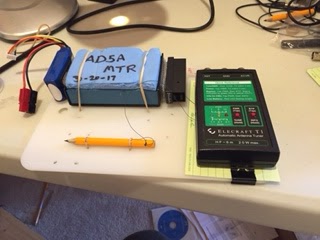
You can see I've added a tethered pencil for logging and an optional Elecraft T1 tuner, if you have a non-resonant wire. I can fasten it to the board with either rubber bands or the Scotch fastener.
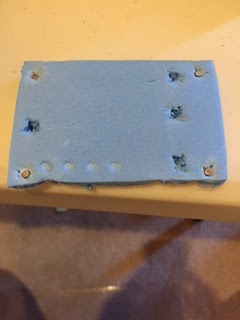
I've also added a protective cover for the MTR. It's made from sleeping pad foam and protects the face and switches on the MTR when getting jostled in your pack. On the backside of the cover I've cut out recesses where the switches are and added little magnets that are attracted to the four screws on the case. Thanks to Fred, KT5X for this idea.
So there you have it, a light, three band, package that is compact, light and ready to go. So until I reconfigure again.
Mike Crownover, AD5A, is a regular contributor to AmateurRadio.com and writes from Texas, USA. Contact him at [email protected].Since I've retired, I've now have the opportunity to have continuous thoughts about things like this without the interference of work or schedule related thoughts, it's great. Consequently, I've had some time to give my rig configuration some thought. What I have done is not totally unique as I have gotten ideas from others and mixed them into my own concoction. I have the 3 Band MTR, with 17m, 20m and 30m. I chose these particular bands so that I would have flexibility on contest weekends. So below is my latest, not my last configuration.
As you can see I am using a backpacking cutting board as the foundation of the setup. I used a product called Scotch Extreme fastener to attache the LIPO battery and the Pico Paddle, it's sort of like Velcro but it snaps into place and is 10x stronger than velcro. I simply drilled holes (this board has seen several iterations as you can see the many holes), and used rubber bands to hold the radio in place. I may decide to use the fastener instead. The "Rite in the Rain" card is for logging. A nice neat package to pull out of the pack, hook up the antenna, plug in the power and off I go.
There are however a couple of further improvements.
You can see I've added a tethered pencil for logging and an optional Elecraft T1 tuner, if you have a non-resonant wire. I can fasten it to the board with either rubber bands or the Scotch fastener.
I've also added a protective cover for the MTR. It's made from sleeping pad foam and protects the face and switches on the MTR when getting jostled in your pack. On the backside of the cover I've cut out recesses where the switches are and added little magnets that are attracted to the four screws on the case. Thanks to Fred, KT5X for this idea.
So there you have it, a light, three band, package that is compact, light and ready to go. So until I reconfigure again.
Please support our generous sponsors who make AmateurRadio.com possible:
 Ham Radio Deluxe |
 W5SWL Electronics |
 Ham Radio Prep |
 KB3IFH QSL Cards  Hip Ham Shirts  HamRadioAuctions HamRadioAuctions Reliance Antennas Reliance Antennas Enigma Shop Enigma Shop |  morseDX  Ni4L Antennas  R&L Electronics R&L Electronics antennas.us antennas.us QRV QRV |
- Matt W1MST, Managing Editor
