 |
 Printing your own QSL cards using HAMQSLer
Anyone who knows me well may be slightly taken aback to find me writing about QSL cards! Each to their own, but it’s a part of the hobby that really doesn’t appeal to me at all. However, I’ve always said that I think it’s nice to be able to QSL contacts which are special to you in some way.
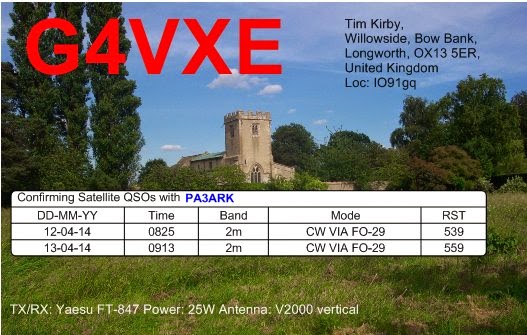
And so it was, I felt, the other day when I worked Berend, PA3ARK on FO-29. Berend often inspires me to try something new and so I thought it might be nice to try and create a QSL to commemorate the QSO.
I looked around and found the HAMQSLer program from VA3HJ. I managed to get past the ‘the final courtesy of a QSO is a QSL’statement at the top of the website! In my opinion, the final courtesy of a QSO is to say 73, but therein lies why I find myself at odds with the ‘every contact must be QSLed’ brigade!
The program is free to download and I found it well-designed and easy to use. I did have to install the Microsoft .Net framework 4.5.1 and install it on my PC before I could install the software.
I was able to import a background image of a photo of our village church to use. I really had wanted to try and use one of the aerial photographs I took of the village when I flew over in G3WGV’s aircraft a couple of years back. However, I found the colours didn’t really lend themselves to overlaying text on top of the photo. Actually, I’m sure a more artistically gifted person would have managed, but I opted for the easy approach – one where I had a nice blue sky, where I could place most of the text.
I found that I was able to setup various static text fields and create a QSOs box, which could be populated from an ADIF file from my logger.
After a bit of resizing and trying various options, I was ready to import my ADIF records. I did tweak the Mode field in the ADIF record, so that I could show that the QSO took place on a satellite. The logger, of course, records that I was (in this case) transmitting on 144MHz, but not that it was a satellite QSO. I wanted this to be clear, so I amended the Mode field in the ADIF field to say CW Via FO-29, which I thought was clearer.
2 Responses to “Printing your own QSL cards using HAMQSLer”
 Ham Radio Deluxe |
 W5SWL Electronics |
 Ham Radio Prep |
 KB3IFH QSL Cards  Hip Ham Shirts  HamRadioAuctions HamRadioAuctions Reliance Antennas Reliance Antennas Enigma Shop Enigma Shop |  morseDX  Ni4L Antennas  R&L Electronics R&L Electronics antennas.us antennas.us QRV QRV |
- Matt W1MST, Managing Editor

Looks Good. I would move the QSO box down to the bottom and center the white text as well.
Here’s another QSL Maker that I have used before…
(BTW, these are EXCELLENT for those fellas who tell you they don’t have any cards. Just create one for them to sign; all stamped and filled in!)
http://www.radioqth.net/qslcards
73, Bill – WA8MEA