 |
 Portable Ops 9/45: Just 1 1/2 contacts today….dead battery
Friday was a bit frustrating – the bands seemed really weird, and not much if any activity was heard here in Kansas.
I did manage one and a half contacts!
N5NAA – On 30 meters I worked Steve down in TX for a 2xQRP contact. Steve was running 3 watts and even mentioned that he reads my blog! Hi Steve!
VE4CWF (10492T) – I replied to Chris calling CQ. He came back to me and gave me all his specifics, and then just as I completed sending our call signs back, my battery died in the KX3! I admit it, I had operated probably 3 portable sessions without charging the internal pack – my fault. So….sorry Chris for dropping you like a hot potato! Hopefully we can connect down the line.
Thats all for today, I hope to have some time this weekend for a bit of SKCC CW!
Burke Jones, NØHYD, is a regular contributor to AmateurRadio.com and writes from Kansas, USA. Contact him at [email protected].
Portable Ops 9/45: Just 1 1/2 contacts today….dead battery
Friday was a bit frustrating – the bands seemed really weird, and not much if any activity was heard here in Kansas.
I did manage one and a half contacts!
N5NAA – On 30 meters I worked Steve down in TX for a 2xQRP contact. Steve was running 3 watts and even mentioned that he reads my blog! Hi Steve!
VE4CWF (10492T) – I replied to Chris calling CQ. He came back to me and gave me all his specifics, and then just as I completed sending our call signs back, my battery died in the KX3! I admit it, I had operated probably 3 portable sessions without charging the internal pack – my fault. So….sorry Chris for dropping you like a hot potato! Hopefully we can connect down the line.
Thats all for today, I hope to have some time this weekend for a bit of SKCC CW!
Burke Jones, NØHYD, is a regular contributor to AmateurRadio.com and writes from Kansas, USA. Contact him at [email protected].
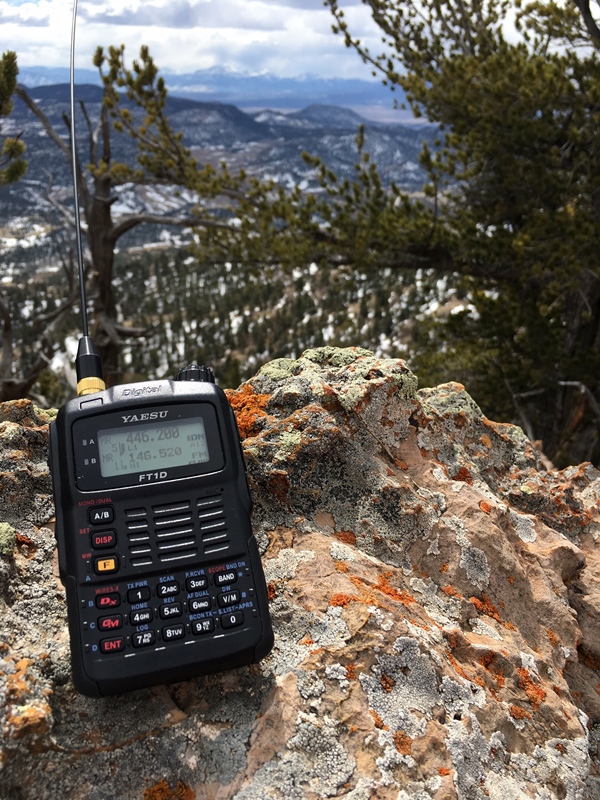
Yaesu FT-1DR: A Trail Friendly SOTA HT
A common topic in the QRP community is the Trail Friendly Radio (TFR) concept for backpack-style operating on the high-frequency bands. I’ve adapted the concept for the VHF/UHF bands, calling it the VHF Trail Friendly Radio (VTFR).
Strong candidates for the best VTFR include the Elecraft KX3 (with 2m option) and the Yaesu FT-817. Heck, both of these radios deliver all of the HF bands, 6m and 2m in one portable package. (The FT-817 also has 70cm.) See my blog post that compares the two rigs.
But the other set of strong contenders for the best VTFR is one of the many dualband HTs available on the market. It is hard to beat the compact, portable attributes of these great little radios for casual use on the trail. I’m not going to review them all but instead talk about my current favorite: the Yaesu FT-1DR. (Yaesu has recently replaced the FT-1DR with the newer model FT1XDR, which is the same design but with an improved GPS receiver and larger battery pack.)
My main usage of the radio is when hiking and doing Summits On The Air (SOTA) activations. This radio has a lot to offer in terms of capability and features, but the main things that stand out are 2m/70cm band coverage, two independent receivers and built-in GPS/APRS capability. Most SOTA VHF operating is on 2m fm so that band is critical, but I also make contacts on 70cm. More important is that together 2m and 70cm covers that vast majority of fm repeaters in my state, providing the best backcountry repeater coverage. The built-in APRS features allow the HT to be an effective tracking device as I move down the trail. SOTA chasers can see my position in real-time and anticipate when I’ll be on the summit. The radio has two separate receivers which turns out to be very useful when on the trail. With two receivers, I can monitor 146.52 MHz (2m fm calling frequency, often used for SOTA) while also keeping an ear on a local 2m or 70cm repeater. Another configuration is using one side of the radio to ping my location via APRS while the other side monitors 146.52 MHz.
The extended receive capability of the radio opens up lots of listening options: AM broadcast, FM broadcast, airband, shortwave and NOAA weather radio. I don’t use these very often but there are times that I want to tune to weather or news.
I am not a huge fan of Yaesu’s C4FM digital mode but do use it on occasion. The DN (digital narrow) mode supports voice and position information simultaneously, so Joyce KØJJW and have been using it to keep track of each other on the trail. The radio provides a basic indication of distance and direction to another C4FM radio.
One final note: if you buy an FT-1DR, I recommend upgrading the belt clip to the BC-102 clip from Batteries America. It is way better than the standard one from Yaesu.
73, Bob KØNR
The post Yaesu FT-1DR: A Trail Friendly SOTA HT appeared first on The KØNR Radio Site.
Bob Witte, KØNR, is a regular contributor to AmateurRadio.com and writes from Colorado, USA. Contact him at [email protected].
Making Pile-ups a Little More Fair

For years I have been an avid chaser of DX and special event stations. I am accustomed to patiently working pile-ups. I have also been an operator of a special event station and have had to pick out callers trying to get through. I know how hard it is to be on both sides of the pile.
I appreciate when the special event operator is overwhelmed with callers and decides to use split frequency operations or operations by the prefix number. This help to reduce the chaos and allows a lot more stations to be heard. However, it is frustrating when the special event operator switches to prefix numbers after I have been working the pile-up awhile, and almost always begin with numbers starting with “1.” I am in “9” land, which means I have to wait another 30-45 minutes for my chance. If I am lucky, propagation is still good but many times that isn’t the case.
I realize that this is just part of operations. However, it might help if the special event operator limited the number of stations or minutes operating each prefix number so that everyone gets a chance without losing propagation.
Another idea would be for the operator to consider starting numbers beginning with “0” or “9” areas once in awhile. The point is to give everyone a reasonable and timely chance to work the pile-up.
Bruce Tisdale, K9ICP, is a special contributor to AmateurRadio.com and writes from Indiana, USA.
Portable Ops 8/45: One NPOTA + Two More!
It was another windy, windy day here in Kansas! Once again the Jackite dropped a couple sections right during a QSO. When I took it down at the end of the session the tip section is stuck and won’t release to slide down inside the next section – will have to work on that.
Today was pretty slow, 20 meters was a weird band for me today. I was spotted all over the far east coast, but really nothing in between.
Tuning around I heard a strong station on 14.064, but for the life of me I could not copy the call sign. I asked him to QRS (slow down) and he did and I finally got his call!
KA4RRU – Mike was activating NPOTA HP06 – this is my first NPOTA station other than when I was an activator.
AH6AX (11165S) – Larry answered my CQ, we had worked each other before. He had a great signal from Maryland today, and it was nice to know I was getting out. I had been calling CQ for some time with no takers!
KG4LLQ (5883T) – Ken answered my CQ from North Carolina. Looking at his QRZ page he has some interesting rigs – I hope he was using one of the cool ones for our QSO today!
So in my quest for SKCC Centurion, I am now sitting at 18 unique contacts on my way to 100!
Burke Jones, NØHYD, is a regular contributor to AmateurRadio.com and writes from Kansas, USA. Contact him at [email protected].
March’s QRP EME Window

 |
| Lunar declination track for March courtesy: http://www.moontracks.com/moon-declinations.html |
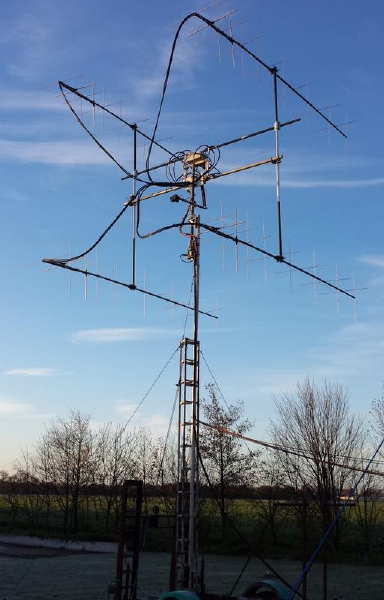
My minimal system (single 9el Yagi and 140w) makes it very easy to see the day to day changes in EME conditions due to various causes such as local geomagnetic conditions, Faraday rotation and libration fading ... or combinations of each! One of the days was particularly good, with numerous signals heard throughout the session while the next day was just the opposite, with only a few very weak signals and no contacts. On that particular day, I was being heard well by several European stations but was unable to hear any of them ... a true 'one-way' path and not uncommon on EME.
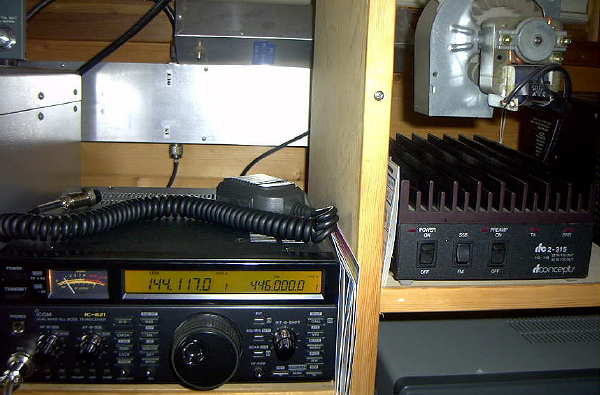 |
| My small EME station. Note old microwave oven blower on the 'brick' amplifier. |
Several smaller 4-Yagi stations were worked during the week, re-enforcing the benefits of having a moonrise over the ocean. As mentioned previously, the extra 6db of horizon gain allows my single 9el Yagi to perform more like a stack of four 9el Yagis. One of the fellows that I worked, DK5EW in Germany, asked if there was anything 'special' about my location that would make my very small station sound so strong at his end ... the ocean is clearly doing its job!
Altogether, 12 new stations were worked during March's window, bringing my total to 70 "initials". From the looks of the amount of activity, there are still many stations yet to work, that should be within range of my system.
Stations worked this week were:
I2FAK, UA3PTW, RZ3BA/1, SK5AA, PA2CHR, ES3RF, YO3JR, PA5Y, DK5EW, SM7GVF, EA4CYQ and W5ZN.
Three of these stations were using relatively compact antenna systems, consisting of 4x8el or 4x9el arrays, while the rest were larger. I have yet to tally up my DXCC or states total on 2m, but I know that W5ZN, in Arkansas, was a new state.
Up until this past week, the highest moon elevation that I have completed a QSO was with the moon at 18 degrees above the horizon. This week it was extended, at what is probably the limit of my fixed antenna, to 19.6 degrees when working ES3RF. At the other end of the scale, IK2FAK was worked with the moon at only .87 degrees high!
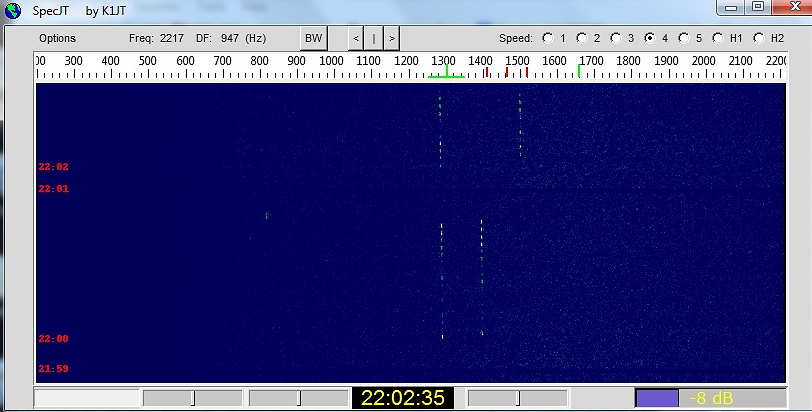
This month also provided my first glimpse of a 2m DX 'pileup', when J8/WW2DX in the Grenadine Islands showed up, calling CQ via the moon. My screen shot below shows at least 12 different stations calling him during his one-minute listening period ... some not yet 'warmed-up' as seen by their drifting oscillators.With several of the signals audible, it was an amazing thing to observe.
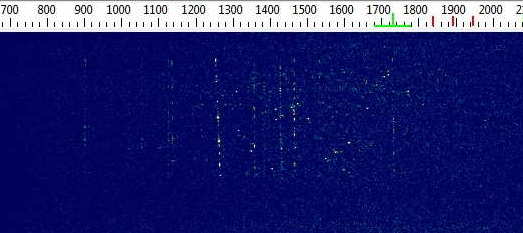 |
| 2m pile up on J8/WW2DX |
 |
| The 4 x 8 el cross-polarized array of PA5Y |
 |
| YO8JR sending his 'RR' followed by '73' |
Steve McDonald, VE7SL, is a regular contributor to AmateurRadio.com and writes from British Columbia, Canada. Contact him at [email protected].
 Ham Radio Deluxe |
 W5SWL Electronics |
 Ham Radio Prep |
 KB3IFH QSL Cards  Hip Ham Shirts  HamRadioAuctions HamRadioAuctions Reliance Antennas Reliance Antennas Enigma Shop Enigma Shop |  morseDX  Ni4L Antennas  R&L Electronics R&L Electronics antennas.us antennas.us QRV QRV |
- Matt W1MST, Managing Editor
