 |
 April 2016 trip to American Sa’moa
I had originally planned to make a maintenance and upgrade visit to my instrumentation in American Samoa in February 2016. There are lots of advantages to February: It’s cold here in W3, the ARRL DX CW contest is in February, and the phenomenon I’m studying is most active during the equinoxes. I scheduled a 7-day trip that ended with the weekend of ARRL DX so I had the opportunity work through the weekend or play some radio if work went better than expected.
My flight had been booked out of Washington National (DCA) airport at 5:15 am Monday morning, which is the best possible time of day at the worst possible airport. A snowstorm of unknown magnitude was bearing down on the mid-Atlantic. And, around 4:00 pm on Sunday afternoon, I fell asleep on the couch. When I awoke 90 minutes later, it rapidly became clear that I had a nasty stomach flu. As my condition deteriorated further, I finally decided I didn’t want to be fighting that for the next 24 hours on 767s on my way to a foreign place where I wasn’t sure what kind of medical facilities I could access. I cancelled the trip and spent the next 24 hours in bed instead.
The trip was rescheduled for three weeks later in March and I managed to get this itinerary out of BWI, which is much more convenient. I loaded up my gear and went to the airport at 4:00 am. My upgrade had cleared so I didn’t pay excess on my overweight and extra Pelican cases. We sat at the end of the runway on the tarmac doing the preflight checks and the cabin lights started flickering intermittently. And we sat, and we sat. And, we returned to the gate and sat some more. I nervously refreshed the ETA on my phone finally watching the arrival in PHX slip past the departure to HNL. I deplaned.
The agents tried to convince me that I could “just take the flight to Honolulu tomorrow.” With some effort, I communicated to them that the HNL-PPG (Sa’moa) leg my journey only goes on Mondays and Fridays and that I would rather be stuck at home for a week rather than a week in Honolulu. So, I cancelled the trip for a second time. My bags went to PHX and were delivered to my house the next day. I rescheduled the trip for late April with a night in Honolulu on the outbound leg to avoid this bit of bad luck happening twice.
Two days before I left, my local contact called me on the phone to tell me that Tropical Cyclone Amos was bearing down on the island. Fortunately, the hurricane dumped some rain and brought some winds but passed to the north of island. The April trip went off without a hitch, although it was scheduled for four days (Monday night – Friday night) instead of the original seven. So, I was hustling to get my work done and find time for radio.
I was vaguely aware that KC0W is also in KH8, but given my historical bad luck with this particular visit, I didn’t reach out to him. In fact, he’s the one that contacted me once I arrived. We met for breakfast at the McDonald’s in Tafuna one morning and had a nice long ragchew about radio and travel. Typical hams. I decided to focus on bands (especially 160) that Tom wasn’t on given my limited time on the island.
Fortunately, I had access to this mobile phone tower, which I use for my wireless networking for instruments as well. So, I climbed up to check on the network equipment and put a pulley on the tower so I could raise and lower ham antennas safely after-hours when no one was around.
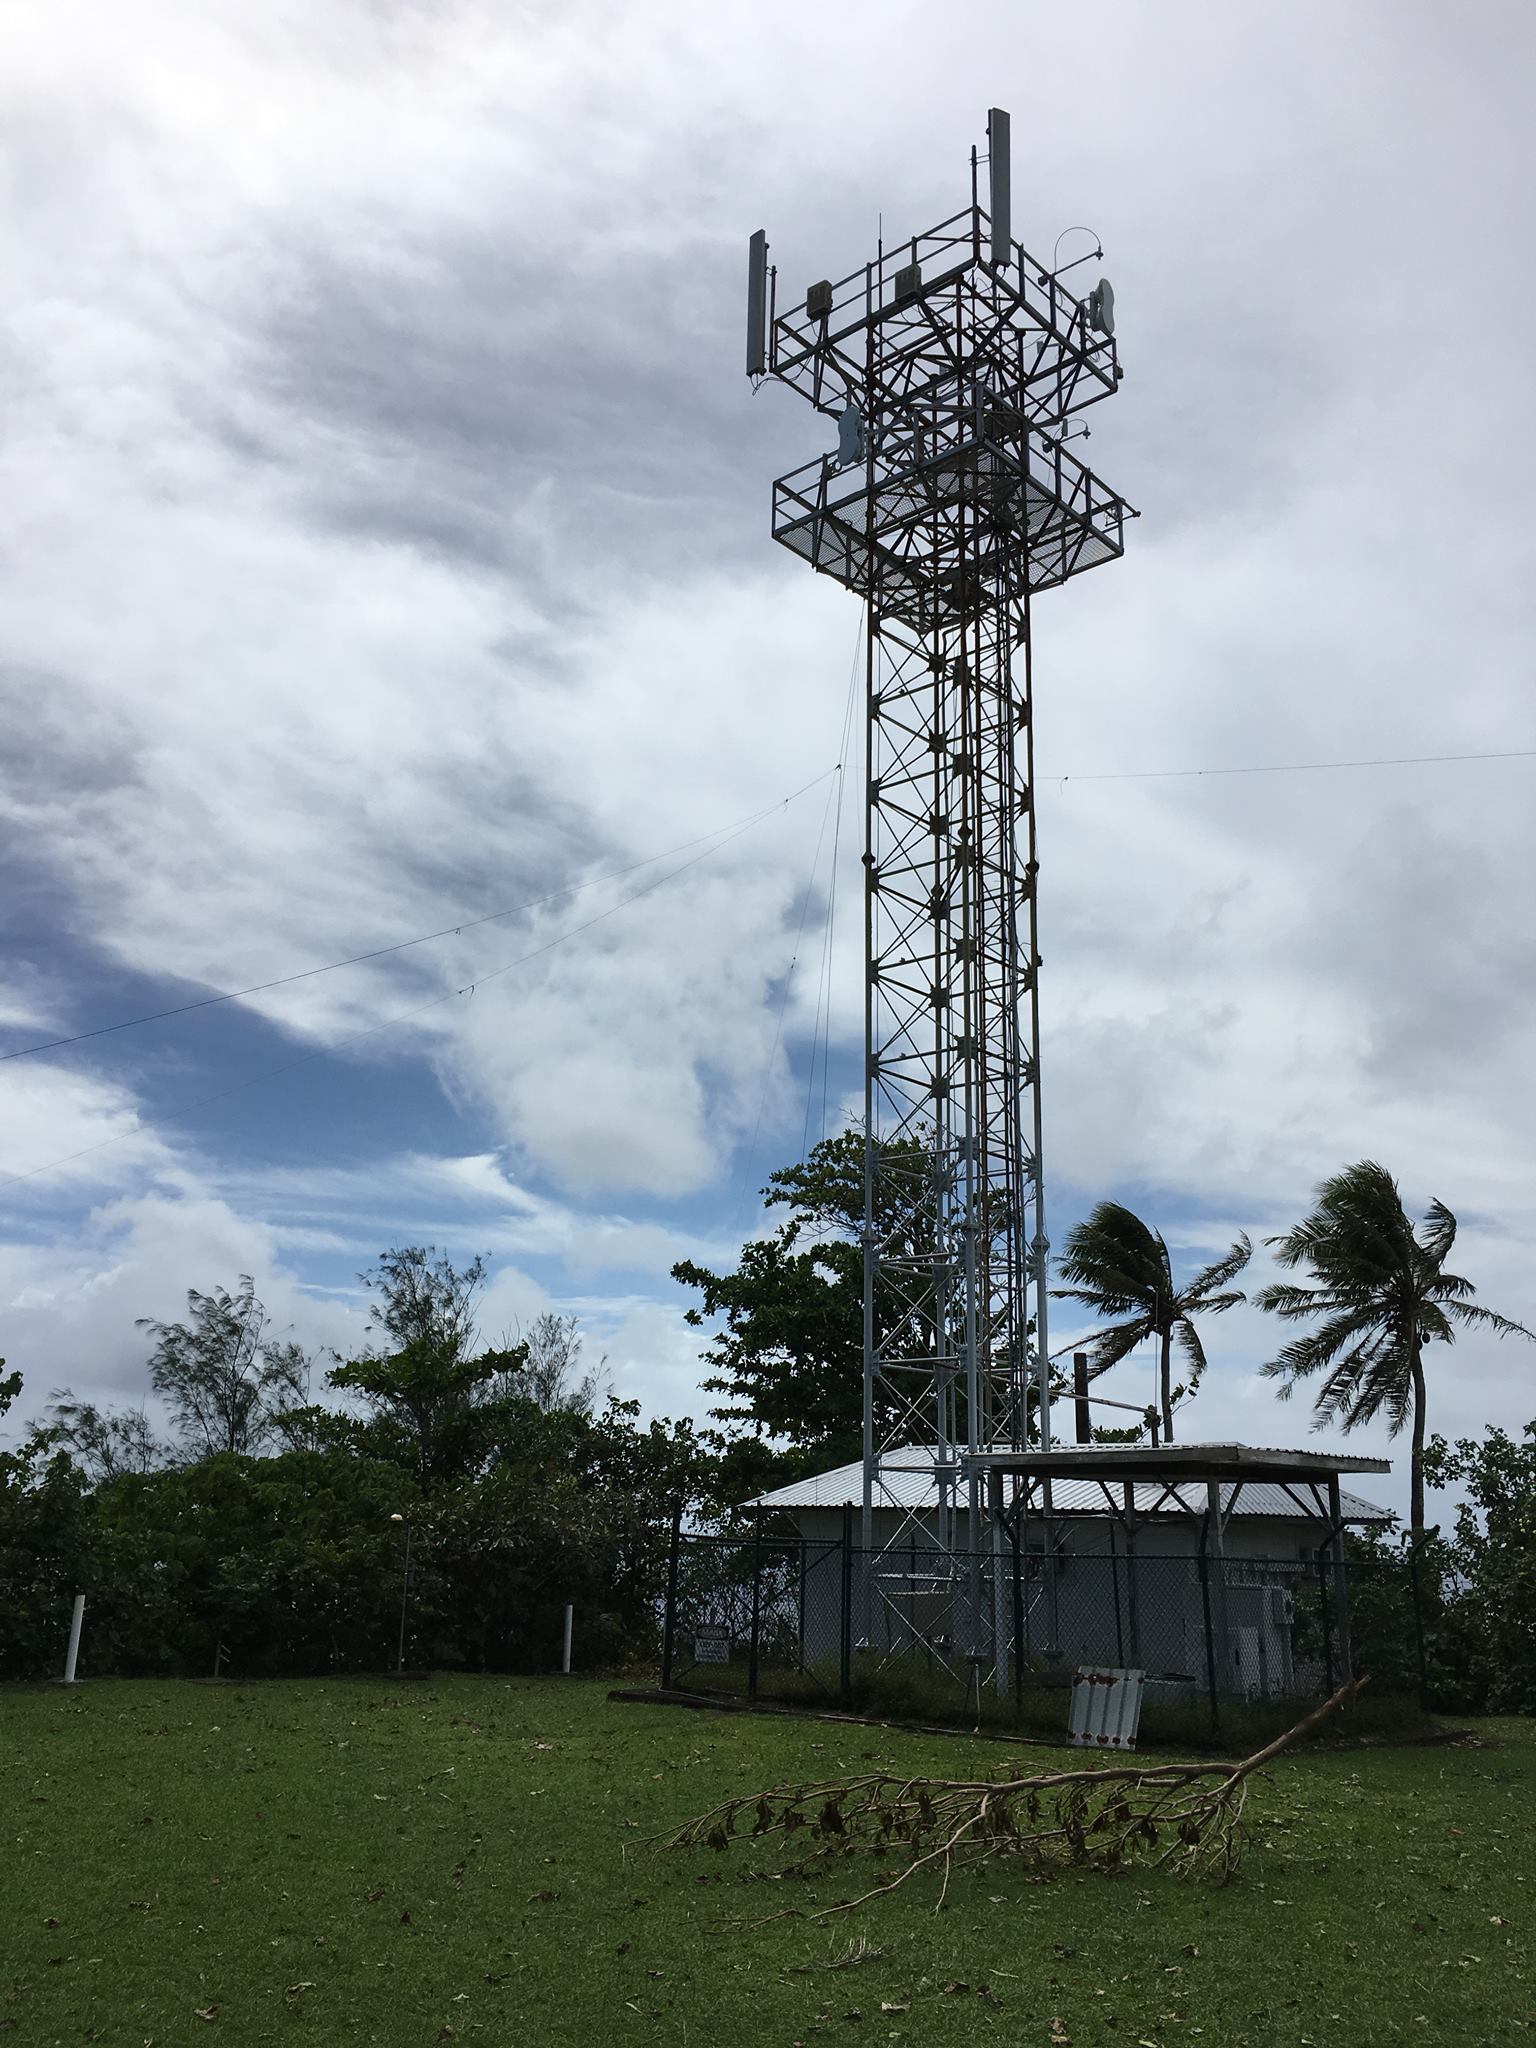
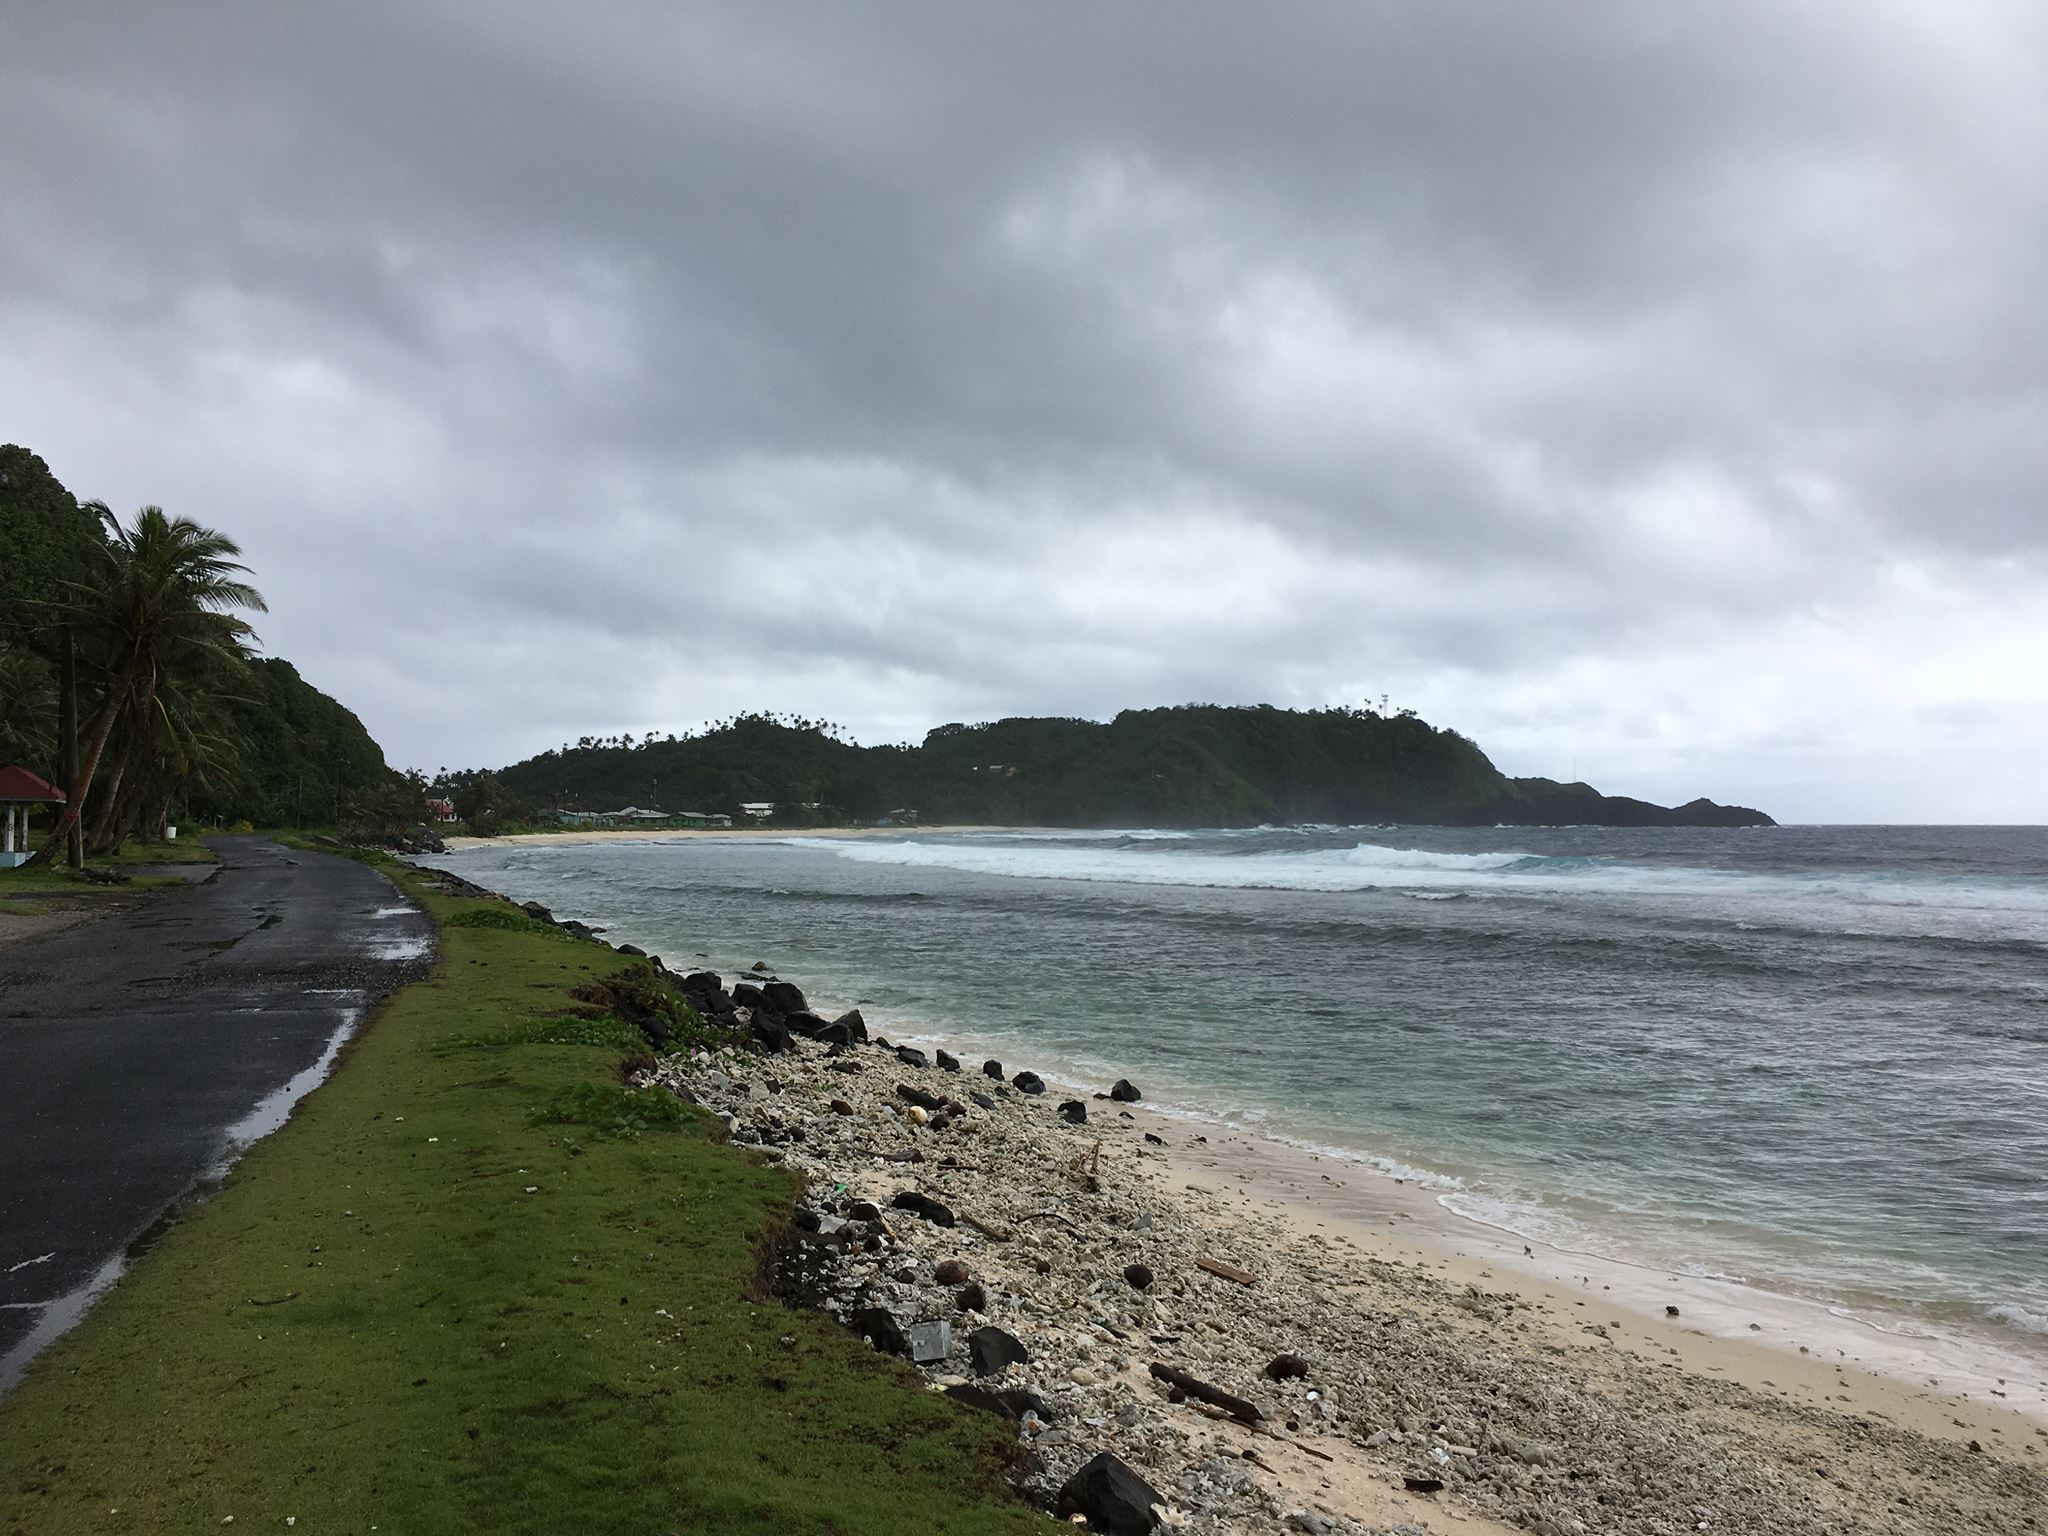
The tower is on the top of Cape Matatula, which sticks out of the northeast corner of Tutuila island. It’s the bit of land jutting out in the middle of the photo below. If you open the full-size photo, you can see the tower just at the edge of a rather precipitous drop-off toward the rocky shore about 1/3 of the way from the right-hand side of the frame. Needless to say, it’s a great QTH with 270 degrees of saltwater view as I’ve mentioned before. At sunrise and sunset, the middle and higher bands are open to EU, JA, and NA/SA all at once. The pileups are thrilling but very challenging.
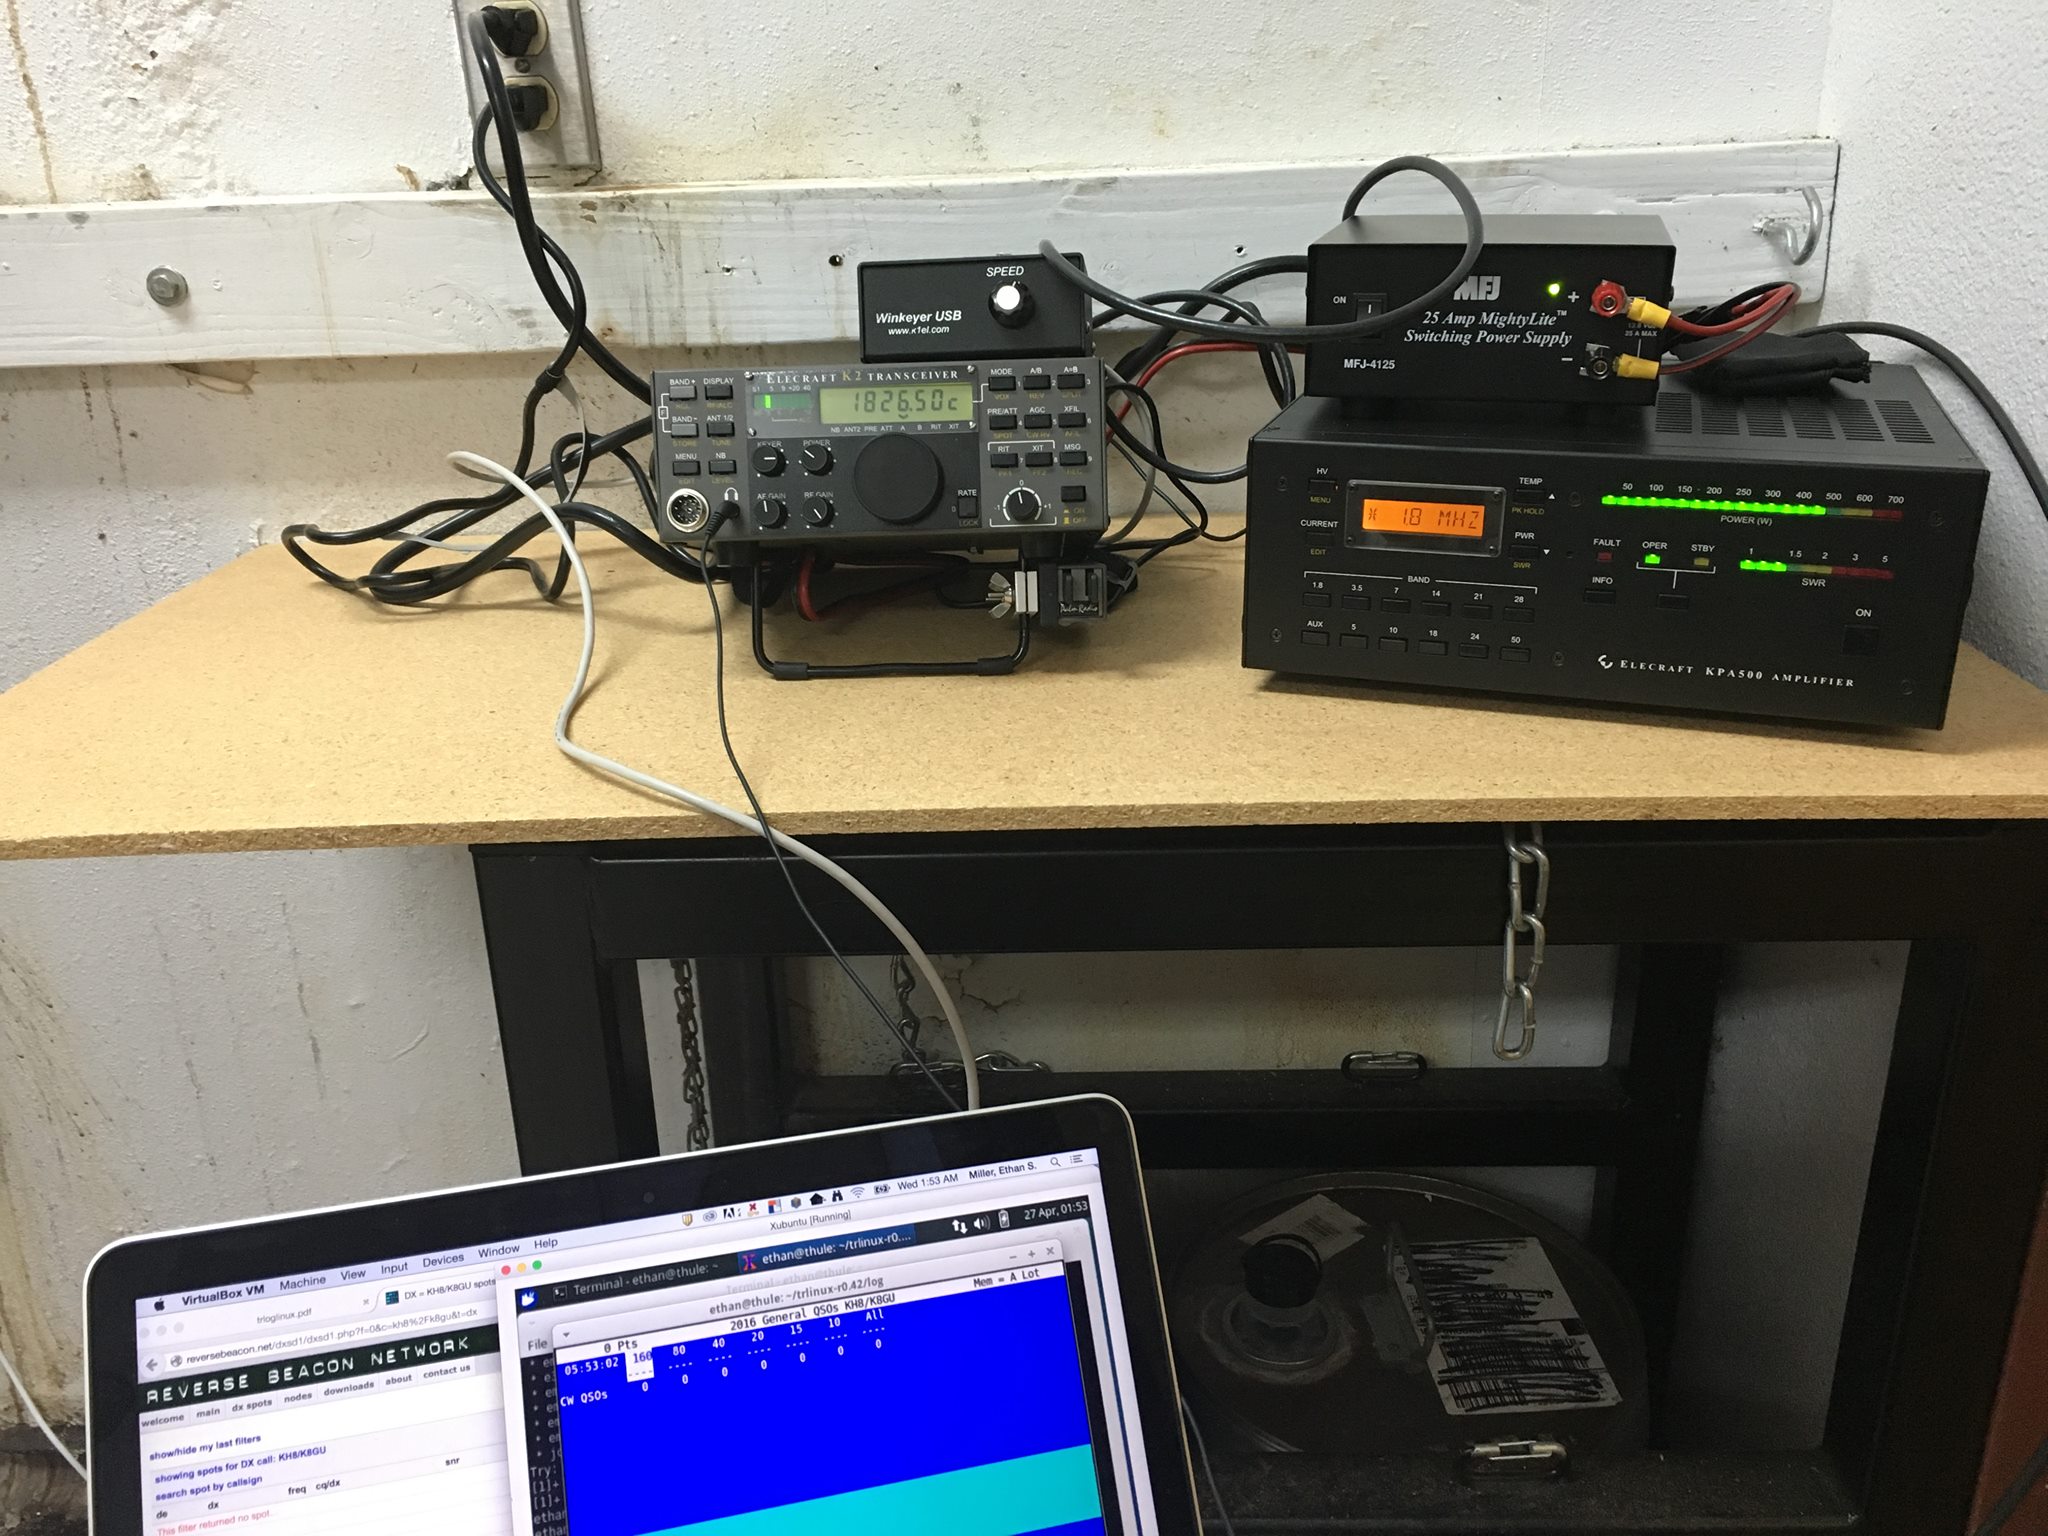
Here’s the radio setup from this trip: K2/100, KPA500, WKUSB, and TRLinux running under VirtualBox on my Mac. This worked OK, but the WKUSB would drop out every few QSOs and needed to be completely rebooted which meant that I had to unplug the USB cable and restart TRLinux. Obviously, this worked when I tested it at home but I was not stressing it like I was in the field. I’m not sure whether it was an RF issue or software/hardware. In any case, I will probably be installing another Windows VM like I’ve used previously.
I only ended up making about 400 QSOs on this trip, which is way down from the approximately 3000 QSOs I made over the past two trips. The combination of aggressive work schedule, glitchy keying, and poor 160-meter conditions (too late in the season, but I made a few guys happy), made it hard to get excited about operating a lot. Furthermore, my operating position was located in a room with an air compressor nearby that would kick on every few minutes. Even with the excellent Etymotic MC5 earbuds, it was still loud. Enough complaining! There will be at least one more trip out there under my present project and if KC0W hasn’t worked everybody, I’ll be there to give you all new counters again. I just uploaded the log to LoTW before I posted this blog entry. I have not responded to any direct QSL cards yet.
Ethan Miller, K8GU, is a regular contributor to AmateurRadio.com and writes from Maryland, USA. Contact him at [email protected].
This won’t take long…famous last words!

- Installed the new WD hard drive inserted Win7 CD and started the PC. The screen goes blank and PC shuts down!
- I reboot again and get a message “can’t read boot manager”
- I reboot again this time a blue screen and the message “ corrupt bios”
- I now remove the WD drive from PC and boot from the second drive in the PC (my drive for backup’s) with the Win7 CD all booted ok.
- I now figure the WD is bad but I put the WD drive back in on its own removing the Seagate drive just to make sure. Restart PC and it boots into the Win7 CD without issue.
- I now add the Seagate drive and restart and the PC screen once again goes blank and the PC shuts down.
- I Googled it and found out I may be powering both drives from the same daisy chain on the power supply and it can’t handle it. I have to power each drive from a separate daisy chain from the power supply.
- No problem I thought I will just plug in to a second daisy chain……it was too short!
- I had to move the drive down 3 bays which meant removing RAM and the video card.
- With that done the PC starts no problem and low and behold Win7 starts to install on the WD drive.
- Then all of a sudden part way through install I get a blue screen and a message “memory dump” and this is just an ongoing cycle!
- I went onto a PC forum site and was told to run a WD diagnostic program and I did and I was told my new drive was defective.
- Back to the store with bill in hand and a hard drive that is hours old.
- I was told at store that drive could not be returned as I did not have anti-static bag. I flipped and the exchange was made.
- Put the new drive in the PC and this time I ran the diagnostic program first (learned my lesson) and the drive passed.
- It then loaded Win7 without any issues and it was now time to start loading programs.
- I was told I can’t load this version as I am only running Win7 32 bit???? That’s very odd as I know without a doubt I was using the 64 bit version.
- Then it hit me……I installed my Win7 32 bit version and not the Win7 64 bit version!!!!!!
- So had to reformat the WD drive and start all over again. I installed Win7 64 bit and all went well with the software install.
- Finally I wanted to reformate the Seagate drive as it did have some programs on it from before. I wanted to use it to store my backups on.
- As I went to reformat the Seagate drive I got a message “not an active drive” whatever that means!!!!
- Back to the PC forum and I was guided on how to make the drive active and format it.
- So now I have a Seagate 1TB 32mb 7200 drive for backup and storage. The new Western Digital black 1TB 64gb 7200 drive as my main functioning drive.
Mike Weir, VE9KK, is a regular contributor to AmateurRadio.com and writes from New Brunswick, Canada. Contact him at [email protected].
Ham Radio Mesh Networks – fun and fulfilling
 |
| K9ECB – Erin – Using AREDN mesh to retrieve weather and soil data. |
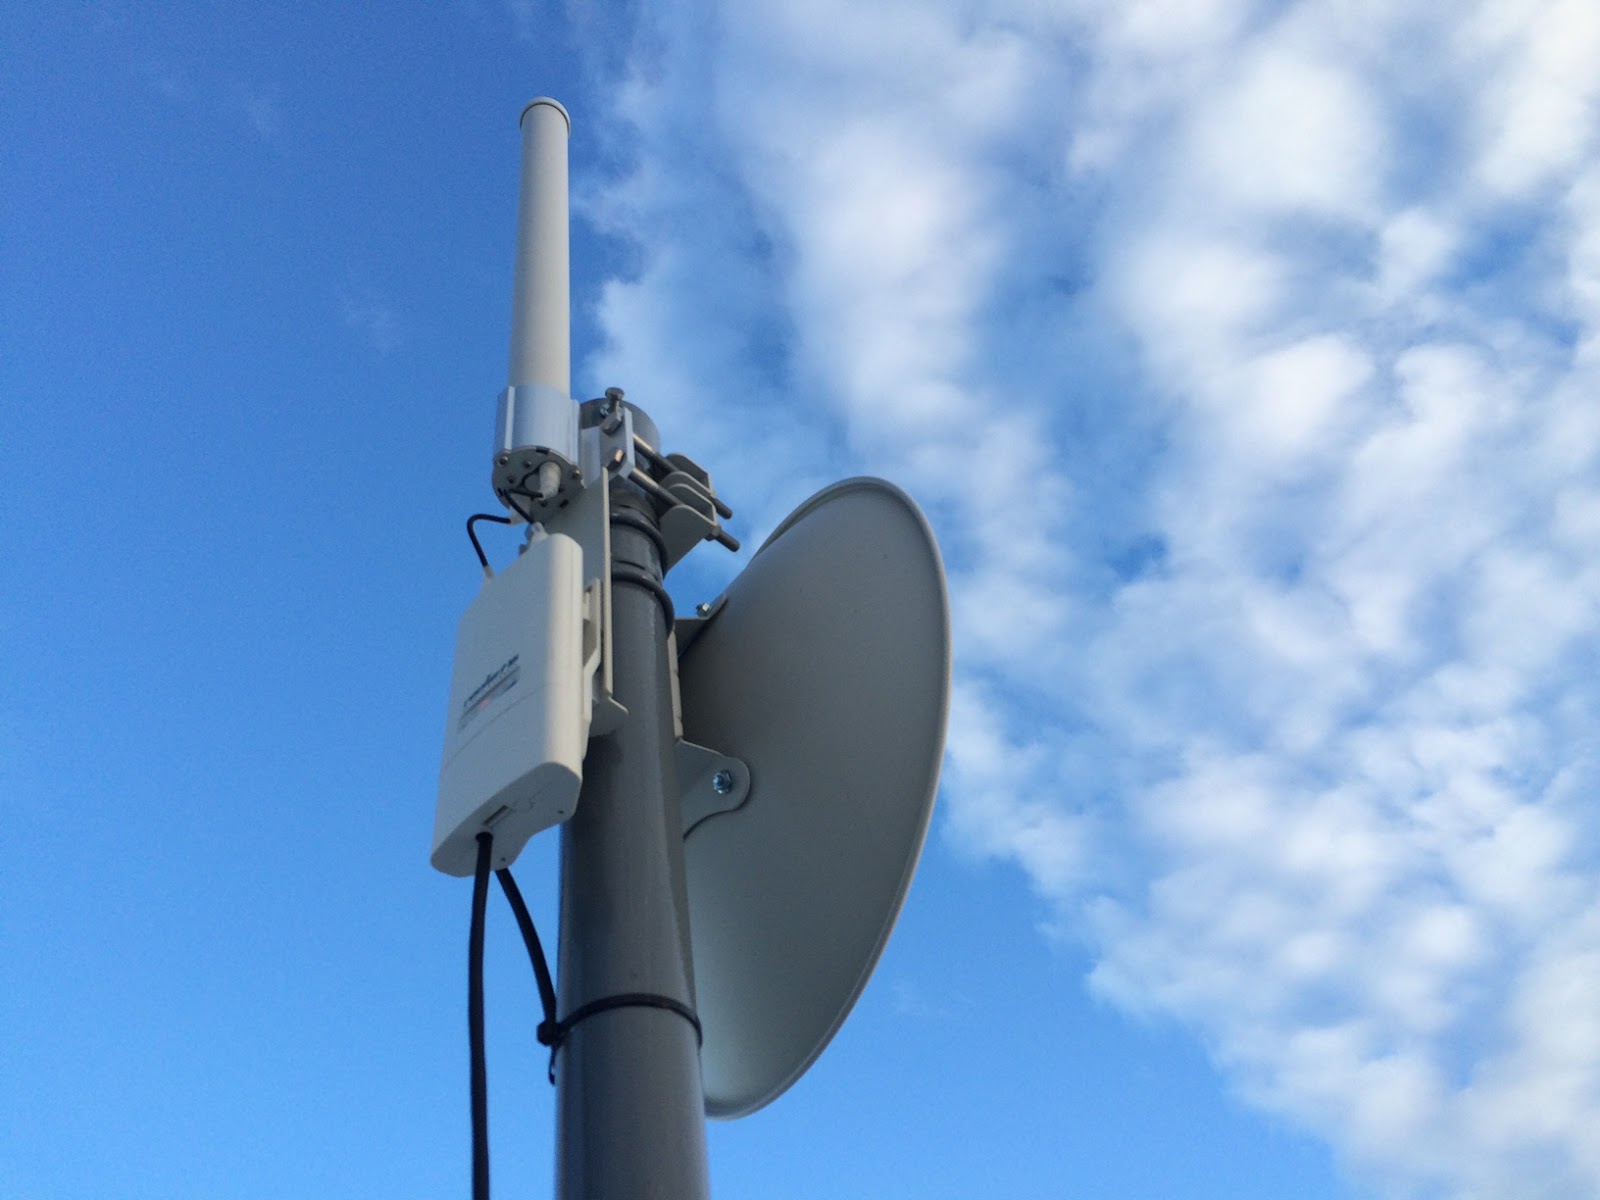 |
| An omni and point to point AREDN 5GHz mesh site feeding a D-STAR repeater. |
Michael Brown, KG9DW, is a regular contributor to AmateurRadio.com and writes from Illinois, USA. Contact him at [email protected].
Ham Radio Mesh Networks – fun and fulfilling
|
| K9ECB – Erin – Using AREDN mesh to retrieve weather and soil data. |
|
| An omni and point to point AREDN 5GHz mesh site feeding a D-STAR repeater. |
Michael Brown, KG9DW, is a regular contributor to AmateurRadio.com and writes from Illinois, USA. Contact him at [email protected].
VE7CNF’s Lightwave Cloubounce / Scatter Tests
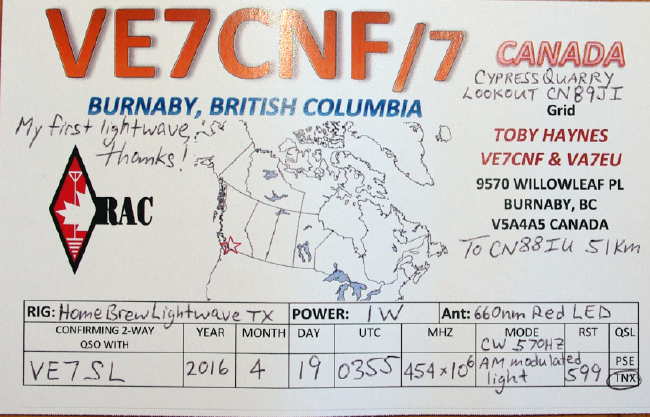
After our recent lightwave CW QSO, described here, Toby (VE7CNF) has been re-focusing on refining his lightwave system for weak signal non-line-of-sight (NLOS) cloudbounce and scatter mode experiments.
His testing to date has been limited to within his own suburban yard, with the transmitter being set up on the south side of the house and the receiver set up on the north, while basically pointing things straight up.
Several tests have already been done with exciting results, including audible CW being returned from a low (5,000') cloud ceiling and weaker returns noted on clear air scatter but readily detected in the CW QRSS mode. Toby has also interfaced his PC audio, via amplifier and FET driver, to enable him to use WSPR and JT9 modes, resulting in positive signal returns using these two digital modes of modulation.
Toby described some of his results and methodology in a recent e-mail updater:
I've done some lightwave backscatter experiments this last week. The transmitter is on my front deck, pointed straight up as verified using a level across the lens end of the box. The receiver is in the back yard and pointed up also. Between the two, the house is about 30ft high and blocks any direct light.
Last night May 8 UTC was clear and I was getting a QRSS10 level signal with the receiver pointed at elevations from 70 to 85 degrees, through the transmitter beam. There was nothing received from straight up, so the clouds were too high for cloud backscatter. At 80 degrees elevation I got the best signal. I've attached an Argo screen grab of QRSS10 (FSK CW with the 570 Hz tone as key-down).
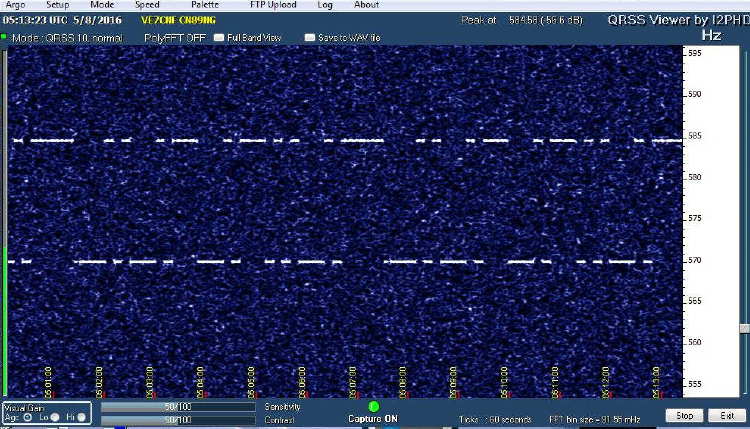 |
| QRSS10 CW clear air scatter return signal |
WSPR2 was decoding consistently and JT9 was about 70%. I tried JT65, BPSK31, and MFSK8 but the SNR was too low for those to work.
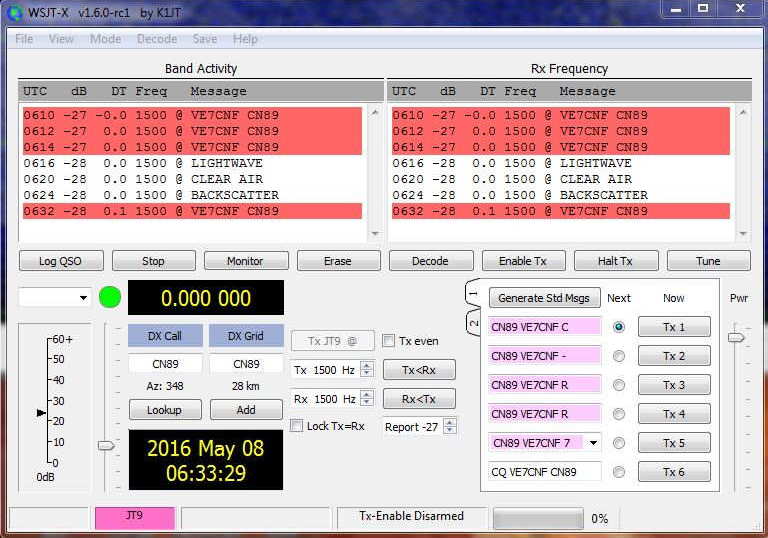 |
| JT9 cloudbounce return signal 14,000 - 24,000 FT |
May 8, 2016 UTC CYVR clouds and temperature/dewpoint data:
0500 FEW CLOUDS (1/8 - 2/8) 14000 FT, SCATTERED CLOUDS (3/8 - 4/8) 24000 FT, 14 C / 11 C
0600 FEW CLOUDS (1/8 - 2/8) 14000 FT, SCATTERED CLOUDS (3/8 - 4/8) 24000 FT, 14 C / 9 C
0700 FEW CLOUDS (1/8 - 2/8) 12000 FT, FEW CLOUDS (1/8 - 2/8) 22000 FT, 13 C / 7 C
... I'll try CW and digital again when there's some lower cloud conditions. That’s tough to get without rain at the same time.
I did get dew on the receiver last night, so I'll be adding heating resistors inside the boxes to keep the lenses warm. Electric heating has worked great to keep dew off the optical surfaces of my telescope. I'll also look at adding shrouds to shield the lenses from the cold sky.
More from May 15th:
I've also attached a screen grab of WSPR2. Signals were up around 0dB this time.
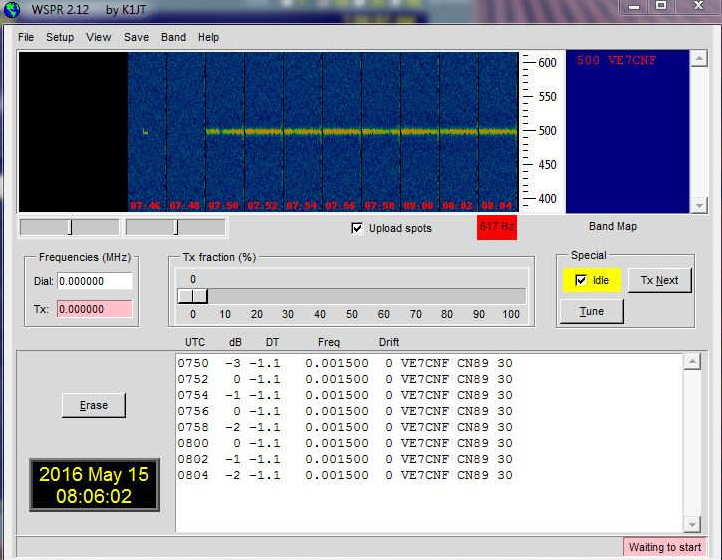 |
| WSPR cloudbounce return signals 1300 - 1900 FT |
I played with a bunch of digital modes and FMHELL and SSTV. Everything was working pretty well off the clouds.
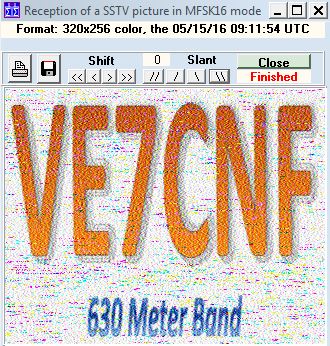 |
| SSTV cloudbounce return signal |
The nextstep is to move the rx farther from home, then to try sending signals over to John or Steve by cloud bounce.
Toby's nearest lightwave neighbour, VA7MM, is in mid-build and is working to complete a system capable of running overnight cloudbounce / scatter tests between their two respective backyards ... the NLOS distance is about 15 km. Although the path includes some bright commercial lighting QRM, with narrow-band modes such as QRSS or WSPR, it may not be a problem. I suspect one of the biggest problems will be getting suitable weather as, here on the west coast, dense clouds usually turn into rain very quickly, especially near the coastal mountains where Toby and Mark are located.
I find Toby's results to be both encouraging and exciting! It will be interesting to try some cloudbounce between their respective stations and my own and maybe hopping the NLOS path across cloudy Georgia Strait. It may well be possible to do this in one of the quicker QRSS CW modes such as QRSS3 or QRSS10, both of which can have fairly fast exchanges of the required information (calls, signal report and final confirmations). Failing that, slower QRSS30 or one of the weak signal digital modes such as JT9 / WSPR which have the ability to dig deep (-30db) into the background noise may be the answer ... there is much to learn yet!
Steve McDonald, VE7SL, is a regular contributor to AmateurRadio.com and writes from British Columbia, Canada. Contact him at [email protected].
Weekly Propagation Summary – 2016 May 16 16:10 UTC
Here is this week’s space weather and geophysical report, issued 2016 May 16 0334 UTC.
Highlights of Solar and Geomagnetic Activity 09 – 15 May 2016
Solar activity was low and only C-class flare activity was observed. Region 2543 (S05, L=002, class/area=Dao/90 on 10 May) produced a C7 flare at 14/1134 UTC which was the largest event of the period. Region 2544 (N21,L=296, class/area=Dao/150 on 15 May) produced five low-level C-class flares on 15 May, the largest being a C1 at 15/0502 UTC. Region 2542 (N12, L=357, class/area=Dai/150 on 09 May) produced a long-duration C3 flare at 15/1603 UTC with an associated filament eruption and partial-halo coronal mass ejection (CME) that departed off of the west limb. Forecaster analysis and WSA/Enlil modelling determined that the CME did not have an Earth-directed component. There were no Earth-directed CMEs during the period.
No proton events were observed at geosynchronous orbit. However, a slight enhancement was observed on 15 May associated with a long-duration C3 flare and filament eruption near Region 2542. A peak flux of 2 pfu was observed on 15 May at 2315 UTC.
The greater than 2 MeV electron flux at geosynchronous orbit was at very high levels from 09-13 May due to the influences of a negative polarity coronal hole high speed stream (CH HSS). High levels were observed on 14 May and moderate levels rounded out the week on 15 May.
Geomagnetic field activity was at unsettled to G3 (Strong) geomagnetic storm levels on 09 May due to the residual effects of a co-rotating interaction region and subsequent negative polarity coronal hole high speed stream (CH HSS). Mainly quiet to unsettled conditions were observed for 10-14 May with a nominal solar wind. A positive polarity CH HSS became connected with Earths magnetic field on 15 May causing quiet to active conditions.
Forecast of Solar and Geomagnetic Activity 16 May – 11 June 2016
Solar activity is expected to be at very low (B-class flares) to low (C-class flares) levels throughout the outlook period.
No proton events are expected at geosynchronous orbit.
The greater than 2 MeV electron flux at geosynchronous orbit is expected to be at high levels on 16-23 May, 30 May-02 Jun, and 06-10 Jun. Moderate flux levels are expected for the remainder of the period.
Geomagnetic field activity is expected to reach G1 (Minor) geomagnetic storm levels on 16, 19-20 May due to the influence of recurrent positive polarity coronal hole high speed streams (CH HSS). G1 (Minor) storm levels are also expected on 29 May and 04-05 June due to the influnce of negative polarity CH HSSs.
Don’t forget to visit our live space weather and radio propagation web site, at: http://SunSpotWatch.com/
Live Aurora mapping is at http://aurora.sunspotwatch.com/
If you are on Twitter, please follow these two users: + https://Twitter.com/NW7US + https://Twitter.com/hfradiospacewx
Get the space weather and radio propagation self-study course, today. Visit http://nw7us.us/swc for the latest sale and for more information!
Check out the stunning view of our Sun in action, as seen during the last five years with the Solar Dynamics Observatory (SDO): https://www.youtube.com/watch?v=zXN-MdoGM9g
We’re on Facebook: http://NW7US.us/swhfr
Visit, subscribe: NW7US Radio Communications and Propagation YouTube Channel
Listen to the music
Comparing CW audio
The Elecraft KX3 and the Ten-Tec Eagle
The radios
Setup
Subjective listening
Richard Carpenter, AA4OO, is a regular contributor to AmateurRadio.com and writes from North Carolina, USA. Contact him at [email protected].
 Ham Radio Deluxe |
 W5SWL Electronics |
 Ham Radio Prep |
 KB3IFH QSL Cards  Hip Ham Shirts  HamRadioAuctions HamRadioAuctions Reliance Antennas Reliance Antennas Enigma Shop Enigma Shop |  morseDX  Ni4L Antennas  R&L Electronics R&L Electronics antennas.us antennas.us QRV QRV |
- Matt W1MST, Managing Editor
