 |
 Ham College 25
Antennas, Coax and more questions from the Technician pool.
1:10:55
George Thomas, W5JDX, is co-host of AmateurLogic.TV, an original amateur radio video program hosted by George Thomas (W5JDX), Tommy Martin (N5ZNO), Peter Berrett (VK3PB), and Emile Diodene (KE5QKR). Contact him at [email protected].
2nd Midwinter 630m Activity Event
One week from tonight, on Saturday Feb 4th, the 2nd Midwinter 630m Activity Event will take place.
The highlight of this event will be the opportunity for amateurs, throughout North America, to attempt crossband CW contacts with Canadian amateurs operating on 630m.
Canadian stations will call CQ on announced frequencies within the 630m band and listen on individual HF (QSX) frequencies for callers.
Due to the RTTY and Sprint activities on the same night, some of the QSX frequencies have been shifted from those that might normally have been used in the past.
There appears to be a lot of growing interest in 630m among American operators. It is hoped that the USA will soon have access to 630m as a ham band.
There will also be a large turnout of U.S. experimental activity, either in beacon mode or in two-way QSO mode with other experimental service stations.
In past events, Transcontinental crossband contacts have been completed. It is hoped that operating events such as this can serve to demonstrate the interesting propagation possibilities of this unique part of the spectrum and generate more new interest in the 630m band.
To read more about this event, please see the ARRL news announcement here.
This time out, there will be six Canadian stations, from Newfoundland to the west coast, hoping to work as many of you as possible!
Station: CF7MM (Mark) CN89 Coquitlam, British Columbia
Time: February 5, 0200-0700 UTC
Transmit frequency: 475.0 kHz
Receive (QSX) frequency: 1,801 kHz, 3,501 kHz, 3,528, and 7,028 kHz
Station: VE7BDQ (John) CN89 Delta, British Columbia
Time: February 5, 0300-0700 UTC
Transmit frequency: 474.0 kHz
Receive (QSX) frequency: 1,833 kHz, 3,533 kHz
Station: CG7CNF (Toby) CN89 Burnaby, British Columbia
Time: February 5, 0200-0800 UTC
Transmit frequency: 476.5 kHz
Receive (QSX) frequency: 1,827 kHz, 3,527 kHz, 7,027 kHz
Station: VE7SL (Steve) CN88 Mayne Island, British Columbia
Time: February 5, 0200-0700 UTC
Transmit frequency: 473.0 kHz
Receive (QSX) frequency: 3,526 kHz, 7,115 kHz
Station: VO1NA (Joe) GN37 Torbay, Newfoundland
Time: February 4, 2130 UTC, until February 5, 0130 UTC
After 0130 UTC, 5WPM CW beacon until 1000 UTC
Transmit frequency: 477.7 kHz
Receive (QSX) frequency: 3,525.5 kHz
Station: VE3OT (Mitch) EN92 London, Ontario
Time: February 5, 0000-0500 UTC
Transmit frequency: 477.0 kHz
Receive (QSX) frequency: 3,610 kHz, 7,105 kHz
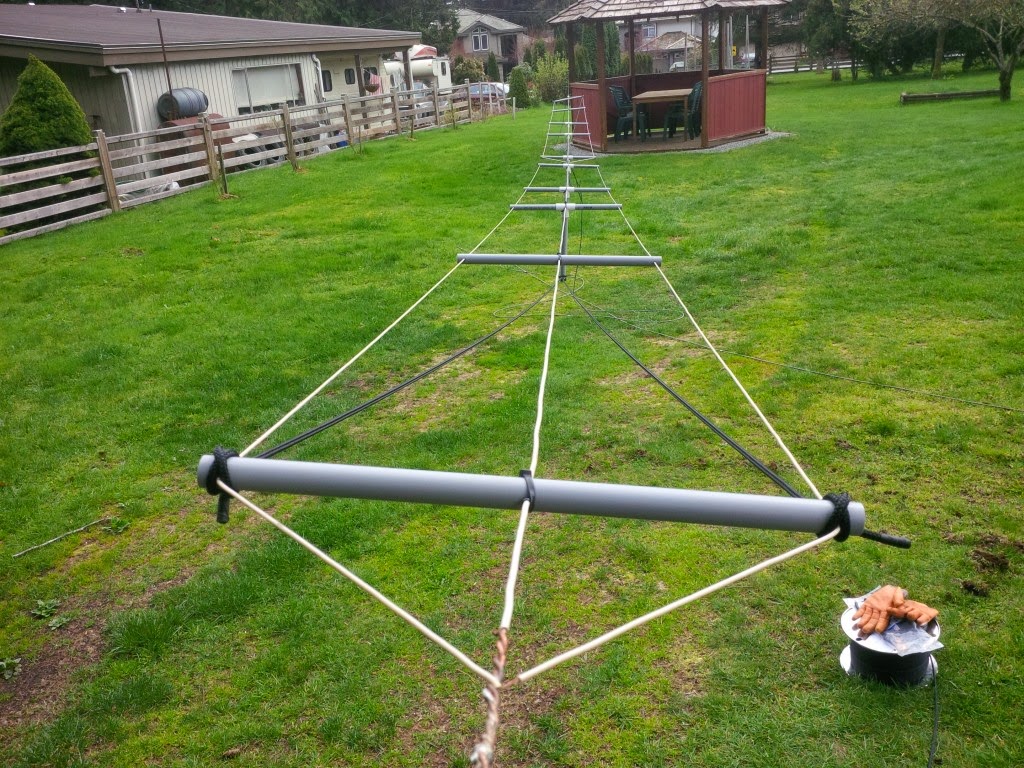 |
| VA7MM 630m Top Hat Under Construction |
Steve McDonald, VE7SL, is a regular contributor to AmateurRadio.com and writes from British Columbia, Canada. Contact him at [email protected].
PW makes an appearance at WH Smith

However could the tide of policy changed it's direction at my local small branch of WH Smith and others? PW is once again available on the shelf, forefront, alongside with it's sister magazine Radiouser.
Practical Wireless is the only independent magazine representing the amateur radio hobby in the UK, it is good to see someone has finally done something to get it back where it belongs, so a new generation can peruse and purchase it along with us old timers.
Steve, G1KQH, is a regular contributor to AmateurRadio.com and writes from England. Contact him at [email protected].
PW makes an appearance at WH Smith
However could the tide of policy changed it's direction at my local small branch of WH Smith and others? PW is once again available on the shelf, forefront, alongside with it's sister magazine Radiouser.
Practical Wireless is the only independent magazine representing the amateur radio hobby in the UK, it is good to see someone has finally done something to get it back where it belongs, so a new generation can peruse and purchase it along with us old timers.
Steve, G1KQH, is a regular contributor to AmateurRadio.com and writes from England. Contact him at [email protected].
Amateur Radio Weekly – Issue 144

Winter Field Day this weekend
If you are as serious about emergency communications as we are, we welcome you to join us for our yearly event.
WFDA
New FCC Chairman praises Parity Act
Newly designated FCC Chairman Ajit Pai praised the House action on H.R. 555 and other telecommunications-related legislation that cleared the chamber.
ARRL
HamRadio360: All about APRS
APRS, oh the questions you’ve raised!
HamRadio360
CIA documents about Ham Radio declassified
The CIA has recently released around 13 million pages of declassified documents. Among these documents is a set of reports on Ham Radio in the former Soviet Union.
Ham Radio Reviews
Making broadcast towers bird-friendly
In 1976 in Gun Lake, Mich., one tower killed more than 2,300 birds in one night.
NPR
Mt Herman Winter Activation
We returned to the Most Radio Active Mountain in Colorado, Mount Herman, for a combination VHF contest, SOTA activation and winter hike.
K0NR
Simple Wi-Fi Yagi
It’s easy to make a small Yagi for a wireless router even if it lacks an antenna connector. The photo shows how I added two parasitic elements to the sleeve dipole of my Netgear WGR614.
K6STI
Building an ADS-B station
Complete guide to building an ADS-B station: theory, components, maximizing reception performance.
Radio for Everyone
Headset shootout
Headset reviews are about a dime a dozen on the internet. They’re all subjective too. Everyone’s hearing is different. Especially mine!
K5ACL
Video
Winter Field Day: 5 basic winter survival tips
Winter Field Day is an opportunity to test your gear and personal effectiveness in cold weather conditions.
OH8STN
WSJT-X Raspberry Pi split mode
WSJT-X on a Raspberry Pi.
K0PIR
Amateur Radio Weekly is curated by Cale Mooth K4HCK. Sign up free to receive ham radio's most relevant news, projects, technology and events by e-mail each week at http://www.hamweekly.com.
Happy Year of the Rooster
 The monkeys are out, the roosters are in. If you are celebrating or not, a happy Chinese New Year to you.
Not much to report from my side. Amateur radio has taken a back seat, partly due to work, partly due to the enormous noise levels that plague me on HF. With the sun not cooperating there is little to be found on the bands, except for way down low. Steve (VE7SL) has promoted NDB DXing more than once here on Amateurradio.com and I am hooked (again), too. Even with my limited antenna I can pick up new stations every time I turn on my TS-440S. My best DX sofar is an NDB from Indonesia; over 3000 kilometers away. Not bad, but not good enough either. Unfortunately I have many AM stations in the area putting out ghost signals on Long Wave. Dealing with them is a pain, but it’s necessary if I want to join the fun on 630 meters. So far, no luck, but we’ll keep on trying.
Hans "Fong" van den Boogert, BX2ABT, is a regular contributor to AmateurRadio.com and writes from Taiwan. Contact him at [email protected].
IO IO it’s off Yahoo groups we go!
Groups.io is the new place where Hams and I guess many others are moving their discussion groups from Yahoo. I was first notified over a month ago that QRPLABS was moving over, I created an account with groups.io and sure enough if by magic it apppeared in my new groups.io account. Using it has become very easy and straight forward, and I find it doesn't suffer from the access lag that Yahoo groups suffered. Since joining, the BITX20 group has also moved and so have a few others, I expect many others will follow.
Groups.io has a full automated transfer service for groups that wish to transfer over:https://groups.io/static/transfer I have not used the transfer myself, but all the groups that have moved I am member of that have chosen to move to the new service appear to have gone over smooth, and they popped into my group.io account.
Steve, G1KQH, is a regular contributor to AmateurRadio.com and writes from England. Contact him at [email protected].
 Ham Radio Deluxe |
 W5SWL Electronics |
 Ham Radio Prep |
 KB3IFH QSL Cards  Hip Ham Shirts  HamRadioAuctions HamRadioAuctions Reliance Antennas Reliance Antennas Enigma Shop Enigma Shop |  morseDX  Ni4L Antennas  R&L Electronics R&L Electronics antennas.us antennas.us QRV QRV |
- Matt W1MST, Managing Editor
