 |
 Video recording woes
Getting the audio right shouldn't be this hard...
I've created videos of the top 100 Words, 500 Words and today, the top 100 most common words in a QSO, at different speeds. I'm machine generating rather than keying them by hand because I would make too many mistakes. I do this through my memory keyer connected to the computer via a terminal application and capture the text being sent along with the audio.
Richard Carpenter, AA4OO, is a regular contributor to AmateurRadio.com and writes from North Carolina, USA. Contact him at [email protected].
CW key dilemma
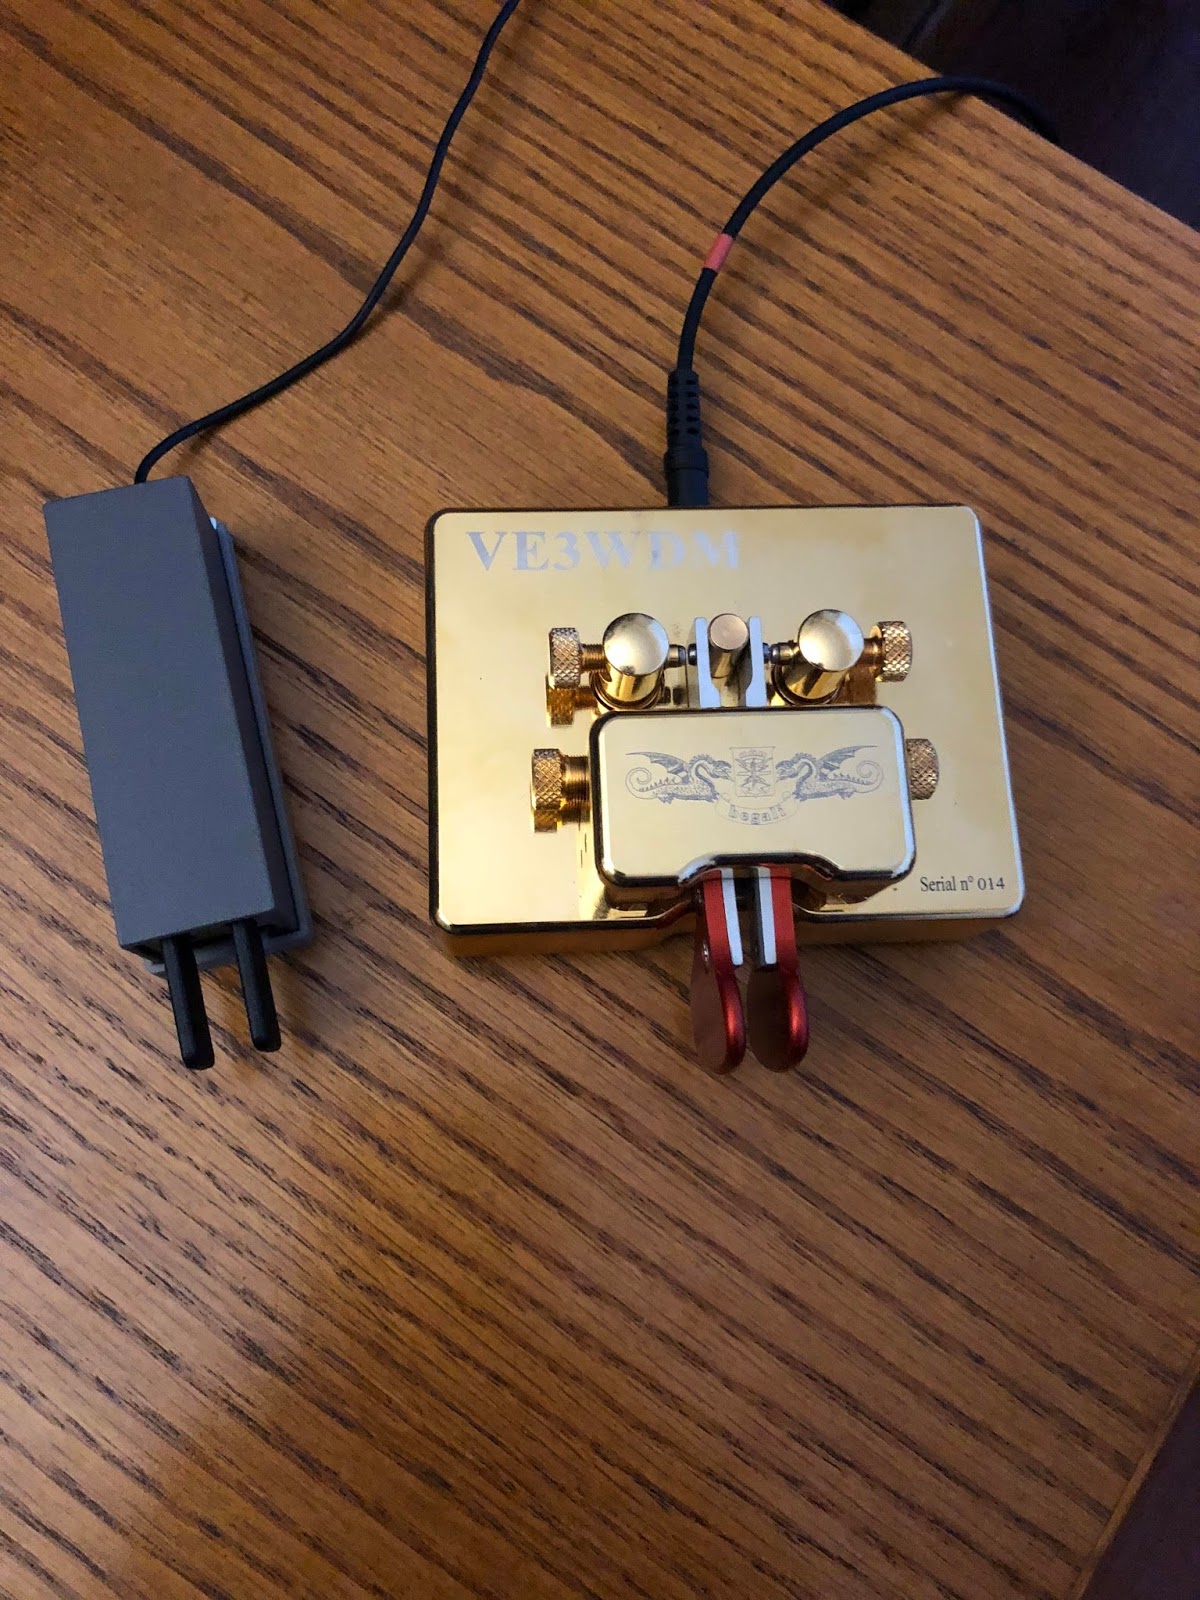
Some time ago I purchased a Begali Key, the Contour key. I have read lots about having a good key, of how it makes sending the code an art. I have to say that from day one the Contour key and I have had a love-hate relationship! The craftsmanship of the key is next to none as are all of the Begali keys. I am not sure if it's just this key or the contour keys but for way to long when ever I use this key I send extra dots and dashes or the spacing gets screwed up. I used to think it was just me and my sloppy fist until I did more portable op's and used the Mini Palm paddle. I just never seemed to miss a beat with this paddle there was no extra anything and the code was very smooth all the time. I have contacted Begali and exchanged many emails about adjusting the key, cleaning the contacts on the key and spacing the contacts on the key. It just seems to be the same old frustration with the Contour key. When I got on the radio today for the RAC contest I started out with the Begali key and after sending some very simple but very embarrassing exchanges I switched to the Mini Palm Paddle and exchanges were sent with not one error. I would put the Begali key up for sale in a second but it has my call engraved in it. I still think nothing can be said for a good quality key but it seems the Begali Contour is just not for me.
Mike Weir, VE9KK, is a regular contributor to AmateurRadio.com and writes from New Brunswick, Canada. Contact him at [email protected].
Amateur Radio Weekly – Issue 187

2017 Year in Review
For this last issue of the year, I pulled the most popular links from each issue and complied the top 10
as a ‘look back’ on the world of Amateur Radio in 2017. Enjoy! –Cale K4HCK
#10
End Fed Antennas – Where’s the other half?
I was shocked to say the least, a guy that’s been a ham for 20 years that’s never heard of the End-Fed antenna?
K5ACL (Issue 147)
#9
What pushed Radio Shack into bankruptcy?
After two years of unsuccessful turnaround efforts, RadioShack filed for its second bankruptcy, citing poor mobile sales.
The Christian Science Monitor (Issue 149)
#8
FT8
I was actually flabbergasted by the amount of signals I already received at the 20m FT8 frequency. Within a few moments I already worked HA6NN and A92AA.
PE4BAS (Issue 165)
#7
Teardown Tuesday: Baofeng UV-5R
This display driver has been around since the late 80s.
All About Circuits (Issue 148)
#6
A better way to put a PL-259 on RG-58 coax
This soldering technique simplifies assembly of PL-259s with RG-58 cable.
KB6NU (Issue 155)
#5
The future of Amateur Radio is not in the numbers
In truth, anyone of any age is a potential good candidate to ensure the future of amateur radio.
Off Grid Ham (Issue 170)
#4
First transceiver with built-in FreeDV
Chinese Ham Radio gear for HF with built-in FreeDV digital voice mode.
marxy.org (Issue 153)
#3
Millennials are killing Ham Radio
Despite being clickbait, the title isn’t wrong. Millennials are definitely killing ham radio, just like they’re killing everything else.
N0SSC (Issue 182)
#2
80/40 Meter Loaded Dipole Antenna
The plan for this antenna was to build a lightweight 80/40 meter antenna for field use (as part of my Go Kit) that wouldn’t overload my 21 foot telescoping fiberglass mast.
High on Solder (Issue 151)
#1
FCC revisions will affect GMRS, FRS, CB, other Part 95 devices
CBers will be allowed to contact stations outside of the FCC-imposed — but widely disregarded — 155.3 mile distance limit.
ARRL (Issue 156)
Bonus!
#11
µBITX general coverage HF SSB/CW transceiver kit
It works from 3 MHz to 30 MHz, with up to 10 watts on SSB and CW with a very sensitive receiver.
HF Signals (Issue 185)
#12
The “Slick Six” 6 meter horizontal dipole
This antenna is small, only about 9 feet 4 inches from end to end and is easy to adjust.
hamuniverse.com (Issue 145)
Amateur Radio Weekly is curated by Cale Mooth K4HCK. Sign up free to receive ham radio's most relevant news, projects, technology and events by e-mail each week at http://www.hamweekly.com.
Top Five Underrated K0NR Blog Posts
 Normally at the end year, I list the five blog posts that got the most hits during the year. It turns out that this list does not change a lot from year to year. For completeness and consistency, these are the top five posts for 2017, in rank order:
Choose Your 2m Frequency Wisely , Getting Started on 2m SSB , Can I Use My Ham Radio on Public Safety Frequencies? , DMR Hotspot from SharkRF and Introducing the Android HT
What I’m doing different this year is to list the five posts that I think readers should read but haven’t made the most hit list. This is based on my personal opinion but what the heck. You’ll see a theme of trying to make sense of how amateur radio fits into our modern world.We’ve Got Some Explaining to Do
Amateur Radio is Not for Talking
That’s Not Real Ham Radio
Is the Internet Destroying Amateur Radio?
Amateur Radio: Narrowband Communications in a Broadband WorldHere is a sixth bonus article…very interesting story about Prisoners of War building radios in World War II.
POW Canteen Radio73 and Happy New Year! Bob K0NR The post Top Five Underrated K0NR Blog Posts appeared first on The KØNR Radio Site.
Bob Witte, KØNR, is a regular contributor to AmateurRadio.com and writes from Colorado, USA. Contact him at [email protected].
QRSS experiments: FSKCW and Slow Hell
These last few days I’ve been experimenting with my QRPLabs Ultimate 2 and Ultimate 3s transmitting on 7 MHz. In addition to WSPR, the modes transmitted have been FSKCW with 6 second long dots, and Slow Hell with 17 second long characters. The result as received this morning can be seen on the display from the grabber of Les, G3VYZ in Northumberland, UK. This is a stack of 6 consecutive 10 second frames as can be found on the QRSS grabber site of AJ4VD.
 |
| FSKCW and Slow Hell reception of LA3ZA at G3VYZ |
My signal is on 7,039.870 kHz and has been set up with a FSK shift of 6 Hz. Power output was 0.2 W and the distance is about 890 km.
It works but the reception is much less reliable than for WSPR, which is not so unexpected. At the same time the WSPR signal was received all around Northern Europe (G, GM, DL, OON, OE, LX, LA, OY, OH, PA, SM) as well as on the Canary Islands, 3930 km away.
Sverre Holm, LA3ZA, is a regular contributor to AmateurRadio.com and writes from Norway. Contact him at [email protected].
FT8 anomaly or long delayed echo?
My friend Alf, LA2NTA, has sent med these screenshots from when he has been operating FT8. The first image is when operating 10 meters and took place early in November.
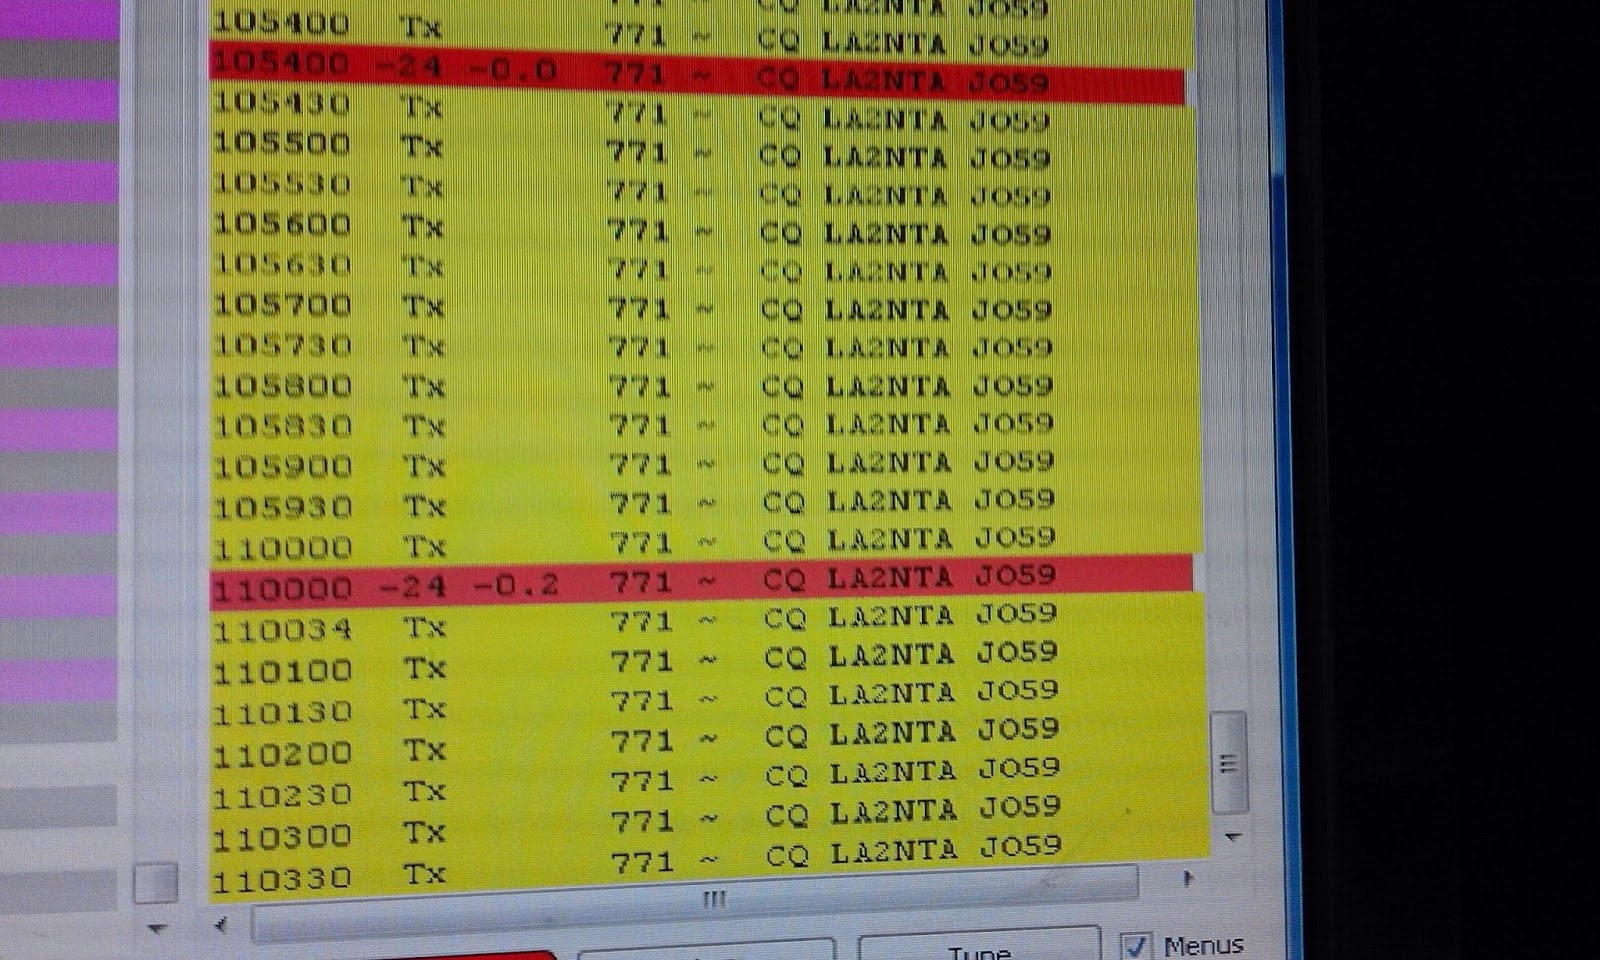 |
| Two of LA2NTA CQs being received by himself on 10 meter (in red) |
It shows how his own CQ comes back to him at 10.54.00 and at 11.00.00 and is decoded in his own receiver.
The second example is from 20 meters and took place just a few days ago.
 |
| LA2NTA CQ being received by himself on 20 meter (in red) |
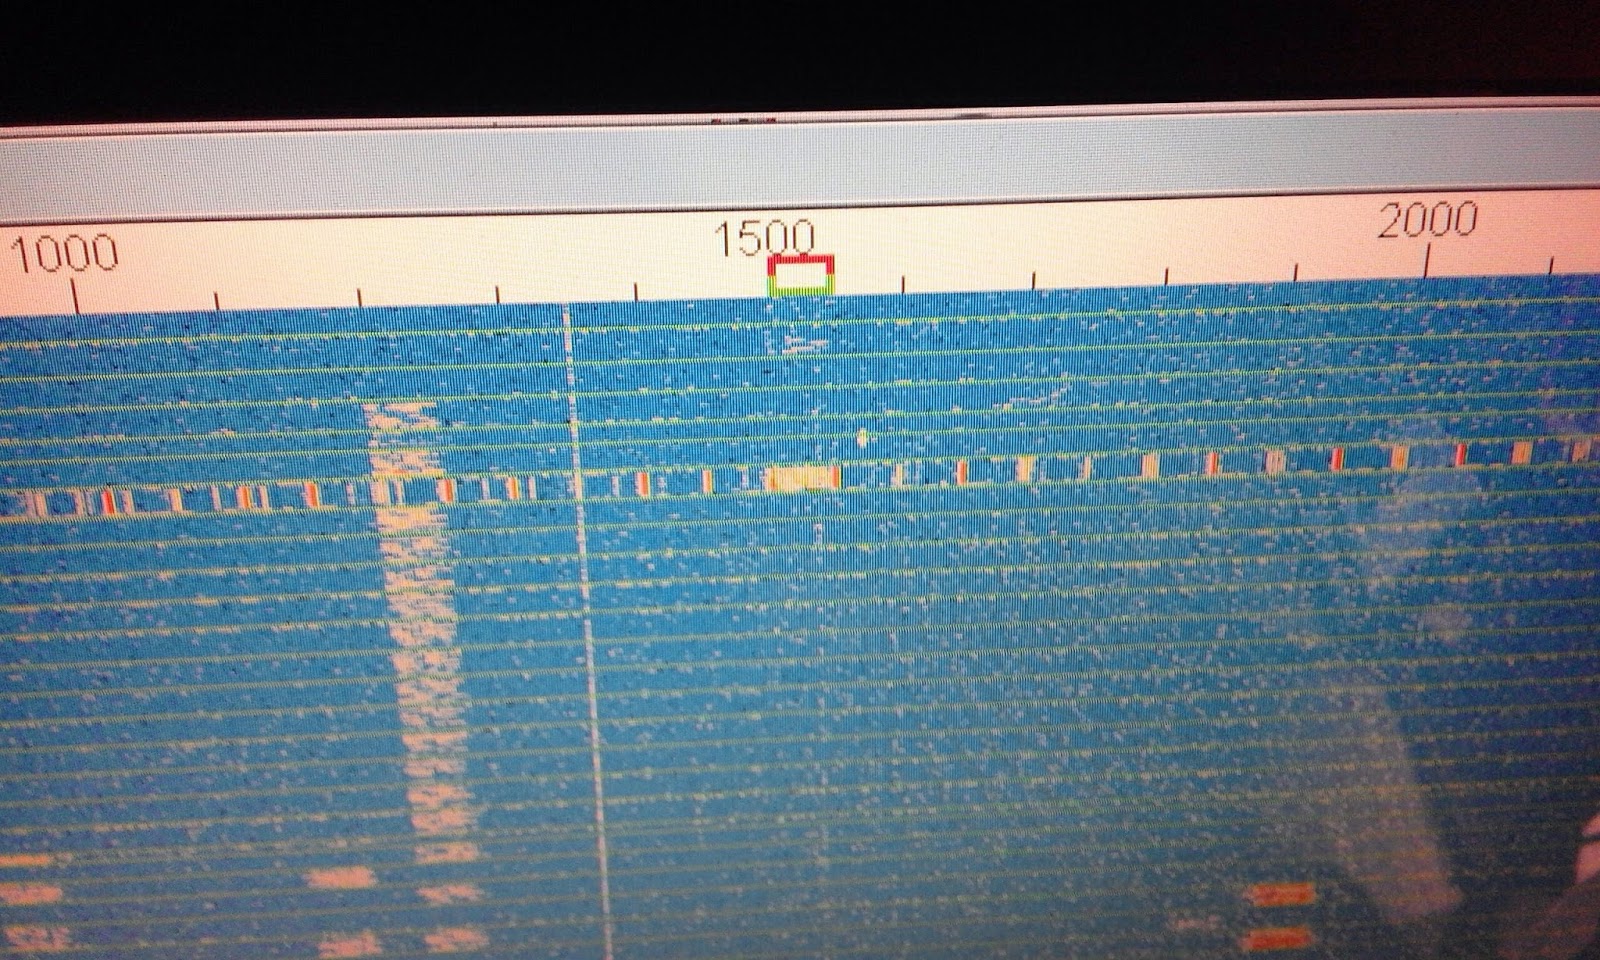 |
| FT8 band on 10 meters showing some form of noise all over the band |
Sverre Holm, LA3ZA, is a regular contributor to AmateurRadio.com and writes from Norway. Contact him at [email protected].
ICQ Podcast Episode 256 – Your Questions Answered
In this, our end of year episode, Colin M6BOY is joined by Martin M1MRB, Edmund Spicer M0MNG, Bill Barnes N3JIX, Ed Durrant DD5LP, Martin Rothwell M0SGL, Chris Howard M0TCH and Leslie Butterfield G0CIB to answer your Amateur / Ham Radio questions.
Colin Butler, M6BOY, is the host of the ICQ Podcast, a weekly radio show about Amateur Radio. Contact him at [email protected].
 Ham Radio Deluxe |
 W5SWL Electronics |
 Ham Radio Prep |
 KB3IFH QSL Cards  Hip Ham Shirts  HamRadioAuctions HamRadioAuctions Reliance Antennas Reliance Antennas Enigma Shop Enigma Shop |  morseDX  Ni4L Antennas  R&L Electronics R&L Electronics antennas.us antennas.us QRV QRV |
- Matt W1MST, Managing Editor
