 |
 Cloudlog on a RPi zero w

As many will testify. I’m not that bright when it comes to clever computer stuff. I can follow instructions quite well and normally this gets me by. So I thought for December I would set myself a challenge of setting up Cloudlog (A really nice looking logging application from Peter 2M0SQL). Only I would be putting it on a Raspberry Pi zero w, without a safety net…or any knowledge of sql, php or any other such acronyms. Here’s what happened.
First things first – You need a LAMP server.
A LAMP server (Linux, Apache, MySQL, PHP) is the thing that will run Cloudlog. We’ll have the Linux part because we’re going to use the normal Raspbian Lite image for our RPI zero w. Apache is installed, as is MySQL and PHP. So first things first. This post is like a nice meal, you’ll not be having bread first, just the starter. Just don’t rush it.
Starter
Do you have a RPi zero w? – If you struggle to find one then use a nice search engine that doesn’t follow you round with a notepad checking on what you’re up to. Perhaps buy from an independent retailer or support your local Pi shop, it might cost a couple of quid extra but you can feel smug about it.
- Have you got the latest Raspibian lite image? If not download it here
- Is is burnt to a suitable micro SD card? I use Sandisk class 10 ones as they seem to be quickest and reliable enough. Try your high street. If not try and support you local Pi shop. This will be the OS ready to go.
- Have you connected to the internet using the command line? it’s pretty easy really, just use this guide.
- Have you enabled SSH on your RPI zero w? RPi headquarters can help again.
- Do you know the ip address of your RPi zero w? in the command line just type.
hostname -I.It will spit out your ip address. For example mine is 192.168.1.113. Make a note of this you’ll need it - Have you logged into your RPi zero w using SSH? Section 4 will help you here
Main Course
So I was really comfortable with the starter. It wasn’t too heavy and just got me feeling a bit peckish for some more. This is where I was a bit uncomfortable and thought that I may have bitten off a bit more than I could chew. But it all worked out nicely in the end.
Installing the server
I followed this guide. I believe that it is de rigueur to caveat this part with some statement that ‘your mileage may vary’ or some such waffle. It might, but if this guide is wrong please shout up and I will correct it. It worked for me but it would be a lot easier if it worked for everyone. You’ll do some straightforward and not so straightforward stuff.
- Make sure everything is up to date
- Install Apache & do a bit of tidying up
- Install PHP
- Install MySQL & do a bit of detective work
- Setup FTP
Everything seems to go well until you hit part 4 where something goes a bit wonky with permissions. I spent quite a bit of time on this and found out that the permissions on the default myphpadmin account weren’t up to scratch and there is a bit of jiggery pokey to do. This should sort it.
Get yourself into MySQL and change the users
From what I could gather the default user does not have enough privileges to do anything, nor does it have access to the users tab in myphpadmin to create a new one. We have to go into MySQL and create
mysqladmin -u root password 'password'
Log in to MySQL
mysql u root
Then do the following. I think I understand, you create a new user using the GRANT command
GRANT ALL to 'username' @ 'localhost' identified by 'password';
where believe it or not the ‘username’ and ‘password’ are exactly that, but for a new user. We’ll use this later
Install Cloudlog
This bit is dead easy. The Cloudlog wiki is exactly what you need. I won’t repeat it here. So for me I downloaded the files from the GitHub page, unzipped them and then uploaded them with an FTP program (Filezilla is popular) to the /var/www folder in the RPi.
Go to your web browser and type in the url you got earlier when you did the hostname -I (Something like 192.168.1.113) only add /install at the end, so for completeness is should be
192.168.1.113/install
Up pops a dialogue. Fill in your details and you are away.
Note: I mucked about a few times when I was sorting out privileges and ended up forgetting the username and password, but the dialogue was good enough to me and I just re-entered everything and it went the second time.
You can now log in as the guest account m0abc which is notes at the bottom of the dialogue.
Dessert
There are a few things to do to get everything ship shape. Firstly delete the demo account and put in your own. Then upload an adif of your existing log (should you have one)
Delete account and create your own
Really easy Admin > Users
Create yourself and give yourself the admin rights
Delete m0abc
Done
Upload adif
So, it turns out that not all adifs are the same. The header in the example below is not to the right format

Whilst this is

Note the ‘#’ at the beginning of every line in the header. If you are going to upload an adif this needs to be checked
Sitting in a comfortable chair and snoozing
I didn’t find this nearly as daunting as it first looks. There is plenty of information on the Cloudlog wiki and to be honest the only hard bit was sorting out the permissions. You don’t need to be an expert in computering. I now have a log I can access on my Linux laptop, Tablet and phone. If I was really down with the kids it wouldn’t be hard to have it web based (I think that can be done for you by MagicBug).
I would say that you’ll probably need a couple of hours to do it but the reward is a good looking, simple to use log that is agnostic to OS.
Give it a go, if any of the instructions are wrong, can be made better or are glaringly stupid because they’ll steal your soul (or sole if you’re not looking) then let me know and we can make this post really handy.
Alex Hill, G7KSE, is a regular contributor to AmateurRadio.com and writes from Cumbria, UK. Contact him at [email protected].
LHS Episode #262: RigPi Deep Dive
 Welcome to Episode 262 of Linux in the Ham Shack. In this episode, we have a special guest, Howard Nurse, W6HN, a longtime amateur radio operator and open-source enthusiast. He has developed the RigPi Station Server, a Raspberry Pi-based hardware and software rig control and operation solution that will be manufactured and sold by MFJ Enterprises. We take an in-depth look at the platform, the underlying operating system, code, open hardware boards, upcoming amateur radio network solution and much more. Thank you for listening and we hope you enjoy this deep dive episode.
73 de The LHS Crew
Russ Woodman, K5TUX, co-hosts the Linux in the Ham Shack podcast which is available for download in both MP3 and OGG audio format. Contact him at [email protected].
Ham College 47
Ham College episode 47 is now available for download.
General Amateur Radio Exam part 18. SSB, Speech Processors, ALC and Beverage Antennas.
1:02:27
George Thomas, W5JDX, is co-host of AmateurLogic.TV, an original amateur radio video program hosted by George Thomas (W5JDX), Tommy Martin (N5ZNO), Peter Berrett (VK3PB), and Emile Diodene (KE5QKR). Contact him at [email protected].
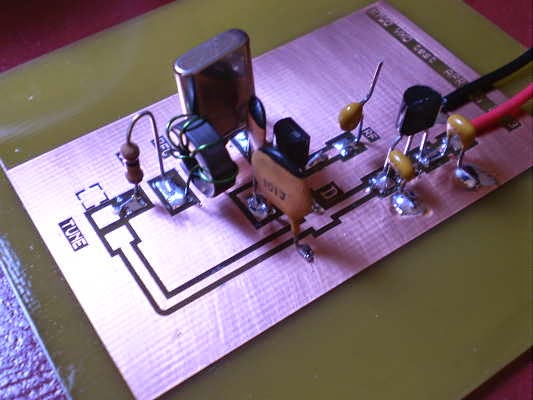
Manhattan Style
I haven't yet decided to rebuild the little 630m CW transmitter using Manhattan style or the newer Muppet style being promoted by Chuck, K7QO.
 |
| K7QO Muppet Style |
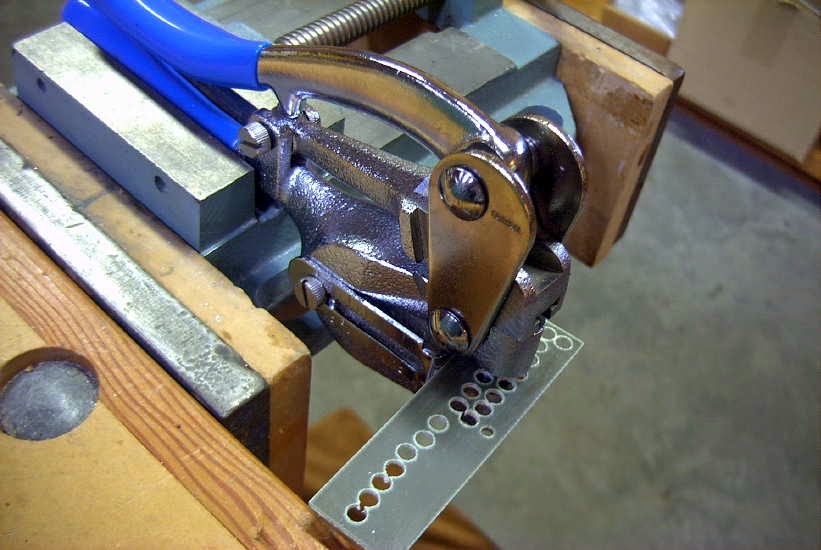
I recently ran low on the pads used for Manhattan and made another pile of various sizes. For those interested in using this style, it's pretty quick and easy to manufacture a good stock of your own pads using a simple hand punch.

These punches are widely available on e-Bay or possibly at your local hardware outlet or craft store. They come with various sized dies but I have only found myself using two sizes, 5/32 and 3/16. The punches have a small point at the center which I filed off so not to create a dimple in the punched pad.
.jpg)

It's also advisable to scuff sand the bottom of the PCB strip as well as to shine up the copper side with some light steel wool before punching any pads. They will eventually be glued to the circuit's PCB copper surface using a small dab of CA ("super glue") glue and the slight scuffing beforehand will ensure that the pads stay put. My usual technique is to place a tiny dab of glue with a toothpick at the spot where the pad will go. I then pick up the pad using an X-acto knife, spearing the pad's copper side and then pressing it down on the glue spot. CA cures quickly once it is oxygen-starved so pressing down on the pad for a few seconds is usually all that is needed. Any time I have run into trouble it was because I used too much glue....just a small dab is needed.
 |
| VE7SL Lowfer Tx |
For me, one of Manhattan's strongest selling points is that even though final part values may have been fleshed out during a rough build, parts can still easily be changed, added or even removed without a lot of fuss....unlike a PCB....but Muppet does look interesting!
Steve McDonald, VE7SL, is a regular contributor to AmateurRadio.com and writes from British Columbia, Canada. Contact him at [email protected].
Amateur Radio Weekly – Issue 225

Skywarn Recognition Day is today
During the SKYWARN™ Special Event operators will visit NWS offices and contact other radio operators across the world.
National Weather Service
Amazon AWS Ground Station
Ingest and Process Data from Orbiting Satellites.
Amazon Web Services
Peanut: Talk to DSTAR reflectors via Android
On the Peanut you can talk with Hams around the world via an Android device or network radio.
PA7LIM
VHF Tropo Opening
After 3 hours I’d worked 10 DXCC on 2m.
Adventures in Ham Radio
Designing and Testing a PCB Wideband Spiral Antenna
A Vivaldi antenna is wideband and directional and the design works well for frequencies above 800 MHz, but becomes too physically large to handle for lower frequencies like 400 MHz.
RTL SDR
Restoring A Rusting Old Tower
I’ve discovered that some ‘free’ ham gear is like being given a free dog… you have to be aware of the hidden costs.
VE7SAR
My SOTA Battery Journey
I started out using a small sealed lead acid (SLA) battery. These use well-established battery technology that has stood the test of time.
K0NR
Video
SDR Basics: RTL-SDR + Android
How to Use an RTL-SDR Dongle on an Android Phone.
YouTube
Inside a Sony CRT factory
YouTube
Get Amateur Radio Weekly in your inbox.
Sign-up here
Amateur Radio Weekly is curated by Cale Mooth K4HCK. Sign up free to receive ham radio's most relevant news, projects, technology and events by e-mail each week at http://www.hamweekly.com.
LHS Episode #261: The Weekender XX
 Welcome to Episode #261 of Linux in the Ham Shack. In this, our 20th Weekender edition, we give you information on upcoming amateur radio contests and special event stations, upcoming open-source conferences and events, personal challenges, Linux distributions to try and a whole bunch of hedonism. It's the perfect intro to your next two weekends. Thank you for listening.
73 de The LHS Crew
Russ Woodman, K5TUX, co-hosts the Linux in the Ham Shack podcast which is available for download in both MP3 and OGG audio format. Contact him at [email protected].
Winter SOTA on Devils Head (W0C/FR-051)
One of our favorite summit hikes along the front range of Colorado is Devils Head lookout tower (W0C/FR-051). This hike is about 1.5 miles one way with 900 feet of vertical gain. See my summer trip report from July 2012 for more information on the hike. This year we activated the summit in winter.

One problem with this trail is that it has become extremely popular in the summer months. The actual summit and lookout tower is not very big and can get very crowded. This is tolerable for hiking but can make a Summits On The Air (SOTA) activation difficult. It certainly is not a “get away from it all” experience.

Recently, Brad/WA6MM pointed out that the summit is still accessible now (in late November) and the crowds have all disappeared. Note that the trailhead will be difficult to access starting December 1st (see the Devils Head forest service page).

We took highway 67 out of Sedalia, then south on Rampart Range Road (FS 300) to the well-marked side road that goes to the trailhead . The forest service roads had 6 to 8 inches of snow on them but we were able to drive our 4WD pickup truck to the trailhead without any problem. The trail was also snow covered but walking in high-top hiking boots worked just fine. We had our microspikes along in case of ice but did not use them.

As you can see from the photos, it was a bright sunny day…wonderful day to be out hiking in the mountains. Temperature was about 25 degrees F but very light wind.

We met a total of four other parties on the trail, so not very busy.
Once on top, we started calling on 146.52 MHz with many stations responding. That summit has good line-of-sight to Denver and the other front range cities. As things quieted down on 2 meters, I switched to 446.0 MHz and worked a bunch of stations there, too. We were using the small TYT 2m/70cm mobile transceiver (which I recently repaired) and yagi antennas for 2m and 70cm. I also had my 23cm HT and Comet yagi with me and managed to work Paul/W0RW on 1294.5 MHz, about 33 miles (53 km) away in Colorado Springs.
Here is my log from the activation:
 Joyce worked a subset of these stations. In particular, she was very happy to work three women. She has been referring to these contacts as “F2F” for “female to female.” On this activation, her F2F QSOs were: Annette/KA0JKZ, Sharon/KC0PBR and Barbara/W0BJE. Way to go, ladies!

We’ve made a note to do this summit again next year, after the crowds are gone. It is a really nice early winter hike. Thanks to everyone that worked us on the summit.
73 Bob K0NR
The post Winter SOTA on Devils Head (W0C/FR-051) appeared first on The KØNR Radio Site.
Bob Witte, KØNR, is a regular contributor to AmateurRadio.com and writes from Colorado, USA. Contact him at [email protected].
 Ham Radio Deluxe |
 W5SWL Electronics |
 Ham Radio Prep |
 KB3IFH QSL Cards  Hip Ham Shirts  HamRadioAuctions HamRadioAuctions Reliance Antennas Reliance Antennas Enigma Shop Enigma Shop |  morseDX  Ni4L Antennas  R&L Electronics R&L Electronics antennas.us antennas.us QRV QRV |
- Matt W1MST, Managing Editor
