 |
 LHS Episode #045: Logbook of the World
 Episode #043 of Linux in the Ham Shack almost didn’t exist. In the process of trying to edit the audio for the program, I managed to delete everything that I had recorded. By some miracle of coincidence, I actually remembered to record the entire episode at Ustream.TV. I almost never remember to do that but it happened this time. The audio was recovered from the live video stream and I put it back together. There are a couple of minor flaws and the quality might not be as good as normal but at least it exists. Since the edited version came out to over 100 minutes, I’d sure have hated to try and record this all over again. And that’s why this episode almost didn’t exist: Because if the audio had truly gone away, I would have thrown up my hands and said forget it. We’ll try again in two weeks.
But since we got lucky, you can now listen to us talk about our newest features and endeavors, our problems with the ARRL, the status of Logbook of the World, listener feedback, live chat room discussion, installing Linux Mint on an ancient laptop, ham radio software for [that other OS] and much, much more. And hey: Go buy a shirt. Please?
73 de The LHS Guys
Russ Woodman, K5TUX, co-hosts the Linux in the Ham Shack podcast which is available for download in both MP3 and OGG audio format. Contact him at [email protected].
Super-sizing the “cheap Yagi” (Part 2)
The two most expensive parts of a VHF/UHF Yagi are the boom hardware and the feedpoint. So, I set about eliminating these costs, keeping in mind that I may only have the antenna installed for a year or two at this QTH.
The feedpoint mechanical construction has been addressed in a previous note. However, I should back up and discuss changes from the K1FO Yagi. In its original configuration, the K1FO antenna is fed with a T-match. This is mechanically complex, although some might argue that it’s sturdier than my solution. I elected to feed the antenna with the WA5VJB hairpin design (38-inch element with harpin 1/4-wave stub spaced 1 inch for 19 inches—this is just a convenient and inexpensive ruse for direct feed without splitting the driven element) for the moment. Yes, I am aware that the K1FO antenna has a natural input impedance considerably lower than 50 ohms, but this is just the first (essentially mechanical) prototype. I’ll do some modeling eventually and determine if I can or should optimize it further.
There are four choices for a boom: PVC pipe, fiberglass, aluminum, or wood. PVC is heavy and too flexible for anything longer than two or three feet. (I see people asking questions in forums all the time about building antennas out of PVC. Why bother when wood and aluminum are so readily-available?) Fiberglass is light and strong, but unless you have access to a lot of it, it’s the most expensive of these options and the most difficult to work. That leaves aluminum and wood. Aluminum is hard to beat for strength-to-weight ratio and ease of working. But, wood will give it a run for its money on cost for a reasonable strength up to a point. Since I had a bunch of wood readily available, I elected to build the boom from wood. This is probably pushing the practical upper limit for a wood-boom antenna.
For the boom, I used three pieces of 1 x 2 select pine that was weatherproofed with a clear lacquer:
![]()
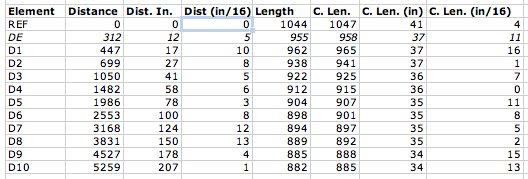
The 0″ reference point for the element position measurements is at the left end. Don’t forget to leave a couple of inches at the end.
The original WA5VJB designs were optimized for 1/8-inch diameter elements, which is fortunately quite inexpensive (part #8974K14, $2.11/each, working out to a $12.66 antenna, plus about $5 for shipping…you can buy a lot of Al rod and still ship it for $5.) from McMaster. The K1FO designs are provided for 3/16- and 1/4-inch elements, costing $4.13 or $6.03 for six-foot pieces respectively. That was a little rich for my budget, but then I looked at the Metric-dimensioned 6061 aluminum rods. 5 mm is a little more than 3/16 inches and these rods are only $1.64/each ($19.68 for 12 six-foot lengths; examining the element length table below should give you an idea how much savings there is if you get some buddies together to build a few of these…forget buddies, build an EME array)! So, I built the antenna out of 5-mm diameter rods using the 3/16-inch dimensions.
The table contains initial element lengths and offsets in inches. Do not build this antenna! (Do as I say, not as I do.) It appears to be a good performer, but it has not yet been optimized as discussed above. The columns “Dist (in)” and “Dist (in/16)” refer to the integer and fractional portions of the distance, respectively. Likewise, “C. Len. (in)” and “C. Len (in/16)” refer to the element lengths.

Using a cheap Dawia SWR meter at the end of the feed cable, I can tell that the SWR is less than 1.7 across the low portion of the band. Actually, it’s relatively flat around 1.5-1.7 all the way up to 144.5 MHz where I quit measuring. The pattern is apparently good. My “local” beacons that I can pretty much always count on are WA1ZMS (to the southwest) and W3APL (to the northeast). WA1ZMS runs a lot of gas to an excellent antenna system from an even more excellent QTH. I can fade either of them into the nulls when listening to the other. When I turn the antenna, they fade pretty rapidly into the noise, as well. Good F/B, F/S, narrow forward lobe, etc.
So, the upshot is: I built the unmodified K1FO-12 design for 144 MHz on a wood boom for $30 and about 5 hours of tinkering with basic hand tools. I can turn it and my 3-element 50-MHz Yagi with a 60-year-old CDE TR-2 TV rotor. My TS-700S happily blasted 10 watts into it even at SWR of 1.7. I’ll need to verify the cable loss and determine if my newly-acquired Mirage B3016 will tolerate it.
I will post models and photos eventually (once I find the files again…oops) for the 11-element disaster and the 12-element one I built. Yagis are tricky to optimize well. So, I’m somewhat disinclined to mess with the K1FO design and more likely to switch from the WA5VJB driven element to the T-match if I decide that the SWR matters that much.
Ethan Miller, K8GU, is a regular contributor to AmateurRadio.com and writes from Maryland, USA. Contact him at [email protected].
Riders On The Storm
Who rode the storm to destinations unknown? I was surprised when Cycle
24 decided to awaken its fury for benefit of some and the
consternation of a few. The coronal mass ejection was enough of a
sensation that it snatched a few brief minutes on the nightly news.
However, ham radio operators surfed some of the best VHF conditions
yet seen much like a powerful southern hemi arriving along the central
coast of California.
I called Fred, KI6QDH and he was stoked because 10m delivered point
break like surf with strong signals arriving from the midwest. VHFDX
was lit up east of the great propagation divide and why so? I wonder
what factors contribute to this difference between west and east coast
propagation? The ‘e’ MUF map intensified across the south while barely
a flicker was seen in the south west.
The storm raged above yet I could only look at the map while the magic
band went aggro for a day. It was one to remember for riders on the
storm.
73 from the anywhere, anytime shack.
Scot Morrison, KA3DRR, is a regular contributor to AmateurRadio.com and writes from California, USA.
Handiham World for 04 August 2010
Welcome to Handiham World!
Daisy book version of Handiham World Summer 2010 is released

DAISY books provide spoken word audio that is connected to text. The Summer Handiham World will soon arrive in regular print, but that isn’t much good to our blind members, except for the giving envelope that will be enclosed. We are hoping that our members will help us out with a little extra this summer so that we can keep our services coming.
Now we are offering a Daisy version of the newsletter, and we think you will enjoy it. The print edition of the newsletter doesn’t have the complete set of articles that this Daisy version has. The reason is that a print newsletter is limited to only 4 pages. We can make our Daisy version as long as we want.
Why should you use a Daisy book? Well, that is a good question. You may have been satisfied with cassette tape books for the past 30 years or more, and the tapes played nicely in your Library of Congress audio book player. Indeed, that technology has served our Handiham members very well over the decades, but it has its shortcomings. Tapes would sometimes not be recorded properly. Occasionally parts of the audio would be cut off when the tape wasn’t quite long enough. Once in awhile a tape would break and wind itself around the capstan or rubber drive wheel in the player and really make a mess. The cassettes themselves did not hold much program material, even in the 4-track format used in LOC players. The audio quality was poor, and even worse in 4-track mode where the tape speed was half the normal speed. If you wanted to find a particular article or chapter, you either had to guess which tape it might be on (a typical book had multiple cassettes) and which side and track it might be on. This was seldom a big deal if one was listening to a novel, but if you were reading some kind of a textbook or reference book and wanted to find a particular topic, well, let’s just say you had your work cut out for you.
DAISY is an acronym that stands for “Digital Accessible Information System”. It is properly spelled in all capital letters, but generally when I write articles I capitalize only the D so that Daisy production software will say “Daisy” instead of spelling out each letter. In this article, I have mixed both spellings. Maybe some of our readers who use Jaws or Window-Eyes will let me know if those screen readers differentiate between the two spellings. I do know for sure that the Daisy production software behaves as I said, spelling out Daisy if all the letters are in caps.
That little trick is just one of many that I have learned in producing accessible materials for our Handiham members. Even so, every time I work on another production I learn something new. I could say plenty more about that, but I still haven’t told you about the advantages of reading a Daisy book instead of a cassette tape book. A Daisy book can be played, which means to say listened to, on the new Library of Congress players that are currently being issued. You can also listen to a Daisy book on your computer. Often times the Daisy book can be simply downloaded via the Internet, which allows the user to bypass the time-consuming process of using regular postal mail. Your Library of Congress player can play the Daisy book that you download to your computer if you wish. If you don’t like the Library of Congress player or you think it’s too large to carry around when you are going places, you can buy a commercial Daisy player that will double as an MP3 player.
Since Daisy formatting includes the text of the book, you can use your player to search for a term within the text and skip directly to that part of the book. Or you can browse the book’s contents and go to the section of the book, say a particular article, that you want to read. There is no more fumbling around with a box full of cassette tapes that get mixed up, since a Daisy book can fit on a single USB cartridge or in a single folder on a personal computer.
The audio quality of a Daisy book is very good to start with, and it stays that way no matter how many times you play it. A Daisy book doesn’t wear out, break, and get tangled up like a cassette tape.
Are you ready to learn more?
How to get started:
You will need a DAISY book reader. You can easily read DAISY on your computer, but you need a software program to do so. AMIS is a free of charge, open source DAISY book playback software. Version 3.1 is the latest stable release of AMIS. You can view the release notes, learn the latest news, or download AMIS by visiting Daisy.org.
Next, you will need to download the Daisy book, in this case the Handiham World Summer 2010 newsletter itself. It is a zip file, and you will find it on the Handiham website.
Unzip the file with an unzipping utility (built into later versions of Windows or freely available), and place all the files in a single folder. Then use AMIS to open the book. The file you want AMIS to open is speechgen.opf. All the files from the folder must be in the same folder for AMIS to read the book.
I don’t expect all of our readers and listeners to figure this out without running into a few problems. As with anything that must be learned, being patient is definitely a virtue. If something doesn’t work the first time, go back through the instructions and make sure you didn’t skip some vital step. The DAISY website has a frequently asked questions page just for AMIS.
Hopefully you will find that reading Daisy books is both easy and fun. If you haven’t tried Daisy yet, this is your chance! If there are any volunteers out there who want to help us make books into Daisy format, please let me know. It does not require a huge investment, and you may even have all of the computing equipment you need. I am considering making some tutorials and also teaching Daisy book use at our next Radio Camp session in August, 2011.
Links to the resources mentioned here are available on the Handiham.org website. We don’t include links in the text of these stories because they mess up the podcast production process.
73,
Patrick Tice, WA0TDA
Handiham Manager
[email protected]
Pat Tice, WA0TDA, is the manager of HANDI-HAM and a regular contributor to AmateurRadio.com. Contact him at [email protected].
Super-sizing the “cheap Yagi” (Part 1)
One of the frustrations of doing VHF on the cheap is getting enough gain to make your low-power signal loud (or simply being heard) at the other end. I had a couple of options with my 6-element WA5VJB “cheap Yagi” on 2 meters:
- Increase the height of the antenna. This is impractical at the present QTH without installing a tower. Actually, the tower would have been possible but I wasn’t ready shoot first and ask questions later with it. Nor was I ready to have my folks spring some Rohn 25G out of storage in their garage for the trip here when I had the opportunity (a truck bringing some furniture from them).
- Run lower-loss cable. I have regular old RG-8 (PE dielectric) running up to the antenna. It’s only about a 50-ft run. So, I’d be hard-pressed to do a lot better. I did figure out how to recycle improperly-installed N-connectors for LMR-600 from a dumpster-diving excursion. Although I have twenty-some connectors, I haven’t yet secured any scraps of LMR-600 to use. This is a future consideration. At $1.50/ft, LMR-600 would still cost $75. No deal.
- Stack multiple 6-element antennas. This is actually a good idea that I’m keeping in the back of my head for the future. It would be nice to do something like this. Maybe some day.
- Launch a rocket to do a chemical release whenever/wherever I needed a sporadic-E layer. Unfortunately, you can’t launch rockets over land. (Update: I was reminded later that this is not 100% correct.) Furthermore, at a megabuck per shot, it’s not cost-effective.
- Dispense with the 6-element design and go for something bigger.
I elected option #5.
The first step was to consider suitable designs. I tried scaling the 11-element 432-MHz cheap Yagi to 144-MHz. Fail. A NEC model showed that the pattern stunk and the input impedance was pretty far from 50 ohms. Knowing that W5UN had built an array of wood-boom antennas for his EME setup, I looked into readily-designed options.
The ARRL Handbook (1993 edition for reference) and ARRL Antenna book (18th edition) have the K1FO optimized Yagi designs in them. This antenna has been around for a number of years (clearly) and is available commercially from Directive Systems. It seemed like a relatively good choice. So, I moved forward with it…
Ethan Miller, K8GU, is a regular contributor to AmateurRadio.com and writes from Maryland, USA. Contact him at [email protected].
Warbler now finished and working

Warbler smoke test
I finally finished my Small Wonder Labs Warbler kit last night. This was started probably two years ago and then was shelved for no particular reason other than I was working on other projects. Last week I decided it was time to get it finished and so have been working on it in the evenings. It is a nice kit with a clever design based around colour burst crystals and the receiver is direct conversion. It was straight forward to build but note there are two SOIC components, the SA612 mixers (look for U1 and U2 in the photo above).
When it came to the smoke test it worked first time. I adjusted the one tuning capacitor (the only adjustment), for frequency alignment and checked power out. Alignment was done as recommended with W1AW which was coming in well (see the screenshot below). On transmit, I get 2W out on my Radio Shack power meter. It is expected that you can get 3 to 4W out of the Warbler. Given the accuracy of the meter I happy with what I measured.

Warbler working and decoding W1AW. Software is Fldigi running on Xubuntu
I have an aluminium enclosure, which is a tight fit for the board, so there is some careful drilling and filing to come. You can see in the photograph I have already cut out the corners to accommodate for the enclosure screw mounts.
Given the simplicity of the transceiver I am very pleased at how well it works. No contacts yet, so will have to see what the IMD is later. Anyone within 100 miles or so of Ottawa want to try a QSO?


![]()
Alan Steele, VA3STL, is a regular contributor to AmateurRadio.com and writes from Ottawa, Ontario. Contact him at [email protected].
QRP Community
What is it about low power operators that binds us together? I’ve been reflecting on that a bit lately.
As a student of anthropology and culture, I see a bit of a tribal influence among the amateur radio ops of the world. We tend to cluster into tribes based upon our modes of operation and other specialized pursuits like contesting, fox hunting, award seekers, etc. Each tribe has its own special characteristics, culture, jargon and social structure.
What I enjoy most about the QRP tribe is that the Elmer spirit is still very much alive and well. Although we all are a bit competitive and like to think we have a line on the best way to do QRP, there is a healthy amount of sharing of information, expertise and even hardware. Groups like Adventure Radio Society, NAQCC, Flying Pigs, Polar Bears, AZ Scorpions, NE QRP, North Georgia, 4 States, etc breed healthy competition and provide us with sources of information and expert assistance when needed. I sure am enjoying getting to know, both on air and in person, some of the people that make these groups work.
My recent connection with Diz W8DIZ while operating the FOBB, prompted me to go back and read the history of the Flying Pigs and to read through the archives of the Bacon Bits Newsletter. There is real gold and a wealth of interesting info that’s been recorded and made available freely. Other clubs have the same heritage. I say a BIG THANK YOU to all the QRP groups for sharing their experience and stories. It makes me feel proud to be part of the tribe!
What about you? What do you enjoy about QRP? Leave a comment and share your thoughts and story.
Kelly McClelland, K4UPG, is a regular contributor to AmateurRadio.com and writes from Florida, USA. Contact him at [email protected].
 Ham Radio Deluxe |
 W5SWL Electronics |
 Ham Radio Prep |
 KB3IFH QSL Cards  Hip Ham Shirts  HamRadioAuctions HamRadioAuctions Reliance Antennas Reliance Antennas Enigma Shop Enigma Shop |  morseDX  Ni4L Antennas  R&L Electronics R&L Electronics antennas.us antennas.us QRV QRV |
- Matt W1MST, Managing Editor
