W5IG Cool Transmitter

A very creative way to add an important addition to your station. I would argue this may be essential for any radio amateur who find themselves in the hamshack for long periods.


Scott Hedberg, NØZB, is a regular contributor to AmateurRadio.com and writes from Kansas, USA. Contact him at [email protected].

Programming the UV-5R – and a word on the antenna

I mentioned last week that manual programming of the memories of the UV-5R was a step too far, at least for me! At the time I ordered a programming cable from Hong Kong. It’s yet to arrive, but today, I had an idea.

I currently have a programming cable for a Midland CT-790 here. Now that looks to be a clone of a Wouxun radio and I knew that the Baofeng UV-5R was supposed to use the same programming cable as a Wouxun. Would it work, I wondered?

I grabbed the Baofeng UV-5R software from the link on http://www.uv-5r.com and installed it. There was an initial problem, because the programming lead installed itself as COM11 and the UV-5R programming software only went up to COM8. I managed to convince the cable to be COM1 (that takes me back to packet  days, playing with COM1….) and then fired up the software.

What I thought were error messages were in fact not! They are clearly interesting translations. After a couple of false starts, I managed to get the computer to read the UV-5R and download the memories into the programming software. From there, it was relatively straighforward to modify the memories and upload them back into the radio without incident. The UV-5R software is pretty basic, but it’s functional. Don’t expect handholding, but it beats trying to program the radio manually.

Since I had the Midland CT-790 (Wouxun KG-UV1P) here, I was curious about the antennas. I swapped the Midland’s antenna onto the Baofeng. Where I had struggled to blip up GB3UK on 430MHz with the Baofeng antenna, it worked better with the Midland. Same story on GB3WH on 145MHz. So it may be that the UV-5R antenna is worth replacing – although it’s certainly adequate. The Midland antenna is slightly longer and more flexible. The Midland antenna, if fitted on the UV-5R has a slight gap at the base which might not be ideal for longer term use.

All good fun and interesting – remembering this was a radio that cost less than £40. As K0NR comments in his blog on the UV-5R, a rig for the price of a tank of petrol/gas. Way less, for us…..!!


Tim Kirby, G4VXE, is a regular contributor to AmateurRadio.com and writes from Oxfordshire, England. Contact him at [email protected].

FT-790R, 1W of Forlorn Hope?

“One Watt! One Watt! What on earth bl***y use is that to you?! I don’t know… (sigh)” exclaimed one local straight-talking OM on 2m FM yesterday. His response to my acquisition of a rather dated Yaesu FT-790R ‘portable’ transceiver was less than encouraging. It’s just as well I’m an optimist then. With a maximum output of one Watt on one band (70cm) I think I’ll need to maintain an upward outlook. But here’s the thing – I always find myself drawn to obtaining the more elusive QSO. You need a certain amount of eccentricity and tendency to self-harm to stand on a hilltop for hours calling out on 23cm FM QRP, for example. I was the first in the area to start calling CQ on DV mode on 2m. It took months before my first simplex QSO and then very little since. The higher bands and modes have their rewards in spades, however. The rush of excitement when you finally make that new or distant contact. The perceived camaraderie knowing someone has gone to the same quirky lengths as you to operate on a lesser used band/mode or from an unusual location. You feel you have made a meaningful and personal connection, at least for the duration of the QSO. Oh, it’s such a far cry from exchanging reports of 5/9 with the fiftieth Italian station running 1kW on 20m you’ve spoken to in one morning. Better still, no QSL cards. Any why the FT-790? Well, at just over £100 it’s one of the few portable internal battery-powered transceivers you come across before taking the small fiscal leap to an FT-817, for example. Either way, it will hold its value if my 2m friend’s prophecy becomes true. Anyway, so far so good. It’s powered up and seems to be fully serviceable. I’ve even managed a short-distance QSO with John GW4ZPL over the Menai Strait in the Caernarfon direction, just a few miles away. I’ll be out and about when the weather improves and will post my experiences here. Will it be too futile, or with a bit of luck will I make that elusive QSO I’m after? Will my single sidebanded plaintive cries of CQ reach a caring ear? Maybe I’ll be happily shouting “One Watt! One Watt!” from a heathery Welsh hilltop.

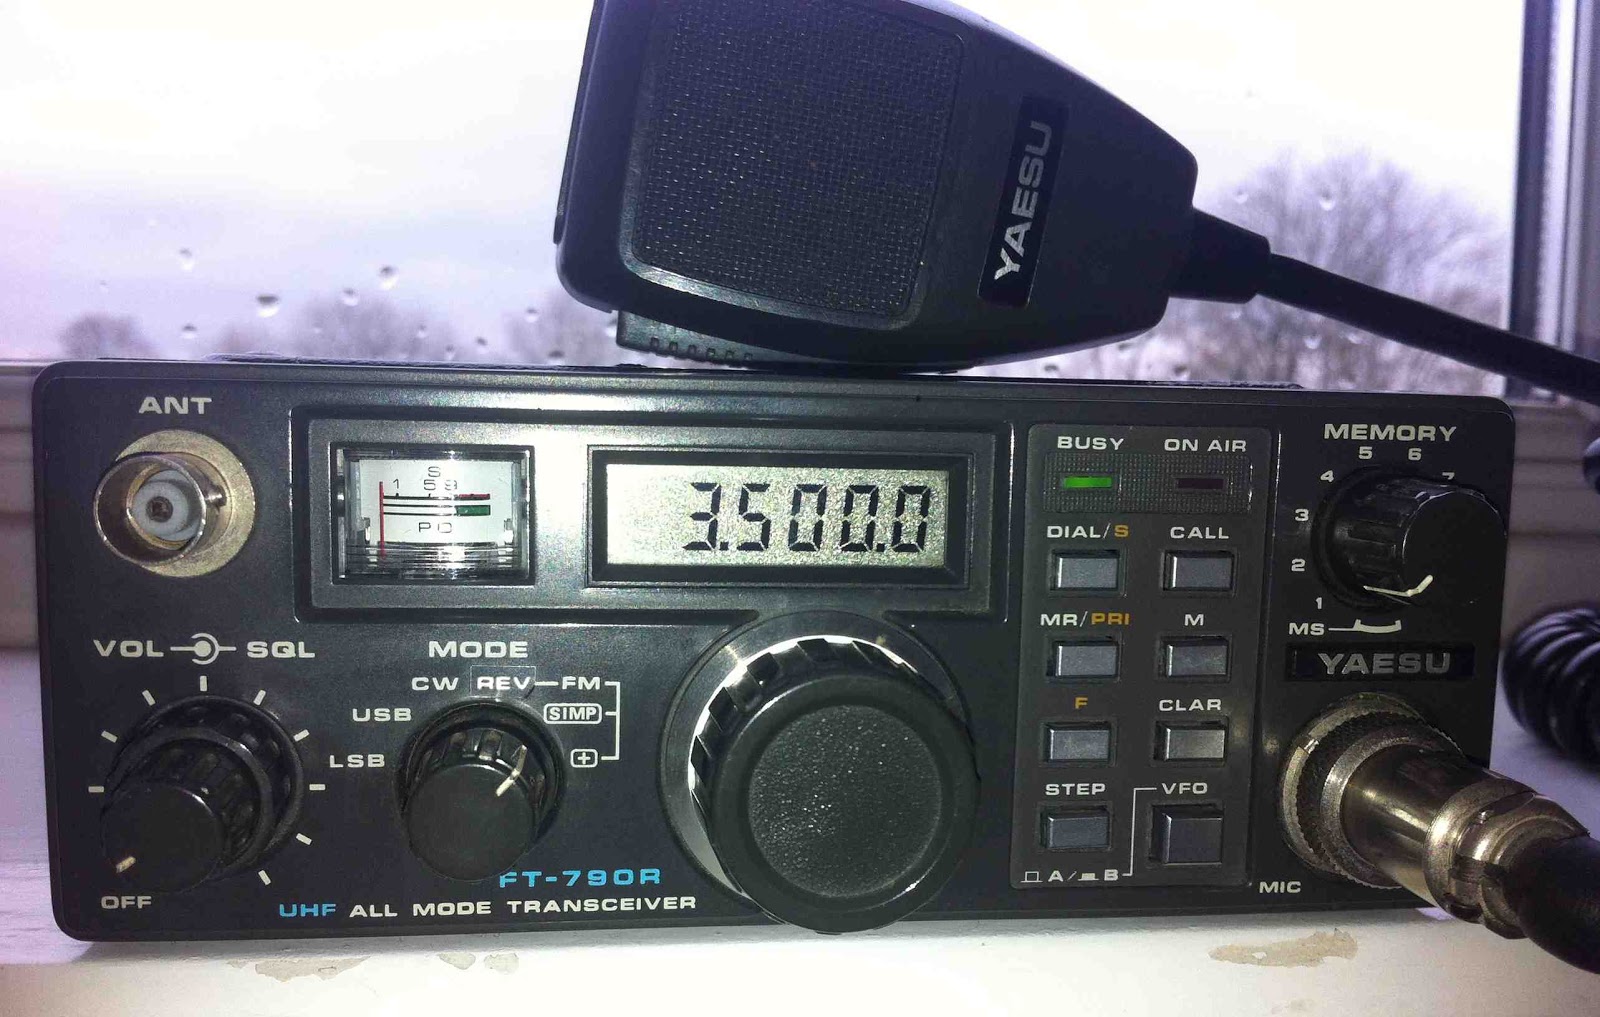
FT-790, forlorn hope?


Rob Law, MW0DNK, is a regular contributor to AmateurRadio.com and writes from Anglesey, Wales. Contact him at [email protected].

iOS CW app recommendations?

CW Apps

App Store search: "learn morse code"

I would like to use an iPhone app to learn CW.  I think that most of my learning and practice will take place on the train each day, so listening to live CW is out of the question.  For those of you that may have already done this, I was wondering if you have a favorite CW app.  Post your recommendations in the comments.

–Neil W2NDG


Neil Goldstein, W2NDG, is a regular contributor to AmateurRadio.com and writes from New York, USA. Contact him at [email protected].

The fault that wasn’t

I thought my Baofeng UV-3R+ had developed a fault today. Whenever I changed channel the rig went into transmit.

Eventually I realized that the VOX was turned on. The clicks from the rotary channel knob were triggering it! Doh! I think I’m getting too dumb for this game.


Julian Moss, G4ILO, is a regular contributor to AmateurRadio.com and writes from Cumbria, England. Contact him at [email protected].

The World’s First Disposable HT

Baofeng UV-5R
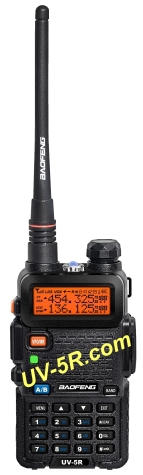
A few weeks back, I was wasting time doing important research on the internetz when I came across the Baofeng UV-5R Dualband Handheld Transceiver.  This radio seemed to have a boat load of features but the sale price was $65. So I am thinking to myself, just how good is a $65 radio?

The last time I went out to a nice restaurant, I blew through $65 pretty quickly so this was not going to be a large purchase. In fact, I realized that we now have HT’s priced low enough to be an impulse buy. As one of my ham buds told me, “filling up the gas tank of my truck costs more than this radio!”

So, of course, I soon broke down and ordered one and it showed up on my doorstep a few days later. I’ve been using it off and on for a few weeks now. I’ve also noticed that there is a real buzz on the interwebz about this little radio. There is usual Yahoo Group (baofeng_uv5r) and youtube videos.

Here’s the short story:

While not perfect, for $65, this radio is impressive.

Besides using the radio and receiving good signal reports, I did check the receive sensitivity, transmit power and frequency — all good. There are quite a few reviews out there, so take a look at articles by W0HC, PD0AC and OE1RFC. Also, there have been quite a few reports of quality problems with this radio…probably more defects than equipment from the more established ham equipment vendors. See the Yahoo Group discussion to understand this better.

Similar to other radios from China, this radio has a quirky user interface…not as easy to use as my Yaesu FT-60. This means that the programming software is a necessity to get the radio set up correctly, which is the major downfall of the rig. The free software program is crapware, with many people reporting a variety of problems with installation and operation. I did finally get it to work, but it was very frustrating.

I find myself grabbing this HT when I head out the door and leaving my other radios sitting in the desk charger. Someone pointed out to me that the low price of this radio makes it an easy choice — if it gets dropped, broken, lost or stolen, I am only out a tank of gas. While I am kidding about the “disposable radio” idea, the low cost does affect how I use it.

73, Bob K0NR


Bob Witte, KØNR, is a regular contributor to AmateurRadio.com and writes from Colorado, USA. Contact him at [email protected].

Handiham World for 25 April 2012

Welcome to Handiham World.
drawing of transceiver
You can do it!  
Today, just as we did last week,  we are going to begin with Troubleshooting 101 as part of our initiative to help new ham radio operators (and even some of us older ones) learn how to do some basic troubleshooting for ourselves. Yes, it can be tempting to ask someone else to do things for us.  This can become a bad habit when it keeps us from learning new things, especially things that we could – with a bit of practice – learn to do for ourselves.  Knowing these basic things can serve us well in the future when no help is available.  This next simple exercise is one that we will be practicing at this summer’s Radio Camp.  You can do it yourself once you learn a few basics.
Troubleshooting 101
Cartoon guy with toolkit
I have set up my Echolink audio and it worked perfectly, but today when I tried using Echolink, the audio was really low or not working at all.  What can be done?
Echolink audio tab in System Setup  Reach system setup with keyboard command ALT-E.
Before we say anything more about this, I have to let you know that you are not alone.  I like Echolink and use it nearly every day, but I still consider it to be a journey, so to speak.  I have not quite arrived yet at the point where Echolink works perfectly each and every time.  Audio problems are common and expected, so we have to learn how to troubleshoot them.
Your first test should be a visit to the Echolink Test Server.  Find the test server by going to the Station menu (Arrow right from the File menu or use ALT-S) and when you hit “Station”, arrow down to “Connect to test server”. You should hear the familiar welcome message.  After the welcome, get focus in the transmit box, toggle transmit with the space bar, and transmit a short test message. Toggle again and wait for your audio to be echoed back to you. If there is no audio, proceed to the “No Audio” troubleshooting.  If there is low audio or too much audio so as to cause distortion, proceed to the “Audio Level” troubleshooting.
No Audio
If there is no audio at all, there are several things to check.  
Volume:  Is the volume turned up?  Are your computer speakers powered up?
Microphone: Is the microphone plugged in?  If there is an external microphone, whether USB or the 3.5 mm plug, it may have been unplugged by another user in the family, or you may have unplugged it and forgotten to plug it back in. Some microphones have their own mute buttons.  Check to make sure the microphone is not muted. If you are using a microphone headset with 3.5 mm audio plugs, make sure that the headphone plug and the microphone plugs are not reversed. If you use a USB headset, plug it into the same USB port on your computer each time so that the machine does not search for USB drivers each time you plug it in. 
Audio Mixer: The audio mixer in your operating system (usually Windows for Echolink users) might have the microphone either muted or the wrong audio input is selected. Windows users need to go to the Windows Mixer recording settings.  Getting there is different depending on your version of Windows.  We will not explore this, but it is something you should learn about your own computer and operating system. In the recording mixer settings, unmute the microphone and run the slider up if it is set at zero. Repeat the test server test and it should work fine.  You can usually get to the mixer settings via the Echolink application itself. Go to the Tools menu, then arrow down to “Adjust sound device” and choose “Recording”.  This is an easy way to find the recording mixer!
Multiple audio inputs: As we mentioned, the wrong input may be selected in your Windows mixer.  Be sure the correct input for the microphone you want to use is selected as the default device.  Again, how you do this may vary depending on your operating system.  You should learn how to use your operating system’s mixer.  
Echolink sound selection:  The Echolink application has its own selection of audio input devices available from a pull down menu.  You will find it on the audio tab in System Setup.  The choices are “Input Device” and “Output Device”. If the microphone selection is to be checked, the one you want to pull down is the “Input Device”.  If you have more than one input device, they should all be listed in the pull down.  However, the first item listed is always “system default”.  That is the one you should select, because if you followed the directions we just gave you, you have already set the preferred microphone to “default device”.

Recording device list in Windows 7 with default device selected.

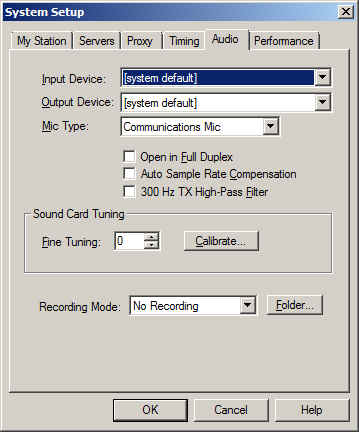
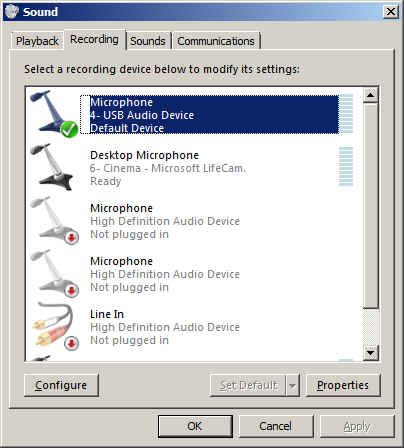
So why do we recommend using “default device” instead of one of the other selections?  It is because selecting the recording device via the Echolink pull down does not always result in the correct device actually being used for audio input.  This is a real mine field for users who have lots of audio devices.  A computer could have a TV tuner, more than one microphone, a webcam with a built-in microphone, a line in device, and even a USB audio line to a transceiver.  Don’t laugh – I have had all of these things, and sometimes Echolink reported one microphone being the input when instead the audio was coming from the HF rig connected via USB.  It is safer to set your preferred microphone up as the default device in Windows, then always choose the default device as the Echolink input via the Setup menu.

Final test: If you have followed the directions and everything is set up as described, repeat the test server test.  Adjust levels if necessary.  If there is still no audio, you may have to look further.  There could be a fault in your microphone, usually with the cable or plug, or with the computer hardware or sound card drivers. 
Low Audio
Microphone selection and positioning: As we already discussed, you must be sure that you are using the correct device. One fellow I know was puzzled by a low transmit audio condition.  When I talked with him on Echolink, his audio sounded like he was far away from the microphone, yet he was wearing a headset microphone combo.  The diagnosis was that the sound was being picked up by his laptop’s built in microphone, which had been selected as the default audio input device.   If you are simply too far away from the microphone it can have exactly the same effect. Position the microphone closer to your mouth, keeping it slightly to the side.  If the mic element must be very close to your lips, as is the case with headset microphones, use a foam wind screen to prevent puffs from making loud noises as you speak.
Beware of other software that takes over mixer settings:  Voice dictation software can change your mixer settings to some predetermined level that is ideal for speech input computing.  You may have your Echolink levels just perfect, then you open Dragon NaturallySpeaking®, enjoy a session of typing with your voice, and think nothing of it.  But the next time you want to use Echolink, the microphone audio may be very low.  This happened to me all the time, because I liked using my USB headset for both voice dictation and Echolink. Dragon would reset the mixer every time, unchecking the microphone AGC boost and changing the slider level. It might be best to select different input devices for these two software applications so one does not fight it out with the other for mixer level settings. 
Mixer settings continued: Most of us will not use anything but the built-in software mixer, but there may be some users who use external hardware mixers.  These can be great for those who like to really be in control of their audio.  If you have an external mixer, be sure the microphone is plugged in and selected as the input device. Check the sliders to adjust the level.  If the device uses external power, be sure it is powered up! 
Every computer system is different.  It is difficult for someone else to help you with your system, especially on the phone.  So I have some “homework” for you.  I want you to learn how to use the audio mixer in your own computer, and learn it well enough to set input and output levels.  Some computers (probably most these days) have some kind of keystroke combination or actual dedicated keys on the keyboard to raise and lower the volume or mute the audio.  Some laptops have a volume control that operates by spinning a wheel or holding down a specific key. You need to learn these controls and learn them well, because they will be used for lots of other applications like taking voice notes, doing voice dictation, playing music, listening to audio books or Internet audio streams, and much more.  Wouldn’t it be nice to learn the mixer settings so that you don’t have to ask for help on these things as well as with Echolink?  
Sure, it would!  And you can do it.  
Email me at [email protected] with your questions & comments.  
Patrick Tice, WA0TDA
Handiham Manager

Pat Tice, WA0TDA, is the manager of HANDI-HAM and a regular contributor to AmateurRadio.com. Contact him at [email protected].

Subscribe FREE to AmateurRadio.com's
Amateur Radio Newsletter

 
We never share your e-mail address.


Do you like to write?
Interesting project to share?
Helpful tips and ideas for other hams?

Submit an article and we will review it for publication on AmateurRadio.com!

Have a ham radio product or service?
Consider advertising on our site.

Are you a reporter covering ham radio?
Find ham radio experts for your story.

How to Set Up a Ham Radio Blog
Get started in less than 15 minutes!


  • Matt W1MST, Managing Editor