 |
 On yer bike….to the hilltop – bicycle portable on 28/50/144 and 432MHz

It seemed ages since I’d taken the FT-817 and a whip antenna out on the bike. After a very wet Jubilee day yesterday, although there were some dark clouds about I decided to get out this morning before any rain could fall.
My simple 28/50/144/432MHz setup carried on the bike is the FT-817 and an ATX Walkabout antenna which I use on 28 and 50MHz. This morning, I took the Baofeng UV-5R for 144/432MHz FM.
A favourite spot to cycle to is Windmill Hill which is a couple of miles from our house. It’s not that high, but it’s open, quiet (both electrically and not too many passers by) and it’s also a pleasant place to sit for an hour or so.
There’s usually something to listen to. This morning 28MHz was pretty quiet. I heard beacons from Finland and Norway quite weakly and IK8JWY was heard CQing weakly on CW – not strong enough to work. 50MHz was quiet too, but interesting to hear the GB3MCB beacon on 50.042 from IO70. I don’t hear it from home, so just goes to show what difference a quiet band can make.
Just as I thought I was going to have to pack up without making a contact, Matthew 2E0RNM popped up on the GB3WH repeater so it was good to chat with him.
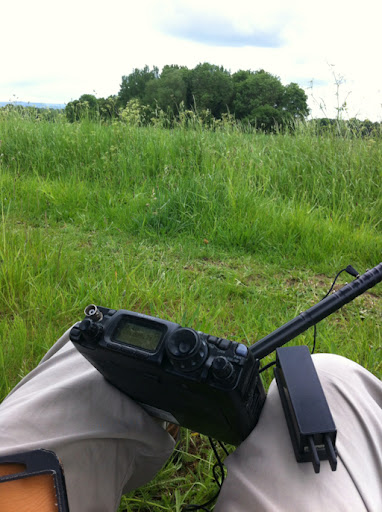
Picture shows the relaxed operating position – and the Palm Paddle used for CW.
Tim Kirby, G4VXE, is a regular contributor to AmateurRadio.com and writes from Oxfordshire, England. Contact him at [email protected].
Bugger!
Or….how I almost ruined my own birthday present.
I had it planned so well: on Friday night I put in all the resistors and capacitors on the Opentracker+ PCB. On Saturday I soldered them on, then put in the other components and soldered them on too. Did a pretty good job, with neat soldering joints. Then last were the two DB-9 connectors. Piece of cake, until I decided to hook the cables up: Bugger! I had switched the male and female DB-9 connectors, so I couldn’t hook up anything!
An hour, a meter of soldering wick and some strong words spoken to myself later they were off. Have I ever mentioned that I don’t like double sided PCBs? No? Well, here it is: I DON’T LIKE DOUBLE SIDED PCBs!!! From a designers point of view I can understand that double sided or multi-layered PCBs are easier to work with and much more efficient. But from a tinker’s point of view they are horrible if you want to (ex)change some components. I noticed that too with the Hi-Per Mite PCB which I made last time.
And yes, I did damage the PCB a bit when removing the connectors and moreover, Murphy paid a visit because it was the most important connection on the data side of the board. After I had figured that one out I carefully soldered a by-pass and I had communication going on between the tracker and my PC. (The Opentracker software is running under Wine on Linux and had no problems with my KeySpan USB-to-serial adapter). The new Baofeng UV-5R was connected to the laptop running Xastir and my other HT, a Kenwood TH-F7E was connected to the tracker. And guess what? It worked! The GPS module found a satellite signal and tracker happily broadcast it to the world, telling it where BX2ABT was located at Sunday afternoon. It was a small world, because I was only running 50 milli-Watts, so the only one who heard it was myself.
But that doesn’t matter. The first steps of BX2ABT on the APRS path are a success and soon Taiwan will have another APRS beacon to track.
Hans "Fong" van den Boogert, BX2ABT, is a regular contributor to AmateurRadio.com and writes from Taiwan. Contact him at [email protected].
On the air
It rained and thunder stormed here today, on and off, in fits and starts. That prevented me from doing the yard work that I was planning to accomplish – boo hoo! 🙂
So I spent some time on the air, getting used to the new radio. Fate would have it that band conditions would be on the less than optimal (read that as: crappy) side today. But I did manage some QSOs both foreign and domestic. Hungary, Italy, and England were successfully worked. The domestic QSOs were brief QSO Party contacts for the most part. They let me know that I was getting out and being heard; but not very satisfying.
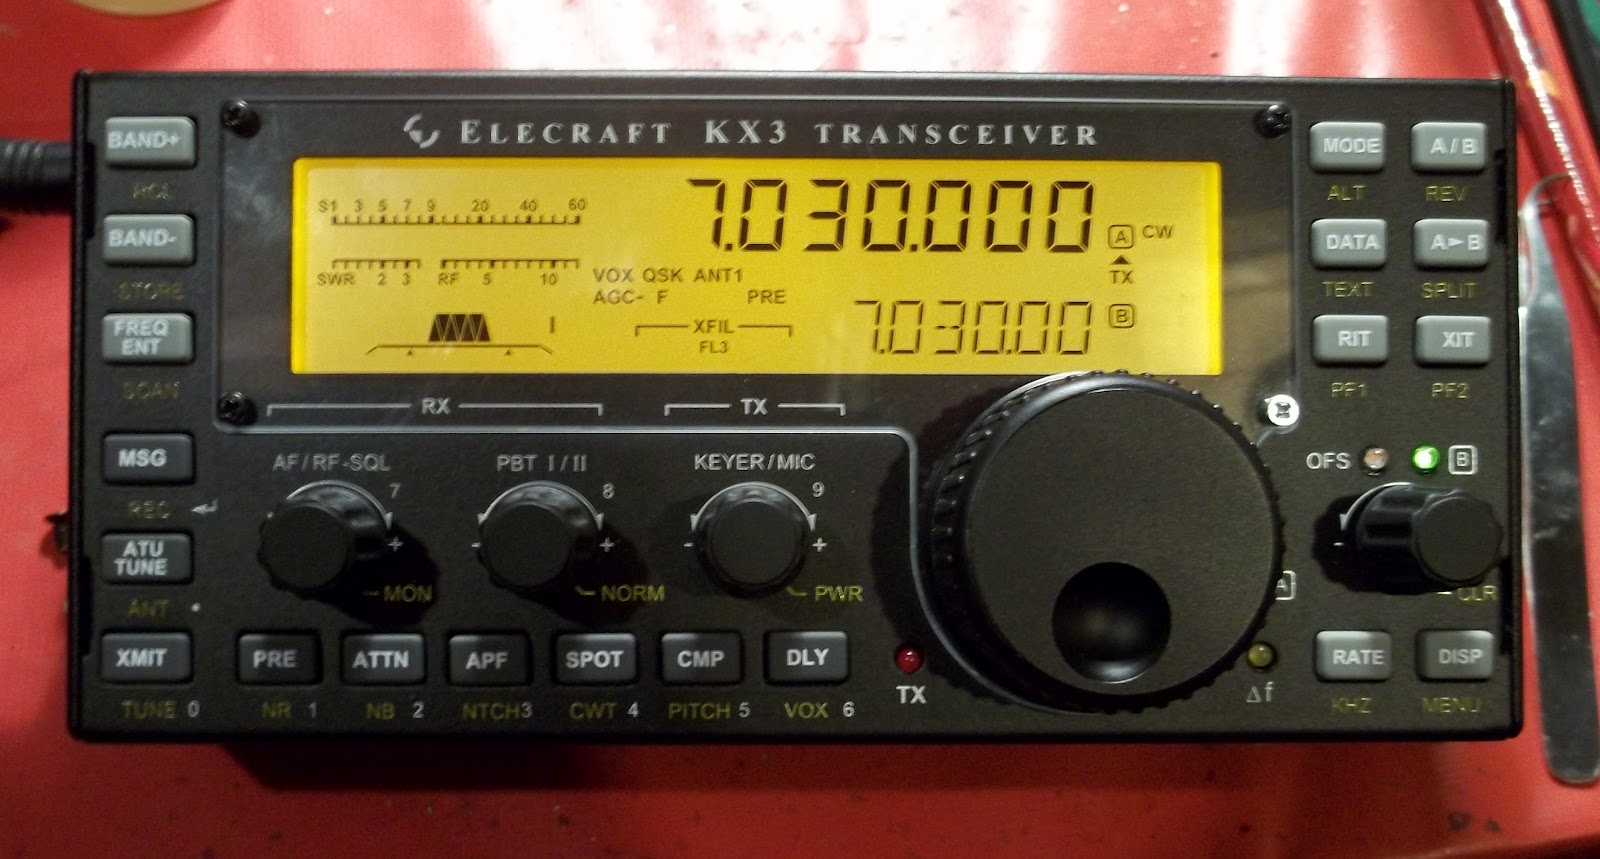
I did have another short QSO with Terry W9UX last night on 30 Meters. I was calling CQ and he answered me and asked, “Larry, is that your new KX3?”. Obviously, Terry is a regular reader of this blog. I answered him that yes, it was and he was my first “real” QSO – something other than “UR 599 TNX QRZ?”
I’ll have to send him my QSL card – the funny thing is that my QSL cards have the image of my K1 on them. I still have a bunch, so I am not going to discard these just because of that. It’s still QRP, which is what the idea behind the card is supposed to be about.
The KX3 is really cool and I’m getting used to it rather quickly. It has really great features like the APF or Audio Peaking Filter that will really help to dig a weak CW signal buried in the noise. I like being able to decode RTTY and watch it scroll at the bottom of the LCD display. I also like the CW Tuning Aid, where you tap a button and the KX3 automatically zero beats the person you’re trying to work.
As the radio is configured now, as a strictly QRP radio, I cannot hook up two antennas like I can on the K2, and I use that feature a lot to switch back and forth between the Butternut and the wire. I suppose I could always go back to using a mechanical manual coax switch; but by going that route, I would be incurring some signal loss, and I would rather not do that.
There is a button on the KX3 that will allow you to switch between two antennas, but that is enabled only when the 100 Watt autotuner is used. As of right now, I have no plans to make this a QRO radio, so the main shack radio will be the K2, unless a K3 should come waltzing into my life for some unforeseen reason.
The other thing that I am looking forward to in the near future is making some contacts on 6 Meters, which I have never done in the 34 years that I have been a Ham. This is the first radio that I have ever owned that is 6 Meter capable. The other thing I want to do is hook this netbook up the the KX3, just to see how Ham Radio Deluxe interfaces with it. I never installed the RS232 option in the K2, so I was never able to have rig control until now, either.
Lots to look forward to!
72 de Larry W2LJ
QRP – When you care to send the very least!
Larry Makoski, W2LJ, is a regular contributor to AmateurRadio.com and writes from New Jersey, USA. Contact him at [email protected].
ICQ Podcast S05 E12- Buying 1st Amateur Radio Rig (3 June 2012)
Series Five Episode Twelve of the ICQ Podcast has been released. News Stories include :-
- Operators needed for Canal Festival
- Volunteers wanted for RSGB Centenary Working Group
- Yaesu FT1D Digital Handheld
- Italian radio amateurs help out after quake
- New transatlantic 144MHz beacon GB3WGI
- Radio transmitter causes bomb scare
- Cuba's Radio Hams get new Digimodes
- Balloon Crossband Repeater Payload over USA
- ACO exam pass = Amateur Radio Foundation pass
- Change in IRTS 40 Metre News Frequency
- 2012 Torch route tracked on APRS
- Worked All Britain Olympic flame award
Chris Howard (2E0CTH and N4CTH) discusses Buying your first amateur radio rig.
Colin Butler, M6BOY, is the host of the ICQ Podcast, a weekly radio show about Amateur Radio. Contact him at [email protected].
It lives !!!

As anticipated, the remainder of the KX3 build did not take long at all. If truth be told, I am technically not finished – I still have to calibrate the roofing filter. But I am done to the point where I have a working radio.
I left off at the point where I had to install the battery holders and the KXAT3 auto tuner.
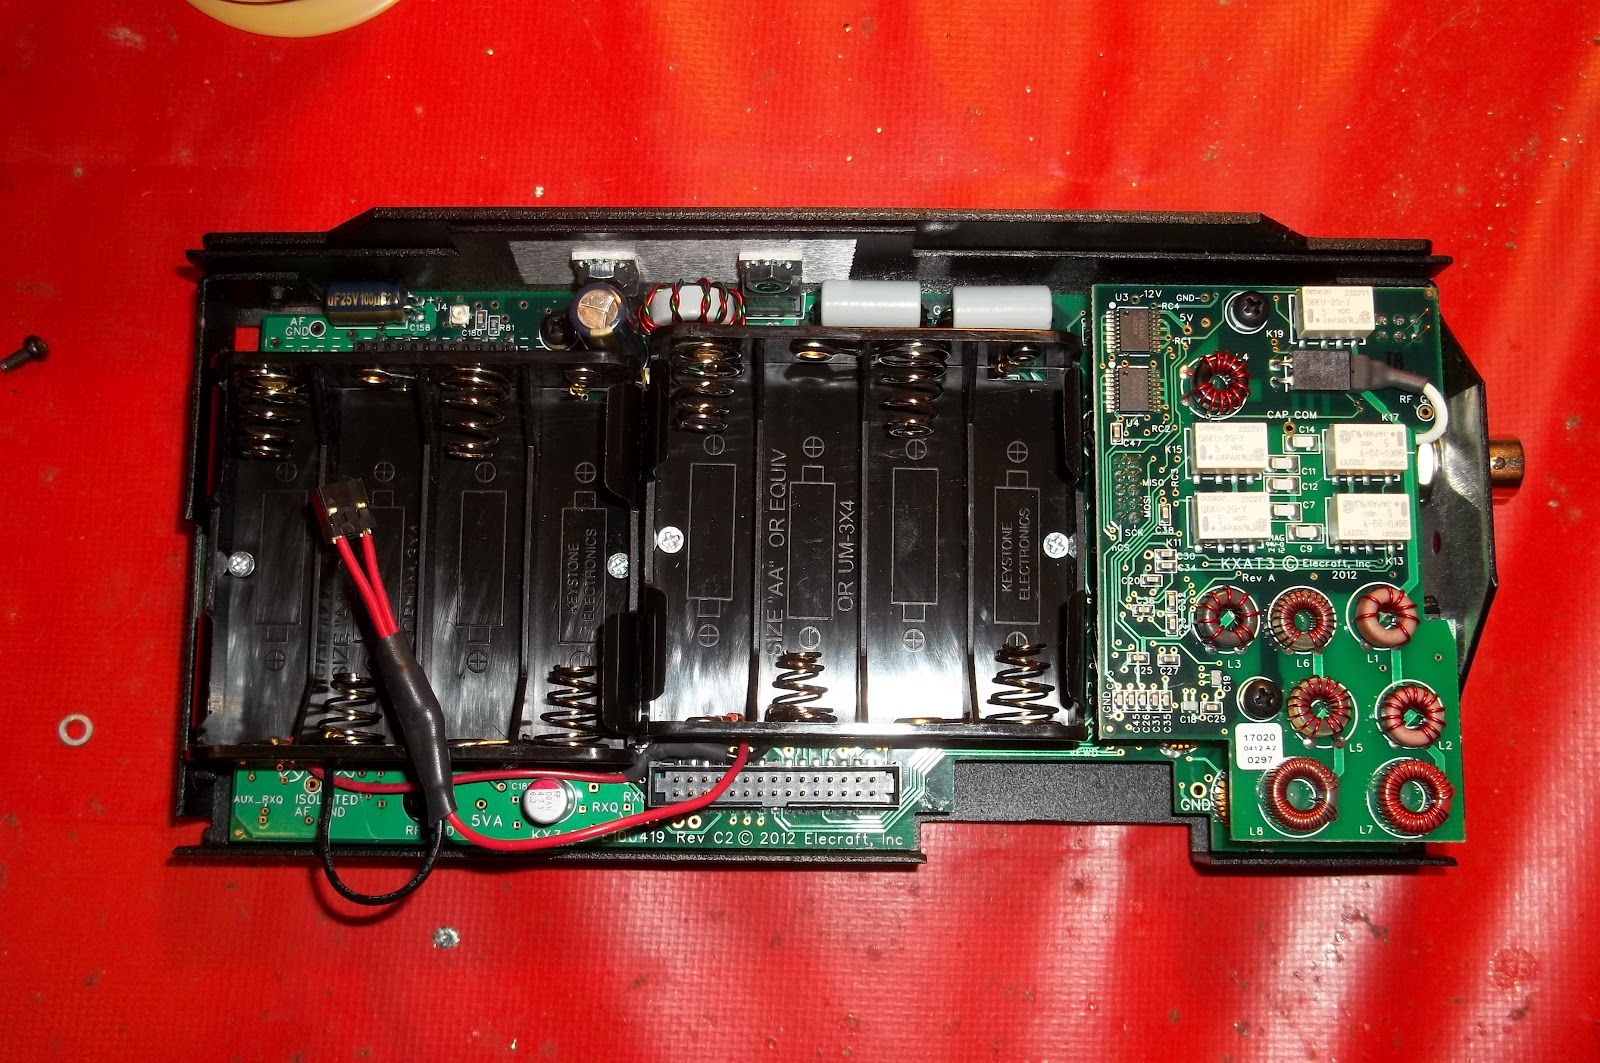
That is them installed. I am not sure if I am going to bother with internal batteries. The option is available to me if I ever decide to; but that li-on battery I bought is so small and light! And if I don’t have to open the case – that makes me happy, also. You can see the auto tuner to the right. Here’s a close up:
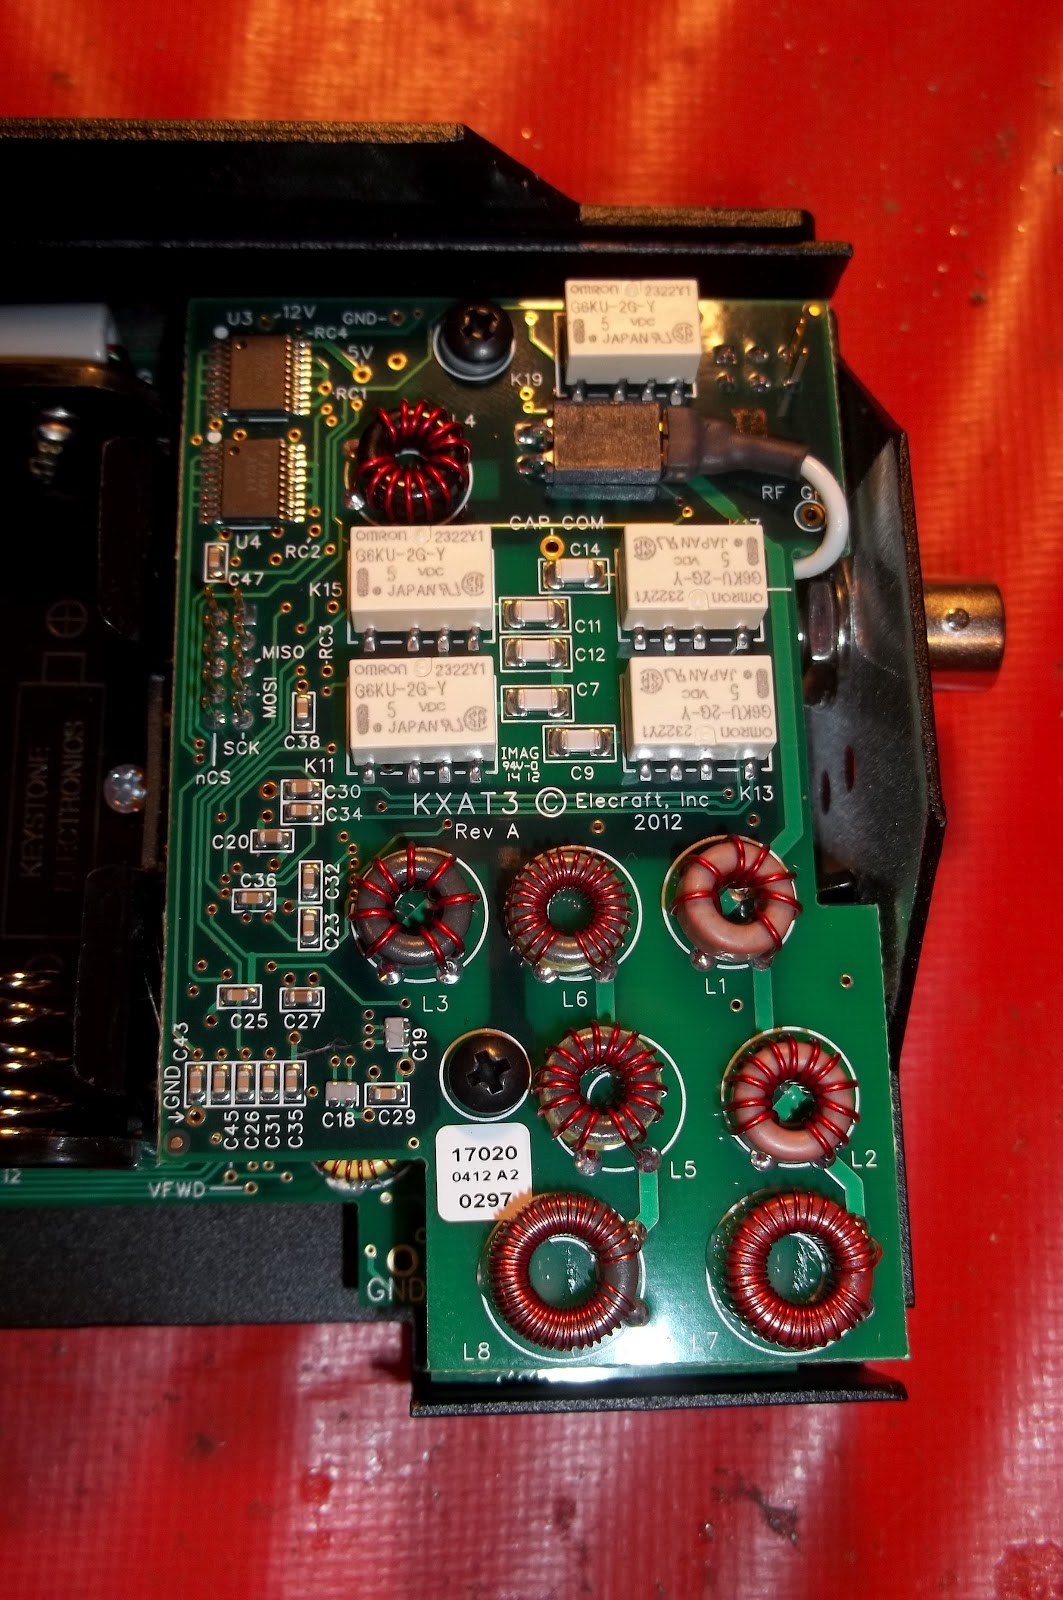
It’s quite a piece of work! Once I turned the KX3 on, I had to go through the menu and select it so that the radio “knew” it was there. The tricky thing was that once you turn it “on”, for the first time, you have to turn the radio off and then back on, so that it initializes with it there. A bit different than selecting options with the K2.
Next came the roofing filter board:
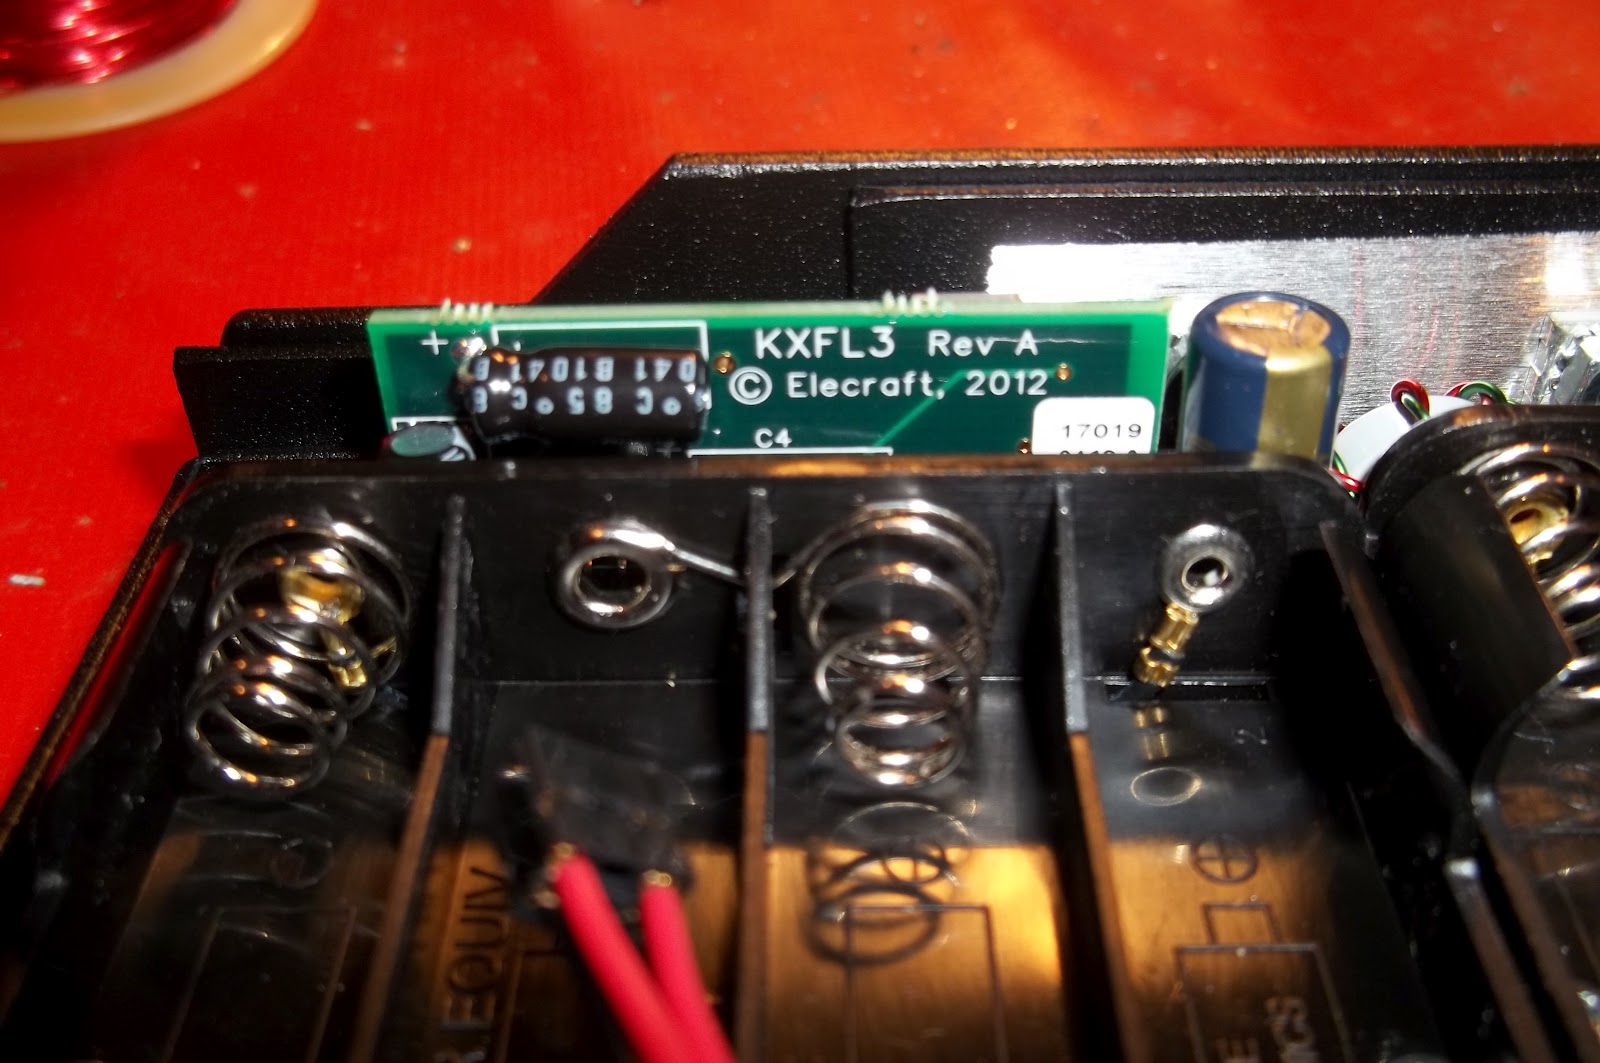
There it is, right behind one of the battery holders. When you install the KXFL3 you have to take out one of the chassis screws. It is replaced with a much longer one that actually extends through a hole in the KXFL3 circuit board. This is to prevent the roofing filter circuit board from becoming jostled loose accidentally if the going gets rough on the trail.
Then came connecting the two halves with the ribbon cable, which was a snap. Connecting the battery holders to their connector and then mating the two halves together and buttoning the radio up.
The first thing to be done was to hook up the battery, cross my fingers and say a small “No smoke, please!” prayer. When the moment of truth arrived, the display came up and static came out the speaker. No smoke, no disasters, no disappointment. From there, it was off of the workbench and onto the shack table we go!
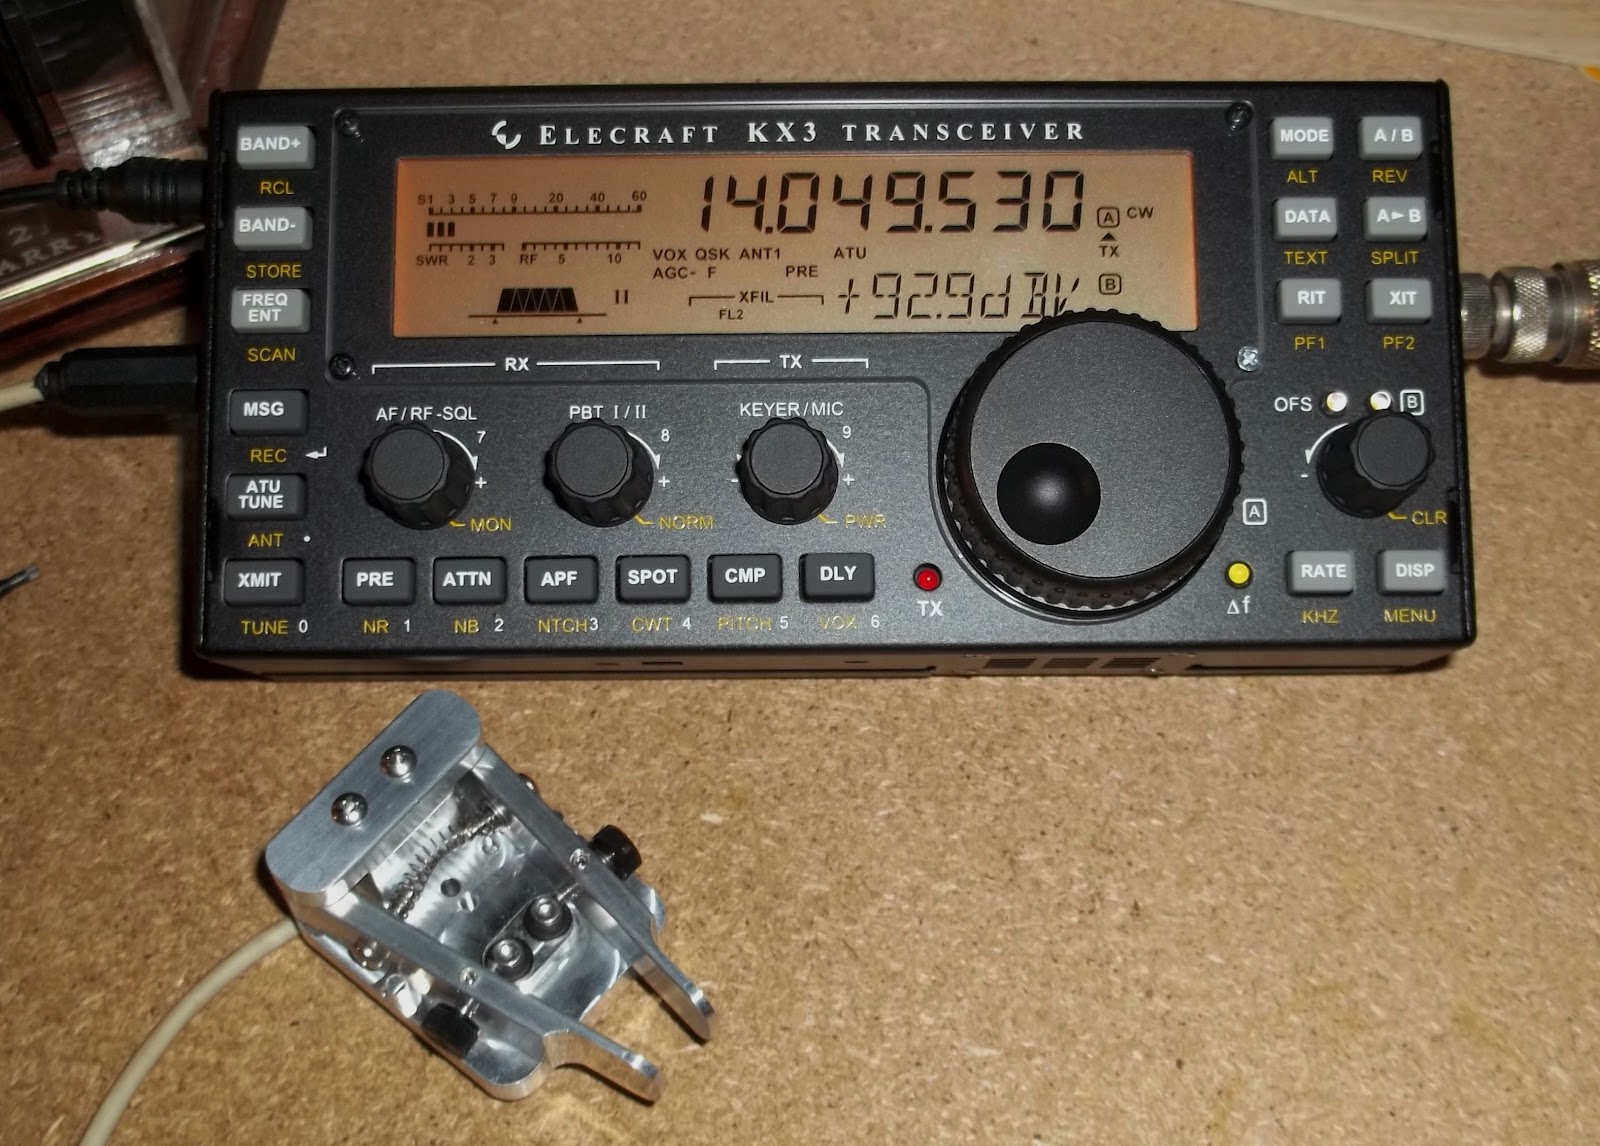
I hooked up the DCP paddles and antenna and made a contact on 20 Meters in whatever 4 land QSO party is going on this weekend. I have it written downstairs; but I think it was K4SAV. Second QSO was on 40 Meters – G5LO in Great Britain.
There’s going to be a learning curve here because this is definitely more complex and sophisticated than my K2. For now, I just want to make a few QSOs and play around a bit. I will intensely study the Owner’s Manual and will probably try to calibrate the roofing filter tomorrow. Right now, it’s back down to the shack to play!
Thanks to all of you who went for this ride with me, beginning last year, when I started saving and selling things to raise the needed funds. Thanks for sticking with me as I ordered and began the, what seemed to be, interminable waiting period.
Now that the radio is built and seems to be working, I can truly say it was worth the wait and am looking forward to many hours of fun filled QRPing.
72 de Larry W2LJ
QRP – When you care to say the very least!
Larry Makoski, W2LJ, is a regular contributor to AmateurRadio.com and writes from New Jersey, USA. Contact him at [email protected].
Solar Power for QRP
-

- 3.37 Amps in the Sun
-

- Brace Detail
-

- Close Up of Curved Leg End
-

- Close Up of Leg Braces
-

- Close Up of Leg Braces 2
-

- Close up of Solar panel controller
-

- Corner Detail of Leg Attachment
-

- Corner Detail of Leg Attachment For Other Leg
-

- Curved Leg Section Cut Away to Allow Legs to Swing Out, Avoiding Panel Damage
-

- Drilling to Set Legs in Place
-

- Go Box on the Left, 100 Watt 5 Amp Solar Panel on the Right
-

- Legs Attached to the Solar Panel Allows it to be Self Standing
-

- Legs Fold Into the Solar Panel Frame for Easy Storage
-

- Rear of Solar Panel, Controler is mounted with Velcro
-

- Right Leg Attached to Panel Frame
-

- Solar Panel Stored in its shipping case.
I’ve always wanted to operate my radio on Solar Power. This was a fun to do project. I can’t wait to bring it to a Field Day Event.
I bought the aluminum from Metals Depot in Kentucky. (link attached) They have lots of aluminum shapes and parts to choose from. The parts arrived via UPS. It nice to have a good source like this for ham radio projects.http://www.metalsdepot.com/
HQRP is a good company to buy solar panel parts and controlers from. The QRP part of their name is just coincidental to this being a QRP project. http://hqrp.com/
de AA1IK
Ernest Gregoire
72
Ernest Gregoire, AA1IK, is a regular contributor to AmateurRadio.com and writes from Florida, USA. Contact him at [email protected].
Stupid UV-3R tricks

Baofeng UV-3R Mark II
So, as some of you may have guessed, I like to tinker. For some reason I’m never satisfied with things the way they are when I buy gadgets. I have an Acer NetBook running Mac OS X, an old Windows Mobile phone running Android Froyo, and a $50 CVS 7″ WinCE NetBook running Debian Linux. If there’s a mod, I want to know about it. I had been reading about the Baofeng UV-3R and its capabilities before I ordered the his and hers models and made sure I ordered a programming cable too, so that I could attempt the 220 mod that’s been talked about. I ordered the cable from someone different than the radios, so as of Thursday it had not arrived yet. Could I wait? Of course not.
I also own a Radio Shack Pro-137 scanner. This is a 1000-channel model that was marketed as a racing scanner. You can usually pick them up on the cheap because of the racing moniker. In reality, these are great all-around scanners, with a stalker function that helps when testing commercial radios. I have a programming cable for the pro-137 that I used, along with ARC software and a RadioReference account, to load all of the local frequencies I wanted. I was thinking that day, after dealing with several other forms of USB-to-serial adapters that these cables are not all that different. Just the pins are different. The scanner uses a 3-conductor 3.5mm plug, and the Baofeng uses a 4-conductor one.
I examined the pinouts for both radios, and realized that the ground and first ring are the same, but the third ring on the scanner’s plug corresponds to the fourth ring on the Baofeng, so it was probably not going to work. I know this because when you plug standard stereo headphones into the UV-3R, you short

Radio Sack 20-047
out pins 3 and 4 in the radio, causing the radio to transmit. When using headphones though, if you pull the plug out just a little (about a mm), you get one ear (left) of sound. I wondered if this would work with the programming cable. I started the software. and hit the button to download the radio memories onto my computer. After a couple of tries I found the sweet spot. About a mm out there is a slight detent you can feel. That is where you need to be. It works! I will post the results of my experimenting with the software and the mod later. If any of you have one of these cables laying around, it will work. The stock drivers in Vista and Win7 will even work! Some Radio Shack’s have these on closeout still. Stock number 20-047.
The funny thing is this: Guess what was waiting in the mail when I got home?
–Neil W2NDG
Neil Goldstein, W2NDG, is a regular contributor to AmateurRadio.com and writes from New York, USA. Contact him at [email protected].
 Ham Radio Deluxe |
 W5SWL Electronics |
 Ham Radio Prep |
 KB3IFH QSL Cards  Hip Ham Shirts  HamRadioAuctions HamRadioAuctions Reliance Antennas Reliance Antennas Enigma Shop Enigma Shop |  morseDX  Ni4L Antennas  R&L Electronics R&L Electronics antennas.us antennas.us QRV QRV |
- Matt W1MST, Managing Editor
