 |
 DIY Magnetic Loop Antenna – Part 2
Part 1 of the DIY Magnetic Loop Antenna covered mostly theory and materials so now its time to move on to designing the magnetic loop antenna (MLA).
If you have priced a commercially made MLA you’ll see prices start at $400 and keep going up, and up. If they cost so much you would think they must be difficult to build or use expensive parts, right? Well, it is certainly possible to spend more and get a higher quality MLA but a low cost MLA will still work very well.
For the purposes of this article we’ll assume that you want to build a loop to cover the 20-10M bands. I’ll run through the calculations required to build the MLA.
The required information for the MLA calculator is:
- Length of the loop
- The conductor diameter
- Frequency/s of operation
- Input power to the antenna
Lets pick some starting values
- We don’t really know the best length of the loop at the moment so I’ll pick 9 feet circumference as a starting point (It’ll still fit in the trunk of my car)
- Since we seem to be having better luck with sunspots now I’d like to try 10M so we’ll start with 29 Mhz as the highest frequency we’ll use.
- I have some copper pipe left over from an ice-maker install, it is 1/4 (0.25) inch in diameter.
- Input power to the loop will be 100W.
Using the 66pacific.com calculator we get the following:
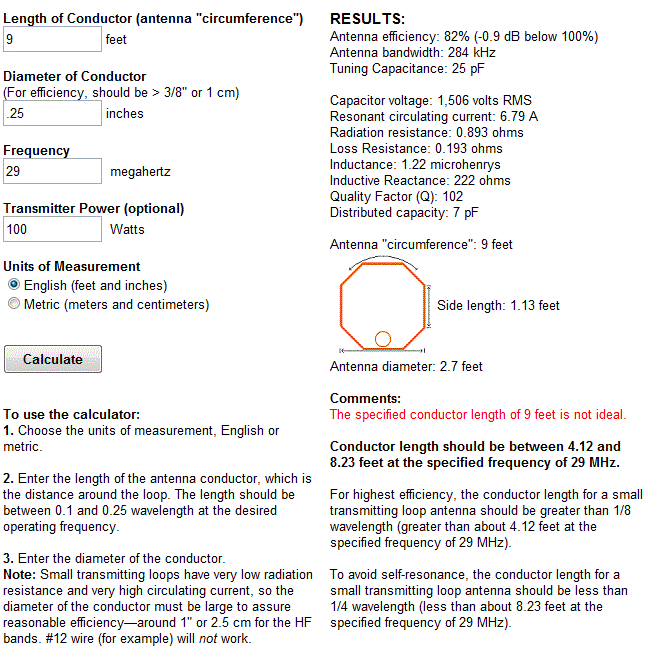
The comments section informs us that, “The specified conductor length is not idea” and we can go on to read that, “To avoid self-resonance, the conductor length for a small transmitting loop antenna should be less than 1/4 wavelength (less than about 8.23 feet at the specified frequency of 29 MHz).”
Well, I don’t want the wire in the loop to resonate by itself, its designed to resonate in combination with the capacitor. Lets make the loop 8 feet in circumference and while I’m at it I’ll make it out of 3/4 (0.75) inch copper pipe for better conductivity.
Lets see what we have now:
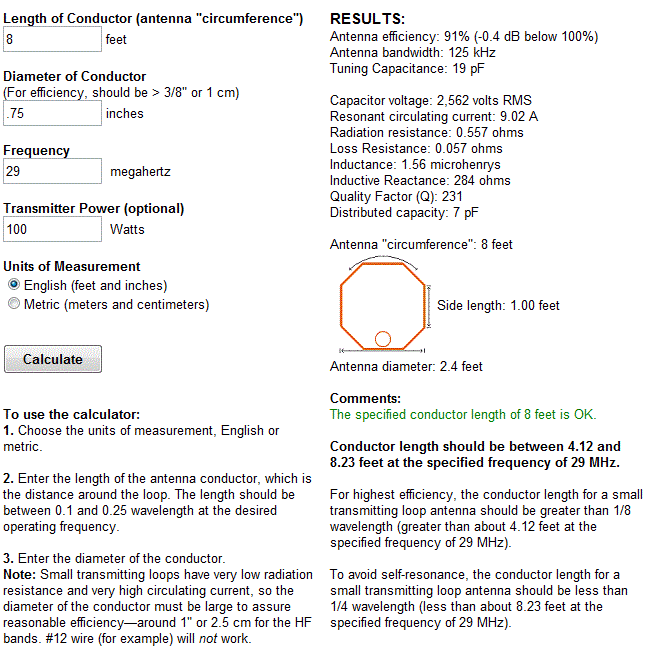
Well, that seems to have fixed the self resonance issue and we’ve managed to bump up the antenna efficiency to 91% from 82% … not a huge increase ( About 0.5 dB) so I could use either diameter copper tube in this case. Everything looks good so far!
How about the 20M band, at 14 MHz how do things look?
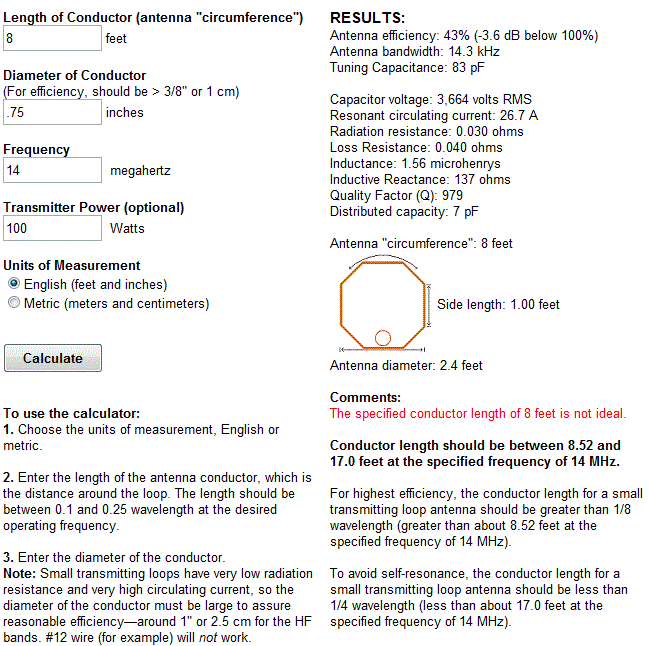
So, the specified conductor length is not ideal but the comments section says were under the 1/4 wavelength at 17 feet. What is also tells us is that, “For highest efficiency, the conductor length for a small transmitting loop antenna should be greater than 1/8 wavelength (greater than about 8.52 feet at the specified frequency of 14 MHz).”
That is OK, we know that the MLA is going to be less efficient somewhere in its range and the suggestion of 8.52 feet is close enough to our 8 feet we can ignore it. The 42% efficiency is not the greatest but -3.6dB is about half an S-Unit down so I’ll live with that.
Just for fun I changed the copper pipe back to 1/4 inch and the efficiency dropped to 20% (-7 dB) so I think I’ll stick with 3/4 inch. It makes more of a difference at lower frequencies since more current is flowing through the loop!
In order to tune the loop between 14MHz and 29MHz we look at the Tuning Capacitance value in the last two calculations above. At 29 MHz the tuning capacitance required is 19 pF and at 14 MHz it is 83 pF.
This is well within the capacitance range of a normal air variable capacitor and in fact a larger capacitor with a maximum capacitance of 160 pF would allow you to reach the 30M band with reduced efficiency.
Its important however to look at the voltage across the capacitor in our last two examples. At 29 MHz we’ll see a Capacitor voltage of 2,562 volts RMS and at 14MHz we’ll see a Capacitor voltage of 3,664 volts RMS.
What does this mean? In order to know what kind of capacitor would be best we need to know the absolute maximum voltage it will have to withstand before it arcs between the closest conductors. If the voltage is high enough it will ‘leak’ between the plates of the capacitor by breaking down the air between them and directly passing an electric current … we don’t want this to happen.
The breakdown voltage of air is around 3000V per milimeter (39/1000 of an inch = 1 mm). The voltage above is shown as RMS (Useful for power calculations) but we need to know the peak value which is higher and determines the maximum voltage. The peak voltage = RMS x 1.414 or 3664 x 1.414 = 5181 V peak.
 A peak voltage of 5181V will require a minimum spacing of 1.7 mm (peak voltage / breakdown voltage per mm) between the closest conductors in the capacitor. That would rule out an old air spaced variable capacitor from a vacuum tube radio but you could still use a wide spaced variable capacitor from an antenna matching unit or transmitter. A vacuum variable capacitor would be great (watch the minimum capacitance) or a home-made capacitor would also be fine provided you checked the breakdown voltage of the insulating material.
What if all you have is a capacitor with insufficient plate spacing for that voltage? If you reduce the output power to 35W then the voltage across the capacitor will decrease to 2168 V RMS which is 3066 V peak( 2168 x 1.414) This voltage requires a 1 mm plate spacing which is easily achievable with surplus capacitors. At QRP power levels (5 W) the voltage falls to 1160 V peak and requires only 0.39 mm between the plates, suitable for practically any variable capacitor!
The value of 3000V / mm is only an approximation and if possible use a capacitor rated for a higher voltage than you expect to run to prevent damage to your radio. Modern rigs have great protections circuits but they shouldn’t be relied on.
Next post I’ll cover building the loop and coupling it to your transceiver. Hopefully you found this information useful and if there are mistakes or inaccuracies you’ll drop me a line and set me right.
3 Responses to “DIY Magnetic Loop Antenna – Part 2”
Please support our generous sponsors who make AmateurRadio.com possible:
 Ham Radio Deluxe |
 W5SWL Electronics |
 Ham Radio Prep |
 KB3IFH QSL Cards  Hip Ham Shirts  HamRadioAuctions HamRadioAuctions Reliance Antennas Reliance Antennas Enigma Shop Enigma Shop |  morseDX  Ni4L Antennas  R&L Electronics R&L Electronics antennas.us antennas.us QRV QRV |
- Matt W1MST, Managing Editor

If you are going to do this, do it correctly and save up for a surplus vacuum variable. Trying air caps or homemade caps is asking for trouble in my experience.
Almost every year around memorial day I participate in an event called the Friendship Cruise in which power boats get on the water at Green River, Utah, go down the Green River to the confluence of the Colorado, and then back up the Colorado River to Moab, Utah – about 180 river miles. In such a remote area there are a number of “rescue boats” that will provide service to those who have difficulties (breakdown, out of gas, emergency help, etc.) and since the 60’s, hams have provided communications over this large, challenging geographic area to assist and coordinate the activities of the rescue boats, their support teams and the local emergency services when necessary.
Traditionally, HF – specifically 75 meters – has been used as that was the only thing that one could hope could get out of 1/4-1/2 mile deep gorges with only a narrow view of the sky and over the years, many HF antennas were tried. The nice thing about 80 meters is that it’s very good in the middle of the day for the distances involved (e.g. from just a few miles to 100 miles away) and nighttime communications usually was not needed.
By far the best HF antenna for this purpose has been a magnetic loop designed by Mark, WB7CAK using an approximately 4′ diameter loop of aluminum tubing (it was filled sand to allow bending) along with a vacuum-variable capacitor and a small, interior coupling loop of #8 copper wire. Its base being built on a heavy plastic substrate, this antenna – and its copies – have survived years on power boats while bouncing on rough water on plane and occasionally getting tangled in tamerisk along the rivers’ banks.
Having personally used this antenna on a number of occasions it’s rather disconcerting to have an antenna that is narrow enough that switching from LSB to USB would require retuning to keep the radio from shutting down on SWR and that one can see the SWR change if on whistles different pitches into the microphone! On receive, the pitch of the atmospheric noise changes very obviously as one tunes past the frequency!
Since these antennas, at least on 75 meters, are essentially NVIS, they worked quite well in getting out of the deep gorges. With proper tuning of the vacuum variable and coupling adjustment of the primary, the same loop also did a very respectable job on all bands through 20 meters, above which the vacuum variable would not tune.
In the past decade or so we’ve refined our techniques for this event and have been able to put up extremely sensitive repeaters in spectacularly remote locations and have mostly switched to using 2 meters, but we still occasionally have fun on HF!
Take a look at my mag loop. It works fine, and I had a lot of fun with it.
Air caps work well at QRP levels. No arcing!
http://tinyurl.com/6rulctv
de AA1IK
Ernest Gregoire