Archive for the ‘radio’ Category
 ARRL DX with the K2
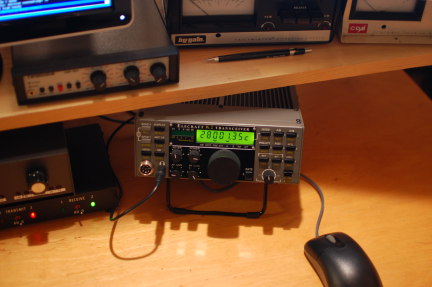
One of the goals I had for the K2 that I failed to mention in the previous post was to fill-in for the K3 in DXpedition service. This is a tall order. It also necessitated upgrading the basic K2/10 to a 100-watt K2/100—being loud (enough) is an important part of pileup control. I had the good fortune to come across an already-assembled final amplifier unit at an attractive price a few days after I purchased the radio. I took that as a sign!
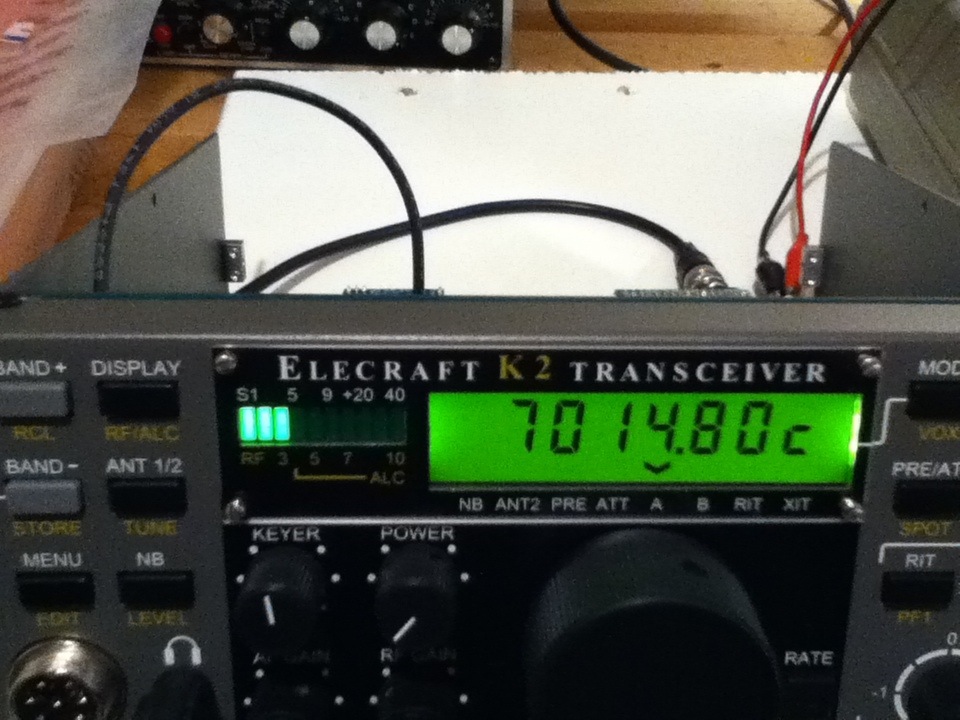
Another rite of passage for the K2/100 would be…how does it perform in a pileup? One of the really great things about ARRL DX CW since the advent of the CW Skimmer and Reverse Beacon Network is that literally any U.S. station (especially on the East Coast, my Western and Midwestern friends will remind) with a modest signal can elicit a blistering run of Europeans. I’ve been relatively unhappy with the K3′s response to pileups, with callsigns often being mushed together more than with other radios (e.g., the TS-930S). I understand that tailoring the K3′s AGC should help this—the KE7X book now graces my shelf but I haven’t had a chance to explore all of his suggestions yet. Having heard anecdotally that the K2 does better in this regard, I was excited to break it in with ARRL DX.
Sarah worked this weekend and I was frankly wiped out from a full week at work plus shoveling 18 inches of snow and cutting up trees from the previous week’s ice storm! Nothing approximating a “full” operation was in the cards. In about two hours of operating, mostly on Sunday, I made about 140 QSOs on 10 and 15 meters. I’m happy to report that the K2 did quite well with regard to the pileup response and I didn’t manage to break it CQing hard at full power. The K2 also passed the “W3LPL test”…Frank lives just a few miles away and is frequently quite loud here. But, I could still hear nearby stations with no problem at all. The one thing that disappointed me about the K2 is that it seemed a little deaf as the 15-m band was closing to Europe. A number of stations were right at the noise floor and were tricky to copy. This might have been “one-way” propagation, too, a topic I should write about at some point.
The upshot is that I’m extremely pleased with the K2 and I look forward many more QSOs with it!
SketchUp project cases
After completing a kit or small project I have a terrible habit of not finding a suitable box to put the thing in. This is partly due to the really unappealing array of cases on offer. Sverre, LA3ZA recently posted something regarding the ultimate qrss kit v3 that I gave a quick response to and this is supposed to be the long winded response.
Sometimes these cases are blow moulded polypropylene or extruded aluminium that needs better tools than I possess to make holes, especially square ones for things like USB connectors and LCD’s. So what’s the answer? well I prefer to use simple acrylic cases like those made by Dangerous Prototypes in a range called Sick of Beige (or SoB). these are simple flat sheets of acrylic that are laser cut and have 4 holes for fasteners. A really nice idea but its only half way there.

This company also like to encourage you to complete a project that looks nice. Not just with the case but also the PCB. They offer a few tools to help you do this. There are a few routes to take and I have found that with a bit of extra time you can make a really well finished project.
1. PCB sizes
CADSoft Eagle is a piece of software that allows you to draw out schematics and then layout a PCB. There are loads of alternatives (Fritzing, KiCAD, DIP Trace etc.) but in order to make use of the tools. Eagle is the way to go.
DP offer a library of PCB sizes that fit their cases. Easy, just use one that fits the project you are doing. Just install the library and pick the right size of case. Take a look here for some more info. You’ll find links to the libraries there too.
2. Case design
Now it gets a bit more complex, but not too hard. You’ll need to look at some mechanical design tools. In simple terms we need to draw something that a laser cutter can cut out. In general the ones I’ve come across use .svg or scale vector graphics files to do the cutting. Not everything produces these files in an easy way. There are loads ways to do this, it just depends on your preference. I prefer to use SketchUp as it has a handy feature I’ll come onto in a moment.
The simplest way to modify one of these cases is to use the guide by Dangerous Protoypes themselves. This is available here
I’m not going to explain how to use SketchUp, there are loads of really good tutorials about and you can build up your skills using those. I tend to go for YouTube ones as they give you the basics you need quickly and easily, without too much jargon.
I’d suggest picking a standard size case first off and then using the other tools when you get the hang of things. Use tools like offset in SketchUp to get things lines and don’t forget about tolerancing to make sure there is a clearance where you need it. It sounds simple and it really is, just put the extra holes in where you need them and hey presto, nearly done.
Export to SVG using the tool and check with something like Inkscape to make sure your case looks right.
3. Case manufacture
As I said earlier, many of the machines I’ve come across just need the data. Seeedstudio is one manufacturer but there are plenty of others. Follow their instructions and upload your files. Pay the man (or woman) and you’ll get your sheets of laser cut material back in no time. You’ll need to get fasteners and your favourite supplier may be able to help. I have a really good industrial supplier a couple of miles down the road who gets excellent quality fasteners, otherwise Farnell, Rapid or RS will give you options. Failing that try eBay if you must.
4. Going a bit further
There is an Eagle Plugin that will give you the chance to export your (empty) board to SketchUp and almost certainly you will find the parts or near equivalents in the 3D warehouse to place on the board. Just remember that whilst SketchUp is good, you need solids to be able to line up properly and whilst a free (or £500 pro version) CAD package is going to give you most of what you need. It isn’t AutoCAD Inventor or Solidworks (at almost 10 times the price). I would suggest getting a handle on the software first before getting too embedded as you may find it frustrating if you can align holes for example.
If you do go for it then you can create some really good looking CAD drawing that can be rendered into photo realistic parts. Here’s one from the website.

The range of free tools available to the hobby user is now amazing and no doubt will only get better over time.
Latest Tinkering (or how Elecraft is taking all my money)
On Christmas Eve, I was sitting at my in-laws’ kitchen table with the Small Wonder Labs SW-40 I built as a high school kid in 1998 listening to beautiful music and I got the itch to come up with a radio smaller (and less expensive) than the K3 to drag around with me when I go places. My mind wandered to the NorCal Sierra, which was a featured project in ARRL Handbook’s of my youth. I was able to come up with a draft version of that Handbook article on the web—pause for a moment and think how revolutionary that is—my in-laws don’t have an ARRL Handbook, let alone the one that contained the Sierra article. I looked at the bill of materials and realized that I had some 70% of the parts in my junkbox. This seemed like a good idea until I went searching for a PCB.
Why PCB? Well, I’ve done the dead-bug thing and it works great but it’s a pain to troubleshoot and unless you have decades of experience doing it, it looks like a Mexico City suburb, sprawling unpredictably in every direction with only the most tenuous connections to the core. Since I was seeking a travel radio, I wanted it to be compact, easy-to-troubleshoot, and relatively rugged. Due in no small part to the wishes of the Sierra’s designers (not coincidentally founders of Elecraft), boards are no longer available. I looked into doing my own board, but if you don’t mix chemicals yourself, you’ve suddenly spent $150 on PCBs, plus the layout effort. I toyed with making the board smaller (a win in several ways) by using surface-mount parts but even that was a non-starter since my junkbox parts are through-hole, requiring me to buy everything.
Astute readers can extrapolate what occurred next. I went to the Elecraft web site to price the Sierra’s successor, the K1. I had all but made up my mind to sell off some junkbox items and raise the capital to buy a K1 kit when something occurred to me: fellow ham blogger Mike, VE3WDM, had recently moved to a smaller QTH and was offering a half-completed K2 kit for sale. His asking price was only a little more than the K1 kit with some of the options I wanted and it was all-band. The ad had been posted for some days by this point, so I fired off a sheepish e-mail to Mike asking if the radio was still available. It was. We sealed the deal and the radio made the somewhat tortuous ride (for us, not the radio—it sat in Chicago for two weeks) from his QTH to mine via the postal system.
I would not have bought a partially-finished kit from just anyone. However, since this was Mike’s second K2 build and he was documenting it carefully in a blog, I figured it was a pretty safe bet. So far, that is definitely true.
While I was eagerly awaiting the radio’s arrival, I redoubled my efforts to get a friend’s TS-930S off of my workbench, a task that involved replacing all 115 electrolytic capacitors on the cookie-sheet-sized “Signal Unit” board (similar to the K2 and K3 “RF unit”). That radio still has low drive (it has ALC again and sounds like a million bucks), something I traced to a hard-to-find semiconductor that’s now on-order. So, I gathered it up and started work on the K2 on Sunday afternoon.
Last night, I got it on 40 meters RX-only and peaked up the RX BPF. Former K2 owner KL9A mentioned to me that it has some blow-by on strong signals but that he thinks it’s a pretty good radio. I can confirm that based on my experience last night. It sounds really really good on CW.
More on the build to come…including a look back at some troubleshooting of the BFO circuit.
One for the Linux fans

Shackbox is a Linux distro for us ham radio fans. So if you fancy using Linux in the shack (and why not) then after a long time in development (Which I understand from those in the know, that this means the developers had other things to do) there is a new release based on Ubuntu 12.04 LTS or Long Term Support.
I haven’t managed to download a copy as the servers were complaining but if you’re feeling lucky then head on over to http://shackbox.net/ and grab a copy.
I’m guessing but I’d image its a Live DVD that you can run on your normal machine without having to install anything. Like most Live versions you can install the distro after playing about either as a complete OS or as a dual boot.
Wrestlemania
Back when I had an easier job I decided that I’d attempt to make a really simple, lightweight rotator that used off the shelf servos or stepper motor’s driven by an Arduino. Either interfaced with a PC or as a stand alone device.
Well, things move when you’re not looking and it seems like my bright idea was also several others, and whilst I’ve been busy not doing anything radio, others have.
I’d managed to buy a couple of servos off eBay and managed to drive them with the standard examples. Although the movement wasn’t as smooth as I’d have liked. Perhaps a couple of large capacitors would have helped but as I didn’t have anything suitable to hand I thought I would have a go anyway.
Well it didn’t work out like that. After spending over an hour installing the Windows 8 drivers (how to turn you off an operating system!) I hooked up the Arduino and wrestled with the servos. Either they are knackered or there’s something missing…..
Time to take a step back and reflect, or buy a few caps
75% Chance of M-class Flares, 30% For X-class
Solar Flare Alert:
Active Sunspot Region 11944 has a 75% chance of producing an M-class flare, and a 30% chance of producing an X-class flare, in the next 24 hours. Smaller flares are also possible.
We are expecting a glancing blow from a Coronal Mass Ejection (CME) sometime in the next 24 hours.
The Earth’s polar regions are under a proton event (Polar Cap Absorption, or PCA, event). This is degrading HF communications over polar regions.

(Live data and more info at https://Facebook.com/spacewx.hfradio or http://SunSpotWatch.com/ )
Still Alive
Despite the lack of activity on the blog, I’m still alive and QRV on the radio. The blog had to wait. Here are some recent activities around K8GU:
- We moved from our 50′x100′ “city” (WM3O told me it was “suburban” because I couldn’t walk to an Asian grocery) lot to a nice “suburban” (semi-rural) lot of just over an acre in October 2013.
- In order to work the November DXpeditions and contests, I hastily erected the hexagonal beam on surplus fiberglass poles, as well as the 80-m vertical and a 40-m dipole. Also, put up several Beverages (yay!!!). The hex has survived some modest wind gusts, which surprises the heck out of me. I thought it would have been on the ground by now.
- Managed to work K9W, T32RC, and T33A on 80m (as well as other bands), which made me happy. Did not manage to work Z81X (on 80m) through the EU.
- Put in a nice 19-hr effort in CQ WW CW, SOAB-HP “CLASSIC” (one radio, no spotting), about 1.5M. It’s nice when WW is before Thanksgiving.
- Repaired a number TS-930Ses for people. I think mine will be on the bench soon since the sensitivity appears to be shot.
I’ve never been into making New Years’ resolutions, but some projects are in order for the next few months:
- More TS-930Ses. I have one still to fix in my queue, plus mine.
- Keep refreshing LoTW until the 99 DXCC I presently have confirmed on 80m rolls over so I can apply for 5BDXCC. I have cards for even more on 80m, but I’d rather do it all on LoTW.
- Getting some VHF antennas up.
- Editing my junquebox and ham equipment holdings, mostly parts. Anybody need some big air inductors and variable capacitors? 6-el 220 beam?
- Getting on 160 and 30 meters, better antenna for 40.
- Working FT5ZM on at least one band/mode.
- Re-installing antenna switching hardware. Right now I have to run across the basement to move coax.
- And, a special project that you’ve probably heard about but do not yet realize…details to follow.
So, Happy New Year and I hope your 2014 holds as much interesting and promising to do as mine does!


