Archive for the ‘antennas’ Category
 Antenna Launcher Revisited
One of my favorite QRP groups is the 4 States QRP Group that sponsors Ozarkcon. Today we had an interesting thread going on their email list concerning slingshot antenna launcher and visibility of the line and sinker.
I’ve been working on that issue for a bit and offered my current solution. Still not 100% perfected, but it is working well now. Here in Florida, the tallest trees are mostly pines and the bark is pretty sticky with sap and lots of crooks and crannies that don’t allow monofilament fishing line to slide as freely as I’d like. I’ve tried the archery reel and slick braided line and although it does slide nicely through the trees, it is much slower and challenging to reel in and also is very prone to tangles and wind knotting which wastes time to untangle. In low wind or super sticky pine trees it is still the best solution.
Below are some photos of my cheapo solution to the slingshot line launcher. A $4 slingshot from Harbor Freight and a 99 cent shelf bracket from Lowe’s are the basic components. One challenge is being able to see where the sinker and line end up after the shot. I tried painting the sinkers, but in tall grass or lots of leafy trees, it did not show up as easily as I would like. The simple solution I found was to use fluorescent plastic surveyor’s tape (also from Lowe’s) to add both vivid color and some motion to help me locate the sinker whether in the trees, air or ground. I’ve also recently switched to red colored monofilament line called Cajun Red Lightning that offers a bit more visibility than clear monofilament.

Here are the basic elements… slingshot, Shelf bracket, spincast reel
If you are looking for an inexpensive simple solution, this might be the answer! Give it a try and let us know how it works for you. Leave a comment or better yet, join the 4 States QRP Group and join the conversation.

Closeup of the mounting of the reel

The assembled launcher — slingshot taped to bracket
End Fed Tuner Success… sort of
Had a good day in the park with Jim K4AHO and Wally KG4LAL. Spent a good bit of time testing a couple tuners for End Fed Half Wave antennas using Jim’s AIM 4170. Wow is that thing a great tool for tweaking antennas! Info overload!
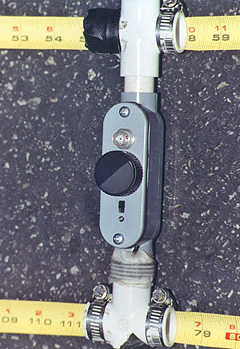
I built an antenna tuner based on AA5TB’s design for an end fed half wave antenna. I am using a 3 ft or so counterpoise on the ground as Steve suggests. On the analyzer in a test lashup it was a bit touchy to hand capacitance but tuned well even up to 21Mhz. Since I am not thinking of backpack size I used a pretty good sized enclosure for it. I am using an air variable 6-160pf cap instead of a polyvaricon like Steve used since space is not a big issue. I also used a T68-6 toroid instead of the T50-2 Steve used.
 When I mounted it in a plastic box the sensitivity seemed to increase. I have not put a LED SWR bridge in the box yet, as I was waiting to see how it worked before adding more variables. Today I was able to put an AIM 4170 analyzer on it and it did tune the antenna… seems that the air variable I used is perhaps a tad small. It is almost fully meshed on 40m cw and on 20m it acts like even at minimum capacitance the sweet spot is very narrow and hard to tune.

Here's the innards
My question(s) are:
1) Is the hand/body capacitance normal? If not, what might cause it to
be so touchy?
2) Would my parts layout be part of the issue?
3) Does the DPDT switch (mini toggle) I added for later use with the SWR
bridge add significant capacitance to the circuit? I was able to match a
21Mhz load on the raw test setup, but not once it is in the box.
4) I have a small bus wire for a ground, do I need to increase that?
5) Is the plastic box the problem? Would it be better in a metal enclosure?
6) Am I asking too many questions? Sorry, this is how I learn. Build,
test, ask… ![]()

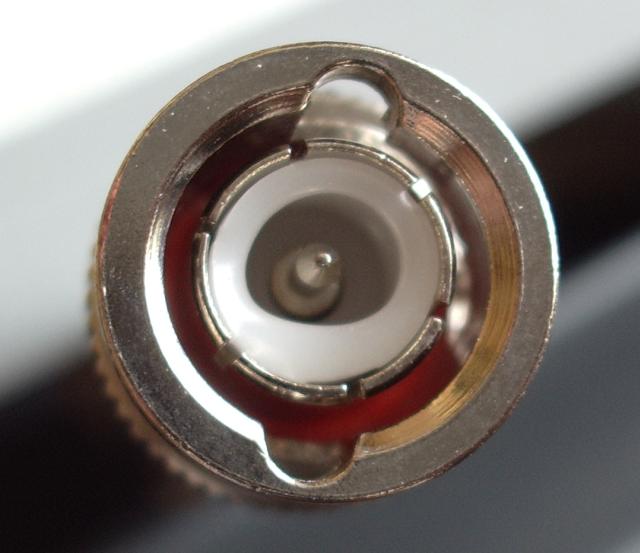
SWR bridge I want to use
Thanks for your wisdom and experience on this one.
72,
Kelly K4UPG
Foxhunt gear – offset attenuators
I attended a great fox hunting presentation at Dayton this year, hence a few posts on the topic.
I had some posts in the past about tape measure beam antennas. Really neat antennas and they have multiple purpose use (they are GREAT for hitting distant repeaters when you orient them vertically!). Much like the picture on the right (courtesy of Joe Moell K0OV) they are more useful for fox hunting when you add the active attenuator to your setup. FYI, Joe is the co-author of the great book “TRANSMITTER HUNTING, Radio Direction Finding Simplified” available where most ham books are sold. His website has more information on the book at http://www.homingin.com/THRDFSinfo.html and he contributes to CQ and CQ VHF.
So….. just what is an offset attenuator? Joe explains it on his “Homing in” site as:
An RF attenuator is a device that goes between antenna and receiver to reduce the signal strength down to within the range that the receiver S-meter can handle. Without one, you may think you’re close to the fox when you’re still far away. You won’t be able to get close enough to a camouflaged hidden T to identify it. The amount of attenuation should be adjustable so that you can add just a little when your S-meter first pins, up to a lot as you get within a few feet. Special ARDF receivers used by champion foxhunters have electronic attenuation built in, but ordinary handi-talkies don’t. Adding it would require major micro-surgery in the HT.
His attenuator page is:
http://www.homingin.com/joek0ov/offatten.html
I recommend his site in general, many great projects:
On his attenuator page, he has full schematics to make an offset attenuator.
But wait…… there’s more!
Further on his page, you see one made in a sweet Pomona box.  I like this box and thought it was a bit pricey at first, until I did the math and figured out the cost/time to do it myself. These boxes are shielded with the connector of your choosing (BNC/SMA/259, etc).
They generally cost around $25 or so and are shielded! Great to have. When you add the cost of connectors and such, it isn’t really so expensive after all.
I really advise using such a case or a metal case in general, makes things work out much smoother in the end. More information on this box at: http://www.pomonaelectronics.com/index.php?i=prodsub&parent=BOX&cat=BONCONN&getDetails=
But wait….. there’s even more!
 Marvin Johnston KE6HTS is now offering a “semi-kit” for this attenuator on his website. I’ve seen this kit when I was at Dayton this year and encouraged a friend to pick it up and build. I may end up running a buildathon here in CT on these attenuators.
The price is really not bad at $22.00. You can purchase them built for a few dollars more.
Information on the kits and pre-built models are at:
http://www.west.net/~marvin/k0ov.htm
And yep……. there’s even more (again!).
If you would like to “roll your own” from parts you may have on your bench, but don’t want to make a circuit board, you can get one from……. you guessed it…… Far circuits. I picked one up and am going this route myself.
There are a few boards/projects on the Far circuits website at:
There are a ton of great resources out there on the web, these will really get you going right from the start. Fox hunting is a really fun and useful part of our hobby and one that doesn’t cost a ton of money to get started in. If there are no active fox hunts in your area – start ‘em! There are plenty of options as far as transmitters and such and really doesn’t cost a club much money to get started.
Spud Gun/Antenna Launchers
 Spud guns or “potato cannon’s” have been around for a long time. For some reason, I’m shocked that more hams don’t use them for putting up wires. QST did an article awhile back on the topic getting people started, but not a lot of activity since (at least from what I’ve found online and locally).
The setup on the right here is the CSV19, instructions (and kits available) are on their website at:
http://www.antennalaunchers.com/csv19/csv19asm.html
There is a ton of information on the web. Unfortunately, a lot of what used to be freely available ended up not being so anymore since people decided to make businesses out of sites that used to give the information away – BAD WEBSITE! BAD!
Anywhooo……
There is still some other interesting sites with plenty of information. On that end, I send you to Philip Mayfield. He has a site with full details on various methods, air displacement, etc. on his site at:
http://www.sigmazone.com/TennisCannon_FullFactorial.htm
I’ve limited this to pneumatic cannons for a reason, the combustible versions are VERY simple. I just don’t like the mess they leave behind (though they are fun). Combustion mortars are fun too……. but I digress…..
There is a FANTASTIC video with step by step instructions courtesy of Patrick Norton (of ZDTV fame, then on various shows on the Digg networks). He did a video on Systm (now canceled program) that is still freely available online – SWEET!
The video below is also available as a downloadable file:
If you want to download the show, or read show notes, visit them at:
http://revision3.com/systm/tennis
If you know of any other resources available online, please post in the comments.
Being taken for an idiot
 I just received a phone call from the service department at Waters and Stanton who had just received the faulty helical antenna I returned to them.
I was asked: “What frequency did you use it on? It looks as if it as been used to transmit at high power on the wrong frequency.”
Do they imagine that it would be possible to overheat an antenna in such a way as to melt the connector without having any effect on the antenna itself, leaving the connector impossible to attach to a socket? You would think perhaps the fact that the antenna was untrimmed and the top cap not placed in position would give the game away that I hadn’t even used it.
In fairness, they did then agree that it must have been a manufacturing fault and they would send a replacement. But I was left feeling that I had been taken for an idiot. They didn’t even have the grace to apologize to me for the inconvenience of receiving a faulty product.
I don’t belieeeve it!
No, this isn’t a post that was meant to go in my other blog One Foot in the Grave. But I just cannot believe the amount of bad luck I have ordering radio goods from suppliers.
A few months ago I wrote about what a difference it made to the effectiveness of helical “rubber duck” VHF antennas if they were tuned precisely to 145MHz and I described how I had tried to lower the resonant frequency of some helical antennas I already had that were too high in frequency.
A few days ago I discovered that Waters and Stanton sell a tunable VHF rubber duck with BNC socket that can be trimmed to frequency by the user. As I have decided to switch completely to BNC antennas on my hand helds I needed another so I decided to order one.
It came this morning, but when I tried to fit it to the BNC adapter on my antenna analyzer in order to start trimming it, it wouldn’t go. When I examined the BNC closely I saw that the insulation had melted and deformed, presumably during the process of applying heat shrink tubing. So it is completely useless! You would have thought an “ISO 9001 Registered Firm” would have heard of quality control, wouldn’t you?
I have written Waters and Stanton a snotty email containing a copy of the photograph asking if they would send me a replacement. Since I have no desire to incur additional expense sending the faulty one back I have also asked how they will reimburse me for the postage.
NEScaf Filter Saves the Day
As one of the many antenna restricted condo owners of America, I cannot operate as often as I’d like. The hassle of putting up and taking down temporary antennas wastes time, isn’t always practical and generally spoils the fun for us.
Great that we have some holidays and time off as it allows a bit more opportunity to get on the air. The MI QRP group hosted a 4th of July Sprint and although the hour was late (7-11PM EDT) since I did not have to go to work Monday, I took advantage of the chance to work a few of my fellow QRP ops.
Rain and lightning welcomed my efforts to set up an antenna. So I forsook my normal setup and settled for a twinlead 44 foot doublet hung from my 20 foot Jackite pole which was bungee cord strapped to a ladder in the back yard of our condo. The antenna ran north south so much less than ideal, but at least I could get on the air.

Freshly Built NEScaf saved my bacon!
The day was saved by my freshly built NEScaf filter. As one of the lucky ones, I recently received the latest edition of this great kit provided by the NE QRP bunch. It enabled me to listen to cw despite the high QRN and background hash from neighbor’s TV’s, computers and air conditioners. What a joy it is to actually hear stations through the noise. This is a must have accessory for the condo based QRP op! I am still learning to use it well, but am mega-impressed with the capabilities it offers. With this audio filter, I could null out the QRN and peak the CW signals making for much more relaxed and enjoyable copy. The extra audio boost helps my little Sierra audio too. Keep watching for the next round of kits!


