 |
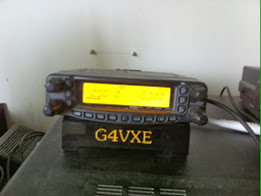
 A SOTABeams desk stand – so much better than propping the rig up!
There’s never quite enough room in the shack, no matter how much space you are lucky to have! So it is that whatever VHF/UHF rig is in use here, tends to perch on top of the FT1000MP. To prevent scratching, a piece of junk mail had been placed between the two rigs!
However, SOTABeams have a very nice range of desk stands for various rigs, including Baofeng UV-3R, Elecraft and Yaesu FT-817. They’re very reasonably priced and rather attractively, have your callsign on the front. Handy for when you forget it!
The rstand is made of good quality plastic and was nicely finished, no rough edges. There’s some edging strip provided to use as feet and a backstop which clips into the back of the stand, to prevent the rig falling off the back.
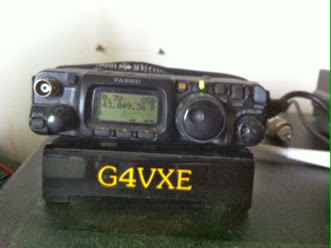
The rig is presented at a good angle and distinctly better than propping it up on a
– pen
– case of jewellers screwdrivers
– book
Another benefit I found was that although the stand is designed for the FT817, I found that the FT8900 fitted nicely too – a little overhang, but the rig is solidly placed on it and won’t go anywhere at all.
Excellent!
It’s good to read of SOTABeams success. Started by Richard G3CWI with products aimed at lightweight portable operation (SOTA operation, of course!), they have grown and grown and have recently moved to larger premises
3 Responses to “A SOTABeams desk stand – so much better than propping the rig up!”
 Ham Radio Deluxe |
 W5SWL Electronics |
 Ham Radio Prep |
 KB3IFH QSL Cards  Hip Ham Shirts  HamRadioAuctions HamRadioAuctions Reliance Antennas Reliance Antennas Enigma Shop Enigma Shop |  morseDX  Ni4L Antennas  R&L Electronics R&L Electronics antennas.us antennas.us QRV QRV |
- Matt W1MST, Managing Editor

What a great idea! I use an English-French dictionary. What does everyone else out there use?
I have an FT817 in my portable station built within an aluminium brief case and I use a wooden single layer pencil tray to prop up the rig to get the angle right for reading the dial but I may get on to SOTA and order up one of these stands. They look smart and it will show my callsign.
I have found the Almost perfect way to go. I lay the HF rig down first. I cut two 1″x4″ to form 2 belly bands around the HF rig. On top of the belly bands 1″x4″ I mounted my vhf rig. In this way air circulation cools both rigs. I painted the wood and it looks pretty good. No scratches or nicks plus good air circulation. On the bottom of the HF rig where it is in contact with the desk I have on each side a piece of 1″x1″ with top and part covered with cloth.
No scratches or nicks and great air circulation. Total cost under $4.00