Posts Tagged ‘blind’
 Handiham World for 02 May 2012
Welcome to Handiham World.

You can do it!
Today, just as we did last week, we are going to begin with Troubleshooting 101 as part of our initiative to help new ham radio operators (and even some of us older ones) learn how to do some basic troubleshooting for ourselves. Yes, it can be tempting to ask someone else to do things for us. This can become a bad habit when it keeps us from learning new things, especially things that we could – with a bit of practice – learn to do for ourselves. Knowing these basic things can serve us well in the future when no help is available. This next simple exercise is one that we will be practicing at this summer’s Radio Camp. You can do it yourself once you learn a few basics.
Troubleshooting 101

I have my General Class license now, so I decided to put up a vertical antenna, which I ground-mounted, in my back yard. I have checked the SWR (standing wave ratio) and it is practically one to one. It is grounded with a ground rod right near the feedpoint, and I have kept the grounding wire short. I am putting out plenty of power with my 100 watt rig, but I am having a hard time making contacts? What is wrong here?
Vertical antennas have long been the subject of derision in many amateur radio circles. It is practically an article of faith that “a vertical antenna is one that transmits equally poorly in all directions”. These operators have either tried vertical antennas themselves and had a poor experience or (more likely) they have heard some know-it-all pontificating on the awfulness of verticals and the awesomeness of just about any antenna other than a vertical.
Yes, the poor old vertical has gotten a pretty bad reputation. But is it justified?
I say no! And here’s why.
The most common vertical antenna design is an electrical quarter-wave long. This means that a simple 20 meter vertical will be on the order of 16 to 17 feet tall (5 meters). There is no problem ground-mounting a vertical in most locations, and this kind of antenna is sometimes disguised as a flagpole in places where there are restrictions on traditional antennas. A ground-mounted vertical will certainly have other advantages, too. It will not require an expensive tower or other supporting structure. It will be easy to install and work on if it needs maintenance or adjustment because you can reach it without any climbing. You can trench the coaxial feedline under the ground to keep it out of the way. If it is mounted in the back yard, it will probably not even be visible from the street. No wonder this simple antenna seems so attractive!
But let’s get back to your troubleshooting question. You have done well with your vertical antenna installation as far as it goes, but you have made a common mistake. You have assumed that a ground rod would suffice as a complete grounding system – but it won’t. When we work with RF (radio frequency) energy, we must remember that RF grounding is not the same as providing a simple electrical ground for low-frequency AC, DC, or lightning protection. Yes, a good electrical ground is an essential part of a well-designed antenna and feedline system. Now it is time to complete your vertical antenna installation with a good RF ground. That means installing radial wires extending from the base of the antenna outward in all directions. The ground rod should work as a common connection point. The coax braid is connected to the ground rod or the antenna’s mounting post, both of which are tied together with a stout, solid conductor.
What is happening in your antenna system is that lots of current is flowing in the vertical element right near the feedpoint. This is normal and expected. There is also a lot of current flowing in the ground beneath and around the antenna, outward in all directions. That is because a quarter-wave vertical is like one side of a dipole system, except that the ground makes up the other half of the dipole. If you recall your General Class studies, you will remember that current in a half wave dipole flows most strongly right near the feedpoint.
Now, answer me this: If you put up a dipole with one leg made of a fully-extended wire and the other a very short wire connected to a big resistor, do you think that dipole would work as well as a dipole with both legs made of wire?
No? Why not?
“Well”, you say, “It is obvious that the dipole with a big resistor in it will not work as well because there will be power lost in the resistor. The resistor will heat up, just like a dummy antenna.”
Yes, you are right! In fact, dummy load antennas are really nothing more than resistors designed to dissipate RF energy to keep it off the air while you run tests on a transmitter. A dummy load will have a near-perfect SWR, even though it is a resistor. Just because it has a low SWR does not mean that it is a good antenna. The problem with your vertical antenna system is that it is like that dipole with a resistor in one leg. The ground beneath the antenna has resistance to the flow of RF energy outward in all directions. The soil does have some conductivity, but it depends on moisture and composition. So the ground can be like a resistor. The ground rod you have installed goes straight down and does nothing to help RF flow in all compass directions outward near the surface of the ground.
The fix: A good radial system.
Radial wires are installed like the spokes of a wheel, outward from the grounded side of your antenna’s feedpoint. They can be cut to a quarter-wave length for every band you plan to operate (if your antenna is a multiband vertical) or – and this is more practical – to whatever length is convenient to fit into the space you have. Mind you, this goes only for a ground-mounted vertical in an area with normal to good soil conductivity. If you are mounting a vertical over quartz rock with almost no soil, the tuned radials might be necessary. If you are in the USA Midwest with its rich soil, you can probably get by with random length radials in your ground-mounted system. The reason is that conductive soil pretty much detunes the radials anyway, so there is nothing to be gained by carefully measuring them. In fact, since most of the RF current will be flowing right near the feedpoint, it makes sense to provide it with a low resistance path there, close to the antenna.
Why? Think of the formula power dissipated = current squared times resistance. The higher the resistance in the ground, the more power will be dissipated as heat. You don’t want that! What you want is for most of the power to be used to make contacts with other stations. The earthworms will be happier, too, because they don’t need the extra heat. If most of the current flows in the ground near the antenna, then THAT is where you need to put the most radial wire. I have always simplified this concept when teaching about vertical antennas by using the following practical example:
You have a coil of wire to use for radials. It is 100 feet long and will provide the radial system for your 20 meter band quarter-wave vertical. The question is which of these choices would be better:
A. One long radial that uses all 100 feet of wire.
B. Two 50 foot radials running in opposite directions.
C. Three 33 foot radials spaced 120 degrees apart.
D. Five 20 foot radials spaced at 72 degrees apart.
If you were thinking about losses near the feedpoint, you would probably pick answer D. The reason is that you are putting more wire near where the loss is actually happening! In fact, the thing with radials is “the more, the better”, not “the longer the better”. Of course you would not want to go to extremes and assume that 100 one-foot radials would work. But in the real world, you want to get more wire down in the ground near the feedpoint. A dozen radials work better than four.
Installing and testing the system:

Stomp the grass back down and you are good to go. Repeat for each radial. If you can go out 33 feet in one direction and only 15 in another, that’s okay. Just make sure that the final installation is solidly connected to the ground rod and coax braid and all of the wires are out of the way of the lawn mower. The insulated wire will last longer in the ground than non-insulated wire. Once you get a taste of a hands-and-knees radial installation, you will not be eager to repeat it to replace rotted out wire any more than you have to. And if you tried to install springy radial wire, well, you know what that is like. Push one part in, another part pops out.
Email me at [email protected] with your questions & comments.
Patrick Tice, WA0TDA
Handiham Manager
Handiham World for 25 April 2012
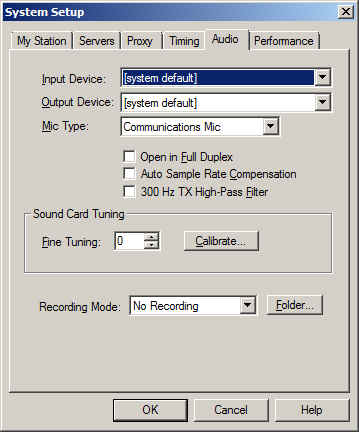
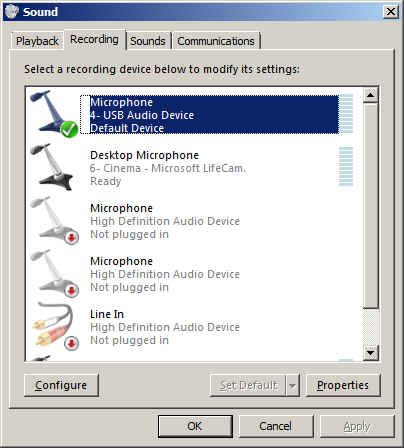
So why do we recommend using “default device” instead of one of the other selections? It is because selecting the recording device via the Echolink pull down does not always result in the correct device actually being used for audio input. This is a real mine field for users who have lots of audio devices. A computer could have a TV tuner, more than one microphone, a webcam with a built-in microphone, a line in device, and even a USB audio line to a transceiver. Don’t laugh – I have had all of these things, and sometimes Echolink reported one microphone being the input when instead the audio was coming from the HF rig connected via USB. It is safer to set your preferred microphone up as the default device in Windows, then always choose the default device as the Echolink input via the Setup menu.
Patrick Tice, WA0TDA
Handiham Manager
Handiham World for 18 April 2012
Welcome to Handiham World.
You can do it!
Today, just as we did last week, we are going to begin with Troubleshooting 101 as part of our initiative to help new ham radio operators (and even some of us older ones) learn how to do some basic troubleshooting for ourselves. Yes, it can be tempting to ask someone else to do things for us. This can become a bad habit when it keeps us from learning new things, especially things that we could – with a bit of practice – learn to do for ourselves. Knowing these basic things can serve us well in the future when no help is available. This next simple exercise is one that we will be practicing at this summer’s Radio Camp. You can do it yourself once you learn a few basics.
Troubleshooting 101
Help! My HF radio is dead!
One of the things we grow used to is turning on the radio and hearing stations, even if they happen to be weak or off frequency. We quickly learn, as new operators, how to tune around and adjust the VFO to hear stations clearly. Sometimes we turn the radio on first thing in the morning and hear nothing but static from far-off thunderstorms, but that is nothing new. We know that we can tune across the band and find some really strong stations.
But this morning is different. You turn the transceiver on, but there is nothing – no sound at all, at least any that is loud enough to detect without headphones. What could be wrong?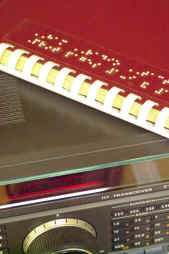
Well, the best thing to do is to follow the advice in “The Hitchhiker’s Guide to the Galaxy” and don’t panic. Many of our Handiham members are blind, so we will include some troubleshooting steps for them. We are going to check off everything without making assumptions. Some of our readers will think that this stuff is obvious, but in the grand scheme of things we must allow for a wide range in the knowledge and experience of amateur radio operators. Some will be familiar with the “dead radio” problem and others will be experiencing it for the first time. Let’s cover all the bases.
- Yes, I know this is obvious, but did the radio really turn on when you flipped the switch? Did the radio make a telltale sound when switched on? Even if I could not see the lighted display of my IC-7200, when it is powered up I hear a click as a relay energizes in the connected autotuner and my computer makes a connected sound to tell me that a USB device is now on line. Keying the PTT in SSB mode and not talking should trip the transmit relay without sending any RF, so you can hear the click of the relay. Have you checked the power supply switch?
- Make sure that you have not left headphones plugged into the PHONES jack. Doing so on most radios will mute the speaker.
- Check the AF gain (volume) control. Maybe you turned it all the way down the last time you used the radio. Don’t laugh – I often do this if I am in the radio room and get a phone call or start listening to something else. Turn up the volume and if you can hear stations, you have solved the problem.
- Check the RF gain control. Sometimes this gets turned down by accident, or perhaps you turned it down in a previous session because you were dealing with a very strong signal. Turn it back up and try tuning around again. Incidentally, I often find that users of the Handiham remote base stations leave the RF gain turned down on the TS-480 radios. No wonder the bands seem dead!
- Okay, so now we have power to the radio, the RF and AF gains are adjusted, and there is still no sound. Many radios have squelch controls, and this little feature can cause all but the very strongest signals to be completely muted. Perversely, this control is sometimes a concentric one that shares the same spot as the volume control. It is easy to misadjust, by which I mean setting it to anything but completely off! With the volume turned up to mid-range turn the squelch all the way down. Note that you don’t want the volume cranked up to max when you do this, as the sound may be startlingly loud!
- Don’t forget the other adjustments your radio may have to tailor the sound. Filter settings and pass band tuning might be set incorrectly. If they have detents, return them to “normal”.
- Still nothing at all? Retrace your steps to make sure there is power to the radio. Check the power supply and connection to the radio. Check the fuses and breakers at the station equipment and at your home’s breaker box. Make sure everything is connected as usual.
- Assuming that you do actually have power and that the radio is powered on, you could have a problem with the radio itself. Sometimes oxidation occurs on the mechanical connection in the headphone jack. Push a headphone plug in and out to clear it. Don’t forget to listen via the headphones to eliminate the unlikely possibility that the speaker coil has opened. If any of this resolves the condition, you are good to go. If not, take further steps to have the radio checked. Ask for help from your local radio club before assuming that the radio has failed. There are probably club members who are experienced with that radio and who can help you determine what is wrong and whether it needs service.
- Let’s say that you do actually hear a gentle hiss from the radio but that you can’t tune in any stations. Check to see if you have locked the main tuning dial by mistake. If the tuning is locked, you can twirl the dial all day long and the frequency will not change!
- Now you have tuned across the band and there are no signals. Try another band and check again. Still nothing? Check to make sure that the antenna’s feedline is connected. If you have an antenna switch, make sure that it is in the correct position. Don’t forget the radio’s antenna selector if your transceiver has one!
- Try WWV on 5 and 10 MHz. Both put out awesomely strong signals. If you hear a weak or warbling signal, conditions may be poor.
- Next, tune your radio to a local commercial AM radio frequency. You may not be used to doing this, so be aware that to direct enter such a frequency you may need to key in something like
zero dot eight three via the direct entry on your keypad to get “830” on the AM radio dial as I do here for local station WCCO. Of course you will choose your own local station if you don’t live here in the Twin Cities. If you can hear a local AM station it is likely that the radio is fine and that HF sky wave band conditions are just extremely poor. By tuning the local commercial AM station, you can hear a ground wave signal that does not depend on sky wave propagation. - If the local commercial station comes in fine, try checking the SWR on your antenna system. If that passes muster, it is likely that your station is intact and functioning normally and that HF band conditions are just really, really poor following a solar event. If the SWR is terrible, perhaps the feedline or antenna have failed. That is a separate troubleshooting issue.
- If the HF conditions are indeed so bad that you cannot hear sky wave stations, you can confirm this by checking various solar weather and propagation websites. It is generally a matter of waiting a few days for conditions to return to normal. When I was a young lad and had only recently gotten my General license, I ran into just this situation. I even went out side to check to see if my antenna was still up in the air! It was the first time I had experienced what amounted to a radio blackout of sky wave propagation caused by a solar event. Today we can confirm our suspicions about solar weather via the Internet, but back then it was a very puzzling thing. Eventually I did learn more about solar weather and HF propagation so that the next solar storm did not catch me by surprise and make me think my antenna had fallen down!
Email me at [email protected] with your questions & comments.
Patrick Tice
Handiham Manager
Handiham World for 11 April 2012
- The cable is good and ready for use.
- The cable is open through the outer shield.
- The cable is open through the center conductor.
- The center conductor is shorted to the shield.
- An intermittent condition exists that causes a short or open when the cable is flexed.
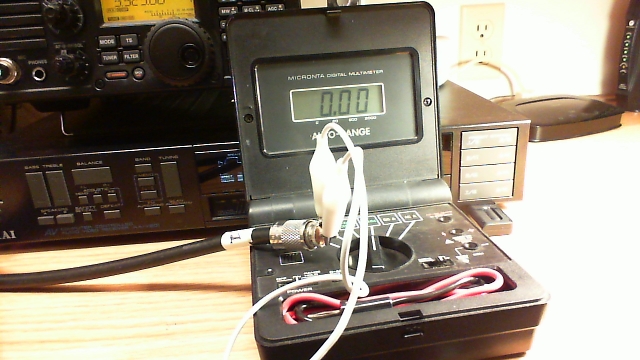
Photo: Simple test gear for a continuity check includes a clip lead and a multimeter with a continuity buzzer.
- Take one end of the disconnected coax. Remember, we are NOT able to test continuity with the coax connected to any equipment or antennas. Touch one multimeter lead to the center pin of the PL-259 plug and the other to the outer metal part of the plug. You should hear nothing, indicating that the cable is not shorted. This is always the first test, because we must eliminate the possibility of shorts before we can make any assumptions about the center conductors or the shield.
- Next, take the clip lead and use it to short the coax at one end by connecting the center pin of one of the PL-259 connectors (it doesn’t matter which one) to the shield side of that same connector. Take the free end of the coax and touch one multimeter probe to the center pin and the other to the metal shield of that PL-259. You should now hear the buzzer that indicates continuity.
- You have now completed the basic tests, because you have determined that the cable is not shorted and by passing a current through the entire length of the center conductor and back through the shield, you have determined that both the center conductor and shield are intact. The final test is to flex the cable and wiggle the connectors while performing both of these tests again. If it helps, you can add two additional clip leads to connect the multimeter probes so that you don’t have to try to hold them in contact with the PL connectors. This will help determine if the cable is intermittent.
- If the cable fails any of the tests, feel free to test the shield to shield and center pin to center pin connections separately. Never use a cable that is suspect, because it could cause damage to your equipment.
- Last but not to be missed is a final check along the length of the cable for any obvious bad spots, such as a break in the outer jacket or any suspicious bends or bumps in the cable.
Patrick Tice
Handiham Manager
Handiham World for 04 April 2012
Welcome to Handiham World.
Goodbye, cassettes.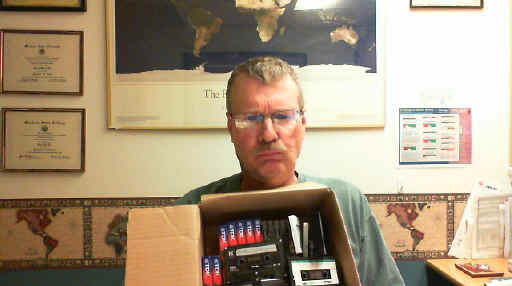
The old way of doing audio: Unhappy Pat poses with box of assorted tape cassettes. Each one holds only a portion of an audio book.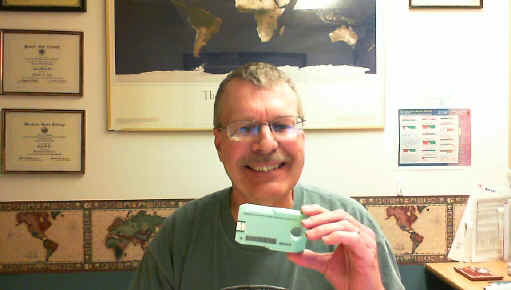
The new way: Smiling Pat holds up a single Library of Congress digital cartridge. Each new digital cartridge holds thousands of DAISY book pages or many hundreds of audio files.
Well, don’t say you didn’t know this was coming. Learning Ally and the Library of Congress have both made the switch to digital audio. Bookshare has been digital for a long time already. Now it is time to announce the final stage in the life cycle of the Handiham tape cassette service, one of the few remaining analog special format services that is still active.
Over the last decade digital audio has steadily overtaken analog tape cassettes in commercial applications. The old cassette format is no longer supported as it once was in boom boxes, portable players, and automobile audio systems. The tapes themselves are harder to find and many households no longer even have equipment to play cassettes. Anticipating the need for a digital system to replace this old technology that was also used by people who could not read regular print, the DAISY Consortium has developed the DAISY format book system that can couple audio files read by humans to specific sections and subsections of books. DAISY can also generate computer speech from computer text of a book, then arrange it all on a DAISY book that includes spoken word audio and all of the text, complete with headings for sections and subsections. Now that the Library of Congress has completed its distribution of the new DAISY-capable digital players to replace the aging 4-track tape cassette players, we feel confident that Handiham members, even those without computers, will still have access to the new digital cartridges.
Make no mistake; the digital audio is far better than the old cassette tape audio. If you are still using tape cassettes, now is the time to check out that new digital player. With the new player you can navigate using audio prompts and find the exact thing in a book that you want. You could never do that with tapes. In the bad old days of taped instruction manuals, it was nearly impossible to find that part about setting the memories on your new radio! With the new digital system, that is an easy task. In the old days, your audio had to come by postal mail. Today you can download it via the Internet and put it on your digital player with a small adapter cable. Even Handiham members without computers can still receive their new digital cartridges in the mail, in special mailers similar to the old Library of Congress tape mailers. The new system is designed to seem familiar to tape users, so that they can more easily learn it and make the transition.
The digital cartridges themselves are just a bit smaller than the old tape cassettes. They have a hole in one end to facilitate grasping the correct end of the cartridge, even by a person with some mobility limitations. The other end of the cartridge has a small USB connector that plugs into the digital player. It slips into the new player only one way, and the experience feels much like putting a cassette tape into the old player. The USB plug is protected by extensions of the plastic cartridge to protect it from damage. This format also keeps it from plugging directly into a standard computer’s USB ports. That is why blind users who receive their audio from Library of Congress digital downloads must use an adapter cable between their computers and their digital cartridges. We can also use such a cable to put Handiham digital audio onto the new cartridges.
There is a cost difference between a tape cassette and the new digital cartridge. Tape cassettes usually ran under a dollar, and because they are falling out of use they are available virtually free from people who are simply getting rid of old technology. The new digital NLS cartridges are around $10 to $12 each, but remember that each one holds the equivalent of hundreds and hundreds of tapes. And because the new digital cartridge has a different form factor than a tape cassette, it requires a new specialized NLS mailer. These run about $2.50 each.
The way the Handiham monthly digest audio program will operate takes into account the cost of these two items. In the old system, we bought tapes and mailers and sent them to our members. The members were responsible for returning the tapes and mailers when they had listened to the audio. The return rate was never 100%, so some tapes and mailers were lost to attrition each month.
In the new system, we will ask our members who want to have digital audio mailed to them by free matter postal mail to purchase their own digital cartridge and mailer, mark them with their callsign or identification, and send them to us for processing each month. We will fill the cartridge and return it. That way each individual has a vested interest in their own cartridge and mailer. This will make the program easier to manage because we won’t have to maintain a supply of our own cartridges and mailers. It also spreads the cost among those users who don’t have computers or Internet services. It has really become labor-intensive to support a smaller and smaller number of Handiham members who use the old tape cassette technology. As our tape duplicators get older, they are more likely to make recording errors. It has gotten to the point where tapes are sometimes custom-produced for a single member who needs something like one of our license courses but who has no computer. So serving that single member can get quite expensive, while hundreds of other members simply download their audio from our website with no staff assistance. The digital cartridge provides a means of still serving that single member with good quality audio, even if they do not have a computer.
So what is the plan?
We will continue to support tape cassettes through the end of 2012, but not for new members, beginning immediately. All new members will be told about the new digital cartridge plan. They will have a choice of either simply downloading the digital audio they need from our website or providing their own digital cartridge and mailer. Members who are currently using the old tape system will be notified of the new cartridge plan and they will be given some options about where to purchase the cartridges and mailers. Members who get their audio via the website will not be affected.
For Handiham World, I’m…
Patrick Tice, [email protected]
Handiham Manager
Handiham World for 28 March 2012
Welcome to Handiham World.
Off the shelf
Most of us have heard the expression “off the shelf” when it comes to purchasing an item from a store. We generally understand this to mean that the item is readily available so that we can simply walk into the store, find it on the shelf, put it into a shopping cart, and head for the checkout line to pay for it. Buying an item “off the shelf” means that it is produced for a mass market and therefore the manufacturer can take advantage of spreading the production costs over a large number of units, thus keeping the price as low as possible. Conversely, an item that is not available “off-the-shelf” is probably produced in limited quantities for a much more specialized customer. Because the production costs per unit are quite high due to the fact that there are fewer units manufactured, the customer must expect to pay more for that item.
This is basic economics. It is the reason why specialized adaptive technologies such as standalone DAISY players can command a price of hundreds of dollars more than simple digital audio players that are produced for the mass market and available anywhere.
Amateur radio equipment is rather specialized as a category in itself because it is produced for a limited market of amateur radio operators. You don’t expect to be able to go to a big box store in your neighborhood to buy a transceiver. Some amateur radio equipment is manufactured with speech frequency read out built in, while some radios have an option for an additional speech module for blind users. Within the specialized category of the amateur radio equipment, this additional adaptive technology adds only a modest amount (under $100) to the total purchase price. Considering the size of the potential market, this is very reasonable.
Personal computers, now a mainstay of the modern amateur radio station, have moved steadily toward “off the shelf” accessibility. Many assistive technology features are now built into operating systems. Apple provides a built in screen reader that is relatively full featured. Microsoft also provides a somewhat less complete screen reader and a very good speech recognition dictation system. Screen reading software and speech recognition software used to be expensive additional purchases that were definitely not “off the shelf”. Today there are more options than ever to get many of these features already installed on the computer you buy at a local retailer. Rather than being optional at considerable extra cost, they are now available to everyone at little or no extra cost. This is the power of mass production and mass marketing to bring costs per unit down and provide an excellent benefit to those of us who need assistive technology.
Earlier this week I talked with a Handiham member who was wondering about more “off the shelf” solutions for people who read DAISY books. Of course specialized standalone readers are available, but they are expensive and they are something else to carry around. Some of them, such as the Library of Congress digital player, work well and are readily available free of charge from the government for anyone qualifying for NLS services, but they are not portable and thus not convenient to use in more than one place. The fact of the matter is that blind people need to be out and about for work, shopping, and all the activities of daily life just as anyone else does. We agreed that it would be better to have a portable reader that could easily be carried around all day long.
This, as you might expect, led us to the obvious conclusion that an already available “off the shelf” device that most of us carry around should also be able to function as a DAISY reader. Of course that device is the modern smart phone, which might be an Android or an iPhone.
Neither of us knew whether it was possible to turn a smart phone into a DAISY reader, so when we finished our phone conversation I turned to the iTunes store and the Android Market (now called Google Play) to search for DAISY reader apps. Guess what? There are some, available from a cost of free to around $15 available for my own Android smart phone. The best bet for Android looks to me like it is the Darwin Reader that reads both Daisy formatted text and audio books and is also compatible with Bookshare and Librivox. That one is $14.95. Compare that to hundreds of dollars for a standalone digital player. And you already have your phone with you if you are like me! Daisy Worm is under a dollar and available for iPod or iPhone. There is also a Learning Ally app for iPhone for around $20.
The neat thing about the off the shelf smart phone is that it can also run Echolink, which can be useful when you are on the go and want to maintain your regular net check-in schedule via the HANDIHAM conference.
Consider, if you will, the profound difference in access “off-the-shelf” can provide. By finding ways to make things like screen readers and DAISY players available on mass-produced devices, we ultimately make these things available to almost everyone.
For Handiham World, I’m…
Patrick Tice, [email protected]
Handiham Manager
ARRL volunteers make an impression

Handiham World for 21 March 2012
Welcome to Handiham World.
Digital Bling and a Cautionary Tale
The news this week about QST going digital is exciting stuff. (See the next story for an explanation and link.) If our own Handiham World had not gone digital, we would still be publishing only four issues a year, one for each season. Yes, back in the bad old days a couple of decades ago the Handiham World was mailed out each Spring, Summer, Autumn, and Winter in a print format. Volunteers would read the print version onto cassette tapes that were mailed to our blind members. Any news that arrived via that system was bound to be pretty old. Then, when printing and mailing costs began to climb we had to cut down to three issues, then two. Using the Internet to deliver the Handiham World was faster, cheaper, and better. Not only could it be read directly with screenreading software by our blind members, but it could be in audio as well, also delivered via streaming or download. Members could even call a phone number to hear the same Internet audio, even if they only had a telephone. The Handiham World could be enjoyed by anyone as a podcast from iTunes. Better yet, it could be published weekly instead of quarterly.
Even though these advantages seem obvious, there were – and still are – some who feel that our service has left them behind. These are the members who don’t have computers and who don’t plan to get them. And this, my friends, is the problem every publisher faces. That is why I’m going to share with you my experience with a newspaper.
It is certainly not news that newspapers want to print: Newspapers are struggling to find their new business model in the 21st century. Who reads them anymore?
Probably people like me, that’s who! I’m old enough to remember having a paper route as a kid. Delivering the daily paper was one of those rite of passage jobs a kid could have back in the middle of the 20th century. The news business was less competitive back then, and there was little urgency to have up to the second updates. The newspaper business held its own until cable news began nipping at its heels, but it wasn’t until news sites began appearing on the Internet that the real problems with printing paper copies and physically dumping them on doorsteps became too big to ignore.
These days we would get our newspaper delivered by some guy driving his personal vehicle around town and pitching the paper out onto the driveway or sidewalk. He would back over the lawn and sometimes his truck would have a loud muffler in the wee hours of the morning. Often as not the morning dew or the lawn sprinklers would soak the paper before we could retrieve it. On rainy mornings the paper arrived in a plastic bag that managed to protect about 3/4 of the paper from getting soaked. The newspaper company also published an on line edition once the power of the web was obvious, and like many other readers I took to it instantly and never looked back. Unfortunately for the newspaper, they lost money giving the news away for free on the web (duh), and they finally had to come up with a pay-for alternative. It involved a special digital edition that looked just like the printed version. In a scattergun approach to pleasing every customer from the grumpiest computer-hating Luddite to the early-adopter geek, they offered a plan to give you a print paper AND a digital edition.
We signed up. I like trying new stuff but I still like a print edition. This would be a chance to compare the technologies.
It’s been a couple of months now, so I feel as if I know where things are going. Both my wife and I read the print paper to some extent, and both of us use the newspaper’s website. The website is actually easy to use, but it is not the new so-called “digital edition” that looks exactly like the printed paper. For that, you have to log on to a special website. The newspaper sends a helpful link by email each day as a reminder. The digital look alike loads a web application in your browser window, after which you see the copy of the printed version in what amounts to a browser frame. Try as I might, I just cannot warm to the idea of trying to read a newspaper that way. The page does not all fit in the browser window, which means that you are constantly scrolling one way of another to read articles. Worse yet, because the digital look alike is supposed to be like the printed copy, you have to follow the story onto other pages buried deep in that day’s edition. The pages of the digital edition have a feature that prompts you with a cute little animation to turn them. Page turns themselves are also animated. Ooooo! This is digital bling! It looks so cool, but let’s face it – I think having to scroll left and right and up and down, then fiddle with the mouse to get the cursor exactly in the right spot to connect me to the remainder of a front-page article that ends up buried on page 10 is just not my cup of tea. What I want is content. I would like it to be easy to find, easy to read, and – after being in the business of helping people with disabilities for so many years – accessible to people who use screenreaders. I have to say that some of these new digital publishing efforts fall flat on all those counts.
What I don’t really understand is the need to make a digital edition look like a printed page. The printed page is fine when it is a printed page. When it is a digital copy on a small screen, it is like putting Victorian furniture in a Frank Lloyd Wright house. It is a bad fit. If you are going to use the web to publish your newspaper, publish it using the easily understood, common, and highly accessible web page formats that are already available. That is why for Handiham World we provide accessible HTML in our web pages. If we put something up in a format like PDF, it contains embedded text and an audio alternative, plus an HTML version. But really, the PDF version is not meant so much to be read on line as to be printed and read as a print publication.
The bottom line with digital publishing is that it needs to be recognized for what it really is – a new and better way to deliver content that is more up to date, cheaper to deliver, and takes advantage of the technology to allow users to search thousands of pages quickly, have access to past issues without collecting an attic full of paper copies, and enjoy it all with accessible technology. It is not a new way to deliver the same old paper dressed up with page turn animations. In other words, forget the bling and give me the content.
Oh, well. At least the digital version does not drive over my lawn at 4:00 A.M. in a noisy truck. On the down side, I miss the plastic bag that is so handy for “dog duty” when I take Jasper out for a walk.
For Handiham World, I’m…
Patrick Tice, [email protected]
Handiham Manager


