Posts Tagged ‘assistive technology’

Handiham World for 25 April 2012

Welcome to Handiham World.
drawing of transceiver
You can do it!  
Today, just as we did last week,  we are going to begin with Troubleshooting 101 as part of our initiative to help new ham radio operators (and even some of us older ones) learn how to do some basic troubleshooting for ourselves. Yes, it can be tempting to ask someone else to do things for us.  This can become a bad habit when it keeps us from learning new things, especially things that we could – with a bit of practice – learn to do for ourselves.  Knowing these basic things can serve us well in the future when no help is available.  This next simple exercise is one that we will be practicing at this summer’s Radio Camp.  You can do it yourself once you learn a few basics.
Troubleshooting 101
Cartoon guy with toolkit
I have set up my Echolink audio and it worked perfectly, but today when I tried using Echolink, the audio was really low or not working at all.  What can be done?
Echolink audio tab in System Setup  Reach system setup with keyboard command ALT-E.
Before we say anything more about this, I have to let you know that you are not alone.  I like Echolink and use it nearly every day, but I still consider it to be a journey, so to speak.  I have not quite arrived yet at the point where Echolink works perfectly each and every time.  Audio problems are common and expected, so we have to learn how to troubleshoot them.
Your first test should be a visit to the Echolink Test Server.  Find the test server by going to the Station menu (Arrow right from the File menu or use ALT-S) and when you hit “Station”, arrow down to “Connect to test server”. You should hear the familiar welcome message.  After the welcome, get focus in the transmit box, toggle transmit with the space bar, and transmit a short test message. Toggle again and wait for your audio to be echoed back to you. If there is no audio, proceed to the “No Audio” troubleshooting.  If there is low audio or too much audio so as to cause distortion, proceed to the “Audio Level” troubleshooting.
No Audio
If there is no audio at all, there are several things to check.  
Volume:  Is the volume turned up?  Are your computer speakers powered up?
Microphone: Is the microphone plugged in?  If there is an external microphone, whether USB or the 3.5 mm plug, it may have been unplugged by another user in the family, or you may have unplugged it and forgotten to plug it back in. Some microphones have their own mute buttons.  Check to make sure the microphone is not muted. If you are using a microphone headset with 3.5 mm audio plugs, make sure that the headphone plug and the microphone plugs are not reversed. If you use a USB headset, plug it into the same USB port on your computer each time so that the machine does not search for USB drivers each time you plug it in. 
Audio Mixer: The audio mixer in your operating system (usually Windows for Echolink users) might have the microphone either muted or the wrong audio input is selected. Windows users need to go to the Windows Mixer recording settings.  Getting there is different depending on your version of Windows.  We will not explore this, but it is something you should learn about your own computer and operating system. In the recording mixer settings, unmute the microphone and run the slider up if it is set at zero. Repeat the test server test and it should work fine.  You can usually get to the mixer settings via the Echolink application itself. Go to the Tools menu, then arrow down to “Adjust sound device” and choose “Recording”.  This is an easy way to find the recording mixer!
Multiple audio inputs: As we mentioned, the wrong input may be selected in your Windows mixer.  Be sure the correct input for the microphone you want to use is selected as the default device.  Again, how you do this may vary depending on your operating system.  You should learn how to use your operating system’s mixer.  
Echolink sound selection:  The Echolink application has its own selection of audio input devices available from a pull down menu.  You will find it on the audio tab in System Setup.  The choices are “Input Device” and “Output Device”. If the microphone selection is to be checked, the one you want to pull down is the “Input Device”.  If you have more than one input device, they should all be listed in the pull down.  However, the first item listed is always “system default”.  That is the one you should select, because if you followed the directions we just gave you, you have already set the preferred microphone to “default device”.

Recording device list in Windows 7 with default device selected.

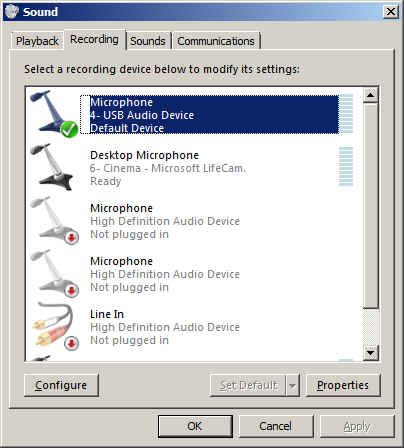
So why do we recommend using “default device” instead of one of the other selections?  It is because selecting the recording device via the Echolink pull down does not always result in the correct device actually being used for audio input.  This is a real mine field for users who have lots of audio devices.  A computer could have a TV tuner, more than one microphone, a webcam with a built-in microphone, a line in device, and even a USB audio line to a transceiver.  Don’t laugh – I have had all of these things, and sometimes Echolink reported one microphone being the input when instead the audio was coming from the HF rig connected via USB.  It is safer to set your preferred microphone up as the default device in Windows, then always choose the default device as the Echolink input via the Setup menu.

Final test: If you have followed the directions and everything is set up as described, repeat the test server test.  Adjust levels if necessary.  If there is still no audio, you may have to look further.  There could be a fault in your microphone, usually with the cable or plug, or with the computer hardware or sound card drivers. 
Low Audio
Microphone selection and positioning: As we already discussed, you must be sure that you are using the correct device. One fellow I know was puzzled by a low transmit audio condition.  When I talked with him on Echolink, his audio sounded like he was far away from the microphone, yet he was wearing a headset microphone combo.  The diagnosis was that the sound was being picked up by his laptop’s built in microphone, which had been selected as the default audio input device.   If you are simply too far away from the microphone it can have exactly the same effect. Position the microphone closer to your mouth, keeping it slightly to the side.  If the mic element must be very close to your lips, as is the case with headset microphones, use a foam wind screen to prevent puffs from making loud noises as you speak.
Beware of other software that takes over mixer settings:  Voice dictation software can change your mixer settings to some predetermined level that is ideal for speech input computing.  You may have your Echolink levels just perfect, then you open Dragon NaturallySpeaking®, enjoy a session of typing with your voice, and think nothing of it.  But the next time you want to use Echolink, the microphone audio may be very low.  This happened to me all the time, because I liked using my USB headset for both voice dictation and Echolink. Dragon would reset the mixer every time, unchecking the microphone AGC boost and changing the slider level. It might be best to select different input devices for these two software applications so one does not fight it out with the other for mixer level settings. 
Mixer settings continued: Most of us will not use anything but the built-in software mixer, but there may be some users who use external hardware mixers.  These can be great for those who like to really be in control of their audio.  If you have an external mixer, be sure the microphone is plugged in and selected as the input device. Check the sliders to adjust the level.  If the device uses external power, be sure it is powered up! 
Every computer system is different.  It is difficult for someone else to help you with your system, especially on the phone.  So I have some “homework” for you.  I want you to learn how to use the audio mixer in your own computer, and learn it well enough to set input and output levels.  Some computers (probably most these days) have some kind of keystroke combination or actual dedicated keys on the keyboard to raise and lower the volume or mute the audio.  Some laptops have a volume control that operates by spinning a wheel or holding down a specific key. You need to learn these controls and learn them well, because they will be used for lots of other applications like taking voice notes, doing voice dictation, playing music, listening to audio books or Internet audio streams, and much more.  Wouldn’t it be nice to learn the mixer settings so that you don’t have to ask for help on these things as well as with Echolink?  
Sure, it would!  And you can do it.  
Email me at [email protected] with your questions & comments.  
Patrick Tice, WA0TDA
Handiham Manager

Handiham World for 28 March 2012

Welcome to Handiham World.

drawing of transceiver

Off the shelf

Most of us have heard the expression “off the shelf” when it comes to purchasing an item from a store. We generally understand this to mean that the item is readily available so that we can simply walk into the store, find it on the shelf, put it into a shopping cart, and head for the checkout line to pay for it. Buying an item “off the shelf” means that it is produced for a mass market and therefore the manufacturer can take advantage of spreading the production costs over a large number of units, thus keeping the price as low as possible. Conversely, an item that is not available “off-the-shelf” is probably produced in limited quantities for a much more specialized customer. Because the production costs per unit are quite high due to the fact that there are fewer units manufactured, the customer must expect to pay more for that item.

This is basic economics. It is the reason why specialized adaptive technologies such as standalone DAISY players can command a price of hundreds of dollars more than simple digital audio players that are produced for the mass market and available anywhere.

Amateur radio equipment is rather specialized as a category in itself because it is produced for a limited market of amateur radio operators. You don’t expect to be able to go to a big box store in your neighborhood to buy a transceiver. Some amateur radio equipment is manufactured with speech frequency read out built in, while some radios have an option for an additional speech module for blind users. Within the specialized category of the amateur radio equipment, this additional adaptive technology adds only a modest amount (under $100) to the total purchase price. Considering the size of the potential market, this is very reasonable.

Personal computers, now a mainstay of the modern amateur radio station, have moved steadily toward “off the shelf” accessibility. Many assistive technology features are now built into operating systems. Apple provides a built in screen reader that is relatively full featured. Microsoft also provides a somewhat less complete screen reader and a very good speech recognition dictation system. Screen reading software and speech recognition software used to be expensive additional purchases that were definitely not “off the shelf”. Today there are more options than ever to get many of these features already installed on the computer you buy at a local retailer. Rather than being optional at considerable extra cost, they are now available to everyone at little or no extra cost. This is the power of mass production and mass marketing to bring costs per unit down and provide an excellent benefit to those of us who need assistive technology.

Earlier this week I talked with a Handiham member who was wondering about more “off the shelf” solutions for people who read DAISY books. Of course specialized standalone readers are available, but they are expensive and they are something else to carry around. Some of them, such as the Library of Congress digital player, work well and are readily available free of charge from the government for anyone qualifying for NLS services, but they are not portable and thus not convenient to use in more than one place. The fact of the matter is that blind people need to be out and about for work, shopping, and all the activities of daily life just as anyone else does. We agreed that it would be better to have a portable reader that could easily be carried around all day long.

This, as you might expect, led us to the obvious conclusion that an already available “off the shelf” device that most of us carry around should also be able to function as a DAISY reader. Of course that device is the modern smart phone, which might be an Android or an iPhone.

Neither of us knew whether it was possible to turn a smart phone into a DAISY reader, so when we finished our phone conversation I turned to the iTunes store and the Android Market (now called Google Play) to search for DAISY reader apps. Guess what? There are some, available from a cost of free to around $15 available for my own Android smart phone. The best bet for Android looks to me like it is the Darwin Reader that reads both Daisy formatted text and audio books and is also compatible with Bookshare and Librivox. That one is $14.95. Compare that to hundreds of dollars for a standalone digital player. And you already have your phone with you if you are like me! Daisy Worm is under a dollar and available for iPod or iPhone. There is also a Learning Ally app for iPhone for around $20.

The neat thing about the off the shelf smart phone is that it can also run Echolink, which can be useful when you are on the go and want to maintain your regular net check-in schedule via the HANDIHAM conference.

Consider, if you will, the profound difference in access “off-the-shelf” can provide. By finding ways to make things like screen readers and DAISY players available on mass-produced devices, we ultimately make these things available to almost everyone.  
For Handiham World, I’m…
Patrick Tice, [email protected]
Handiham Manager


ARRL volunteers make an impression

cartoon people lined up holding hands, big, little, different colors, one using wheelchair
I just got off the phone with a fellow who is studying for his first amateur radio license and is entering the hobby as so many of us did ourselves, as a listener who tunes around the bands. Recently he had occasion to buy a new antenna, but really needed some help figuring it out. When you are a beginner, you probably don’t know much about antennas and feed lines. A call to ARRL yielded a couple of resources, the Handiham program and a volunteer ARRL technical adviser. To make a long story short, this young fellow was able to call the ARRL and get a very encouraging welcome to amateur radio along with the offer of technical assistance. A Handiham volunteer also responded with the willingness that we see so often in our amateur radio community. Kudos to ARRL and Handiham volunteers and to ARRL and their wonderful programs.

Subscribe FREE to AmateurRadio.com's
Amateur Radio Newsletter

 
We never share your e-mail address.


Do you like to write?
Interesting project to share?
Helpful tips and ideas for other hams?

Submit an article and we will review it for publication on AmateurRadio.com!

Have a ham radio product or service?
Consider advertising on our site.

Are you a reporter covering ham radio?
Find ham radio experts for your story.

How to Set Up a Ham Radio Blog
Get started in less than 15 minutes!


  • Matt W1MST, Managing Editor